eiConsole v.18R2
Tutorial
eiConsole Foundation
Source Transformation / Data Mapping
You will need to download sample files to do this tutorial. If you have not done so yet, please click this LINK.
Note: the Tutorials in eiConsole Foundation, 1-13, are modular and are designed to be used in the sequence presented.
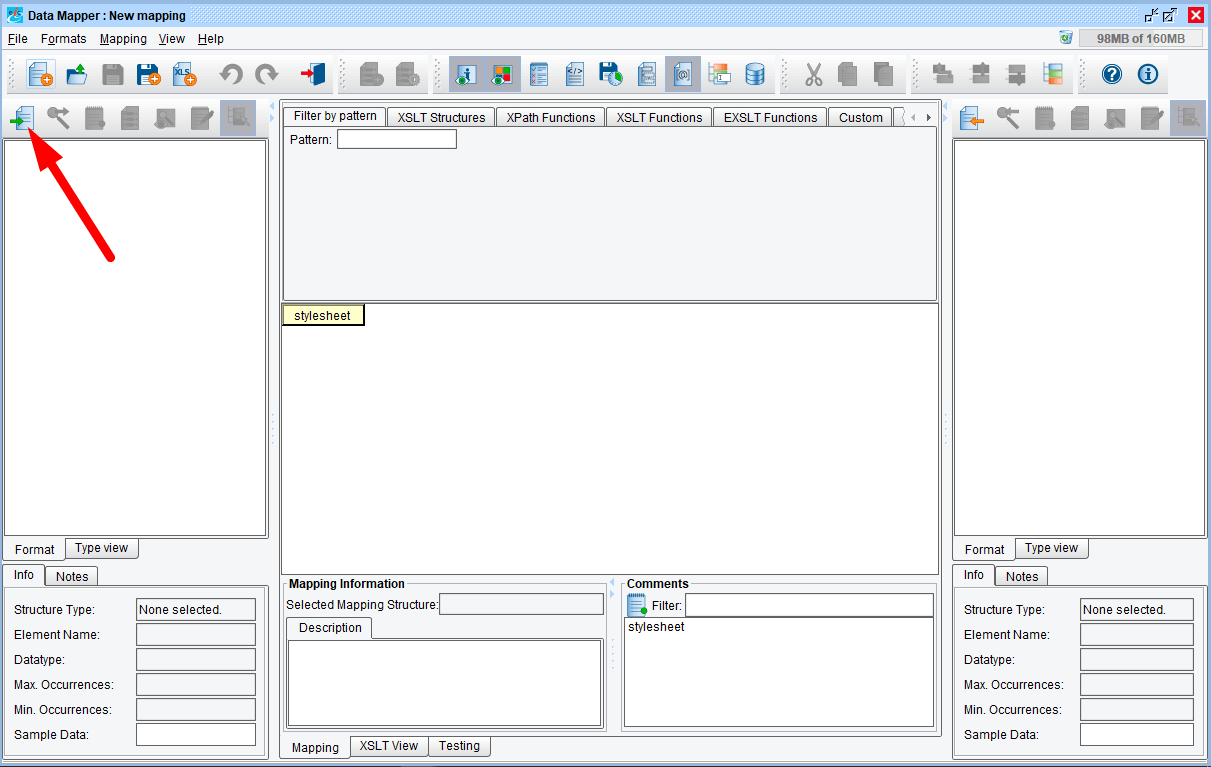
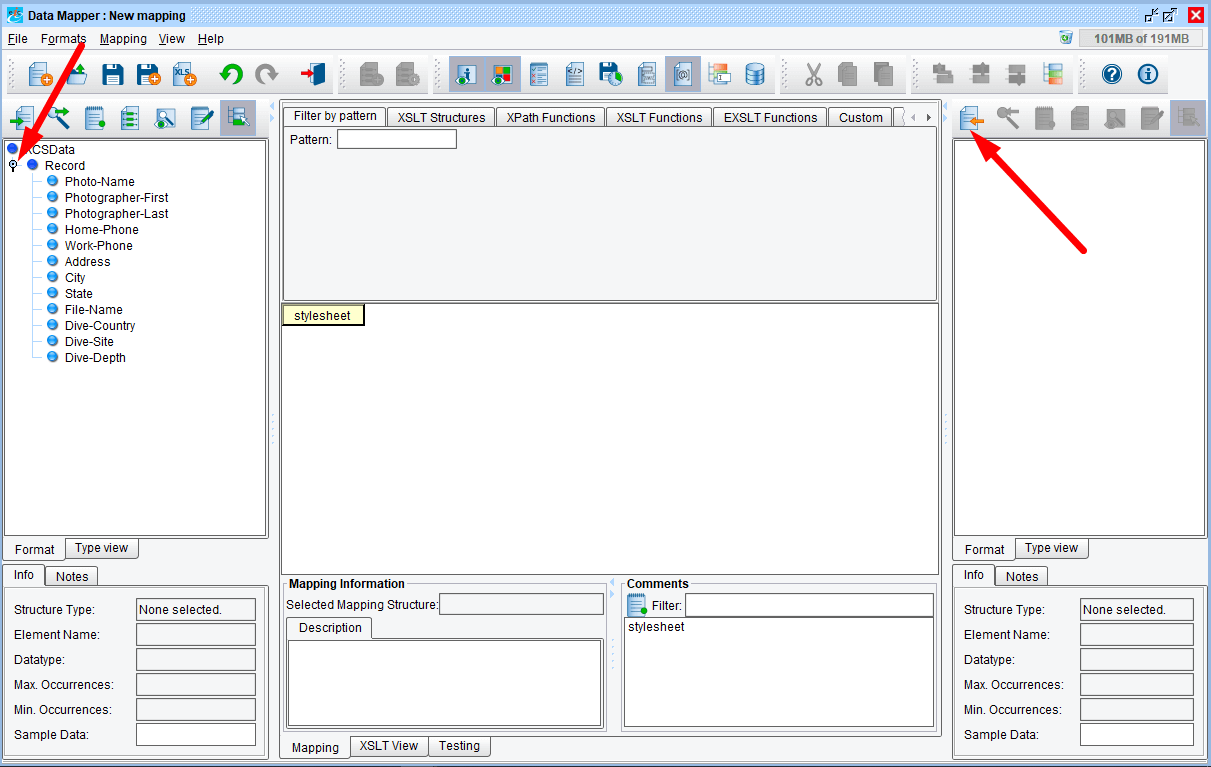
Next the eiConsole’s Data Mapper opens. we’ll use the Data Mapper to define the logical mapping between the flat file source and the XML standard target. When you open the Data Mapper you will see three panels. The panel on the left will represent the logical structure of the source data. The panel on the right will represent the logical structure of the target data. The panel in the middle will be used to generate the logical mapping between the two.
To load in the Source format, chose the Open source format icon.
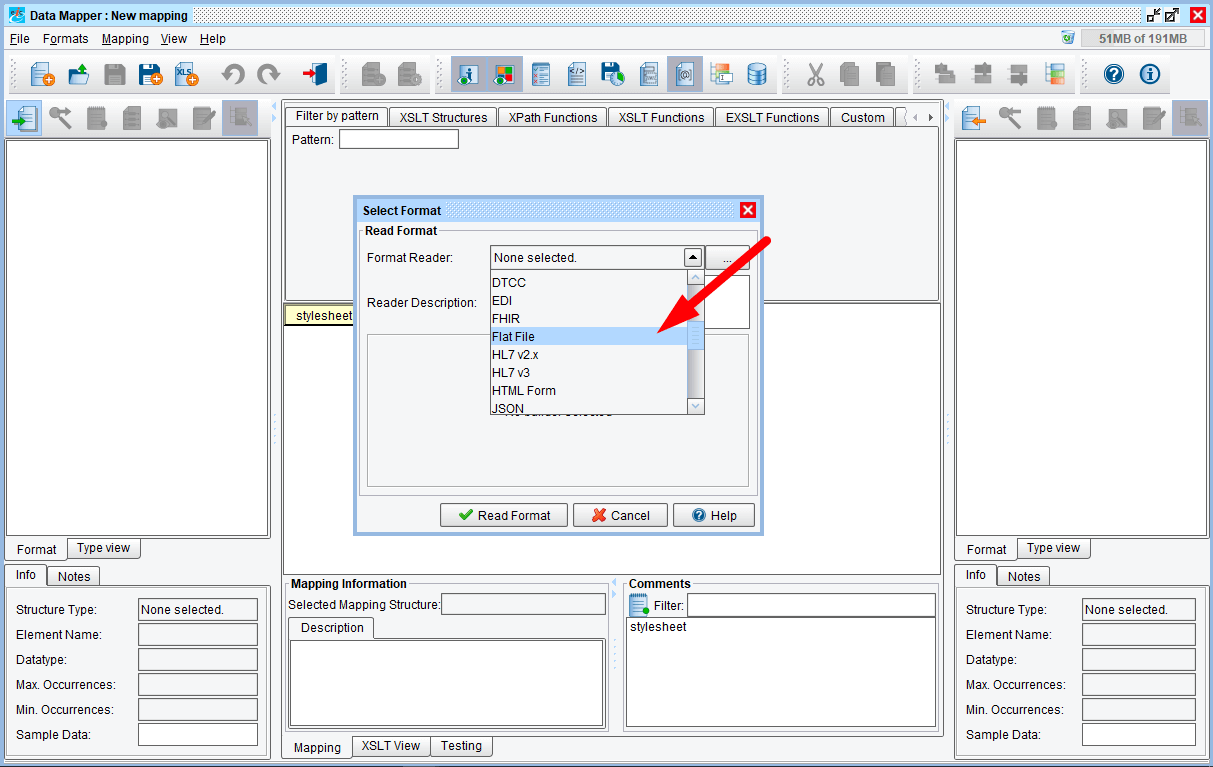
Select the Flat File and double click. This will allow you to leverage the file specification created in the File Spec Editor to populate the tree on the left hand side of the screen.
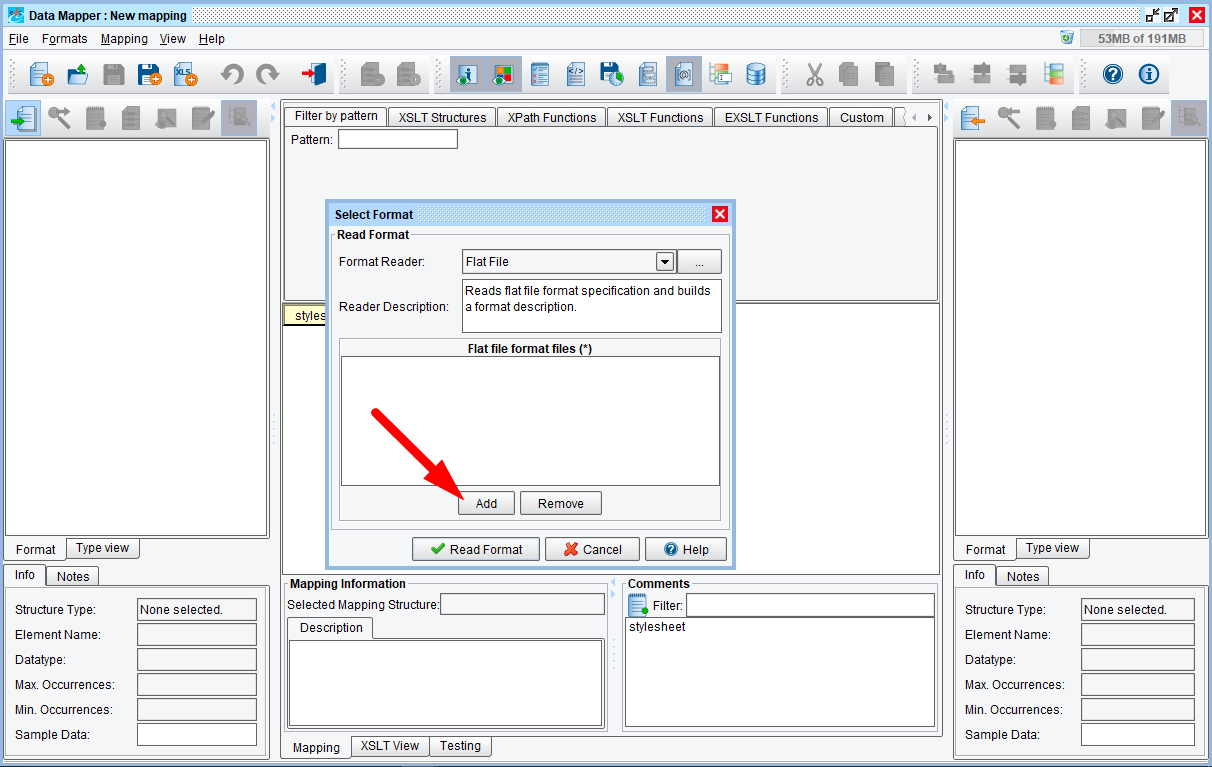
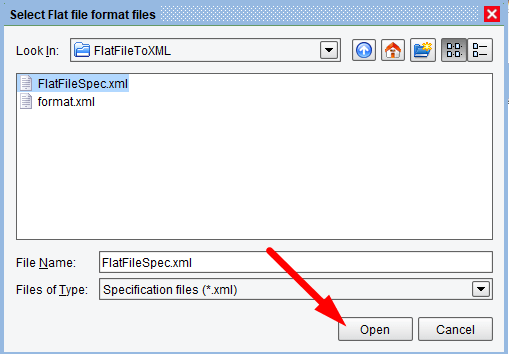
When the Select Format dialogue opens, click Add.
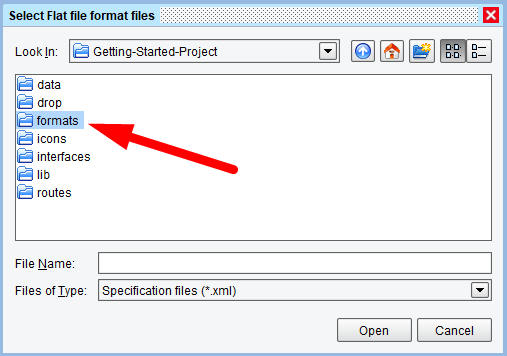
Navigate to your Getting-Started-Project Working Directory.
Select the formats folder. Underneath that folder you will find the FlatFileToXML folder.
Select the FlatFileToXML folder and double click to open. This contains the file specification that you created in the previous stage. Select FlatFileSpec.xml and click Open.
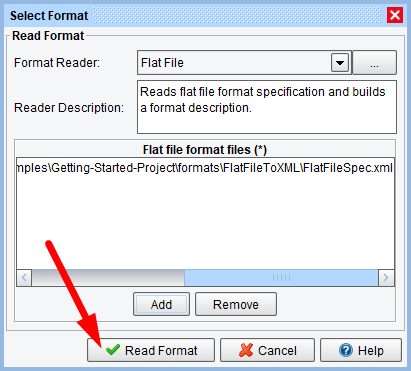
When the Select Format dialogue opens click Read Format.
The left hand side of the tree (the Source System) is populated with the logical structure of your inbound tab-delimited file.
To expand the tree, double click on the Record node.
To do the same with the Target format, choose the Open Target format icon on the right.
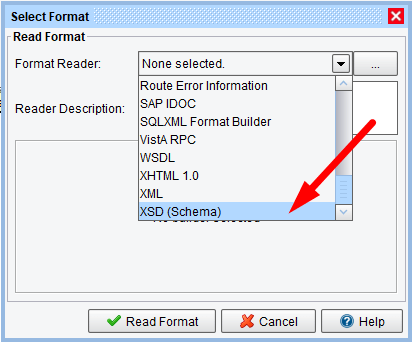
This time, read the Target format from an XML schema. In the Select Format dialogue from the drop down menu, select and double click the XSD (Schema).
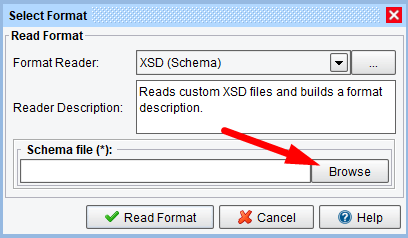
When the Select format dialog opens you will be prompted to select a schema file. Click Browse.

Navigate to c:\Program Files\PilotFish Technology\Samples\data\ folder or the location of the sample folder of your distribution. Select it and double click to open. Next double click the data folder.
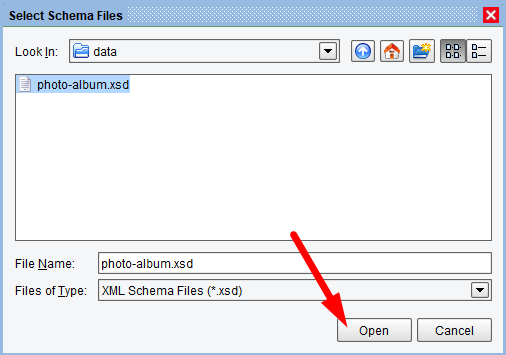
The data folder will include an XLM schema that describes a standard mechanism for expressing a photo album as XML – the photo-album.xsd file. Select the file and then click Open.
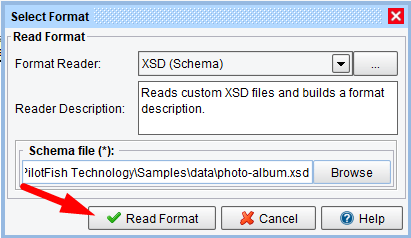
When the Select Format dialogue opens again, click Read Format.
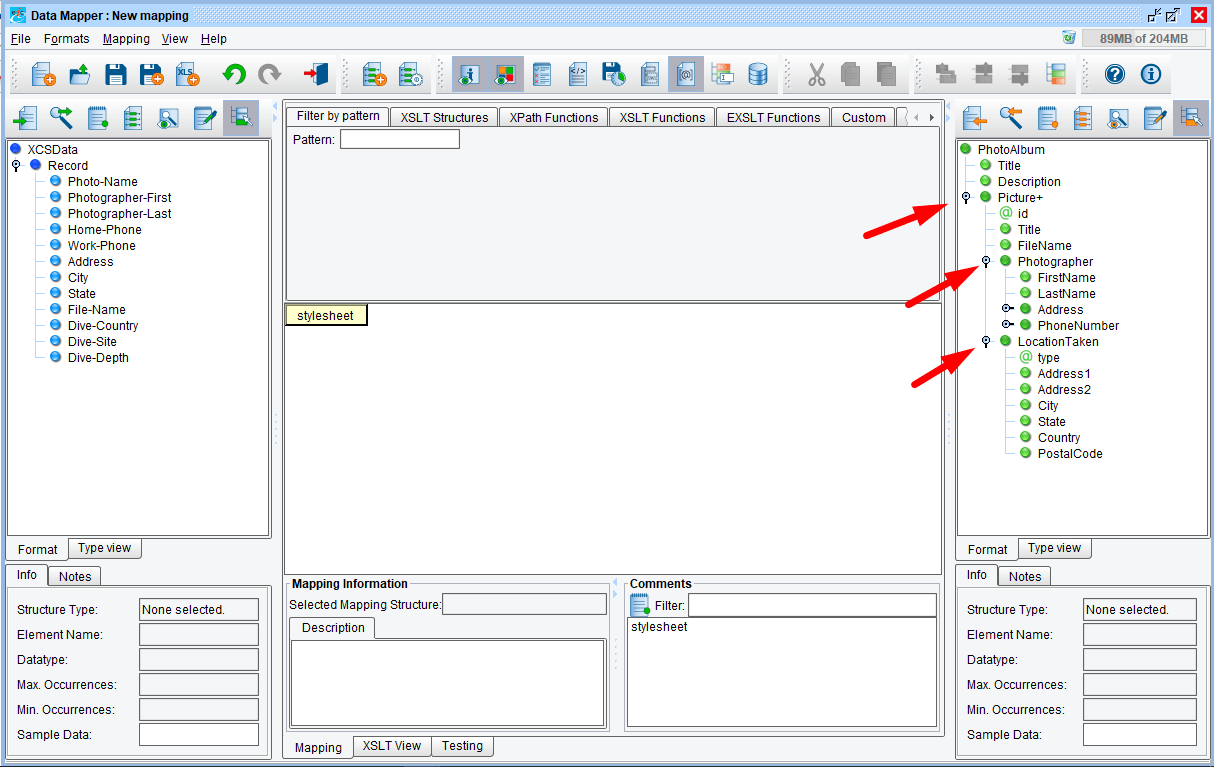
The tree on the right now represents the logical structure of the XML format that you would like to output.
Double click the nodes including Picture+, Photographer and LocationTaken to fully expand the tree. You’ll need the tree fully expanded to do your mapping.

You’ll now create the mapping between the two. To start this mapping, select the “Mapping” tab in the Data Mapper, then you’ll need to create the structural format of the output. To do this, you want to create one logical structure for each inbound Data Element, which is the root element of the XMLized flat data.
To begin, drag and drop the XCSData element (Source, left column) onto the stylesheet XSLT element (center panel). The blue XCSData element will now appear below the stylesheet element, as shown above.
Note: the red V that appears on your node, indicating a mapped element.
Note: You’ll want to drag and drop your element on top of the style sheet element so that you see the gray bar above it and then release. If you make a mistake, you can delete mapping elements by right-clicking and selecting “Delete” from the context menu.
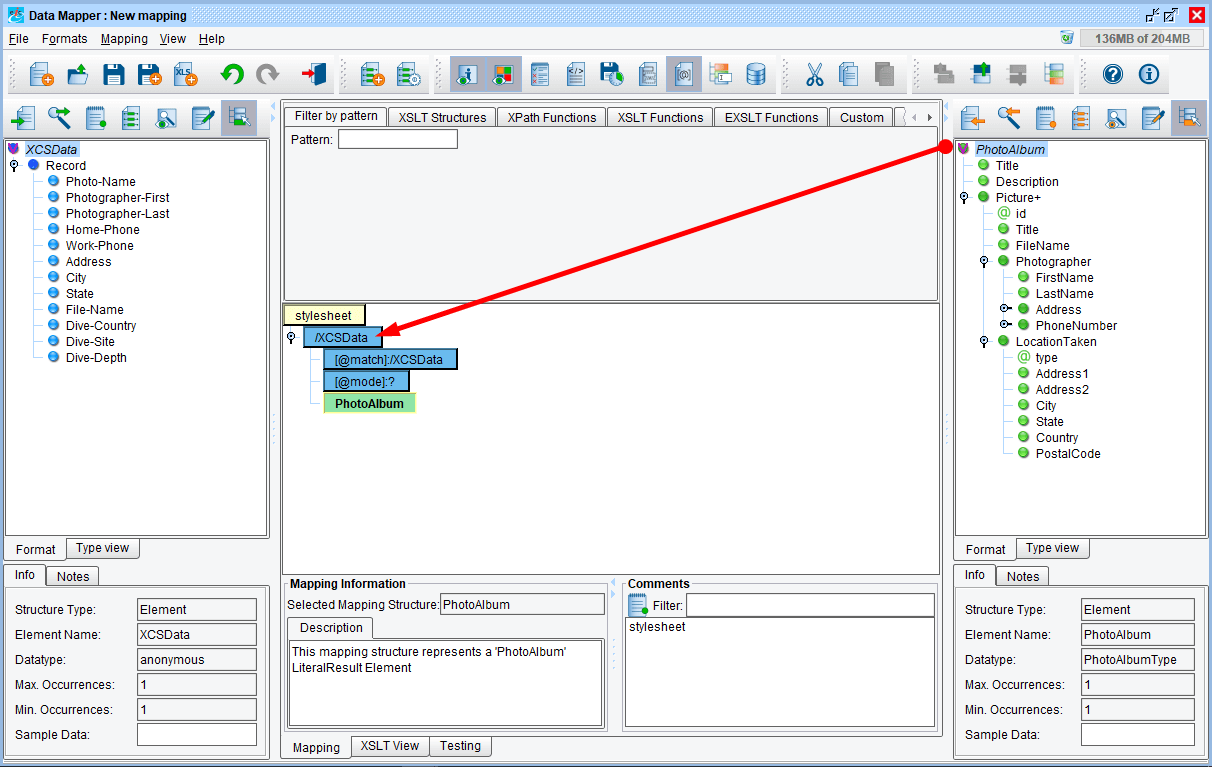
At the root of the output (green elements in the right panel) you want the PhotoAlbum tag. Drag and drop this tag onto the XCSData element in the middle panel.
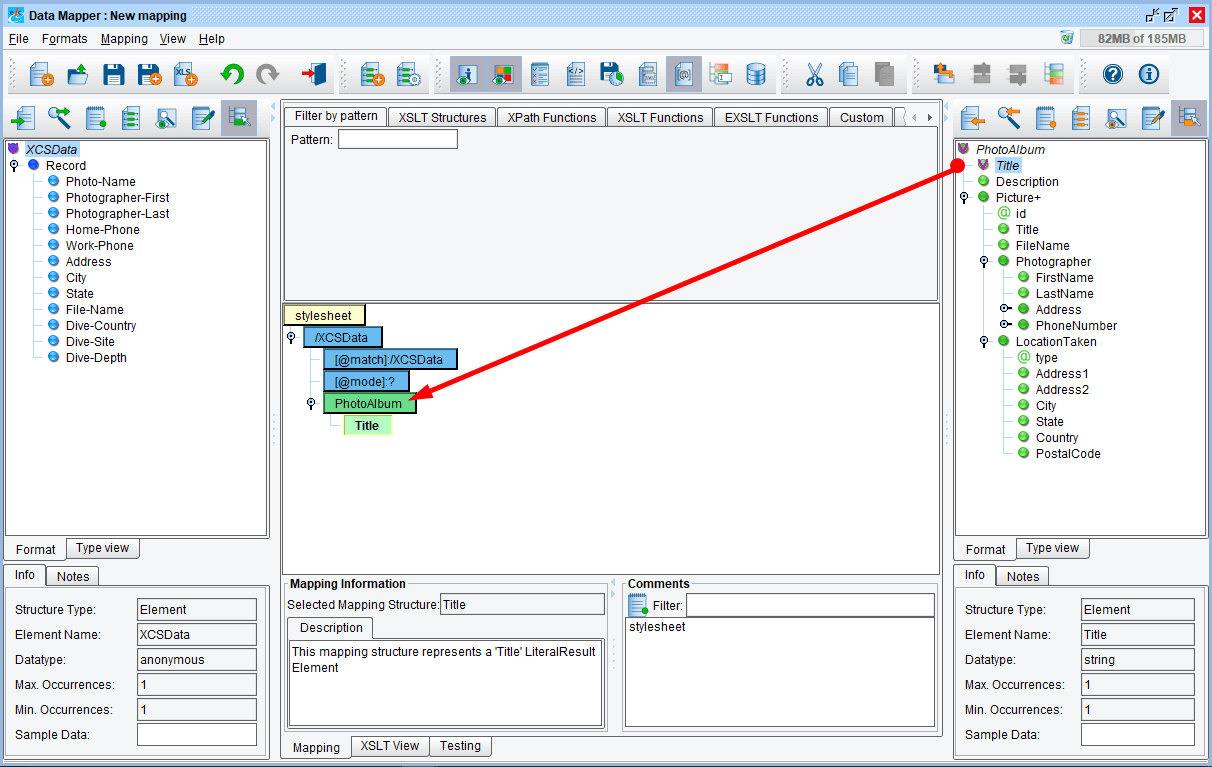
You will also want to add a Title. Drag and drop the Title element from the right column (target) onto the PhotoAlbum element in the middle panel. When done, it should look like the above mapping.
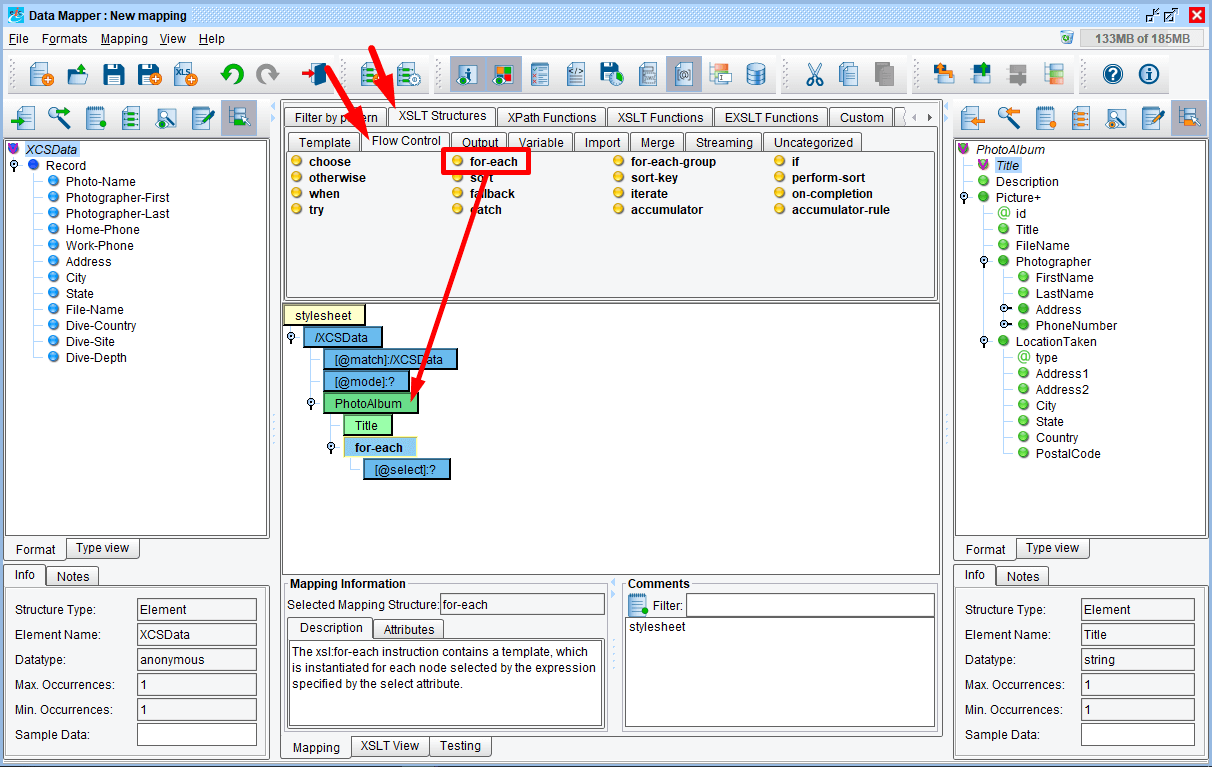
Now you will have a number of records in the inbound file, each of which needs to be mapped to a picture element in the XML output. To handle this looping structure, use the XSLT palette (above the main mapping panel).
Select the Flow Control tab in the XSLT palette. Drag and drop the for-each element onto the PhotoAlbum element. You’ll now see the blue for-each element added to the mapping.
Note: The XSLT palette of structures and functions at the top allows you to do anything you can do by programming via the eiConsole’s drag & drop process.

Next, you will want to iterate over each inbound record. Select Record from the source and drag and drop it onto the [@select] element.
Note: elements are placed at valid locations automatically when mapped.
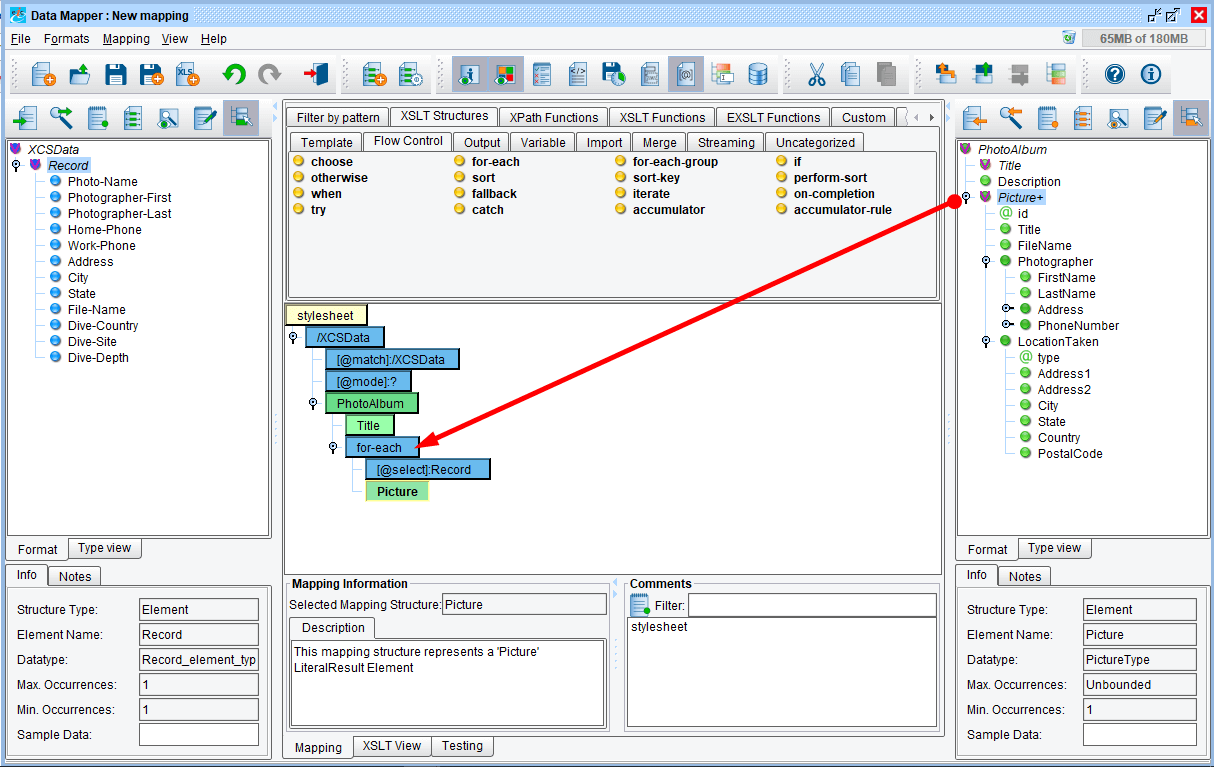
For each Record, you will want to generate a Picture element. Drag and drop the green Picture+ element from the tree on the right panel onto the blue for-each element in the middle panel.
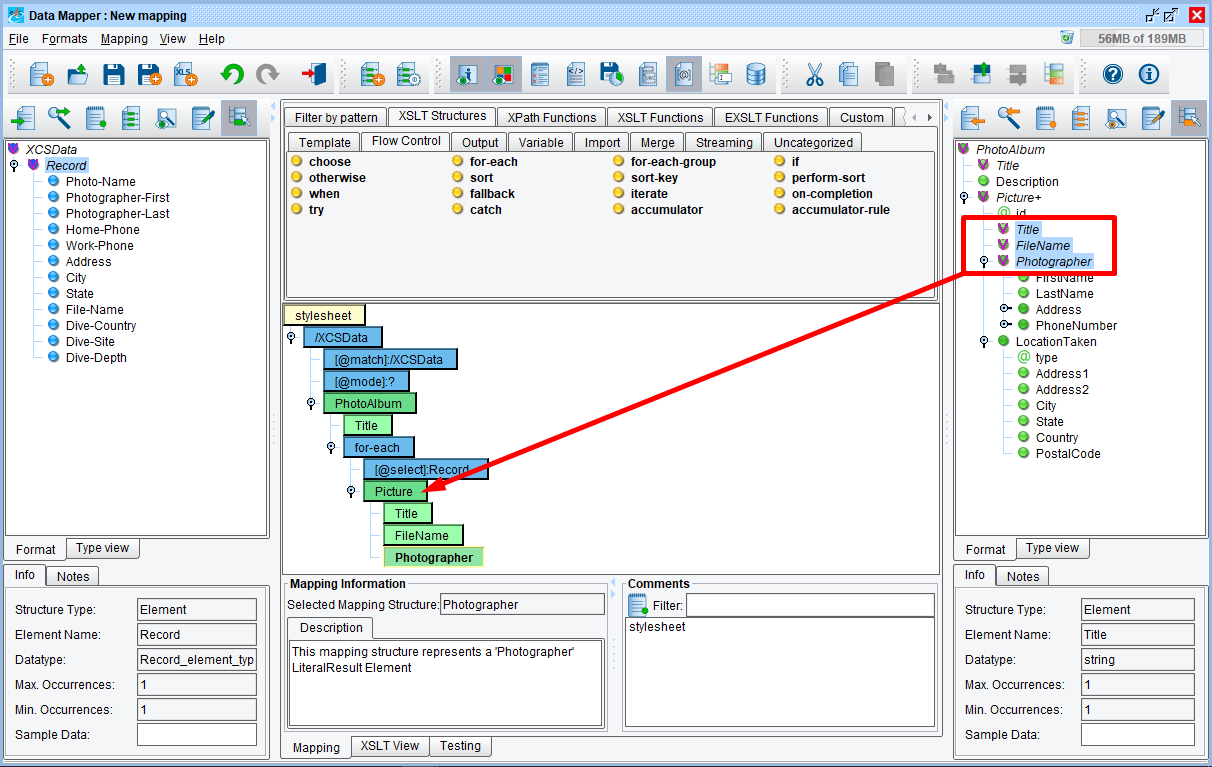
For each Picture, include a Title, FileName and Photographer element. Drag and drop Title, FileName and Photographer from the right panel onto the Picture element.
Note: you can do this one at a time or as group.
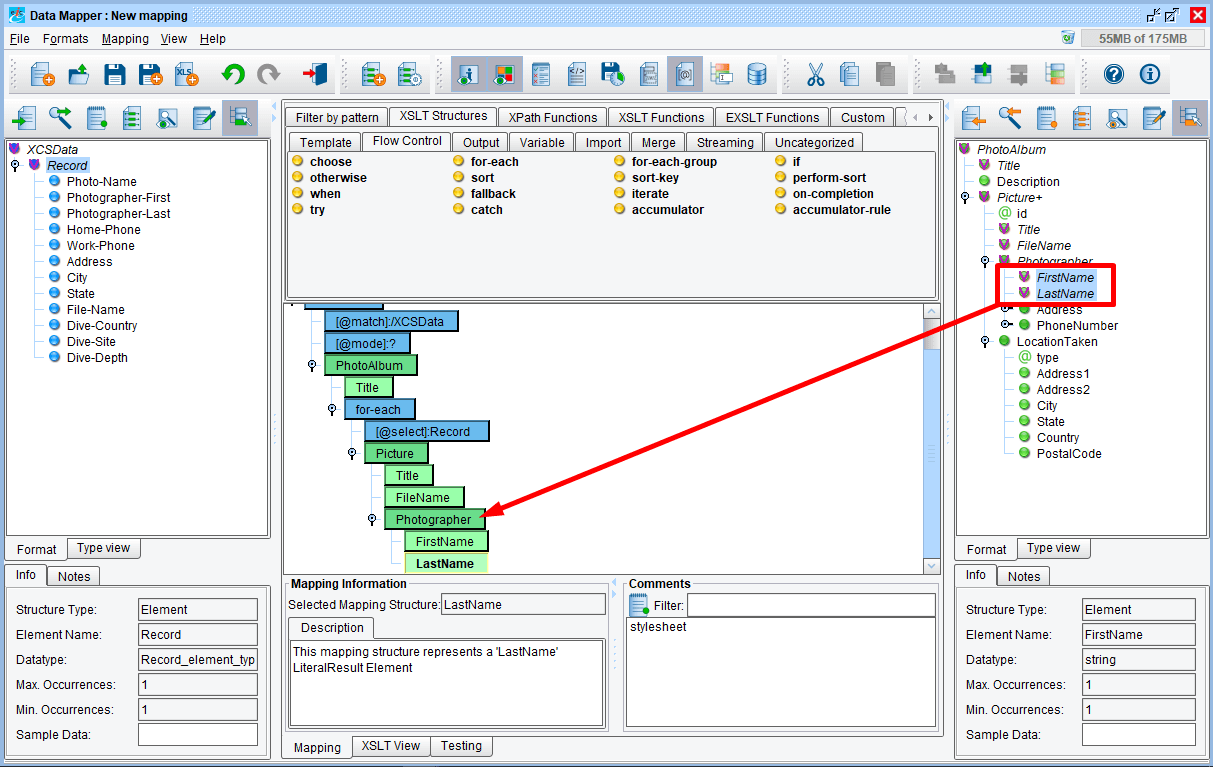
Underneath Photographer, you will want to include the FirstName and LastName. You can drag and drop these elements individually or together onto Photographer.
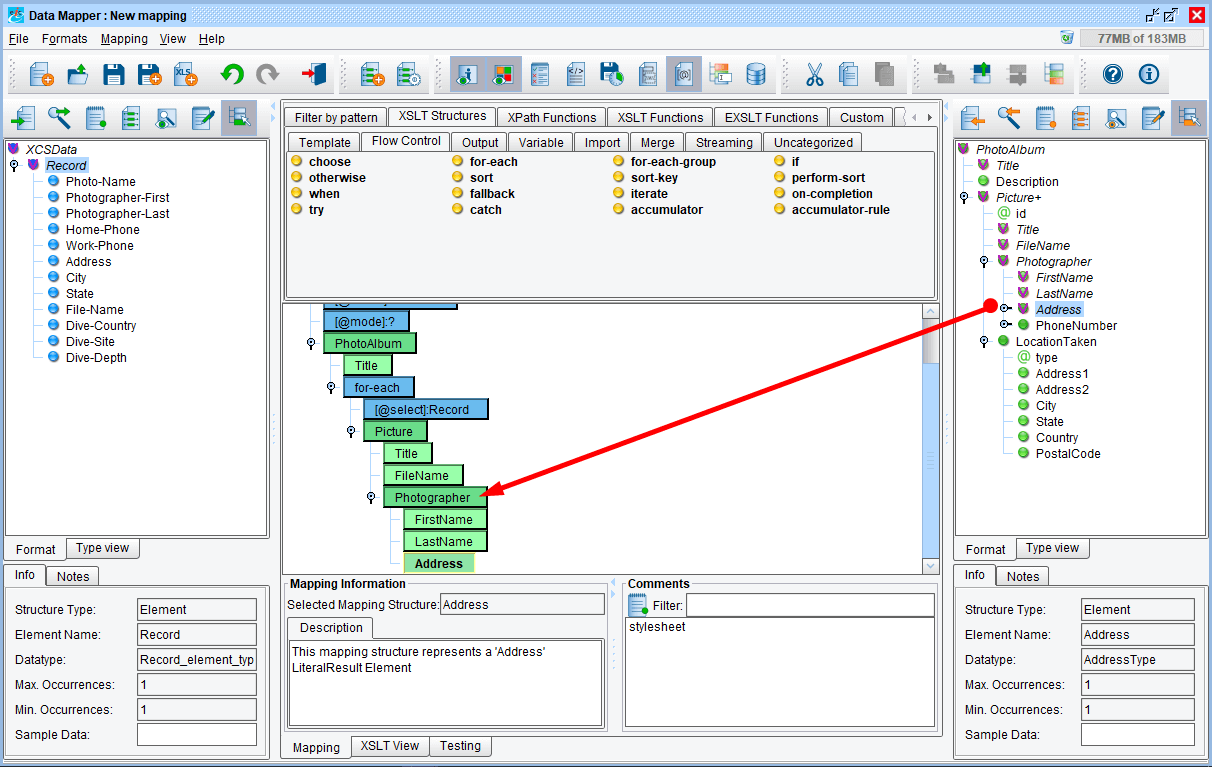
You will also include some aspects of the address of the Photographer. Drag and drop Address onto Photographer. For the next mapping you will need to expand this Address node.
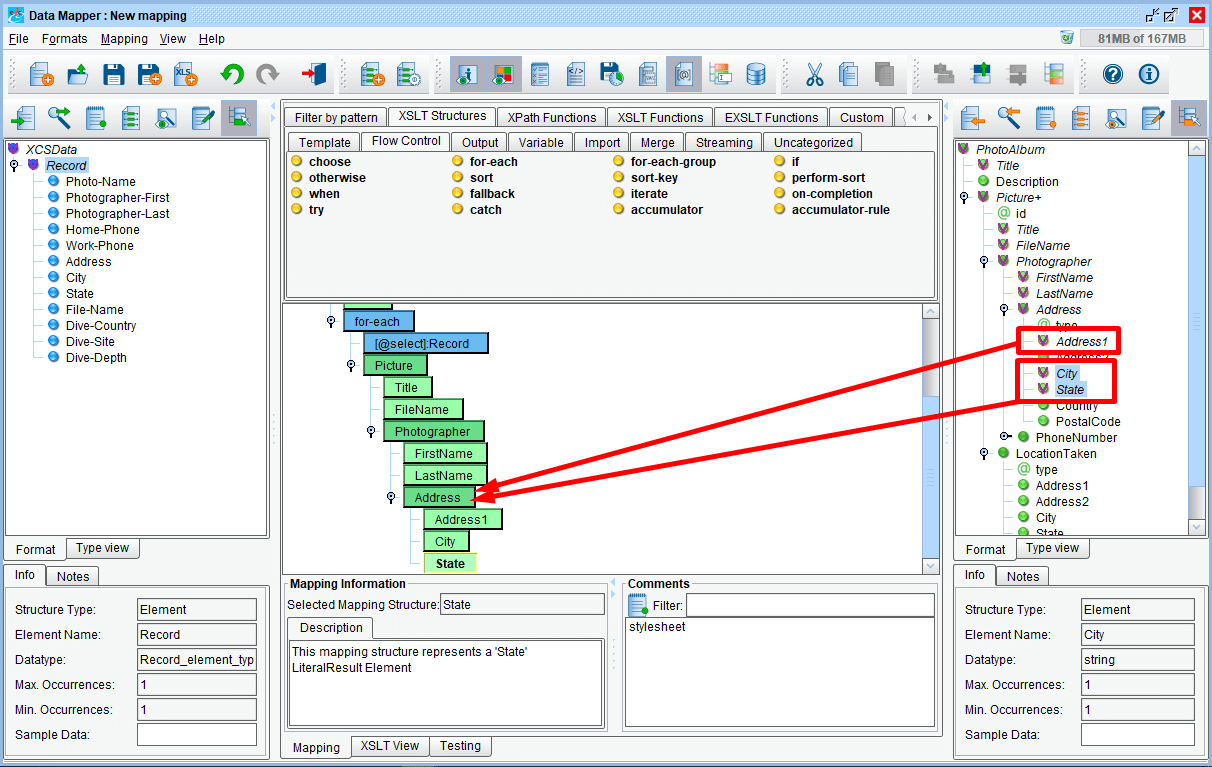
Then drag and drop Address 1, City and State onto Address. When finished, all will show red Vs on the nodes. Your mapping should now look like the above screen.
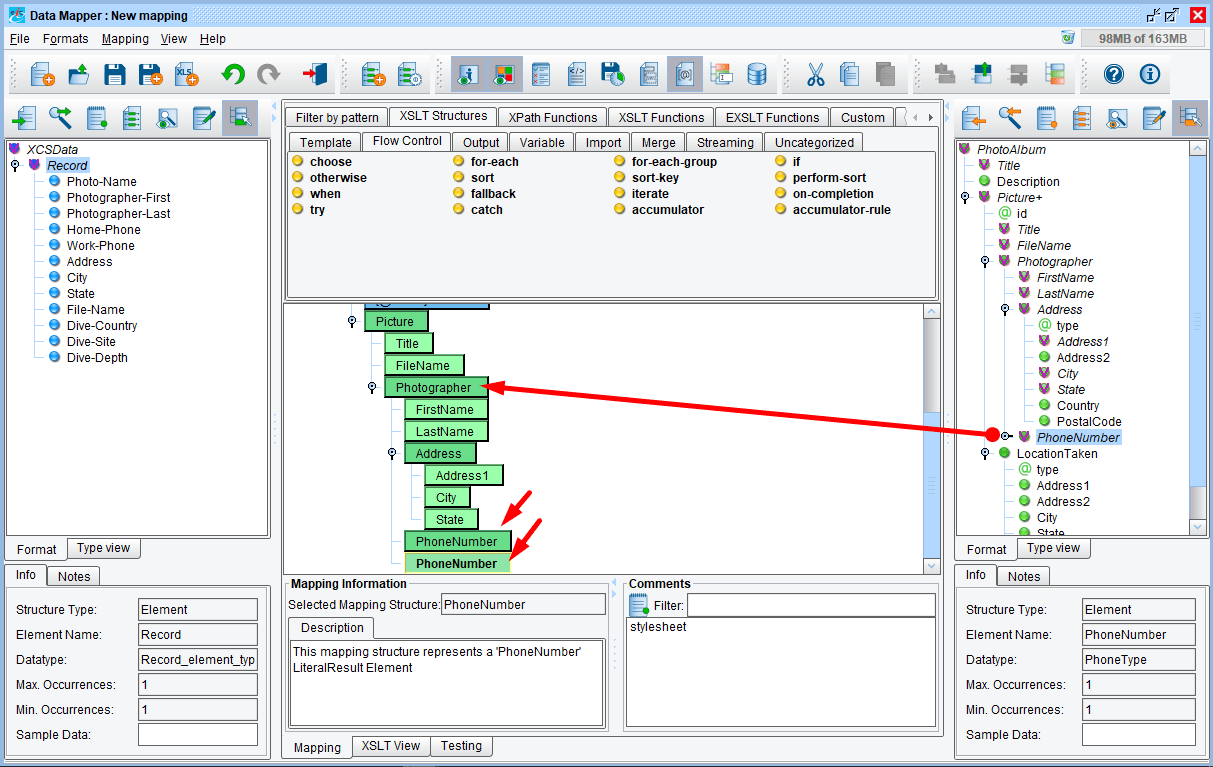
Next, include 2 phone numbers for the Photographer: home and work. Drag and drop PhoneNumber onto Photographer twice. Notice that they appear at the end of your mapping.
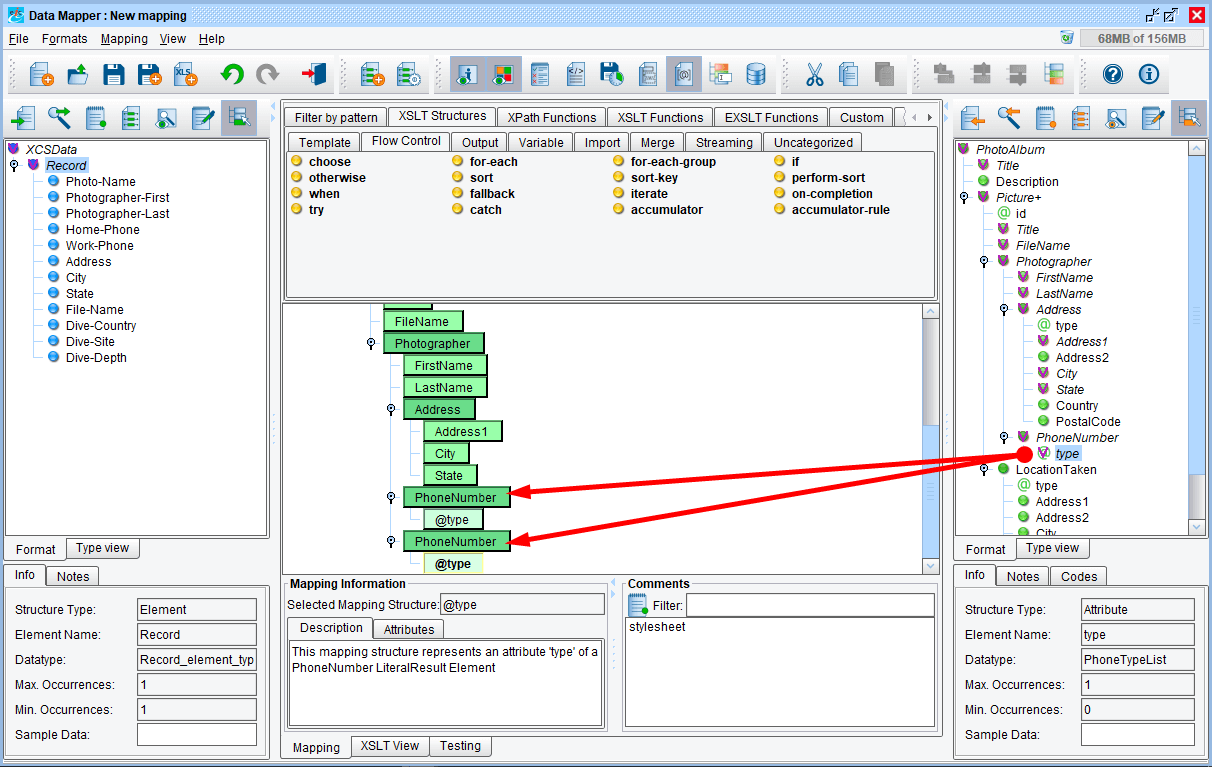
Next, drag and drop the type attribute (found under PhoneNumber in the target format) on top of both PhoneNumbers in the mapping. To view the Type attribute, you will need to expand the target tree by clicking the PhoneNumber node. Your mapping should now look like the mapping above.
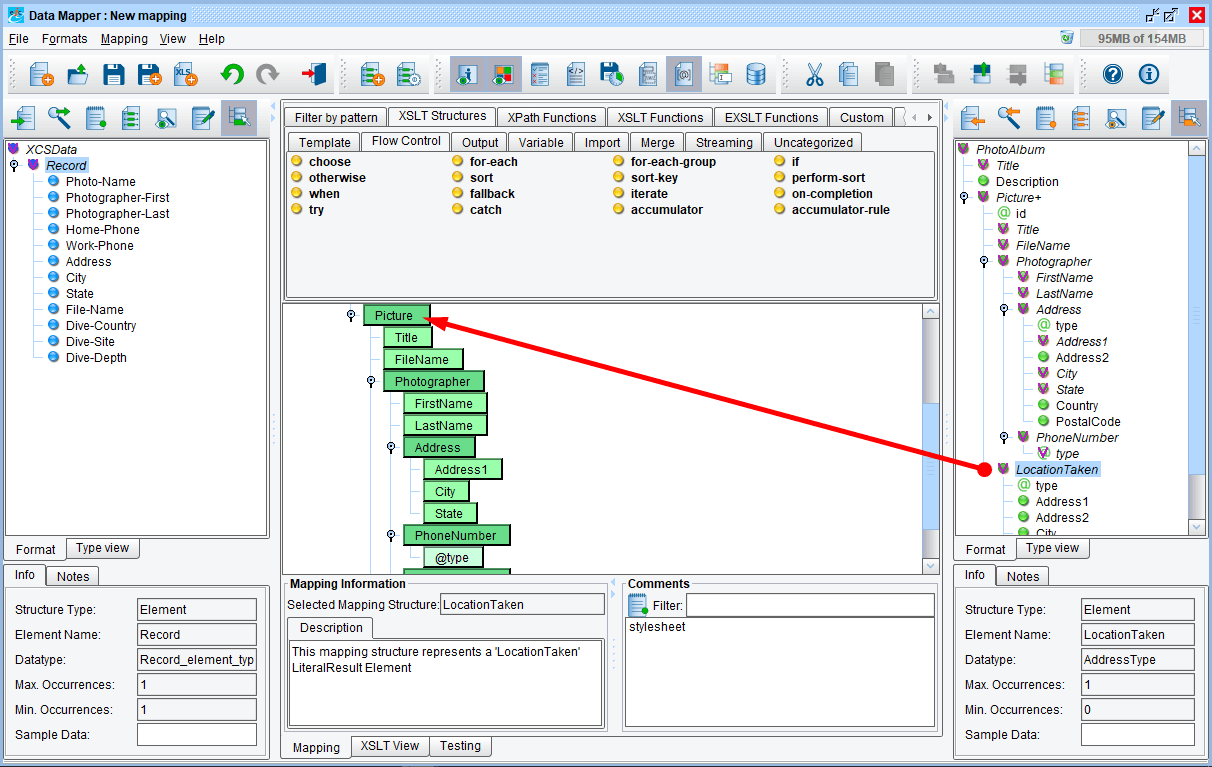
You will also want to add information about where the photograph was taken. Drag and drop the LocationTaken element onto Picture. Notice the element is placed automatically at the valid location, in this instance under the Type element at the very bottom of the mapping.
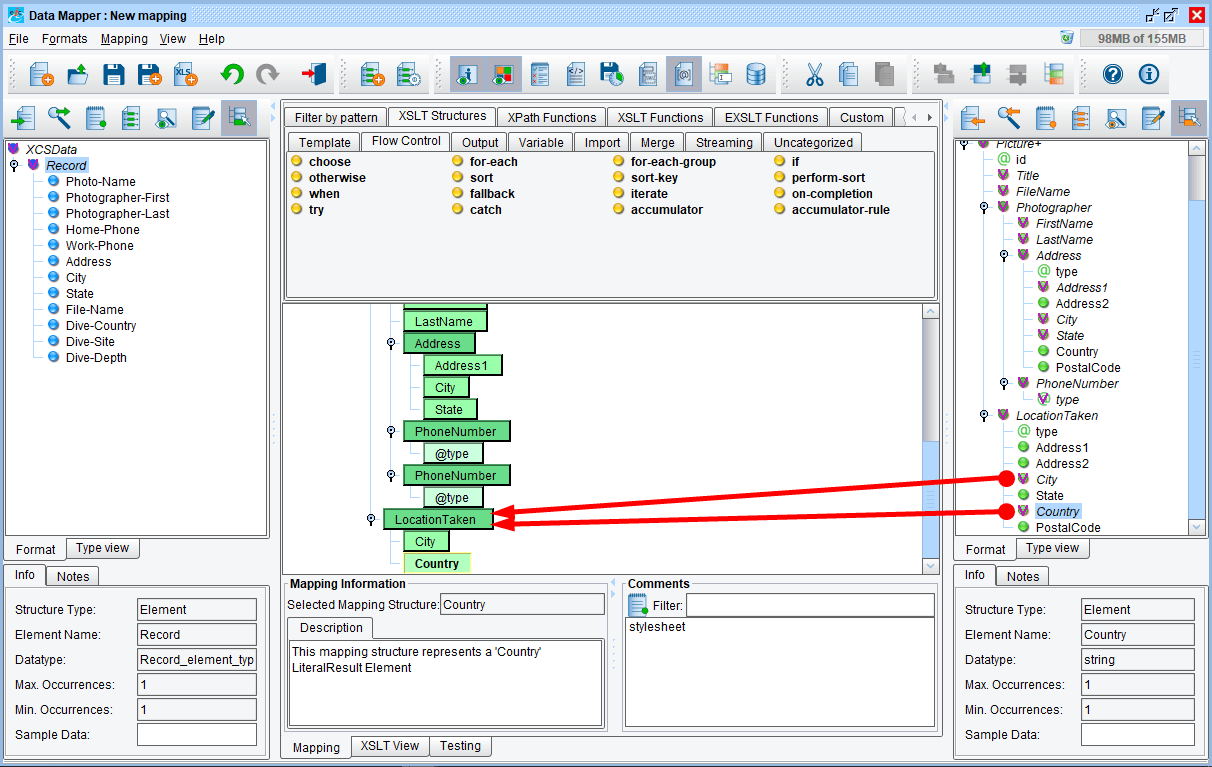
Then drop City and Country (from under LocationTaken in the target format) to LocationTaken in the mapping.
You have now created the structure for which you plan to populate from values in the source. The next step is to associate source fields with target data elements.
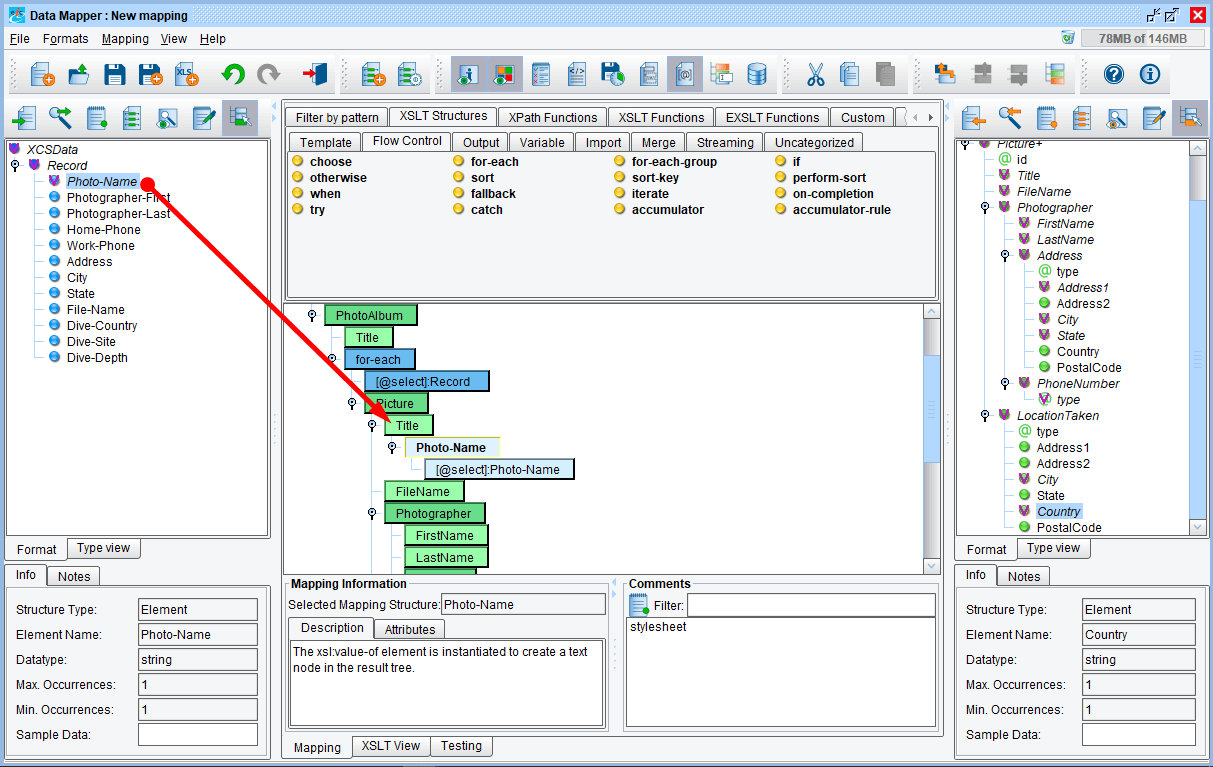
Click the Record node, in the Source panel to expand the tree. The first information to map falls under Picture in the mapping (center panel). You will map Photo-Name to Title. Drag and drop Photo-Name from the source format (left panel) onto Title in the mapping. You will see the blue element appear underneath the green Title and blue Photo-Name elements.
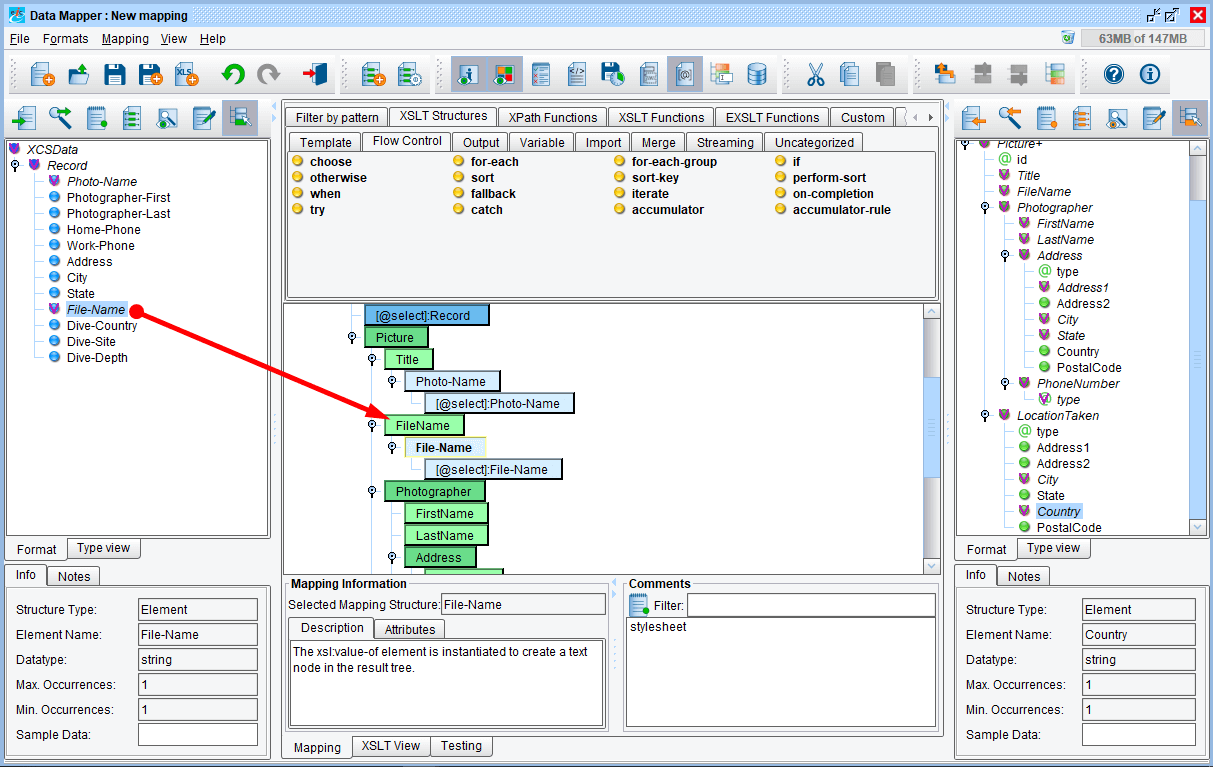
Create a similar association between File-Name in the target and File-Name in the mapping.
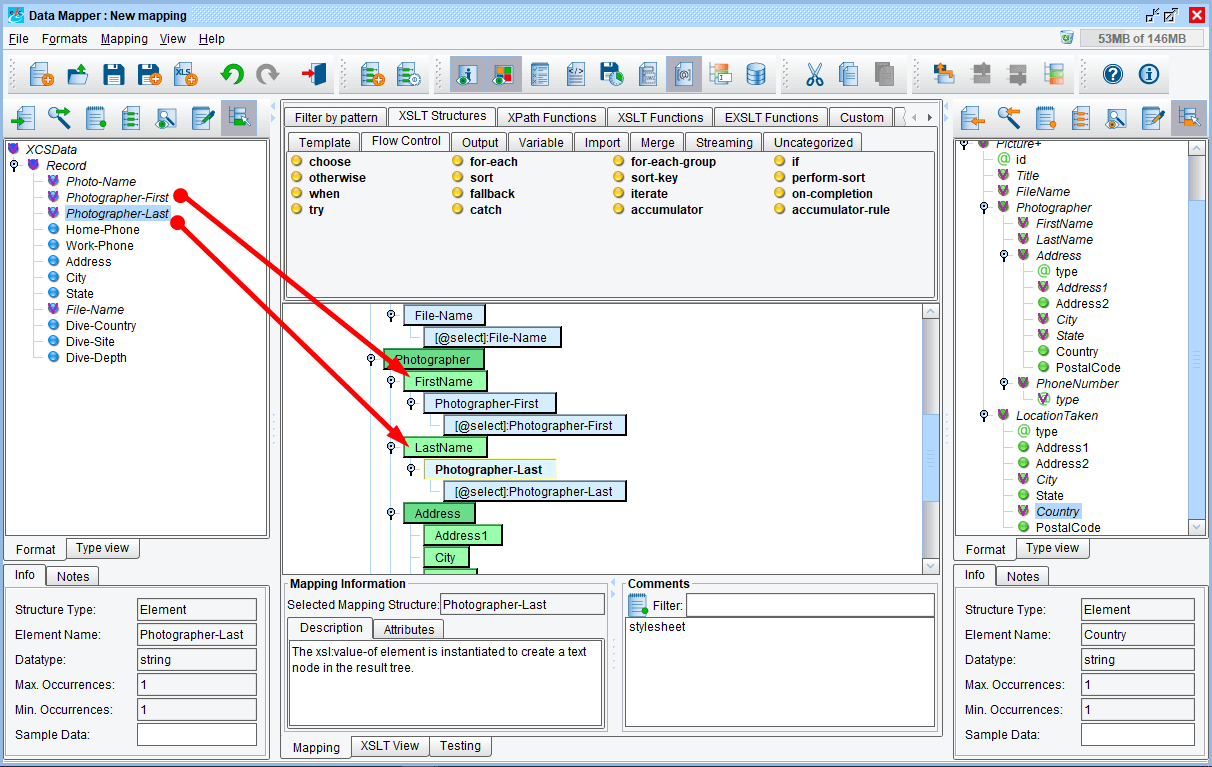
From the source drag and drop Photographer-First on top of FirstName (under Photographer), then drag and drop Photographer-Last on top of LastName (under Photographer) in the center panel.
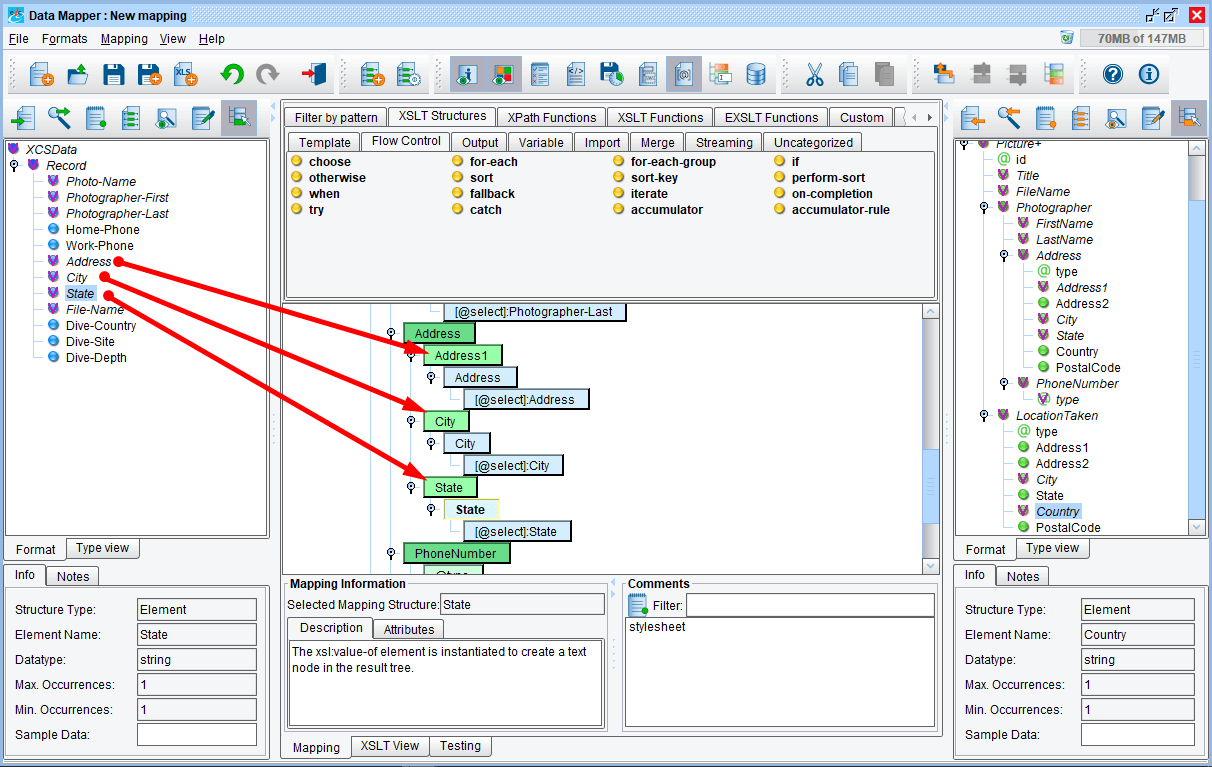
From the source drag and drop Address on top of Address1 in the mapping. From the source also drag and drop City on top of City, and State on top of State.
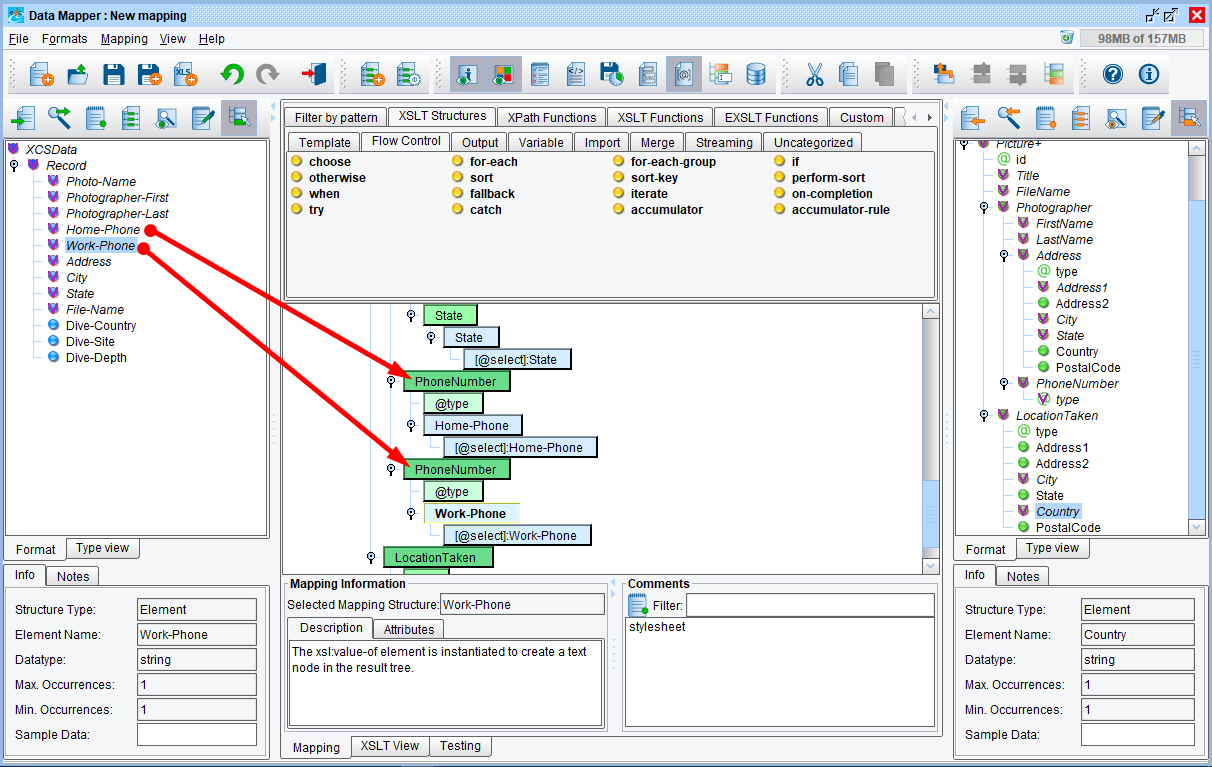
There are 2 phone number elements to map: Home and Work. First you will need to scroll down to the bottom of the center panel to have access to the elements. Next, drag and drop the Home-Phone element from the source to the first PhoneNumber in the map and the Work-Phone element from the source to the second PhoneNumber in the map. Your mapping should now look like the above.
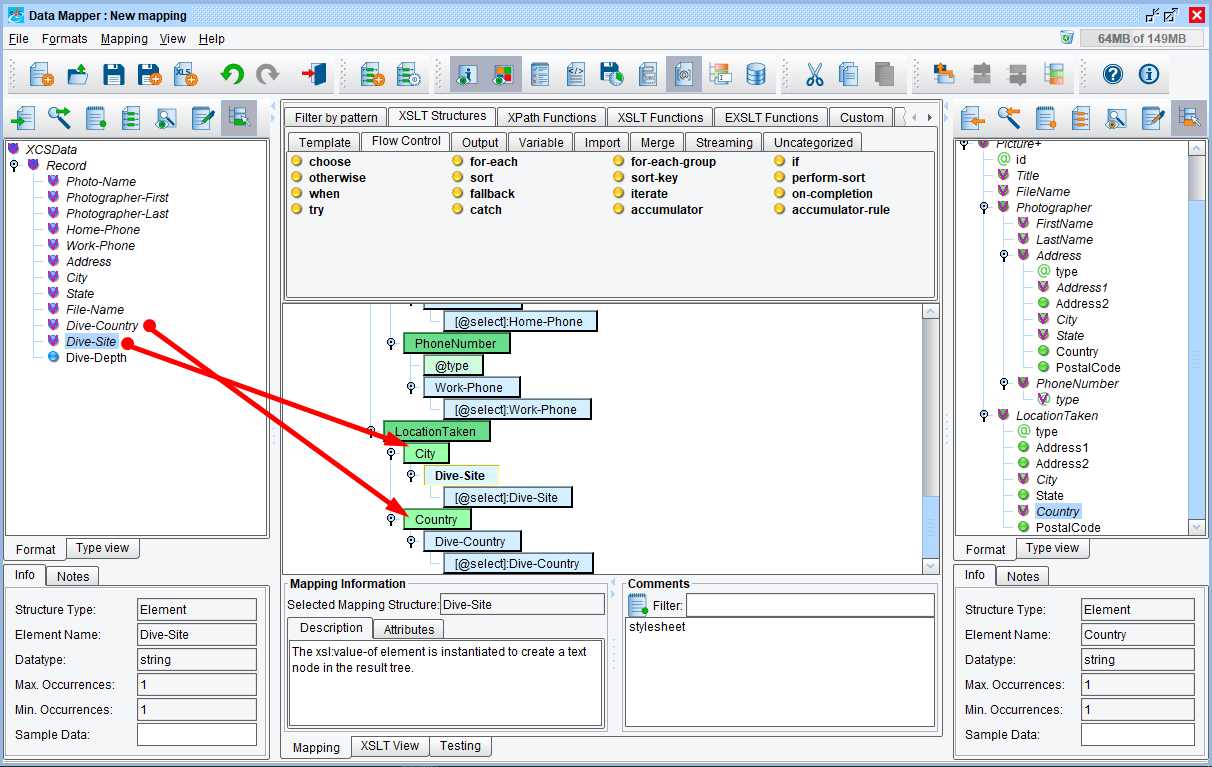
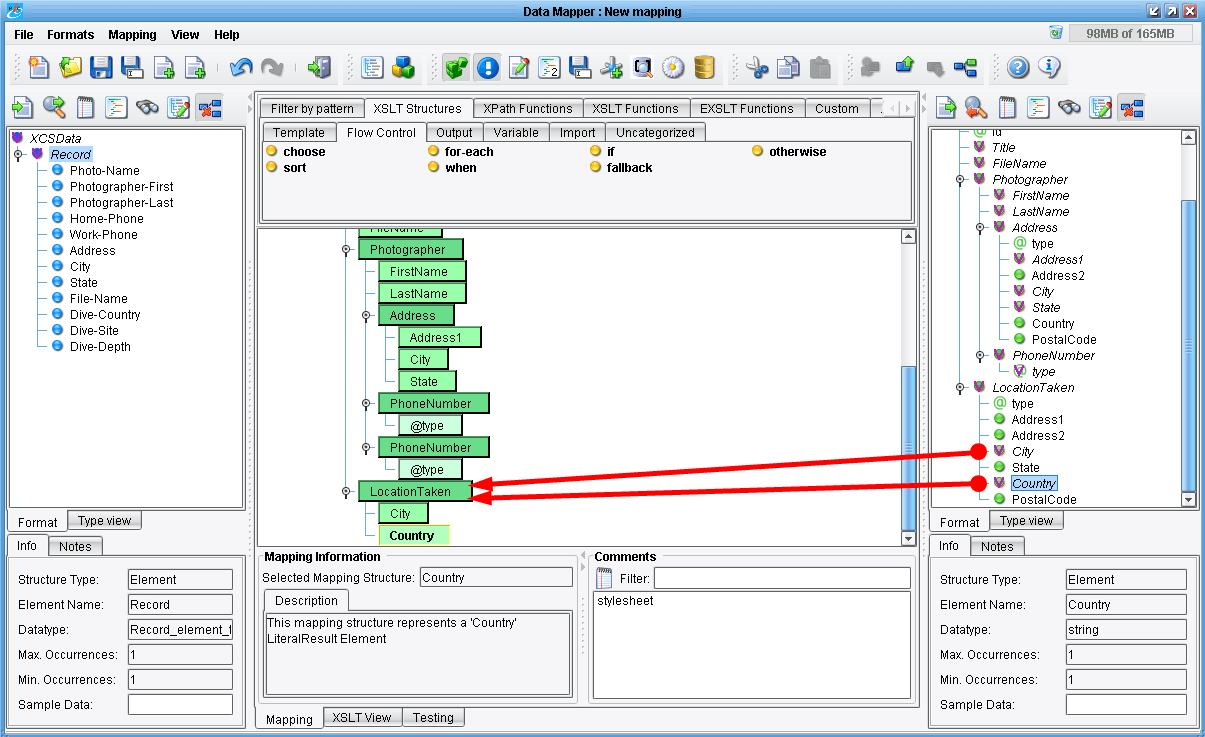
For LocationTaken in the mapping, map Dive-Site from the source to the City and the Dive-Country from the source to the Country. Leave Dive-Depth unmapped. (You may have to scroll to have access to these elements.) When you are done, your mapping should now look like the above.
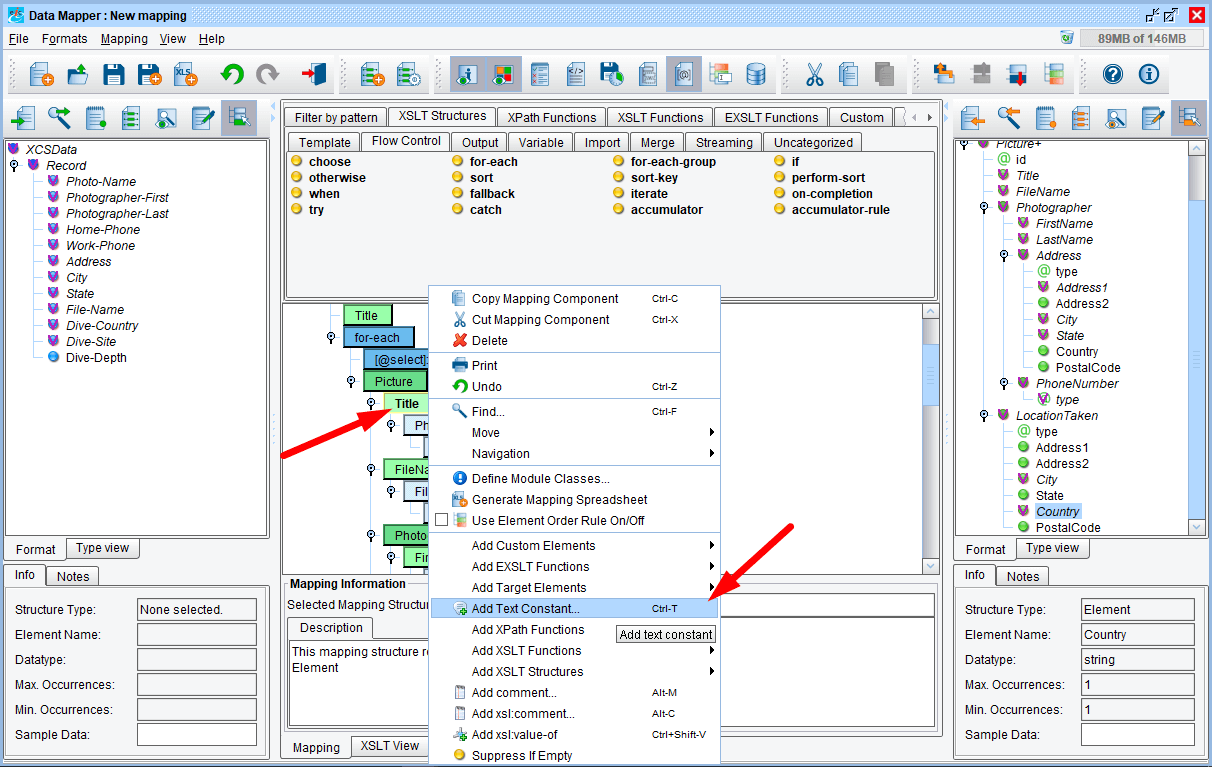
You have now mapped values from the source onto values from the target. There are several text constants that need to be added to clarify the meaning of various fields. For example, Title is unmapped. Scroll up in the center panel. Right click on Title and select Add Text Constant from the drop down.
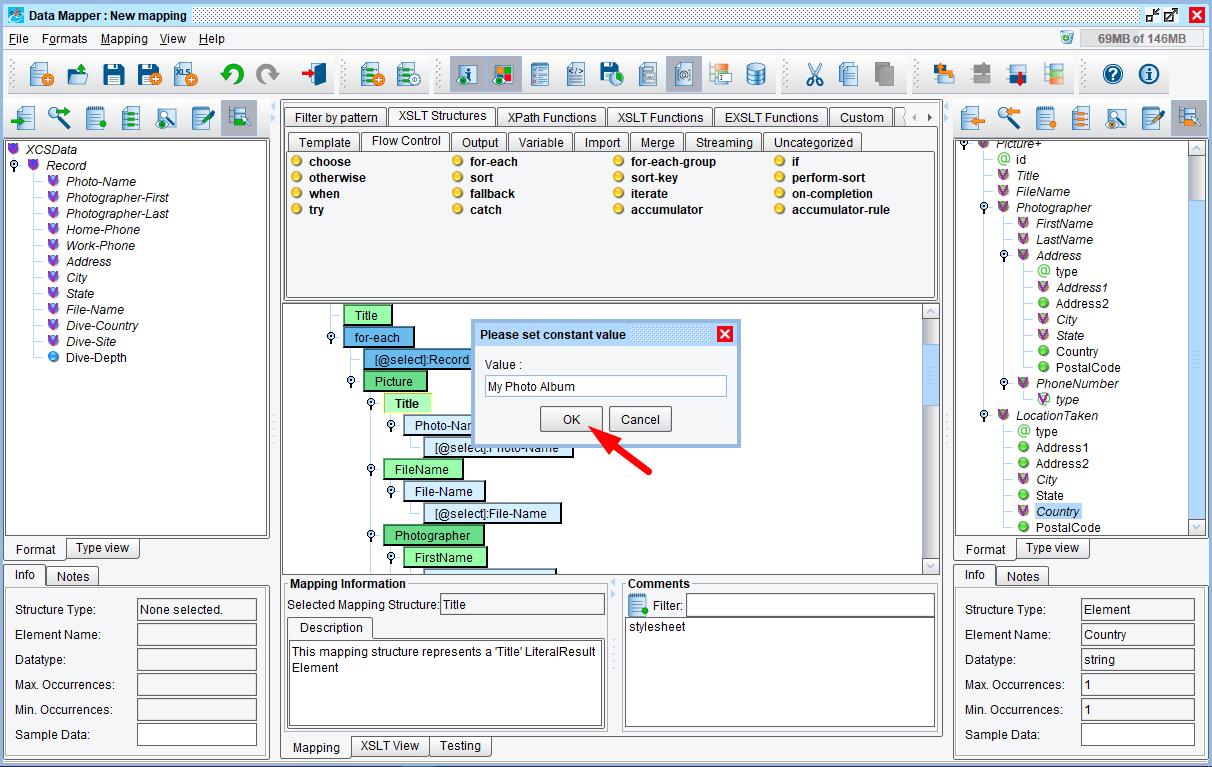
When the Please set constant value dialogue panel opens, enter “My Photo Album” and click OK.
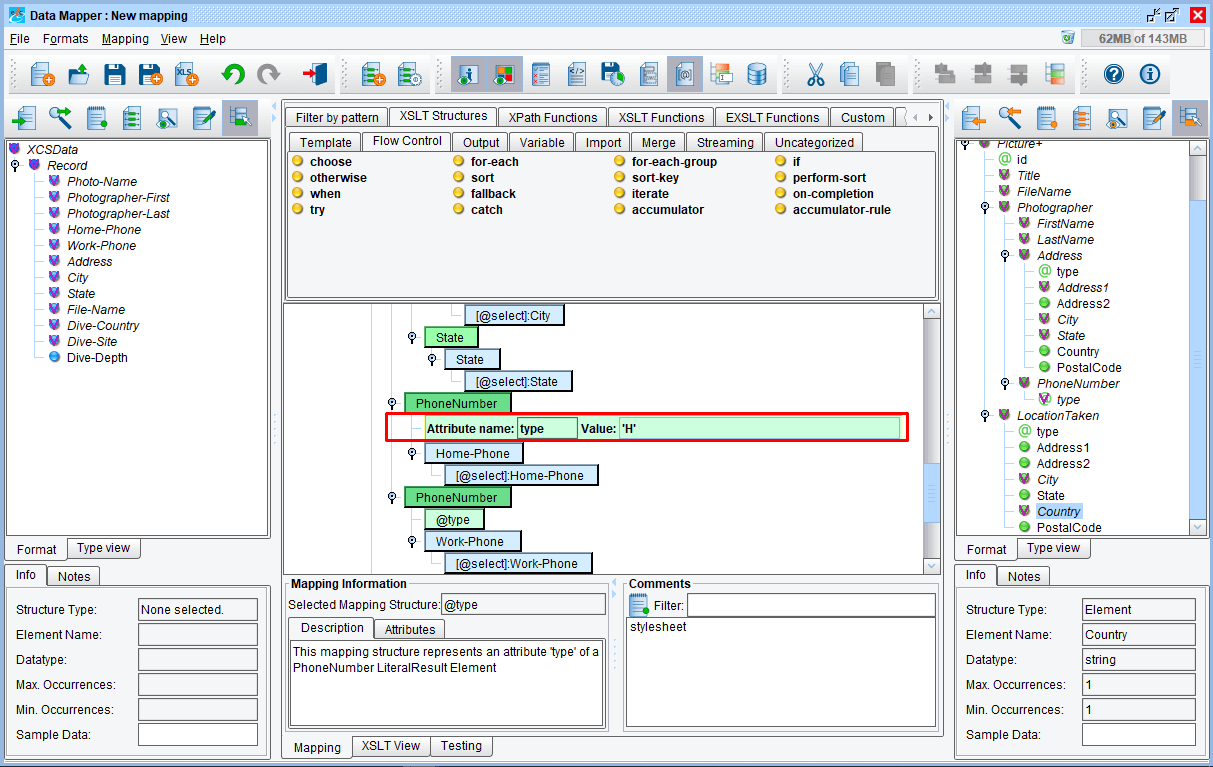
Now, scroll down to the PhoneNumber section of the mapping. You will see the type attribute, which is used to indicate the type of phone number that each PhoneNumber element represents. Double click the first PhoneNumber type attribute. In the Value text-box enter 'H' to represent Home (use caps and make sure you use single quotes) and hit enter/return.
Do the same for the Work PhoneNumber. In the character box enter 'W' and hit enter/return.
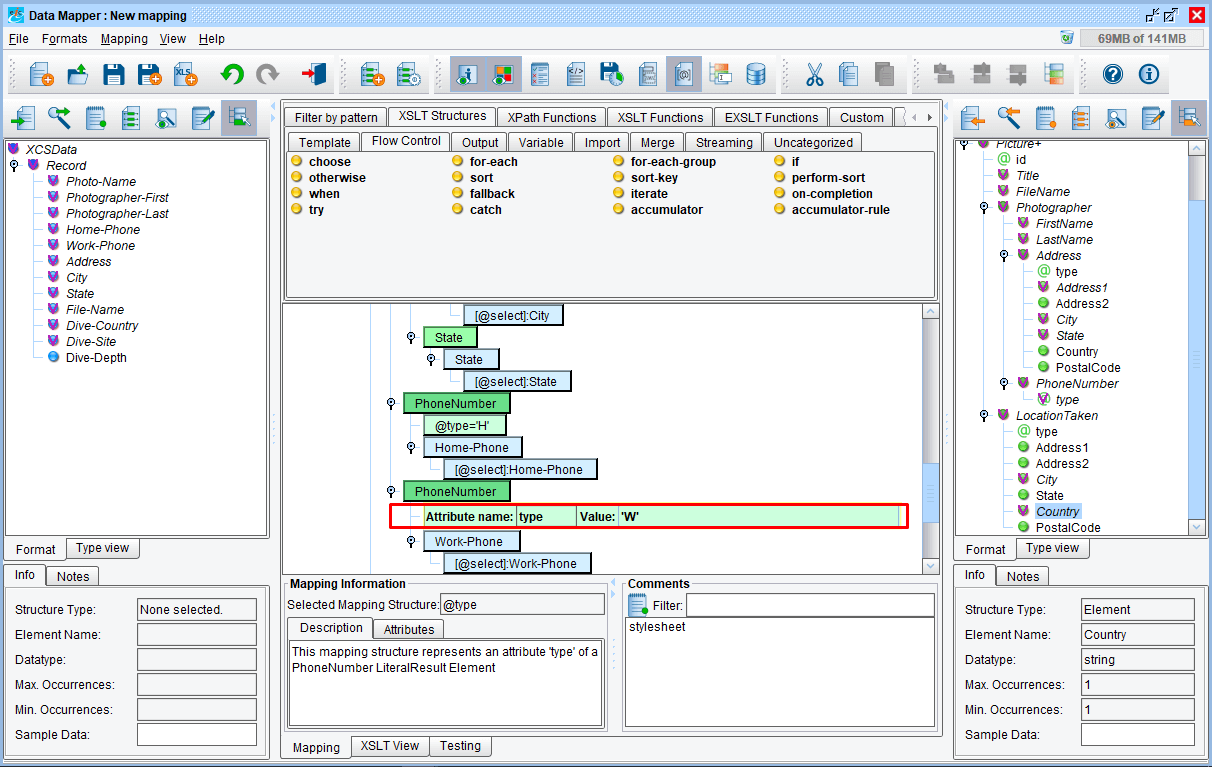
When you are done your mapping should look like the above.
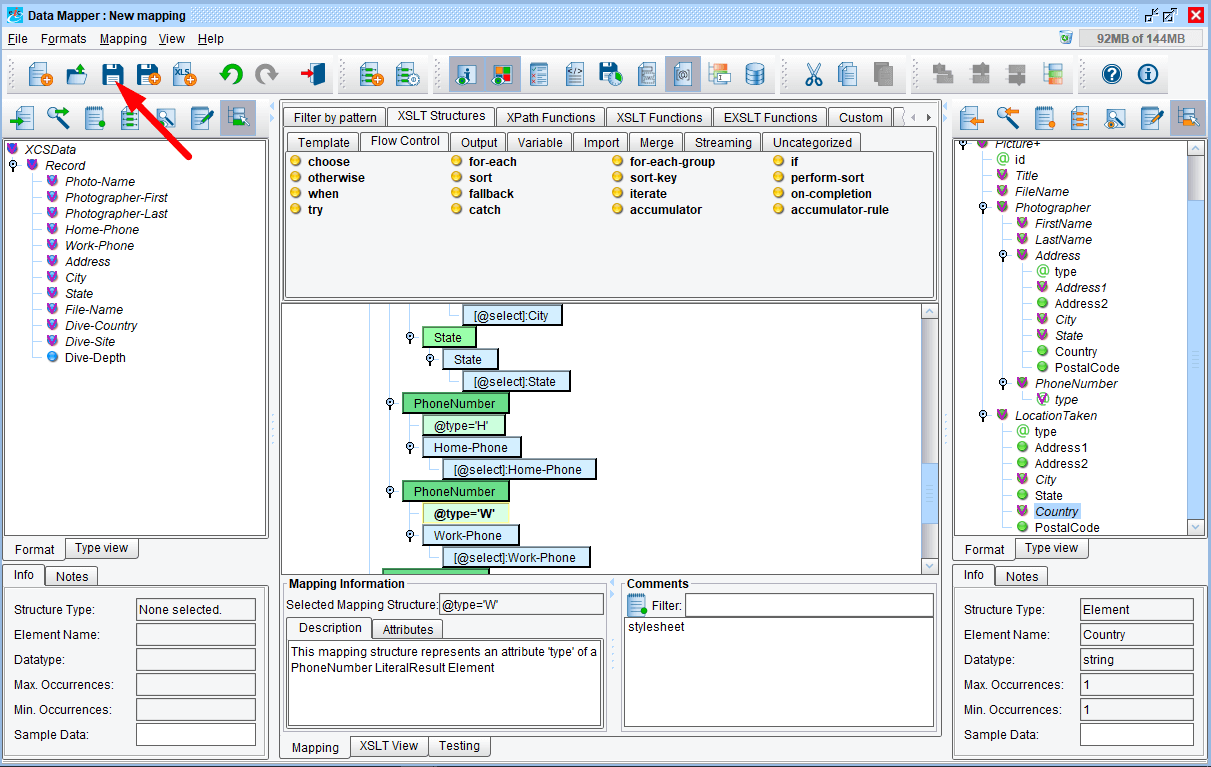
Your logical data map is now complete. Hit the Save icon at the top.
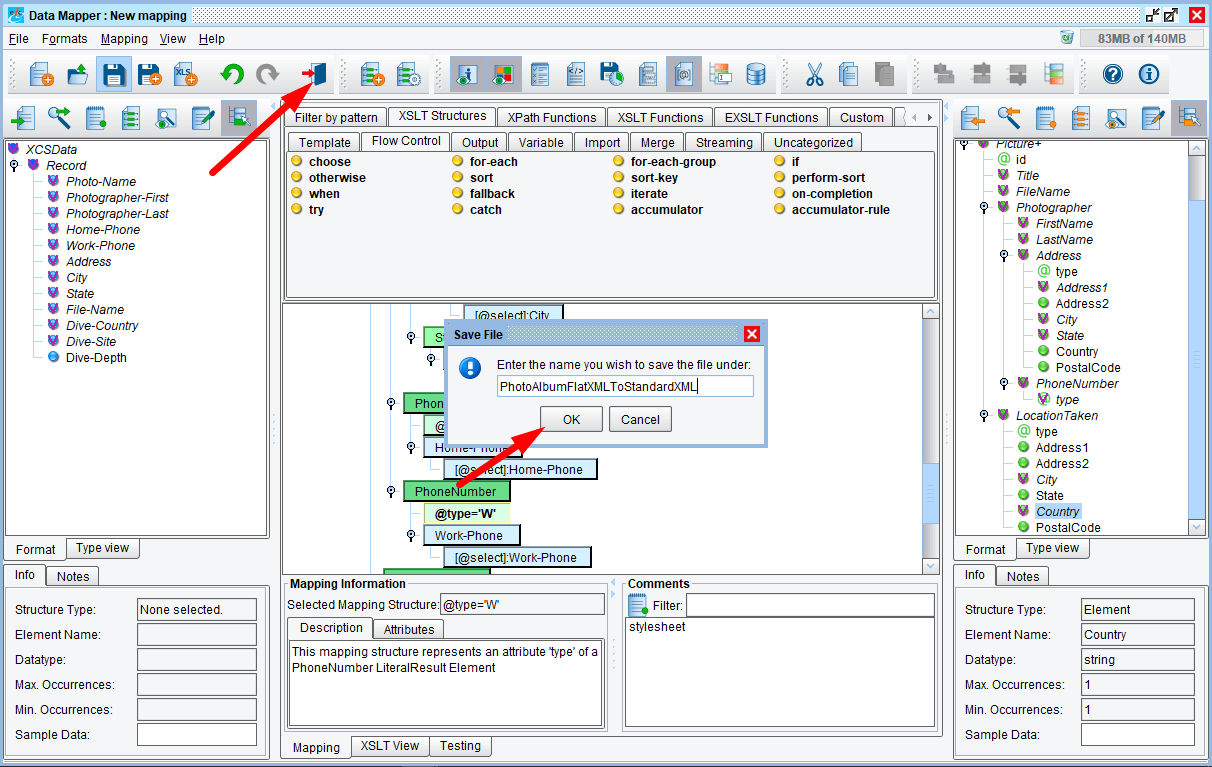
When the Save File dialogue opens enter “PhotoAlbumFlatXMLToStandardXML” and click OK.
Now you are ready to move on to the next step. The Route Stage. Next, click the Return to Console icon at the very top.