
FastRez Tutorial – Part 1
Welcome to the XCS eiConsole OpenTravel for FastRez Getting Started Tutorial. During the course of this tutorial you’ll build your first XCS eiConsole interfaces are the highest-level of visible abstraction within eiconsole. any given>Interface is defined by one or more Routes. ” class=”lexicon-term”>interface. The Interface that will be built will be very similar to the HotelAvailabilityRequest sample provided in your download bundle.
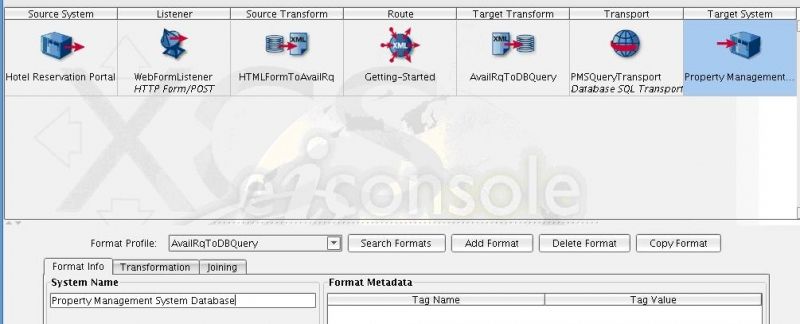
In this interface information is submitted off a Web Page Form to an XCS eiConsole HTTP Form Listener. The Listener will take that date, convert it into XML, and then pass it along to the Source Transformation where this information from the form will be mapped onto an OpenTravel FastRez compliant HotelAvailabiltyRequest message. That message is then routed along towards a Property Management system. A Target Transformation is used to translate the data from an OpenTravel HotelAvailabilityRequest XML format into a SQL query. The Database SQL Transport is used to execute that query against the Property Management system’s database. The results are converted by that Transport to XML and then passed along to a separate HotelAvailabilityResponse message. The scope of this tutorial will be building the request portion of this interface.

Let’s get started…
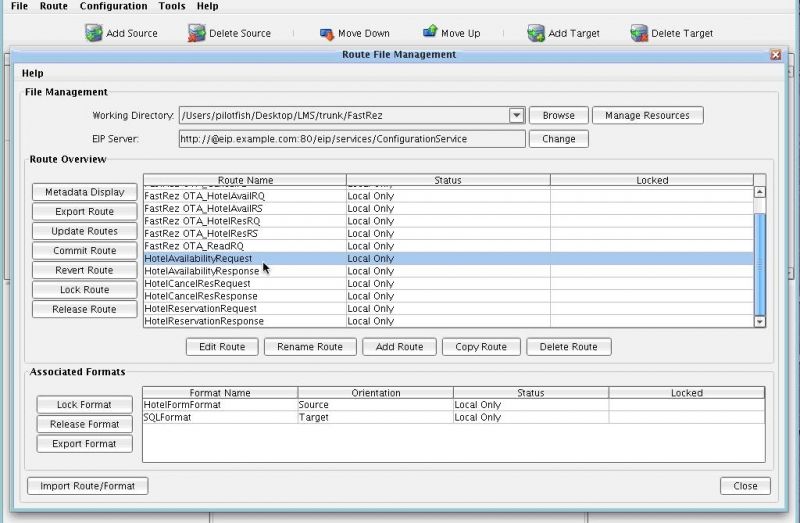
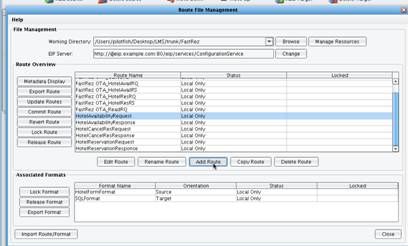
On the Route File Management window you will need to build a new interface. Click the Add Route button.
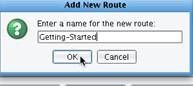
The Add New Route dialogue will appear. Name this route Getting-Started and hit OK.
A new row will appear in the Main Route Grid called Getting-Started. Double click this row.

Double clicking that row will bring up the interface in the Main Route Grid. You now need to add one Source and one Target to account for the Web Form and Property Management system. Click Add Source…

And Add Target.

Work your way from left to right across each of these stages. The Listener you want to configure will be an HTTP Form/POST Listener. Click the Listener icon on the Main Route Grid and then select HTTP Form/POST from the Listener type dropdown.

In the Listener Name dialogue, let’s simply type WebFormListener.

You now need to configure the appropriate configuration items. The Request Path configuration item is used to determine what URL will be used to invoke this particular interface. In this case, use the text gettingStarted. Because this HTML Form/POST will be expected to produce a response, also click the Wait for response checkbox.

You won’t need to configure anything on the Advanced tab.

Now let’s move on to the Source Transformation. Click on the Source Transform icon in the Main Route Grid. You’ll now need to add a format to handle the transformation from the We
b Form format into your HotelAvailabilityRequest.

Click the Add Format button.

The Add New Format dialogue will appear. You’ll need to provide a name for this transformation. Call it HTMLFormToAvailRq. Enter this text and hit OK.

When you click OK, this format profile will be highlighted in the Format Profile dropdown. You now need to configure the Transformation Module and XSLT. The HTTP Form/POST Listener handles the conversion of the Form/POST values into an XML data stream. No Transformation module needs to be selected.
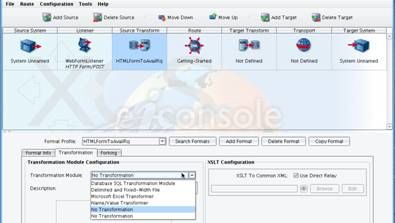
However, if you were taking data from a non self-describing format and converting it into XML, you may need to choose one of the Transformation Modules from this dropdown. The most commonly used Transformation Module is the Delimited and Fixed-Width File Transformation Module, which has the corresponding XCS File Specification Editor that allows you to describe the structure of the delimited or fixed-width file to be parsed. Again, in this case, just choose No Transformation.
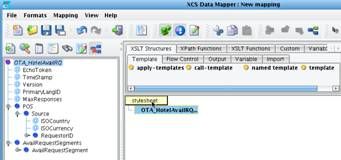
The next stage is the XSLT. XSLT is a W3C standard technology used to describe the logical mapping from one XML format to another. The XCS eiConsole supports the generation of XSLT with the XCS Data Mapper. You’ll now use the XCS Data Mapper to generate the logical mapping from the Web Form to the OpenTravel FastRez message. To do this, first uncheck the Use Direct Relay checkbox. This will enable the Browse and Edit buttons in the XSLT Configuration box. Click Edit.

Clicking Edit will launch the XCS Data Mapper.

In the XCS Data Mapper you have three panels. The panel on the left is used to depict the logical structure of the Source format that you are mapping from. The panel on the right is used to depict the logical structure of the Target format that you are mapping to. You then drag and drop to create the mapping in the middle. First, load in the Source and Target formats.
To load the Source format, click the Open source format icon above the left hand panel.

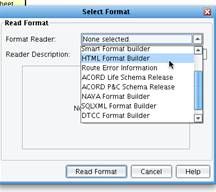
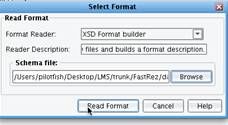
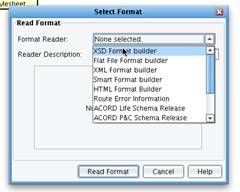
This will launch the Select Format dialogue. The Select Format dialogue allows you to read in the logical structure of the Source or Target from a variety of different artifacts. In this case, you’ll want to use the HTML Format Builder. Select this option from the dropdown.
The Format Builder Configuration for this particular Builder requires an HTML Form file. This is an HTML Form that includes Form elements that you’ll need to map onto the Target format. Click the browse button.
Your XCS eiConsole for OpenTravel FastRez distribution includes a samples directory. Underneath that samples directory will be a web sub-directory. Open this directory and then double click on the HotelAvailRq.html file. Choose Open.

When you click Read Format, the HTML Format Builder will identify all of the Form elements in that HTML file and use it to populate the left hand side of your screen. Go ahead and click Read Format.

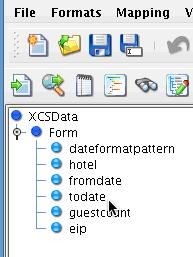
If you expand the Form element in the left hand side of the screen, you’ll see that all of the elements in the HTML Form will appear.
You’ll now need to load in the right hand side of the screen, the Target format. Click the Open target format icon above the right hand panel.

Your Target format will be the OpenTravel FastRez HotelAvailabilityReqest message. This is described as an XML schema. Choose the XSD Format Builder.
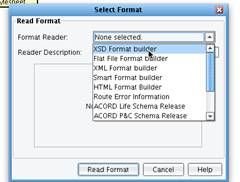
Select the XSD Format Builder from the Format Reader dropdown. The XSD Format Reader uses an XSD file as input. Click the Browse button next to the Schema file configuration item.

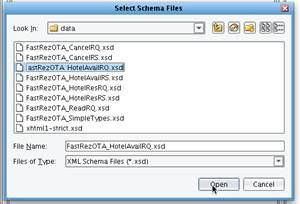
In the data directory underneath your sample project you’ll find the schema for the HotelAvailabilityRequest. If you’re not a licensee of the OpenTravel FastRez schemas, you may need to download these separately from the OpenTravel FastRez site. In that case, simply locate the XML Schema file from your OpenTravel FastRez download. Select that file (FastRezOTA_HotelAvailRQ.xsd) and select Open.
Click Read Format.
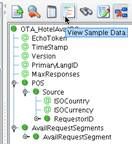
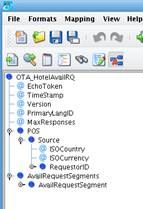
The right hand side of the screen will now include the logical structure of the OTA_HotelAvailRQ message. Now that you’ve loaded the Source Format and Target format,
you’ll want a template of what you’ll want to map to. You can do this by opening up sample data for your Target format. To do this, click the View Sample Data button above the right hand panel.
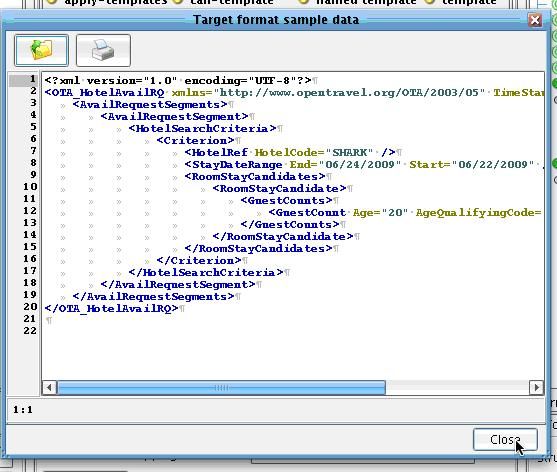
The Target format sample data dialogue will appear. Click the Load Sample Data icon in the upper left hand corner of this dialogue.

In the data directory, you’ll now find a HotelAvailabiltyRequest sample (FastRez_HotelAvailRq_Sample.xml). Again, if you’re not a licensee of the OpenTravel FastRez standard you may need to download these separately after licensing. Find this file and click Open.

A sample instance of the OTA_HotelAvailRQ message will appear. Click Close.
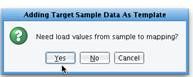
You can now use the XML that you just loaded as a sample to help you in the mapping process. Under the Formats menu, select Add Target Sample Data as Template.
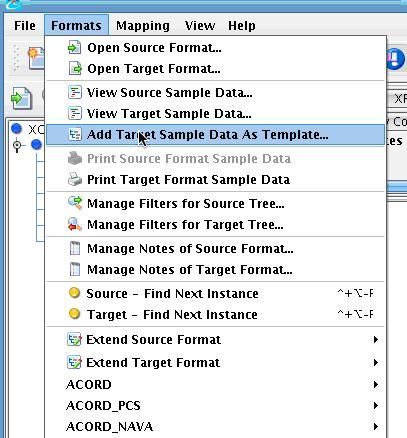
You’ll be prompted to load the sample values from the mapping. Choose Yes.
You’ll see that the basic mapping is built for you. The structure from your sample data now appears in the middle of the map. What you’ll need to do is replace hard coded values with values from your source format. Let’s begin.
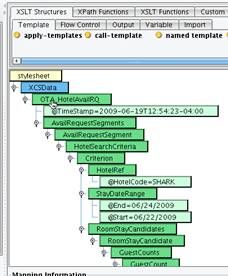
Working your way down from the top, you’ll first see a TimeStamp attribute. Let’s replace this with the actual current time. You can do this by using the pallet of functions above the center mapping. Click the custom Tab, and if the Date tab is not in the forefront, click it. You’ll now want to use the Current DateTime.

Click on this, hold the mouse, and drag it onto the TimeStamp attribute underneath the HotelAvailRQ.

The static time will now be replaced by a mapping that will produce the current date and time when the transformation is run.

As you move down the map, many of the structural elements of the message don’t need to be changed. The next element you’ll want to change is the HotelCode. You’ll want to take this from the hotel element in your HTML Form.

Select hotel underneath Form on the left and drag it onto the HotelCode attribute.

You’ll see the static value replaced by Form/hotel, the XPATH to the hotel.

You’ll also want to dynamically handle the StayDateRange. Your end date will be mapped to the todate in the Form. Drag todate onto the End attribute.

Similarly, the fromdate will be mapped to the Start attribute.

The simple mapping of the End date and the Start date from the fromdate and the todate is not sufficient in this case. The format of the dates coming in from the HTML Form are different than those expected by the OpenTravel FastRez standard. To manage this, you’ll use the Date/Time Formatter tool available underneath the Date subtab of the Custom tab in the pallet above the mapping. Select this tool and drag it on top of the End date.

This will launch the Add Date/Time formatter dialogue. Ensure that there are no special characters in the Value text field which should just read Form/todate. You’ll then need to add the expected Input pattern and your desired Output pattern. Your input will be in MM/dd/yy format. The OpenTravel standard, an XML schema in general, expects dates in the yyyy-MM-dd format. Enter each of these patterns and then click OK.

The basic mapping is replaced by all of the logic required to map from the Input format into your desired Output format. You’ll need to do the same for the Start date. Again, drag the Date/Time Formatter tool onto the Start attribute. Remove any special characters from the value, it should just read Form/fromdate. Enter the Input pattern MM/dd/yy and Output pattern yyyy-MM-dd and click OK.

You can now continue through the mapping (you should see the following that you just created).

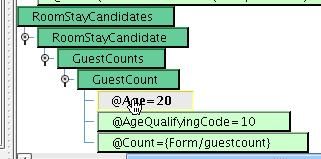
As you move down the map, move through RoomStayCandidates, RoomStayCandidate and GuestCounts. Then, underneath GuestCount you’ll see the Age, AgeQualifyingCode and Count. The only field to worry about is the guestcount. Select this field from the tree on the left hand side and use it to replace the static mapping in the Count attribute (drop it on top of this attribute). For the purposes of this demonstration, leave the standard values for Age and AgeQualifyingCode.
You’ve now completed your mapping. Click the Close icon in the Data Mapper.

You’ll be prompted to save the mapping, click Yes.

Give the mapping the name HTMLForm2AvailRq. Enter this name in the dialogue and click OK.

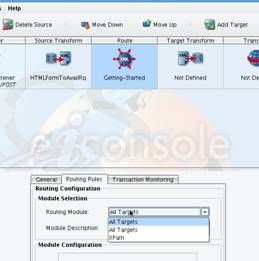
You’ll now be returned to the main XCS eiConsole route grid. You can move along to the Routing stage. Click on the icon in the Route element of the grid. In this particular case you only hav
e one defined Target System. You don’t need to do anything in terms of configuring Routing Rules. However, if you had multiple Target Systems you may use one of the other Routing Modules in order to conditionally determine which one of the potentially many Target Systems to send the data along to.
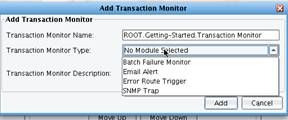
Also configured at this point in the mapping is Transaction Monitoring. Transaction Monitors are used to determine how you want to notify the operator of an interface if something goes wrong. Email, SNMP, and the invocation of another interface are just some of the mechanisms that might be used for this type of proactive notification.
Along with proactive notification, the XCS eiConsole’s companion product, the XCS eiPlatform includes out-of-the-box text logging, trace files, and database logging of all traffic flowing through the system. For the purposes of this interface, you won’t do any configuration in the Routing stage.

Now click on the Target Transform icon in the main route grid. In your Source Transformation you took data from a Web Form and mapped it onto the OpenTravel FastRez HotelAvailabilityRequest message. In your Target transformation you’ll want to take data from that common format and translate it into a format that will be acceptable to your Target system. Your Target system is going to be a toy database that models a Property Management system’s relational database. Hence, you’ll be mapping from the HotelAvailabilityRequest onto a SQL database query. To accomplish this, you’ll need to add a new Transform. Click the Add Format button.

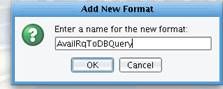
The Add New Format dialogue will appear. Name the transformation AvailRqToDBQuery. Enter this name and click OK.
The format will now be selected in the Format Profile dropdown.
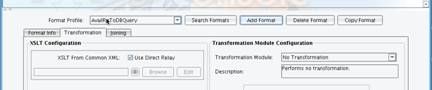
The only difference between a Target Transformation and a Source Transformation is the order of events. In the Source Transform you first convert data into XML and then use XSLT to perform the mapping onto the common model. In the Target Transform, the XSLT occurs first. You take the data from the common format, map it onto another XML format, and as required – may use another Transformation Module to take that data and further translate it into the physical format consumable by the Target System. To configure your XSLT, uncheck the Use Direct Relay checkbox.

Click the Edit button in the XSLT Configuration window.

This will again launch the Data Mapper. Click the Open Source Format icon above the left hand panel. This time, your Source Format is the OpenTravel HotelAvailability request message. Choose the XSD Format builder.
Browse for the schema file. Select it from the data directory and click Open.

Then choose Read Format.

The structure of your HotelAvailRequest message will appear in the left hand window.
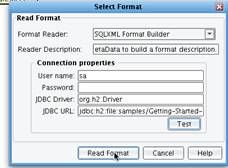
Now, click the Open target format icon above the right hand side. This time you’ll be connecting to a relational database in order to generate your mapping to a SQL query. To accomplish this, use the SQLXML Format Builder. Select SQLXML Format Builder from the dropdown. This Builder allows you to connect up to a relational database in real-time and load your tree on the right hand side based on the exposed database catalogue. An embedded database is included with your XCS eiConsole for OpenTravel FastRez distribution. Enter in the User name “sa” in the textbox and leave the Password blank. Now, you’ll need to enter in the JDBC Driver class name. You’ll be connecting to an imbedded H2 database, so the correct value here is org.h2.Driver. You’ll now need to enter the JDBC URL. Enter jdbc:h2:file and then the path to the file in your samples directory. Typically, this will be something like samples/Getting-Started-Project/data/hotel.db. Click the Test button to ensure that all of your connection properties are entered with the correct syntax.

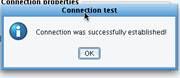
If the connection was successful, click the Read Format button.
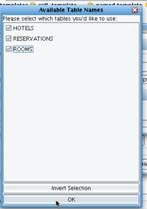
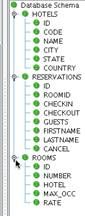
An Available Table Names dialogue should appear. If this table is blank, it means that the path to the database was entered incorrectly. You’ll want to use each one of these tables in your query.

Check all three table names and click OK.
Each of the tables in the sample database, along with their corresponding columns, will be available for viewing in the tree on the right hand side.
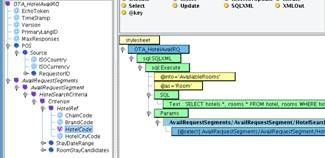
The next step is to generate the query in the database from elements in the Source. To do this, you’ll first create a mapping that occurs each time you come across an OTA_HotelAvailabilityRequest message. Click the root node. are nodes which have attributes and child nodes. generally they pretty in terchangeable. using a good analogy you can think of it this way: node is like fruit an element apple. apple kind class=”lexicon-term”>node in the tree on the left hand side and drag it to the root of the stylesheet in the middle.
You will now need to use the SQLXML structures to generate your query. To do this, select the SQLXML tab in the pallet above the main mapping. Select the SQLXML root element and drag it on top of the OTA_HotelAvailRQ element.

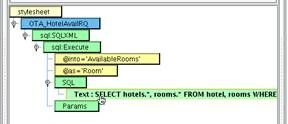
The SQLXML tag is the root of any SQLXML document. The SQLXML document is what is used by your Database SQL Transport to execute a query against an arbitrary relational database. Because you’d like to execute a free-hand query, use the Execute command. Select Execute from the SQLXML pallet and drag it on top of the SQLXML element. The general structure of the SQLXML will appear.
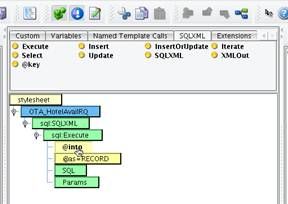
It includes two parameter names. One from the variable that you will execute the results into, and the as attribute used to determine how you will name each record in the result. The SQL element will include the actual SQL to be executed against the database, and will have a Params element for each parameter that you wish to include. Double click the into attribute.

You’ll execute the query into a variable called Available Rooms. In the Value area, enter in a single quoted value ‘AvailableRooms’ and click Enter.

Now, double click on the as attribute. Replace the default Value of Record with the single quoted value of ‘Room’. Do this and click Enter.

Now you need to structure your query. Left click on the SQL element in your mapping. Then right click and choose to Add XSLT Structures, text.
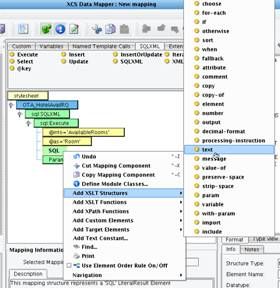
Select Text from the Add XSLT Structures submenu and a new Text element will appear. Double click this. In this Text box you’ll enter in the actual SQL query that you’d like to create. Enter the text: SELECT hotels.*, rooms.* FROM hotel, rooms WHERE hotels.code=? AND hotels.code=rooms.hotel
In this query, you’ll be joining the hotels table and rooms table on the hotel code and returning all available rooms. There is one parameter in this query, which means that you require only the default single params element in your SQLXML execute state. The parameter you’ll want to pass is the HotelCode passed in from the request. Navigate the tree on the left hand side to locate HotelCode.
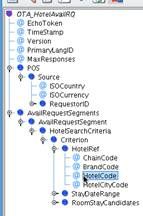
Select this attribute and drag it on top of the params element in the mapping. The full path to the HotelCode will appear.
You’ve now created the SQL execute that will execute the query and return all of the rooms available for this particular HotelCode. In a full featured implementation you might also do filtering by date, time, etc.
You’ll now want to output the results of this query to be used in subsequent stages of the interface. To do this, you’ll use the SQLXML, XMLOut tool. Select XMLOut from the SQLXML pallet and drag it on top of the SQLXML root element.

The XMLOut element includes one attribute, the variable name that you wish to output. You’ll want to output all of the available rooms. To do this, double click the var attribute and enter the Value: ‘AvailableRooms’. Hit Enter.
You’ve now completed your mapping from the OTA HotelAvailRQ message to your SQL query. Click the save icon on the main toolbar.

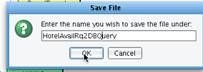
You’ll be prompted for a name under which to save the file. Enter the name HotelAvailRq2DBQuery and click OK.
Now click the Close icon to return to the Console.
You’ll now move on to the Transport stage. In the Transport stage, you’ll take the SQLXML generated in the Target Transform and execute it against a standard relational database. To do this, you’ll use the Database SQL Transport. Select this option from the Transport Type dropdown.

Give this Transport the name PMSQueryTransport.

Click the Connection configuration tab. You’ll use the same configuration information for this connection as you did in the Data Mapper in order to read your reference at the various tables. In the User name area, type sa. Leave the Password blank, Type as a JDBC Connection. For the JDBC driver, enter org.h2.Driver . For the JDBC URL, you’ll need to enter the same value that you entered in the Data Mapper: jdbc:h2:file:samples/Getting-Started-Project/data/hotel.db. Click the Test Connection button. If you get a success message, click OK.

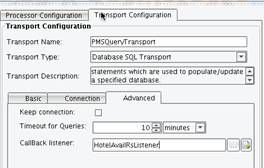
It’s important to note that this path must be the same one that you successfully used within the Data Mapper. Click the Advanced tab. The Advanced tab allows you to specify a desired Timeout for Queries, as well as whether you’d like to keep the connection open in between invocations.

It also includes a CallBack Listener. CallBack Listeners are the XCS eiConsole’s mechanism for chaining together one or more routes to produce an orchestration of various messages. In a fully built out version of this interface, you’d likely choreograph a request along with a response. That response would use a programmatic Listener whose name matches the value you enter in this CallBack Listener configuration item. In order to position this interface for future use, enter in a CallBack Listener name: HotelAvailRsListener.
You’ve now successfully configured all of the stages in your interface.
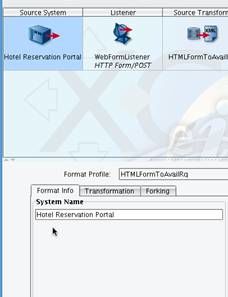
Let’s add some Metadata so that you can search and sort on this interface more easily in the future. Click on the Source System icon. On the Format Info tab you can give the system a name. Enter Hotel Reservation Portal.
You can do the same for the Target System. Call it Property Management System Database.
Now that you’ve configured the Metadata, let’s go ahead and test the interface. The XCS eiConsole testing mode allows you to test various stages of the interface. Select Switch To Testing Mode from the Route menu.

In this mode, all of the icons between your Source System and Target System are replaced by question marks, indicating a stage of a test that you may or may not choose to run. Start your test at the Listener and allow it to run all the way through to the Transport. Select the Listener icon and check the Start Test Here checkbox in the Stage Configuration panel in the lower right hand portion of the screen.

You’ll see green and blue arrows indicating where the test will start as well as which stages might be run. Now click the Execute Test button to begin your test. If you were to start your test somewhere other than the Listener, clicking the Execute Test button would prompt you with a dialogue to provide sample data. That sample data would be used as the input to this stage. However, when you start with the Listener, the Listener itself will fire up and wait for data to be passed to it. Click the Execute Test button.

In the case of a passive Listener, a dialogue will often appear indicating that it’s waiting for data to arrive.
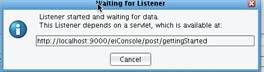
The Waiting for Listener dialogue will appear in this case indicating that it’s expecting data to be posted from a Web Form to the location http://localhost:9000/eiConsole/post/gettingStarted. You’ll note that the last part of this URL is the path that you configured as part of your HTTP Form/POST Listener. The remainder of the URL is constant for any XCSeiConsole interface. In the web directory underneath this distribution is a tutorial source HTML file. Open this file in a brower.

Fill out the form with any values that you’d like. Make sure that the check-in date and check-out date match the date formats that you expect in the mapper.
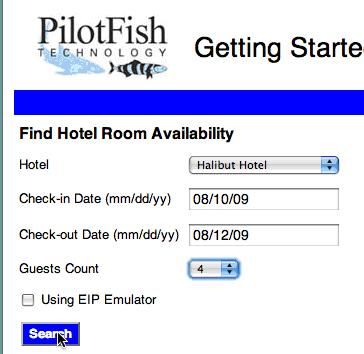
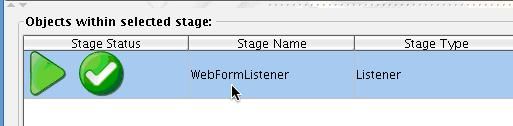
Then click Search. When you click the Search button on the HTML Form, the data will be submitted to the XCS eiConsole’s HTTP Form/POST Listener. As data flows through each of the various stages of the interface, the question marks will turn into either checkmarks (indicating success) or a red X (indicating failure). You’ll see here that all of your stages through the Transport stage were successful.

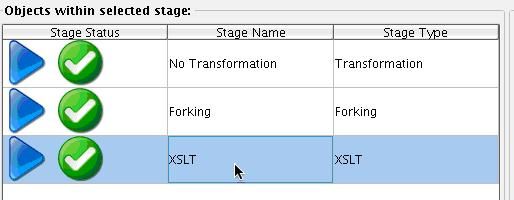
Clicking on any of the substages allows you to view the data as it appeared at that stage of the process. Select the Listener stage, and then click the WebForm Listener row in the Objects within selected stage table.
The XML data as it appeared from the HTML Form will be displayed.

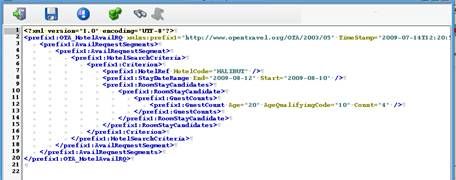
Now click the Source Transformation and double click the XSLT row in the Objet within selected stage table.
You’ll now see the data as it was mapped onto the OTA HotelAvailabilityRequest message. You’ll see that the values you input in the Form are now present in the OpenTravel message.
The Routing stage passed the data along unmodified. Click on the Target Transformation icon and then double click on the XSLT row within the Objects within selected stage table.

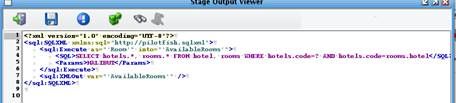
You’ll now see the SQLXML that was generated to be executed against a relational database.
Unfortunately, your connectivity to the database was unsuccessful, so you see a red X.
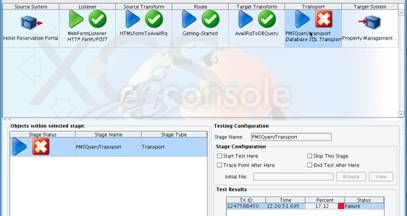
Click on the Transport stage and then click on the PMSQueryTransport within the Objects within selected stage table. Double clicking that row will display not the data but an error message. You can see the error message from the database. The table called HOTEL referenced in your query was not found.

To remedy this, you can return to the Data Mapper and fix the name of the table. Under the Route menu, switch back to Editing Mode. Click on Target Transform and then select Edit in the XSLT configuration area.

Reviewing the SQL that you created, you selected from the tabl
es hotel and room. Referencing your database schema on the right, you can see that the table name is HOTELS. To edit this information, double click on the text Node underneath SQL.
Change the name hotel to hotels. Hit Enter. Save your mapping. Then click the Return to Console icon.

Now, return to test mode by selecting Switch to Testing Mode in the Route menu. Again, start your test with the Listener. Click on the Listener icon, check start test here. Then click Execute Test.

Return to your form and resubmit.

In this case, each one of the stages completed successfully.

Click on the Target Transform stage. Double click on the XSLT sub-stage. You can now see the corrected SQL.
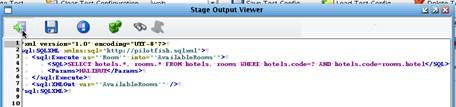
The Transport stage now has a green checkmark associated with it. Click on the Transport stage and then double click on the PMSQueryTransport row in the Objects within selected stage dialogue. Double clicking this row will bring up the XML stream generated by the database SQL transport.

You’ll see the AvailableRooms tag is the root of this element. This is the name that you provided in the XMLOut element of the XSLT. You’ll see that each row returned from the query is labeled as a room. Again, this is because you chose room as the record name within the SQLXML execute stage. Each column in the result is now generated as an XML tag, with the content of that column in the body of the tag. When running as a full interface on the XCS eiPlatform, this data will be passed along to the Listener specified in the call-back Listener configuration item of your database SQL transport. For the purposes of today’s demonstration, you’ll end your test here.
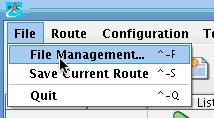
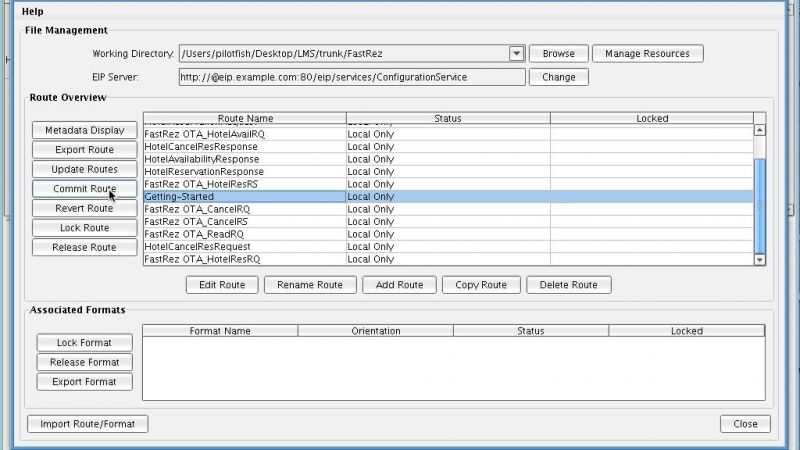
If you’re a licensee of the XCS eiPlatform, you would then deploy this interface into the server instance. Chose File Management from the File menu to return to the File Management window.
Select your newly created interface from the Main Route Grid. Click the Commit Route button.
This concludes the Getting Started Tutorial of the XCS eiConsole for OpenTravel FastRez.