
Welcome to the XCS eiConsole Getting Started Tutorial, demonstrating support for SAP’s IDoc formats. During the course of this tutorial, you’ll generate the CreatePurchaseOrderIDOC interfaces are the highest-level of visible abstraction within eiconsole. any given>Interface is defined by one or more Routes. ” class=”lexicon-term”>interface.
In this Interface, you’ll consume an XML representation of a Purchase Order, presumably coming from a Point of Sale System, pick it up from a directory, translate it into an IDoc format, and then drop the result in another directory. Let’s get started.
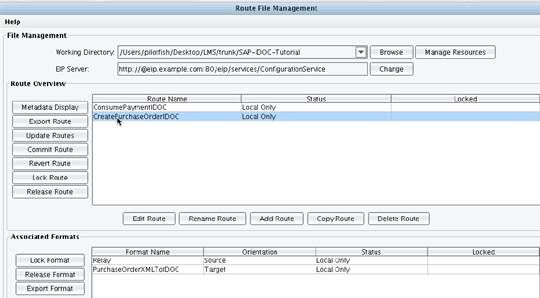
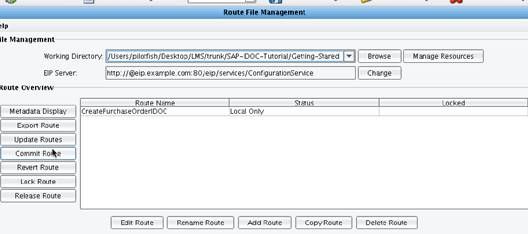
When you first launch the XCS eiConsole you should see the Route File Management window. The first thing you’ll need to do is create a new project directory where you’ll house your interface. To do this, click the Browse button next to the Working Directory drop down.
Click the New Folder icon.
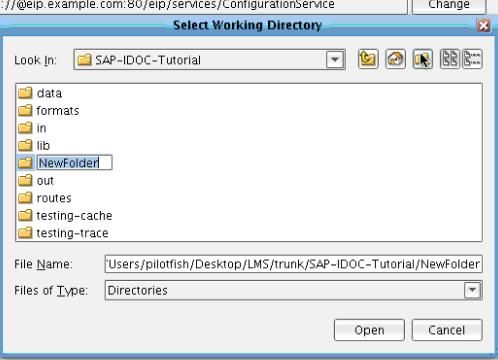
Name the folder Getting-Started. Select the folder in the dialogue and click Open.

When prompted to initialize the directory click Yes.

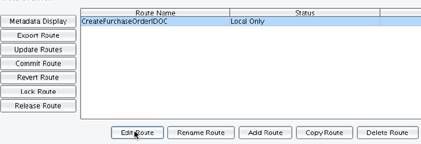
Your next step will be to add a route to the new Working Directory. Click the Add Route button underneath the Main Route Grid.

Enter the name CreatePurchaseOrderIDOC and click OK.

A new row will appear in the Route Overview Grid. Click the newly created route and then the Edit Route button beneath the grid.
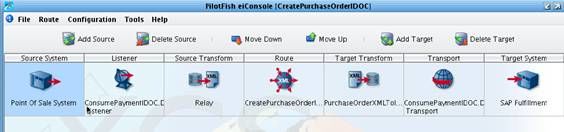
You’ll now be taken to the main XCS eiConsole view. You’ll now need to define a Source System and a Target System. Click Add Source…

And Add Target.

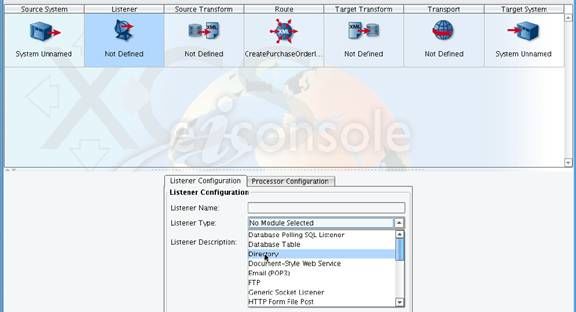
Your interface template is now presented to you with the Source System, Listener, Source Transform, Router, Target Transform, Transport, and Target System. Your next step will be to configure each one of these stages. Start with the Listener. Click on the Listener icon. The Listener Configura
tion tab will appear below. This allows you to determine how you want to accept data in from the Source System. Since you’ll be picking the data up as a file from a network directory, click the Directory option.
A set of configuration tabs will appear. Those marked with the red circle indicate a required field. In the Polling interval configuration area, change the -1 to a 10, indicating that you’ll poll the directory every 10 seconds.

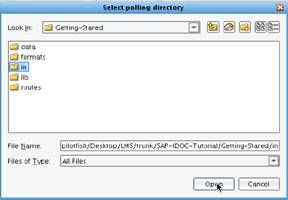
Next, you’ll select a polling directory by clicking the three dots next to the Polling directory configuration item.

This will bring up a file dialogue. Again, create a new folder. Give it the name in. Select the in folder and click Open.
This means that you’ll poll the in folder every 10 seconds. In the File name restriction configuration item enter the name purchase-order, meaning that you’ll only process files with purchase-order in the file name. In the File extension restriction, enter xml, indicating that you’ll restrict files that you pick up to those with an xml extension.
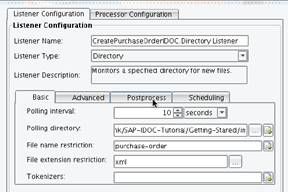
Next, click on the Postprocess tab. This allows you to define how you’ll handle the file after it’s been processed. Rather than the default of deleting the file, select Move from the Postprocess operation drop down.

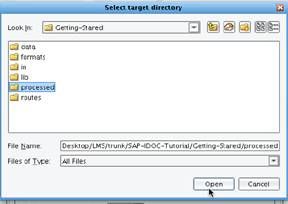
The Target directory will become required. Click the three dots next to the Target Directory configuration item…

And create a new folder called processed. Click Open to select that folder.
You’ve now completed the Listener Configuration.

Next, move on to the Source Transform. Click on the Source Transform icon in the main grid.

You’ll now need to select the Transformation to use. In this case, you’ll need to create a new one that does nothing; you’re simply going to use your Purchase Order XML as the canonical model. To accomplish this, click the Add Format button.

Enter the name Relay. Relay is conventionally used when you want to do a transformation that doesn’t involve any manipulation of the inbound data. Click OK.

The newly created Relay format will appear in the Format Profile drop down. You’ll now see the Transformation Module and XSLT Configuration. For your first transform, you’ll do No Transformation Module and use Direct Relay for the XSLT Configuration, so no further work needs to be done here.

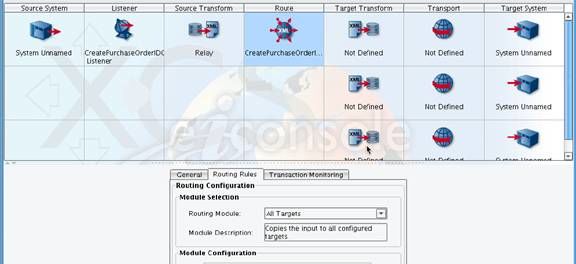
Next, click on the Route stage. The Routing stage allows you configure Routing Rules that determine (if you had multiple Target Systems) which one, or which several of the Targets to send the data to. In this case, you have just one Target System. Because of this you can keep the All Targets Routing Module selected.
In production interfaces are the highest-level of visible abstraction within eiconsole. any given>Interface is defined by one or more Routes. ” class=”lexicon-term”>interfaces, you’ll also typically set up Transaction Monitors that will allow you to describe how you should be proactively notified if an error occurs.

Again, for the purposes of this demonstration, you won’t include any Transaction Monitors.

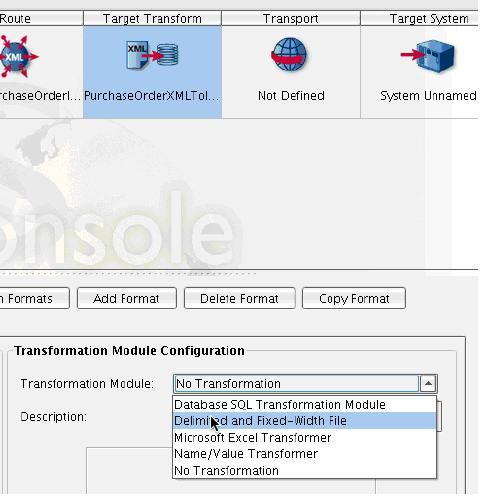
Next, click on the Target Transform icon.

The bulk of your transformation work will be done here. This is where you’ll take your XML representation of the Purchase Order and translate it first into an XML representation of the IDoc, and then into the Fixed-Width IDoc format itself. To do this you’ll need to add a new format. Click the Add Format button.

Name this PurchaseOrderXMLToIDOC and click OK.

A new Transformation Configuration tab will appear. This time you’ll need to implement both the XSLT and Transformation Module. Uncheck the Use Direct Relay checkbox in the XSLT Configuration area. This
will enable the Browse and Edit buttons that allow you to manipulate the data mapping. Next click Edit.

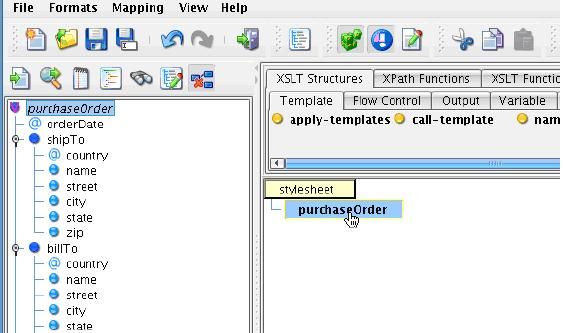
The XCS Data Mapper will appear. The XCS Data Mapper is the tool used to generate the logical mappings between the Source and Target data formats through drag and drop. When you see a blank mapping, there are three panels. The panel on the left will be loaded with the Source Format, the panel on the right to be loaded with the Target format, and a larger panel in the middle where you’ll drag and drop the two together to create the logical relationships between fields.
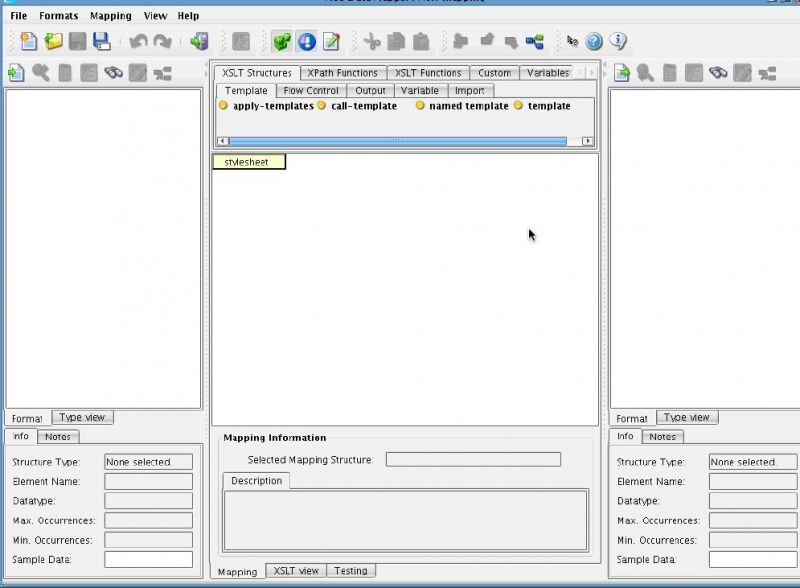
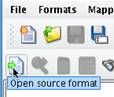
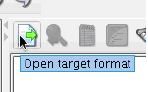
To load in the Source or Target format, click the Open Source or Target format button.
Start with the Source. The Select Format dialogue will appear. Since your Source is an XML file, you can use either the XSD or the XML Format Builder. You’re presented with only a sample XML file, so you’ll use the XML Format Builder. Select this choice from the Format Reader dropdown.

A configuration area allowing you to select multiple XML files will appear. Click the Add button beneath this.

Underneath the tutorial’s distribution directory there will be a data folder. In this data folder a file called purchase-order.xml will appear. Select this file and click Open.

Now click the Read Format button.

When the prompt asks whether you’d like to use this as Source sample data, click Yes.

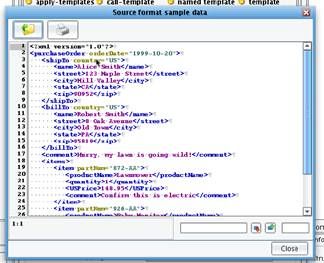
The structure of your Purchase Order XML file will appear on the left hand side of the screen. Clicking the View Sample Data icon will bring up the file that you just loaded in.

You’ll see the sample Purchase Order XML. Click Close.
Now, load in the Target format. Click the Open Target Format button above the Target panel.
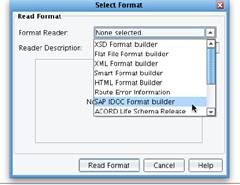
Since your target is an SAP IDOC, choose the SAP IDoc Format Builder.
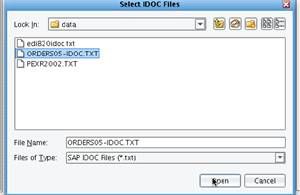
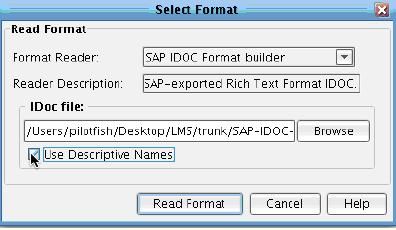
You will now be prompted to select an IDoc file. The IDoc file that is accepted by the XCS eiConosle’s SAP IDoc support is a text export of the IDoc format from the SAP environment. To learn how to export an SAP IDoc format, consult your SAP documentation. Click the Browse button next to the IDoc file configuration item.

Again, in the data folder that comes with the tutorial, you’ll see a file called ORDERS05-IDOC.TXT. This is an unmodified file exported from the SAP environment for the ORDERS05 IDoc type. Select this file and click Open.
A checkbox allows you to determine whether you want to use longer, more descriptive names for the fields defined in the IDoc. In this case, select the checkbox. Then click the Read Format button.
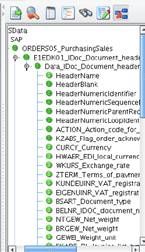
The tree on the right hand side will now be populated with the IDoc ORDERS05 format, including all segments and corresponding fields. Next, your job is to create the relationships between your Source format and your Target format.
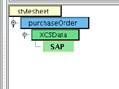
The first step is to set up the root of the mapping. To do this, select the root element of the Source tree, the purchaseOrder XML element and drag it on top of the stylesheet element in the main panel. A blue purchaseOrder node. are nodes which have attributes and child nodes. generally they pretty interchangeable. using a good analogy you can think of it this way: node is like fruit an element apple. apple kind class=”lexicon-term”>node will appear. This means for each purchaseOrder Node that you encounter when processing the inbound file, you’ll generate any children you place underneath it.
You’ll now need to begin to create the SAP IDoc structure. To do this, select the XCSData node from the Target tree and drag it on top of the purchaseOrder.
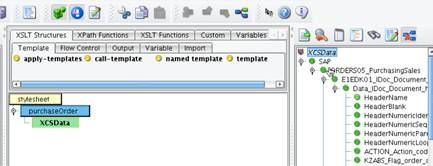
Do the same for the SAP node, dragging it now on top of the XCSData node.
Next, drag the ORDERS05_PurchasingSales element on top of the SAP node. This indicates the type of IDoc that you will be generating. ORDERS05 is the technical SAP IDoc name, with the long name following the underscore.
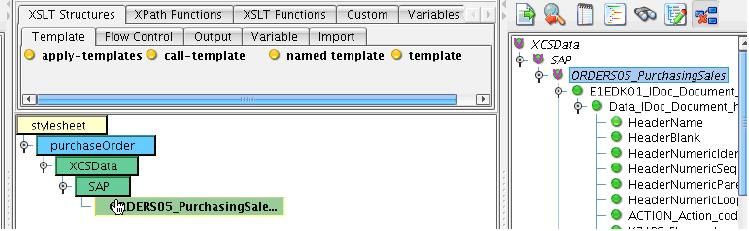
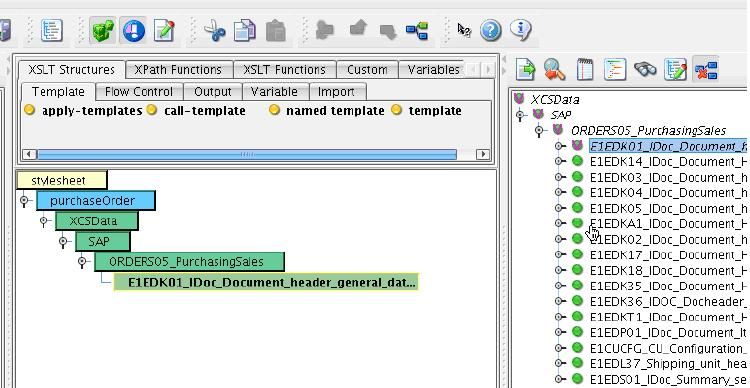
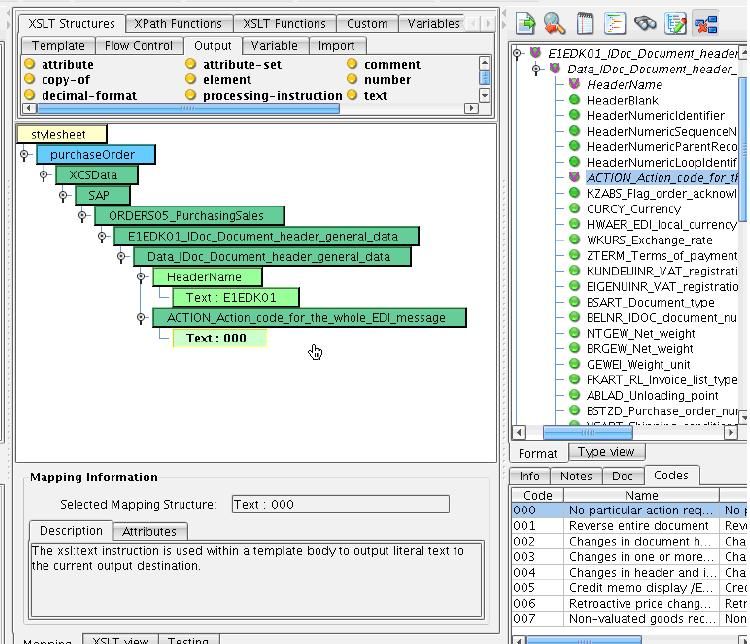
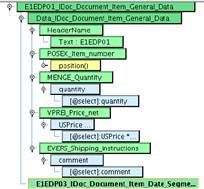
What follows in the Target tree are all of the allowed IDoc segments. The first segment that you’ll use is the E1EDK01 segment which is the document header. Select this segment and drag it on top of its parent, the ORDER05 IDoc element.
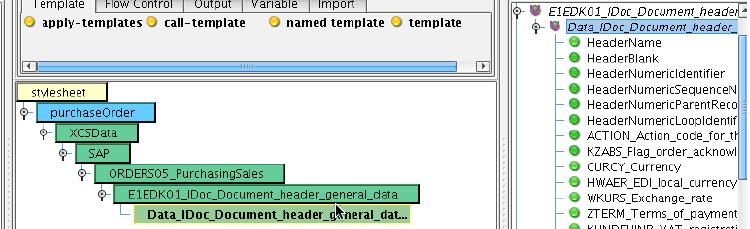
Now, in the Target tree, expand this. Underneath this you’ll want to include some of the general data. To do that, drag the Data_IDoc_Document_header_general_data element on top of the E1EDK01 element.
You’re now down to the field level. In this tutorial, you’ll include two fields: HeaderName and Action Code. Drag HeaderName underneath the Data element and do the same with the Action element.

In this IDoc you’ll include constant values for each of these. To assign a constant value to a field, underneath the XSLT Structures tab above the main mapping, choose the Output sub-tab and use the text tool. Click on the text tool with the yellow icon next to it and drag it on top of HeaderName. A green text node will appear. Double click this and enter the name of the segment E1EDK01 and hit Enter.

The HeaderName field will now be populated with that constant. Repeat this process, dragging the text node onto the Action field. Double click the text node, and in this case you’ll refer to the code lists available underneath the tree on the target side. Click the Codes tab. This gives you the allowable actions. Choose to use the action code 000 and then click Enter.
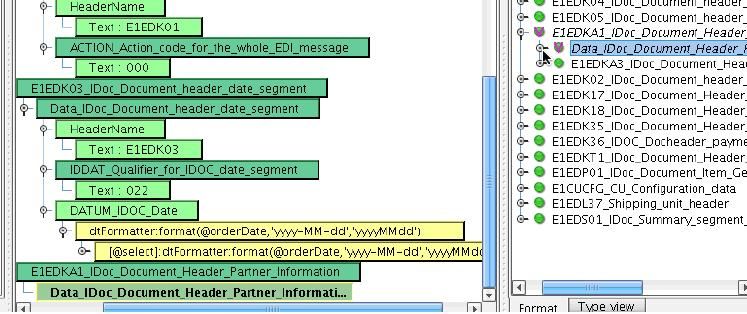
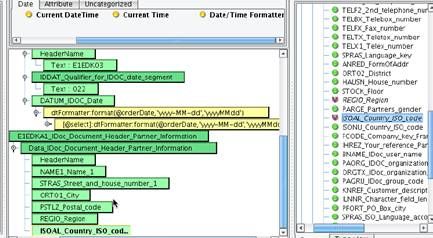
You’ll also want to include the date. Add an IDoc document header date segment. This is the E1EDK03. Select this element and drag it on top of its parent, which again is the root of the IDoc (ORDERS05_PurchasingSales).
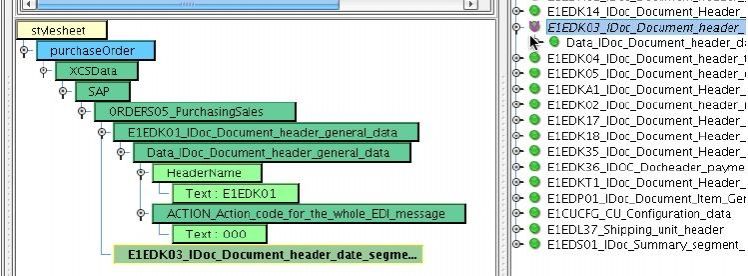
You now need to drag over the Data segment underneath the E1EDK03.
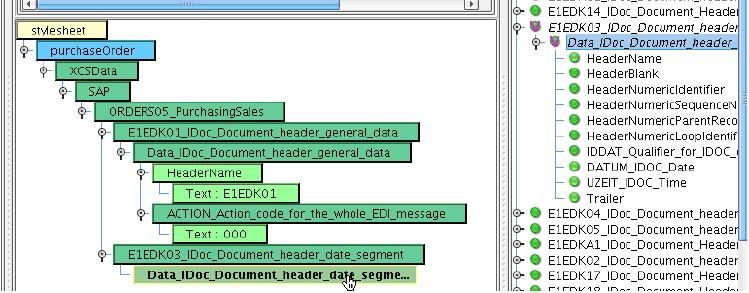
You’ll include three fields: HeaderName, Date Qualifier, and the Date itself. Drag HeaderName, DATUM_IDOC_DATE, and IDDAT_Qualifier all on top of its parent, the Data_IDoc_Document_header_date_segment.
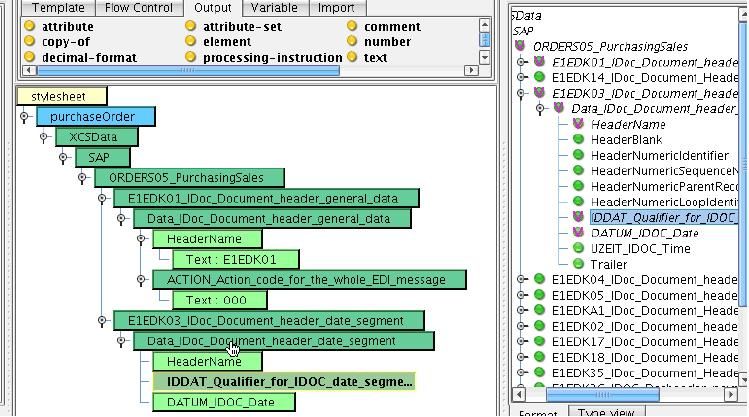
The Header, as typical, will be hard coded to the value of the name used in the segment. Drag the text node on top of HeaderName. Double click Text and add E1EDK03.
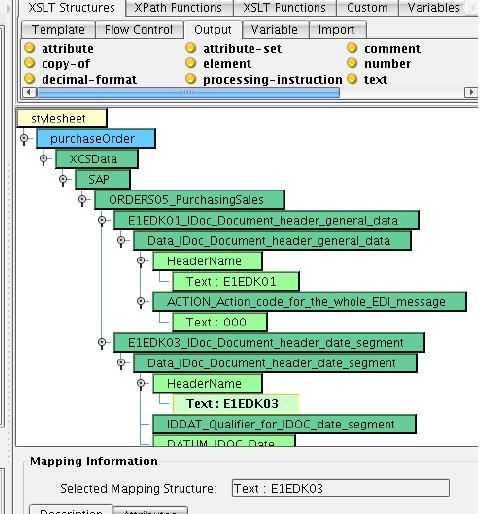
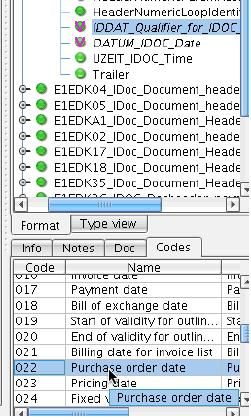
The Date Qualifier will be selected from the Codes list. Again, select the qualifier in the right hand tree and look through the codes at the bottom. The date that you’ll map here will be the orderDate in your purchaseOrder, so you’ll need to find a code that matches that. If you scroll through the list, you’ll see that 022 is the Purchase order date.
Again, drag a text node onto the Qualifier, and enter that value 022.

The final field in this segment requires data to be mapped from your Source, that is, the orderDate itself. Select the orderDate in your Source tree and drag it on top of the DATUM_IDOC_Date field in the mapping. This will copy the value from the orderDate into the DATUM_IDOC_Date element.

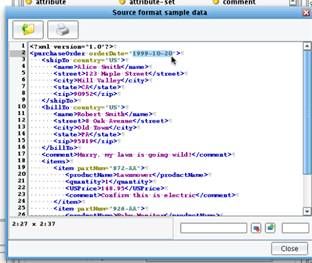
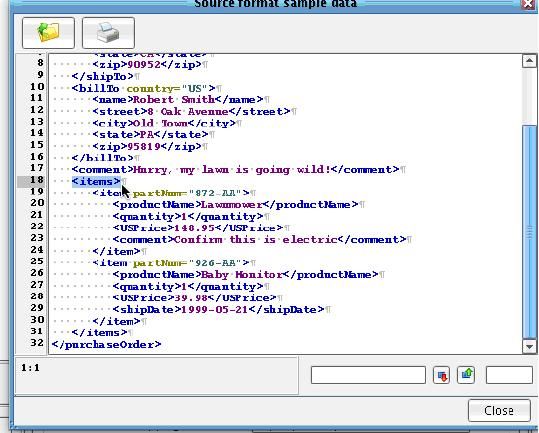
If you look at your sample data…

You’ll see that this is the order date provided. The date here is in yyyy-MM-dd format; however, the IDoc format requires an 8 character date representation.
To accomplish this, choose the Custom tab from the pallet above, choose the date sub-tab, and then select the Date/Time Formatter. Drag the Date/Time Formatter onto your newly mapped orderDate. The Add Date/Time formatter dialogue will appear. You can enter your expected input pattern, which you’ve seen as yyyy-MM-dd, and the desired Output pattern, which is the same with the dashes removed yyyyMMdd. Enter these values and click OK.

The blue node is replaced by a yellow node that will handle all of the date formatting of the orderDate attribute that you’ve mapped to the DATUM_IDOC_Date.

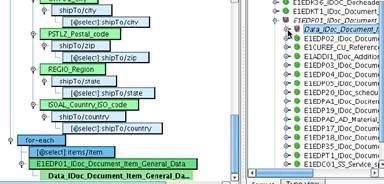
The next segment that you’ll map will contain information about the shipping address. In the IDoc ORDERS05, this is stored in the E1EDKA1 segment. Select this from the Target tree, and drop it into your IDoc mapping on top of ORDERS05. Expand it in the Target tree, and add the corresponding data element.
For this, you’ll enter quite a few fields. You’ll want the: HeaderName, Name1, STRAS, ORT01, PSTLZ, REGIO, and ISOAL. Drag each one of these onto the map.
You’ve now created the general structure for the fields that you want to populate in this segment. You’ll now need to map the appropriate values from your source onto each one of these. Again, the HeaderName is static. You’ll again repeat the common process of using the XSLT Structures Output tab and its text tool, dragging it onto the HeaderName, and entering E1EDKA1.
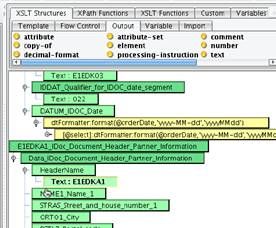
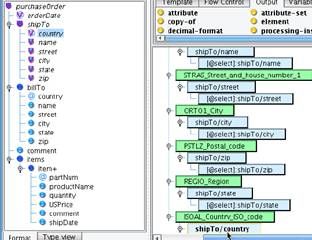
The Name element will be populated with the name from the shipTo element in your Source. Select name underneath shipTo underneath the purchaseOrder and drag it on top of the Name1 field.

Repeat this process by mapping street to STRAS, city to ORT01, state to REGIO, and zip to PSTLZ_Postal_code.

Map the attribute country to the Country code.
You’ve now mapped everything you want from the shipping address. The next thing you’ll need to do is enter in information about the items that will be purchased. If you refer again to your sample data, you can see that you have multiple items to be purchased underneath an items tag, each one represented by an item tag and its children. To represent this in IDoc, you’ll need a repeating segment.
T
o handle this, underneath the XSLT Structures tab, you’ll use the Flow Control sub-tab and the for-each structure. Scroll to the top of your mapping and drag the for-each tool on top of the ORDERS05 IDoc.

A new for-each element will appear. You’ll want to repeat this process for each item tag that you see in your Source. Select the item element in the Source tree and drag it on top of the for-each block.

Now, you’ll need to determine what you want to generate for each occurrence of items/item. Individual items in the purchaseOrder are represented using the E1EDP01 segment. Select this IDoc segment from the Target tree and drop it on top of the for-each.

Expand it, and then choose the Data_IDoc_Document_Item_General_Data segment and drag it on top of the E1EDP01.
Basic information about the price and quantity of the item being purchased will appear here. The fields that you’ll include in the mapping are the: HeaderName, POSEX_Item_number, the MENGE (which is the quantity), the VPREI (which is the net price), and the shipping instructions – EVERS. Drag each one of these on top of the newly created element.
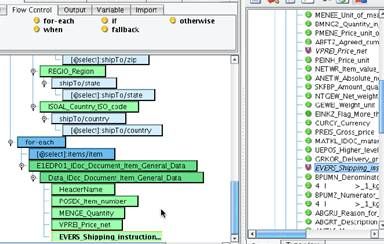
Next, you’ll need to map to each of these. For the HeaderName, again enter in the text constant E1EDPO1.

For the item number, you can look at the documentation and see that this is the number of the item in the current document; that is the sequence number. To do this, you’ll enter in a special value-of. Underneath the XSLT Structures tab, in the Output sub tab, choose the value-of tool and drag it on to the POSEX field.

A blue value-of element will appear. Double click it’s sub-element, and enter in the function position() with an opened and closed parentheses. This will generate an auto generated sequence number each time this field is output, that is the first one will have a 1, the second a 2, and so on.
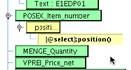
The quantity will be mapped directly from the quantity field of the item. Drag quantity from the left directly onto the field MENGE_Quantity.
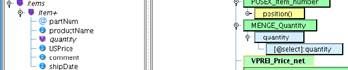
If you look at the price, you’ll see that the price is the net total price, which is the quantity times the US price. To do this, drag USPrice from the item onto the VPREI element. Expand it, and double click its select node.
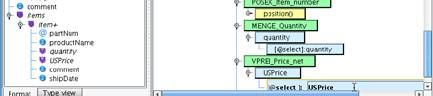
This will allow you to edit it in-line and add the computed value. Keep the USPrice, add an *, and type quantity. This will now populate the VPREI field with the result of multiplying the US price times the quantity.

The final element that you’ll populate here is the shipping instructions. Map the comment from your item onto these shipping instructions. Simply drag and drop comment onto this field.
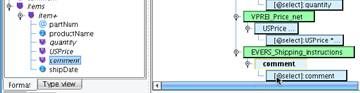
Next, you’ll need to create a couple of sub-segments. You’ll need to create an E1EDP03 to represent your shipping date. You’ll also need to create information to contain the object identifier, the part number and the product name. You’ll use the E1EDP19 segment for that. Start with the date. Underneath the E1EDP01 you can find all of the allowed sub-segments. Locate the E1EDP03 and drag it on top of its parent, the E1EDP01.
Expand it, and then drag the Data Segment on as well. In this segment, you’ll include the HeaderName, the Qualifier, and the Date itself. Drag HeaderName, IDDAT_Qualifier, and DATUM_Date all onto the mapping.

For HeaderName, again use the text tool to add the constant E1EDP03. The Date Qualifier comes from a code. Browse the codes, and you’ll see that what you want is something to represent the shipping date. You’ll see that that value is 010.
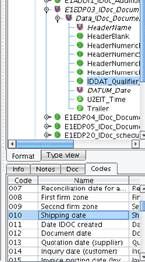
Use the text tool to enter this constant.

The DATUM_Date field will be populated with the shipDate underneath item. Drag shipDate onto DATUM_Date.

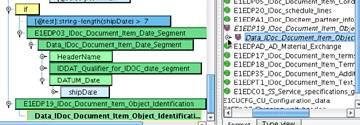
However, if you return to your sample data, you’ll see that not in all cases do you have a shipping date. This means that you don’t always need this segment. To make the creation of this segment conditional on the existence of a value in shipDate, you can use an XSLT conditional structure. Under the XSLT Structures tab, in the Flow Control sub tab, drag the if tool just above the Date_Segment.

Then, select the E1EDP03 segment in the main mapping, and drag it upwards on top of the if. This will make creation of the E1EDP03 segment conditional on the condition that you place in the test area.

Double click the test attribute underneath the if. You’ll only include this if the string-length(shipDate) > 7. Enter in this condition and click Enter.

You’re now done with the date segment.
Pause for a moment to save your work. Click the disk icon in the toolbar.

Enter in the name POXMLToIDOC and click OK.

The final item that you’ll need to map is the E1EDP19 segment. Locate this sub-segme
nt, and drag it on top of the E1EDP01. It will appear at the right place in the map. Expand this in the Target tree, and also include the Data segment underneath.
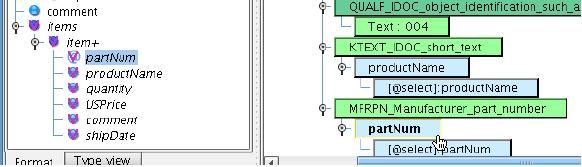
This segment will include information about the object’s identification. Include the HeaderName, the Object Identification Qualifier, the short text (KTEXT), and the Manufacturer Part Number (MFRPN). Drag each of these on top of the data segment.
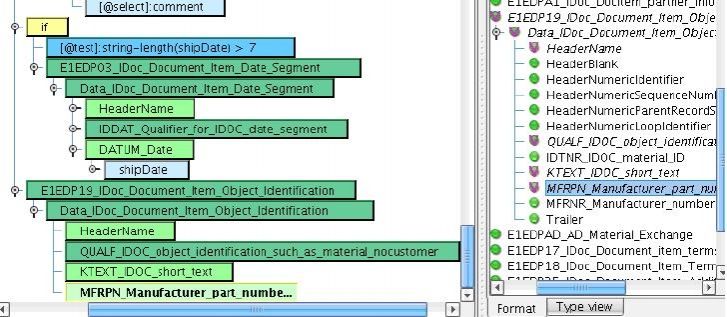
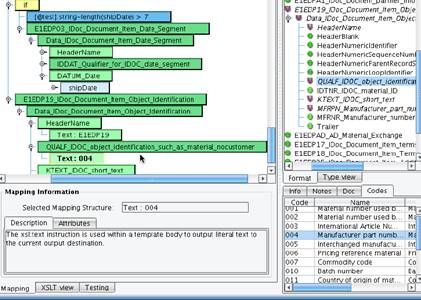
As usual, use the text element underneath XSLT Structures Output and drag it onto header name and enter in a matching constant value: E1EDP19. The Object identification describes the type of description that you’ll be using here. You’ll see that you’re using the Manufacturer’s part number. Underneath the Codes list, you’ll see that the corresponding value is 004. Add a text constant to represent this.
Map the KTEXT element to the productName from the Source. Drag productName onto KTEXT.
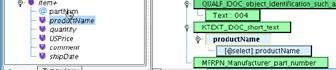
And the partNum attribute to the MFRPN field that contains the Manufacturer’s part number.
You’ve now complete the mapping. If you click on the XSLT view tab, you can see that all of the code required to generate this mapping has been created in W3C compliant XSLT. You can jump back and forth between the XSLT view and the Mapping view at will. They’ll be kept in synch with one another.
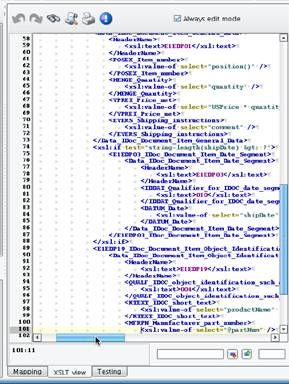
If you click on the Testing tab, you’ll see that the top panel includes your Source data, your XML Purchase Order. Clicking on the Gear Icon will execute your transformation.
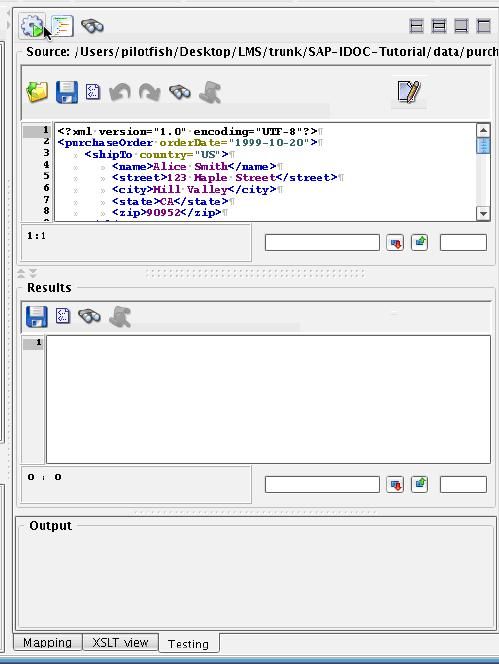
The results of the transformation, an XML representation of the IDoc, will appear in the Results pane.
It all looks good, so click the save button at the top of the screen, and choose the return to console button.
![]()
![]()
You’ve now completed the logical mapping from the Purchase Order XML onto the XML IDoc format. The next thing you need to do is to set up a transformation module that will take that IDoc XML and lay it out in the appropriate Fixed-Width format. In the Transformation Module Configuration area in the Transformation Module drop down, select the Delimited and Fixed-Width File Transformation Module.
Then, click the Edit button in the basic configuration area.

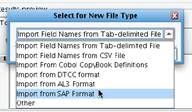
This will launch the XCS File Specification Editor. This tool is use to convert flat file data, or delimited data, to XML, or vice-versa. You’ll be presented with a Select for New File Type dialogue. From the corresponding drop down, select Import from SAP Format and then Next.
In the data directory accompanying this tutorial you’ll see a file called ORDERS05-IDOC.TXT, the same file that you used in the Data Mapper to load the right hand side of the screen. Select this and click Open.

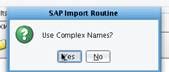
Again you’ll be prompted and asked whether you want to use Complex Names. Click Yes.
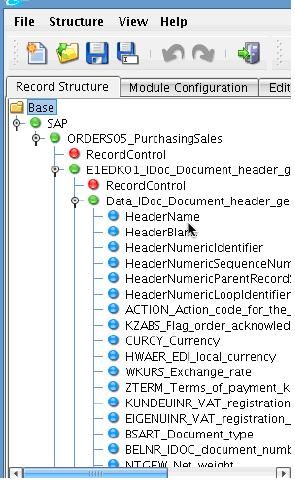
The tree on the left hand side of the screen will be populated with the IDoc definition.
That’s all you need to do here, so click the Save button in the File Specification Editor.
When the Save File dialogue appears, enter the name SAP-PurchaseOrder-IDOC-Spec and click OK.

Then, click the return to console button.
![]()
![]()
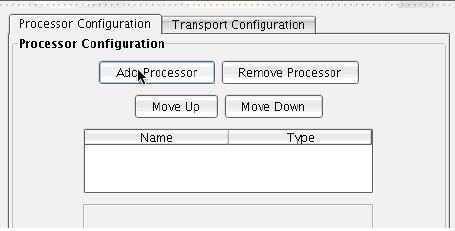
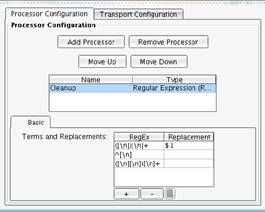
You’ve now completed configuration of your Target transformation. The final stage that requires configuration is the Transport. The Transport includes both a Processor and a Transport Configuration tab. Start with the Processor Configuration. Processors allow you to do general work over the data stream before you send it out to your Target system. One of the things you might do here is to clean up data. In fact, let’s do that. Click the Add Processor button.
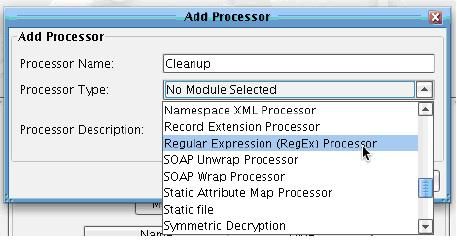
The Add Processor dialogue will appear. Replace the default Processor Name with the name Cleanup and in the Processor Type dropdown select the Regular Expression Processor and click Add.
The Regular Expression Processor will take the incoming data stream and do regular expression replacements over that data stream. When processing data and generating an SAP IDoc, it’s possible that the resulting file can have extra newlines at the end. You’ll generate a processor that allows you to remove
those newlines using regular expressions. In the basic configuration tab for your Cleanup processor click the plus icon.
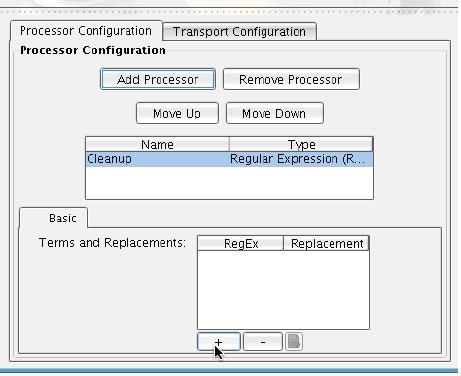
A new row will appear in the Terms and Replacements table. Click on the RegEx column of the first row and enter in the following ([n])[n]+. This regular expression will replace any set of newlines next to one another with the variable value of $1, which you should enter into the Replacement column.
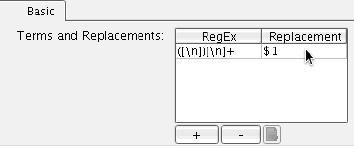
Click the + button again. Enter in the following additional Replacements: ^[n] replaced with nothing; and enter ([n][n])[n]+. As a result of this Processor configuration, extra newlines and end characters will be removed from the output after the Target transformation. For additional information on regular expressions, please consult the documentation.
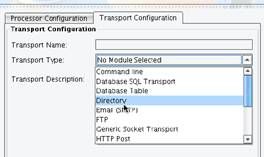
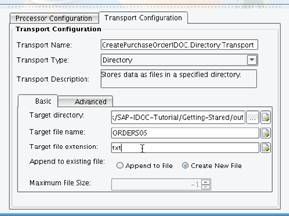
Finally, you’ll need to configure the Transport itself. Click on the Transport Configuration tab, and again choose Directory from the Transport Type drop down.
The Directory Transport Configuration panels will appear. The Target directory, file name, and file extension will be required. Click the … next to the Target directory configuration item on the Basic tab.

In your project directory, click the New Folder icon and enter in the name out. Select that folder and then click Open.

For the Target file name enter ORDERS05. For the Target file extension enter txt.
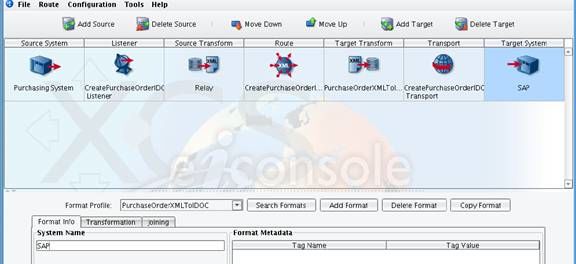
You’ve now completed configuration of the Transport. Before you move on to test the interface, add some simple Metadata. Click on the Source system icon. The Format Info tab will appear with Metadata about the Source system. In the System Name text area enter in Purchasing System.

Now click on the Target System icon. Again, the Format Info tab will include a System Name configuration item. Enter in the value SAP. The system name and Metadata is purely for information purposes. It can be used to search and sort your Interfaces at a later date and time.
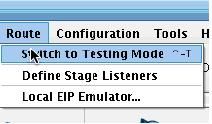
Now that you’ve configured all of the stages between the Source and Target, move to the testing mode to test your interface. But first, save your work. Under the File menu, choose Save Current Route.

Under the Route menu, select Switch to Testing Mode.
In testing mode the icons between the Source system and the Target system are replaced by question marks, indicating the stage of a test that you might choose to run. For your tests, start with the first portion of the Source Transformation. Click on the question mark in the Source Transform column, then select Start Test Here in the Stage Configuration area.

A green arrow will appear indicating this is the first stage that you’ll run of the test. Each subsequent stage will be represented by a blue arrow. Now, click the Execute Test button. You’ll be prompted to provide a sample file.
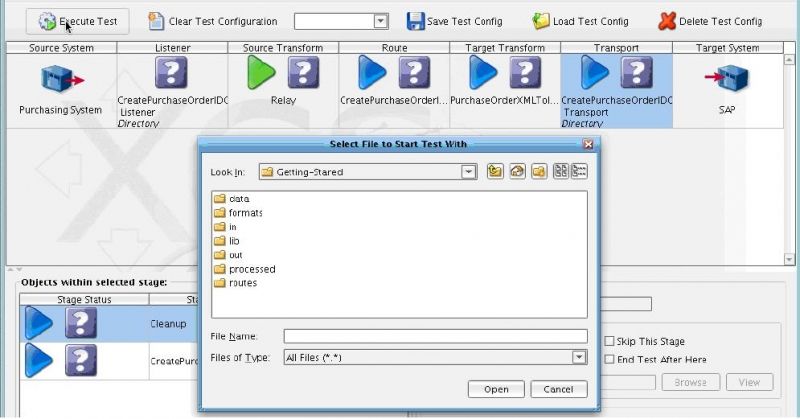
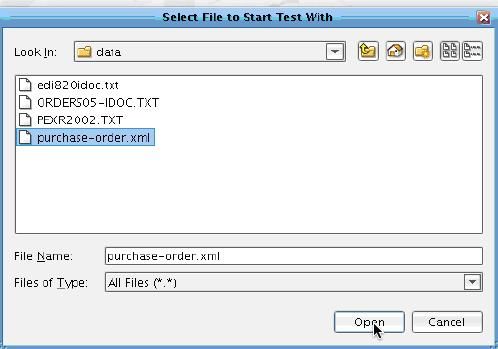
Here, you’ll need to provide the purchase-order.xml file. It’s included in the data folder of the tutorial. Select this file and click Open.
As each stage completes the question marks will turn into checkmarks indicating that the stage was successful. If you see a red X you can double click on that X, see the error, and try to correct it. Click on the Source Transform icon and then click View next to the initial file configuration item.
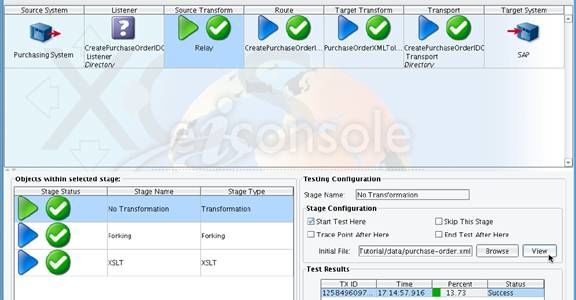
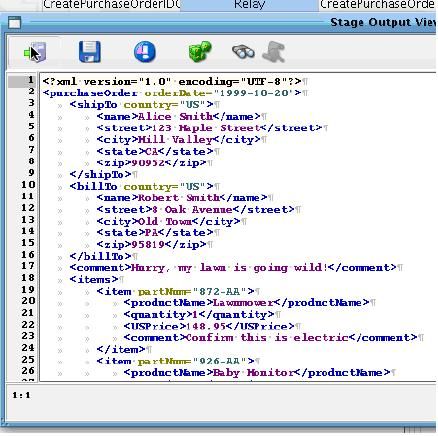
You’ll see the Purchase Order XML file that you’re using as your input. Close this by clicking the return to console icon.
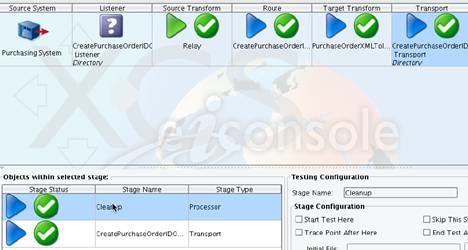
No further work with the data is done in the Source transform or the Routing stage so you can move past these. Next, click on the Target Transform icon and double click on the XSLT row in the Objects within selected stage panel.
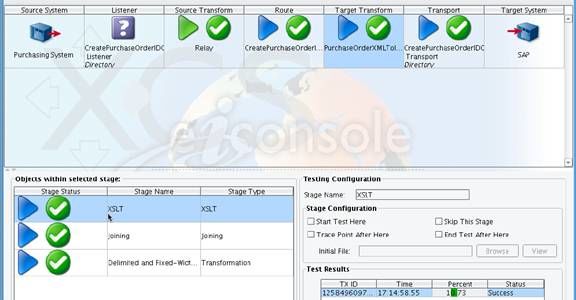
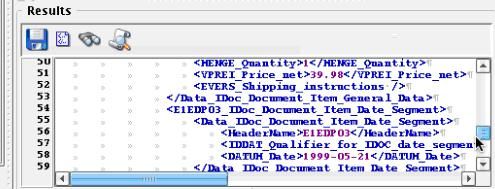
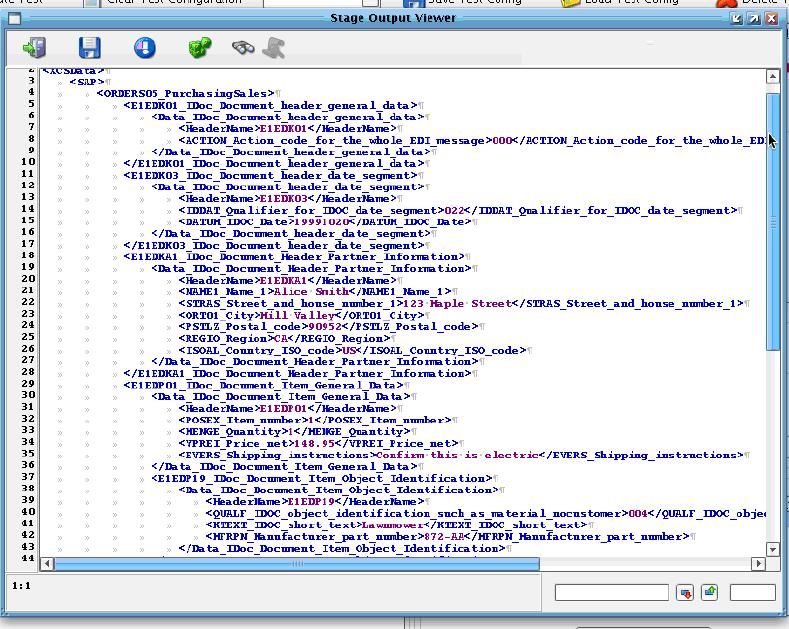
This will show you the results of your XSLT; that is the XML representation of the Purchase Order IDoc. You can see the values from your XML Purchase Order being mapped into this format.
In the Objects within Selected Stage dialogue you can double click the Delimited and Fixed-Width File Stage.

This will bring up a representation of the IDoc itself after it has been translated into the Fixed-Width format.
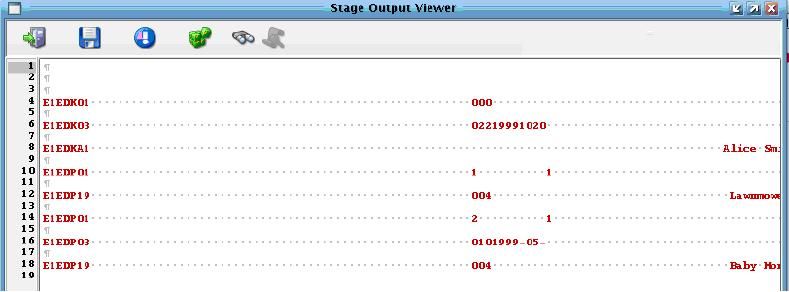
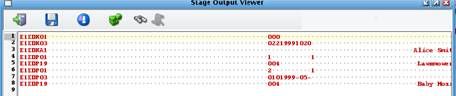
You’ll note that the transformation yielded some extra newlines. Next, click on the Transport icon. In the Objects within selected stage panel double click the Processor row.
You’ll see that the cleanup Processor ran the regular expression and removed all of those extra newlines. The result is a partial Purchase Order IDoc.
Once you’re happy with your test results you can return to the File Management screen. In the File menu, choose File Management.
If you’ve licensed the XCS eiPlatform, you would then take the configuration files generated
and deploy them to an eiPlatform server either through the automated interface available through the eiConsole or by moving the project files to your eiPlatform server environment manually.
This concludes the XCS eiConsole tutorial for generating SAP IDocs. To summarize what you’ve done, you’ve created a new route and configured each one of the different stages: a Listener to pick up the file from a directory, a Source Transformation to relay the information along, a Routing module to route the data to All Targets, and then a Target transformation, first to map your inbound XML file to an XML representation of the IDoc using the XCS Data Mapper, and then you used the File Specification Editor to specify the IDoc’s Fixed-Width layout. Finally, you implemented a Regular Expression processor to cleanup the results of your Target Transform, and created a Directory Transport to drop your results off in a local directory.