eiConsole v.20R1
eiConsole Tutorial Basic
Creating a Simple Route
Overview
In this brief tutorial, we’ll cover how to create a simple Route in the eiConsole. This Route will be configured using a Listener and Transport pair called the “Directory Listener” and “Directory Transport.” Testing or running the Route will pick up files in one source directory and deliver them to a target directory with different names.
How to Use This Example
Download the INTERFACE to get started. (Once logged into the eiConsole it immediately shows up in your “PIE” inbox for use.)
Note: if you are not logged in to the eiConsole, or have arrived at this page via a browser, you will be prompted to log in before the interface downloads into your eiConsole “PIE” inbox. Or if you have not downloaded and installed a FREE eiConsole Trial, you will have the opportunity to register after you click the Interface Download link. Once you are logged in the interface will automatically download into your “PIE” inbox. First, you’ll see a screen pop up indicating that a new product is ready for download. Select the Download Now button. Once you’ve downloaded the Interface, you can drag it into your current working directory and begin.
Next, follow the tutorial and walk through it step-by-step. You may check your work in the Testing Mode of the eiConsole.
Open your eiConsole

To begin, open your eiConsole. This will display the Route File Management dialog, as above.
At the top of the dialog, you will see a selected directory, known as the “Working Directory.” You may click the “Browse” button to change this directory from the currently selected or default directory. The images in this tutorial assume you have created and navigated to a new Working Directory or one that is empty. To create a new Route, simply click the “Add Route” button, shown highlighted in red below:

Provide a name for the new Route

This will raise a dialog where you will be asked to provide a name for the new Route. For this exercise, we will simply name it “Creating a Simple Route”.
Press “OK” and you should see the new Route listed in the Routes table. To open the Route, select it from the list and either double-click or right-click and select “Edit Route” from the drop-down:

Opening the Route for editing will raise the main eiConsole screen, shown below:

Define the Listener
We’ll now define the Listener, which dictates how information (messages) get into the Route. Select the Listener stage (the second column):

You will notice the bottom half of the screen now has a “Listener Configuration” tab, which should be selected automatically. Now we need to pick a Listener from the Listener Type drop-down. Select “Directory / File”:

Once selected, the bottom panel should change once again to resemble the following:

Define a name for the Listener
We can now define a name for the Listener in the “Listener Name” field. It’s a good idea to get in the habit of naming modules (Listener, Processors, Transports, etc) once defined. We’ll call ours “Simple Route Inbound”:

Configure our Listener
Next, we’ll need to configure our Listener. Most modules require some configuration. Items that are required (such as the “Polling Directory” items for this Listener type) have a red dot next to them if they’re not yet configured. For our Listener, we’ll need to specify a directory on the file system to check for new files, as well as how often we’ll check that directory. Provide “5” for the “Polling Interval” value:

Configure the “Polling Directory”
We’ll now configure the “Polling Directory.” Because this is an exercise, we recommend creating a new directory somewhere on your computer to pick files up from. We’ll be using “C:\in”. Note that the directory you specify must exist. You may type the path manually or use the “…” button to browse to it:

Configure Post-Process Operation
We’ll specify the behavior of the system after a file has been picked up. You can Keep, Delete or Move the file. If you choose to Move a file, the Target directory becomes required (C:\in\processed in our case). This allows you to specify the directory to use for the processed files.

Configure a Target
We’ve now configured our Listener. We’ll next need to configure a Target to deliver the messages created by this Listener to some destination. Select the “Transport” (the sixth) stage:

Like the Listener, you’ll want to select a Transport from the “Transport Type” drop-down. We’ll use “Directory / File” here:

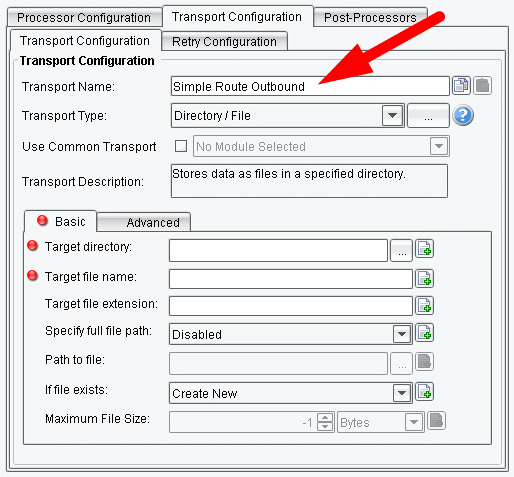
Once again, we should name the Transport once defined. For this exercise, we’ll simply call ours “Simple Route Outbound”:

As you can see, there are a couple of required items for the Directory Transport. “Target Directory” is the directory we’ll be creating a new file in, “Target File Name” is the name (minus extension) of the file to create, and “Target File Extension” is the extension of that file. For our example, we’ll populate these as “C:\out”, “output”, and “txt”:

This Transport is now configured to deliver messages to “C:\out” as “output.txt”. If such a file exists already, it will automatically append a numeric suffix (“1”, “2”, etc) to the end of the file name.
Testing the Route
Our Route is now configured and complete. We’ll now wish to test it. To do this, go to the Mode menu (the menu bar at the top of the screen) and select “Testing Mode”:

Once in Testing Mode, we can start, stop, skip, or trace at or after any stage. By default, the Testing Mode will have the first Listener selected. Copy a file to your input directory (“C:\in” in our example) and click “Execute Test”:

You should see each stage’s “question mark” icon be replaced with a green checkmark as each stage completes:

You may now click on the “Stop” button and check your output folder (“C:\out”); you should see “output.txt” placed there.
If you do see it, you’ve now completed successfully creating a simple route.