PilotFish Best Practices – Detailed
General
- Understanding How PilotFish Software Works
- Data comes in from a source and is stored in a Transaction Data object. Each of these Transactions ultimately runs in a separate thread.
- Metadata is stored in Transaction Attributes either manually or from the Listener (or other modules).
- Transaction Data passes along from one stage to another within the route it is currently running through
- PilotFish supports passing any type of data (XML, binary, stream, text, etc …) throughout a route’s Stages, but many modules work assuming the data is in a specific format. Most commonly, this format is expected to be XML. See the description of various modules for clarity on what the expected format is.
- The Transaction Data is sent to the Target system using a Transport
- Some Transports expect a response and others don’t
- A thread pool can be set up to manage the number of threads being created and used at a given time
- You can also limit the route/Interface to just one thread if you need FIFO-like processing

- You can also limit the route/Interface to just one thread if you need FIFO-like processing
- You shouldn’t use PilotFish’s built-in FIFO mechanism unless absolutely necessary as it is likely to slow down performance
- See this page for info about FIFO processing in PilotFish
- Using the eiDashboard
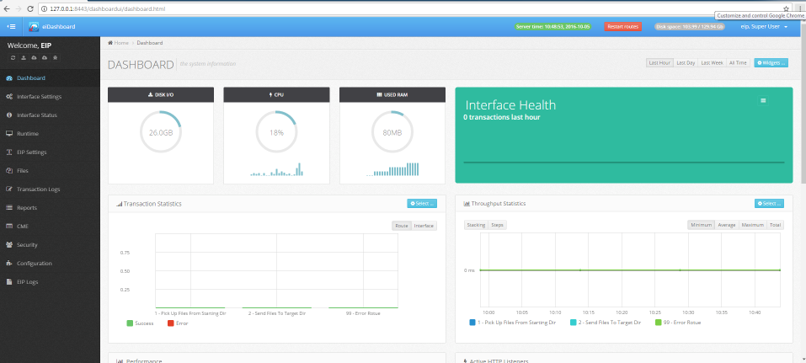
- The eiDashboard is a PilotFish application that monitors an eiPlatform instance(s)
- See transaction counts, throughput data, JVM options and health, route settings, eiPlatform settings, enable/disable routes & interfaces, restart the eiPlatform, see all web service endpoints made available by the routes, view logs, see the number of threads created and used, view and edit route.xml files, and much more …

- See transaction counts, throughput data, JVM options and health, route settings, eiPlatform settings, enable/disable routes & interfaces, restart the eiPlatform, see all web service endpoints made available by the routes, view logs, see the number of threads created and used, view and edit route.xml files, and much more …
- View it from your mobile device
- Must have VPN connection setup on your device for it to work
- The eiDashboard is tuned to provide a robust set of graphs and reports.
- The eiDashboard is a PilotFish application that monitors an eiPlatform instance(s)
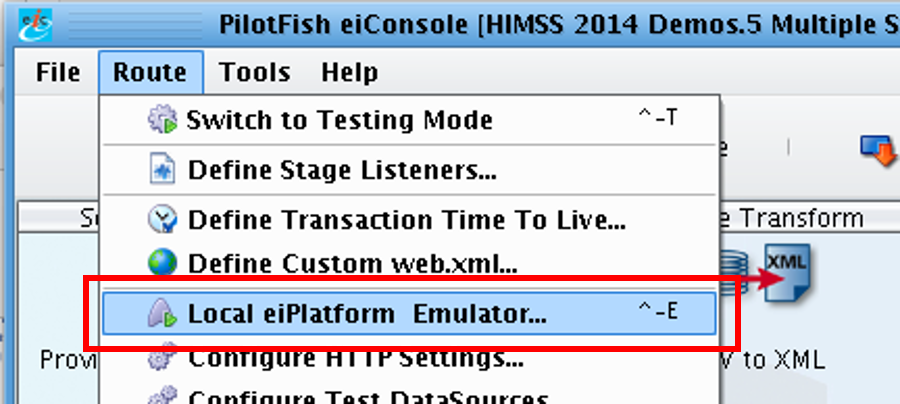
- Using the eiConsole’s Local eiPlatform Emulator
- You can test multiple routes or interfaces using the eiPlatform Emulator that is built into the eiConsole
- You can also use the debug mode for this but, the Emulator functions much closer to how the eiPlatform will function once you deploy it
- The Emulator lets you simulate running it through the eiPlatform without having an eiPlatform instance installed on your machine
- This is a great resource for developers

- This is a great resource for developers
- Be sure to disable interfaces or routes that you do not want to run in the initial Emulator configuration window
- You can test multiple routes or interfaces using the eiPlatform Emulator that is built into the eiConsole
- Always open the eiConsole at the Root of Your Working Directory
- It is strongly recommended to always open your entire working directory in the eiConsole.
- This is because it is technically possible to open up any sub-interface in the eiConsole directly.
- When opening a sub-interface in the eiConsole, the eiConsole will consider that sub-interface to be the root of the working directory, even if it really is not.
- It is strongly recommended to always open your entire working directory in the eiConsole.
- Understand How External Jars Are Loaded
- Many times you will need to use a custom or 3rd-party library to support a feature that a route or interface needs.
- Custom jars are added by placing the .jar file into the “lib” directory in the Working Directory.
- Each interface can have its own lib directory, however, we recommend keeping all custom modules in the root lib directory to avoid confusion.
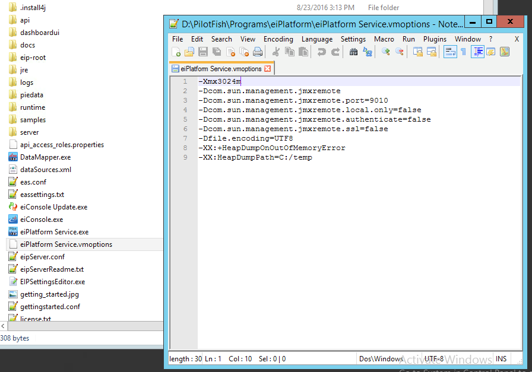
- Use Java VM Settings for eiPlatform to Increase Heap Size
- Java and PilotFish can be quite memory intensive
- Consider how many messages will be simultaneously coming through the system and the size of the expected messages
- You may want to increase the heap size in the VM settings for the eiPlatform
- Set your heap size based on what is necessary to handle the expected workload

- Java and PilotFish can be quite memory intensive
- Use Java VisualVM For Performance Tuning
- Bookmark the reference guide!
- CPU & Memory Profiling
- RAM and Heap usage
- Threads created and usage charts
- Java objects created
- VM core dumps
- Cleaning Up Working Directory Temporary Files
- Avoid using Debug Trace unless absolutely necessary
- Debug Trace is an excellent tool for diagnosing production issues, however, it generates a significant amount of output that can fill up a hard drive.
- Debug Trace is turned on/off in the Routing stage of a Route’s configuration.
- To clean up existing Debug Trace files, simply delete the debug-trace folder in the root of the working directory.
- Other temporary files can be cleaned up too
- The eiConsole and eiPlatform generate other temporary files during their operation, although these consume far less space than Debug Trace. However, they can be safely removed to clear up space.
- The directories that store these files are all in the root of the working directory, and they are:
- statistics
- testing-cache
- testing-trace
- transact-trace
- Avoid using Debug Trace unless absolutely necessary
- Use Security Mechanisms
- We recommend several authentication strategies for storing credentials:
- Store in message body transmitted via a secure channel
- Store in SOAP Headers & WS-Security
- Use certificates
- Use IP Filtering
- Use Transport-dictated options, i.e. encryption during Transport
- Use encryption
- Transport-level via SSL
- Standalone via PGP or Symmetric/Asymmetric algorithms
- For inbound messages, you can choose which security mechanism to put in place to meet the needs of your system
- For outbound messages, many times the security mechanism will be dictated by the external system you are connecting to
- We recommend several authentication strategies for storing credentials:
- Version And Backup Your Changes
- When you are making changes to an interface or route, you should get into the habit of creating backups of a previously working state.
- The recommended way for backing up the configurations is using source control, such as Git or Subversion.
- Alternate approaches include creating backup ZIP files of your configurations.
- Use Well-known Standards When Possible
- Using a canonical model via well-known standards is very important to ensure correct data processing and effective communication between separated systems
- Creating your own standard can be very time-consuming and error-prone
- Avoid creating your own message format if a canonical model could be used instead
- We recommend standards such as :
- ACORD
- HL7
- EDI
- SOAP
- And more …
- However, there may be times where using your own message format might be more efficient and less bloated if it’s a small message without very many fields or any complicated structure
- Canonicalized formats tend to be bloated and they contain a lot more information than you might need, so weigh the pros and cons of using your own format
- Consider using schema splicing to use only the portion of a schema you need in order to reduce schema loading bloat
- Avoid using custom nodes when using a standard format
- Other systems might not know how to interpret your customized data and too much coordination might need to take place to account for the differences from the standard
- Basically, avoid de-standardizing a standard (though, sometimes it’s necessary)
- Have an Upgrade Plan!
- PilotFish Issues a Major Release Each Year and Slip Stream Releases Throughout the Year
- Keeping your software current with new releases allows you to:
- Take advantage of new feature enhancements
- Not be slowed down by bugs in an old release that was fixed in the new release
- Benefit from a more stable system (patches on top of patches destabilize the system
- Keeping your software current with new releases allows you to:
- PilotFish Issues a Major Release Each Year and Slip Stream Releases Throughout the Year
Interface Design
- Use Architectural References
- Use other interfaces & routes that are known-to-be-working when creating new routes that are similar in structure.
- Most route/interface/module can be quickly copied/duplicated to a new location to re-use working configurations.
- Plan Your Interfaces Before Implementing
- We recommend that before you start implementing an interface you gather as many requirements as you can and create a high-level plan for development
- Be flexible because requirements often change that you will need to adapt to
- We recommend creating a high-level flow diagram to show how data will be flowing through the system
- The plan and diagrams will make it easier to implement the interface(s):
- More effective communication between team members, and across teams helps iron out design details while creating plan and diagrams, instead of while in the middle of development
- Don’t spend too much time creating a perfect planning document as it should just be a guideline and an exercise to try to iron out any requirements or problems before you start implementing the solution
- The planning document should be a living document that can change as you go, spending too much time on it upfront can be counterproductive
- If there are problems identified in the plan leverage peer review and try to get input or suggestions for potential solutions
- We recommend that before you start implementing an interface you gather as many requirements as you can and create a high-level plan for development
- Use Global Transaction Monitors For Larger Interfaces
- When creating larger interfaces with a lot of routes and interface packages, it can be very helpful to create Global Transaction Monitors that are shared between several routes/interfaces
- This way you create just one transaction monitor and then set each route to use that Transaction Monitor
- When creating larger interfaces with a lot of routes and interface packages, it can be very helpful to create Global Transaction Monitors that are shared between several routes/interfaces
- Use Interface Packages
- Use interface packages to group related routes or interfaces together in order to make it easier to develop, test, debug and maintain interfaces
- You can open the eiConsole at any interface package level or at the root level however we strongly recommend opening at the root level to avoid inconsistent behavior between the eiConsole and eiPlatform, which always opens at the root level
- Pay Attention to Naming Convention
- Give your routes and interfaces unique names that accurately reflect the project you are working on
- This will make it much easier to search for and identify routes and interfaces at a later time
- Give your routes and interfaces unique names that accurately reflect the project you are working on
- Understand Types of Transactions You Will Be Processing
- It is very important to understand the types of messages you will be processing so you can choose the appropriate way to implement your route/interface
- Often the structure of your Routes will be determined based on the types and amount of messages you will be processing
- Understand the performance of the system over time and under load
- Understand volume over time and how it will affect performance and other systems it will be connecting to
- Externalize Environment Properties Early On
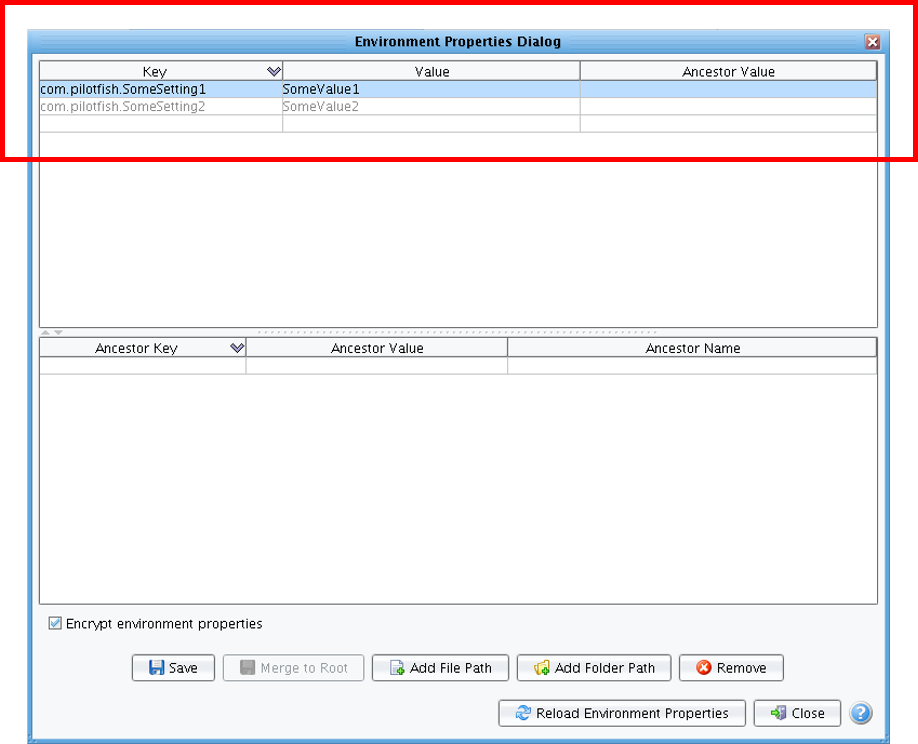
- Externalize configuration settings to environmental settings as early as possible
- Allows re-use in other routes
- So you don’t forget, do it earlier rather than later

- Environmental settings can be set at the Root or Global level, or at each interface level.
- They are also hierarchical so that a route in a given interface can use the environment setting values at its own interface level or any parent level higher.
- Be sure to make the names unique enough that they don’t clash with other properties running through the eiPlatform
- This could be eased by putting all environment properties for all routes and interfaces into the same environment-properties.conf file in the eip-root directory
- Externalize configuration settings to environmental settings as early as possible
- Use Consistent Route Structure
- We recommend creating a route numbering system so that your routes appear organized, in the closest order that messages will flow through the system
- A good rule of thumb is that if you can’t decide if you should do the task in one, two or three routes, you should consider going with more routes because it gives you more flexibility to move things around without having to change the existing routes too much
- Recommended Route Numbering Scheme:
- 1 – First Route
- 1-1 – First Route, Sub-Route
- 2 – Second Route
- 3 – Third Route
- 3-1 – Third Route, Sub-Route 1
- 3-2 – Third Route, Sub-Route 2
- 3-2-1 – Third Route, Sub-Route 2, Sub-Sub-Route 1
- 99 – Error Route 1
- 99-1 – Error Route 2
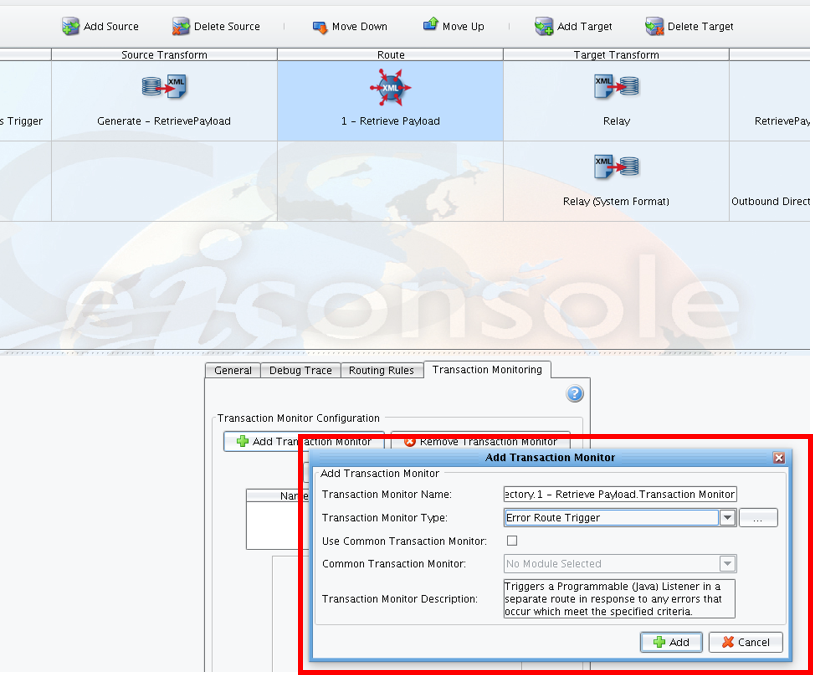
- Use Error Routes
- As a way to see what has happened in the case of a bug or issue when processing transactions
- Get in the habit of always creating an error route for your routes/interfaces and then add that error route as a transaction monitor to each route you want errors reported for
- Get in the habit of naming your error routes with either “0 – …“ or “99 – …” at the beginning of the route name so that they always appear at the top or bottom of the File Management view in the eiConsole

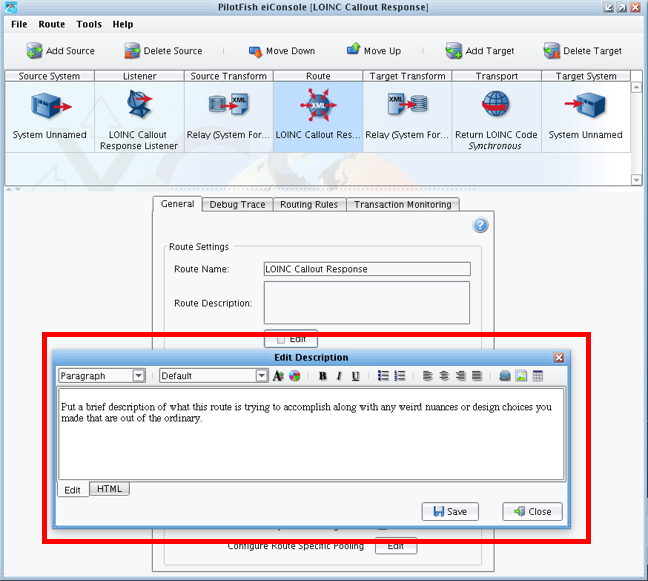
- Use Route Descriptions
- Consider these like comments in the code
- Only put non-intuitive info and high-level descriptions and overviews into the descriptions
- Highlight the goals and intentions of the route
- Write up any potential or known issues with the route
- Avoid writing a book!
- These descriptions can be viewed from the File Management view by hovering over a route and looking at the tooltip that appears
- You can make the descriptions look “prettier” by utilizing the minimalistic HTML features provided

- Consider these like comments in the code
- You Can Rename Routes/Listeners/Interfaces – But Be Very Careful
- Routes and listeners reference each other using their names
- Use caution when you rename routes or listeners that you also rename anything that references those routes or listeners by name
- Also, be careful when renaming interfaces because routes/listeners use fully-qualified names, which includes the interface name
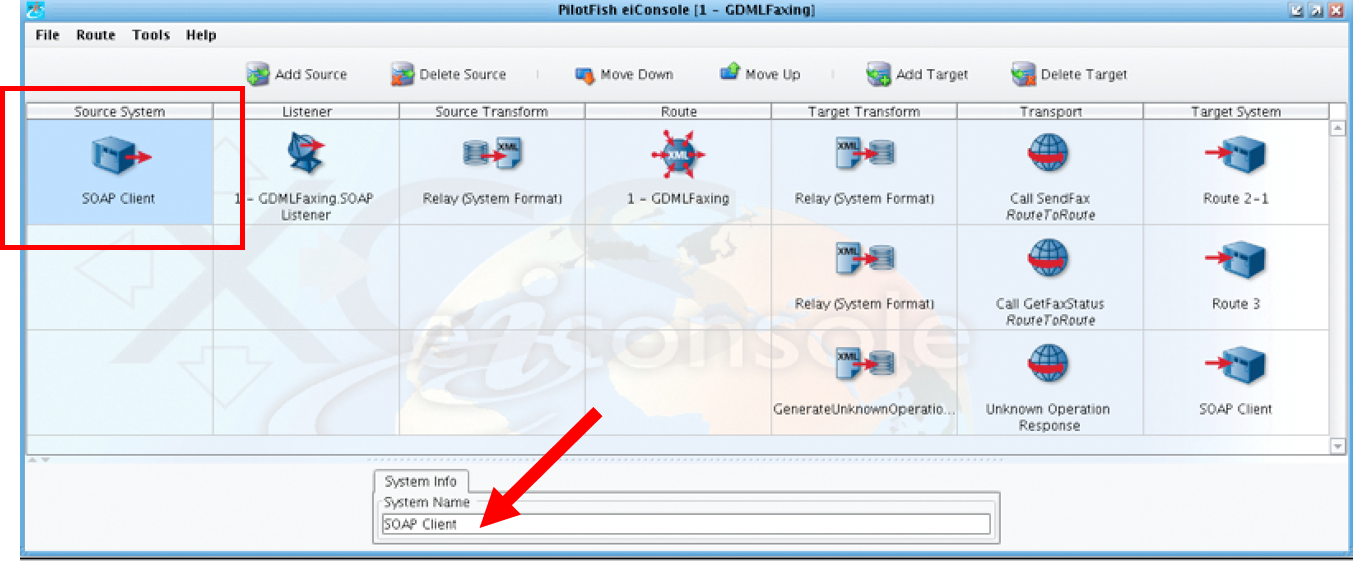
- Use System Info Fields
- Use the System Info fields to describe the Source and Target Systems:
- Source / Listener-side –shows the system’s origin of the data coming into the Listener
- Target / Transport-side –shows the system’s Target location that the Transport will be transporting out to

- Using the System Info fields makes it easier to scan over a route quickly to see where the data will be coming from and where it will be going without having to click around too much into the Listener/Transport Configuration settings

- Use the System Info fields to describe the Source and Target Systems:
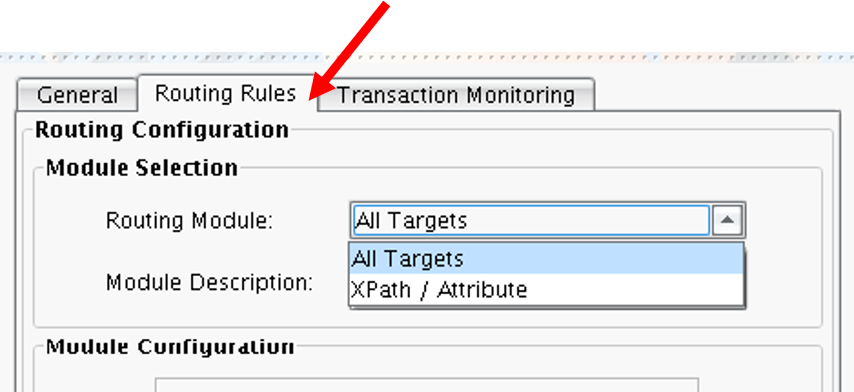
- Use Routing Rules
- Use routing rules if you need to use the same source message to:
- Send the same message to multiple target systems
- Send two different messages to the same target
- Send multiple different messages to multiple different Targets, based on the same source message
- Routing rules can also be used to determine if you can continue along the interface’s path or if you should stop processing (perhaps due to missing data or any other reason)
- You can use OGNL & XPath within routing rules

- Use routing rules if you need to use the same source message to:
- Use Forking but not Joining
- Forking can also be interpreted as “splitting” because you will split the current transaction into multiple transactions based on some specified criteria

- If you need to fork into separate sub-transactions based on multiple nodes being in the message’s XML, then you use forking based on an XPath to do this
- Many more forking modules have been added to the application to fork data in non-XML formats.
- This can be a big performance advantage when dealing with large data payloads that need to be split up in their original format before being able to be transformed into XML in a performant fashion.
- If joining is needed later you should use the Process Orchestration feature, instead of forking with joining
- Joining is a feature maintained for legacy compatibility, but is no longer recommended as Process Orchestration provides a more complete solution
- Forking can also be interpreted as “splitting” because you will split the current transaction into multiple transactions based on some specified criteria
- Use Process Orchestration for Forking With Joining – But Use Caution
- Process orchestration is a fancy way of forking transactions and then joining them back together later after all the work has been done
- Process orchestration sounds really cool and it is, but it can be challenging to configure and test
- Use caution when testing interfaces relying on Process Orchestration
- Consider transactions that may come into a process instance in any order
- Consider the impact of timeouts, delays, and errors within component transactions
- Consider the memory footprint when dealing with large payloads or high volumes
- Ensure you set the Process Instance ID appropriately when parallel processes are possible
- Configuring PilotFish Interfaces – Do’s & Don’ts
- Avoid using a text editor to modify route or environment properties files directly
- route.xml files are XML files that require escaped characters in certain scenarios required by XML
- environment-settings.conf files are Java properties files that also require escaped characters in certain scenarios
- This can result in errors if you are modifying this file manually in Notepad
- Generally, use the eiConsole when making changes to routes or environment properties
- Automatically escapes any characters
- Always constructs the route XML and environment properties config correctly
- Marks a route with the user and the date/time it was modified
- Don’t use post-processors for needed tasks if you have a Callback Listener In the Transport
- This is a common “gotcha” for PilotFish users where they would expect the post-processors to be called when the Transport has completed, but it’s not the case
- Always use any Transport built-in callback listener mechanisms for handling data that is returned from the Transport
- Some transports don’t offer a callback listener, so add a Route Callout Processor to the post-processors to handle the transport response/results
- When a callback listener is called after a Transport finishes it will run the post-processors and the callback route in parallel
Be careful in this scenario if you need the post-processor tasks to happen in the callback route
- Avoid using built-in H2 database for production
- Built-in H2 database may appear convenient but, are more likely to be troublesome and cause performance issues, especially when dealing with a significant amount of data
- Use a robust, external relational database management system instead, ie Postgresql, Oracle, MS SQLServer
- An external relational database will scale better and be more reliable overall
- Avoid using a text editor to modify route or environment properties files directly
- Handle Transport Results in Another Route
- When you are making a call out to another system using a Transport, we recommend handling the results returned from that Transport in another route because it will give you more flexibility to perform the handling you need rather than being restricted to just the right side of the calling route
- This also lets you set up two different error routes for handling errors differently when dealing with:
- Data before or during the Transport
- Data validation from results returned from the Transport
- Often times you will want to handle errors differently before and after the Transport
- Use the Disable Route Feature
- You can disable a route in two ways:
- If you have the eiDashboard, then you can use the Interface Settings page to enable/disable routes/interfaces

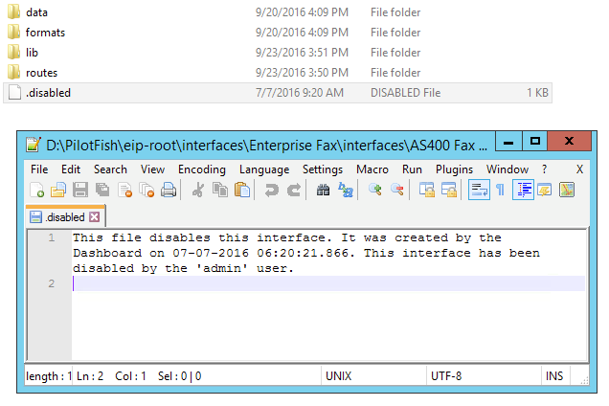
- If you don’t have the eiDashboard, then you can disable the routes manually by placing a .disabled file in the route’s directory

- If you have the eiDashboard, then you can use the Interface Settings page to enable/disable routes/interfaces
- You can disable a route in two ways:
Data Mapping
- Don’t Have to Restart eiPlatform When Only Making XSLT Transformation Changes
- If you want to make a change to an XSLT transformation file
- You don’t have to restart the eiPlatform to apply that change as long as you haven’t turned on caching the XSLT in the transformation configuration options
- Useful because you want to avoid restarting the eiPlatform as little as possible
- Allows you to restart the eiPlatform less often (great for PROD)
- While this can be done, it is only recommended when running on a development or test machine. Doing this in production will likely lead to problems.
- If you want to make a change to an XSLT transformation file
- Use caution when making changes manually on a server to XSLT files because those changes will apply as soon as you save the file
- Use & Understand Transaction Data (Trans Data)
- Listeners/Transports/Processors work assuming that the data you are working with is currently in the Trans Data
- You can swap data in/out of Trans Data and Trans Attrs to make sure Listeners/Transports/Processors have the data they need to function as expected
- Use “Data Attribute Swapper Processor” to move data between Trans Attrs and Trans Data
- This is a very common task so it’s important to get used to how to do this
- Trans Data can store any type of data you will need, including InputStream objects or any other Java object, but many times its just text data
- Re-use XSLT Transformations When Possible
- There will be cases where you will be doing the same or similar XSLT transformation in two separate interfaces or routes
- In this scenario, you should consider re-using the same XSLT file on disk so that any changes to that transformation only need to happen once
- However, if you think the transformation might change in the future for one client or route and not another then you might be better off having two separate transformations that you maintain separately.
- This can help avoid breaking one route when fixing or developing another
- Be very careful when re-using XSLTs in multiple places, however, because someone might make a change for one specific location that will negatively affect another.
- Use Data Mapper’s Testing Tab
- When working with XSLT transformations in the Data Mapper you should utilize the Testing tab.
- Use a known well-formatted message to test your transformation against for a quick smoke test that the transformation will work as intended

- Use a known well-formatted message to test your transformation against for a quick smoke test that the transformation will work as intended
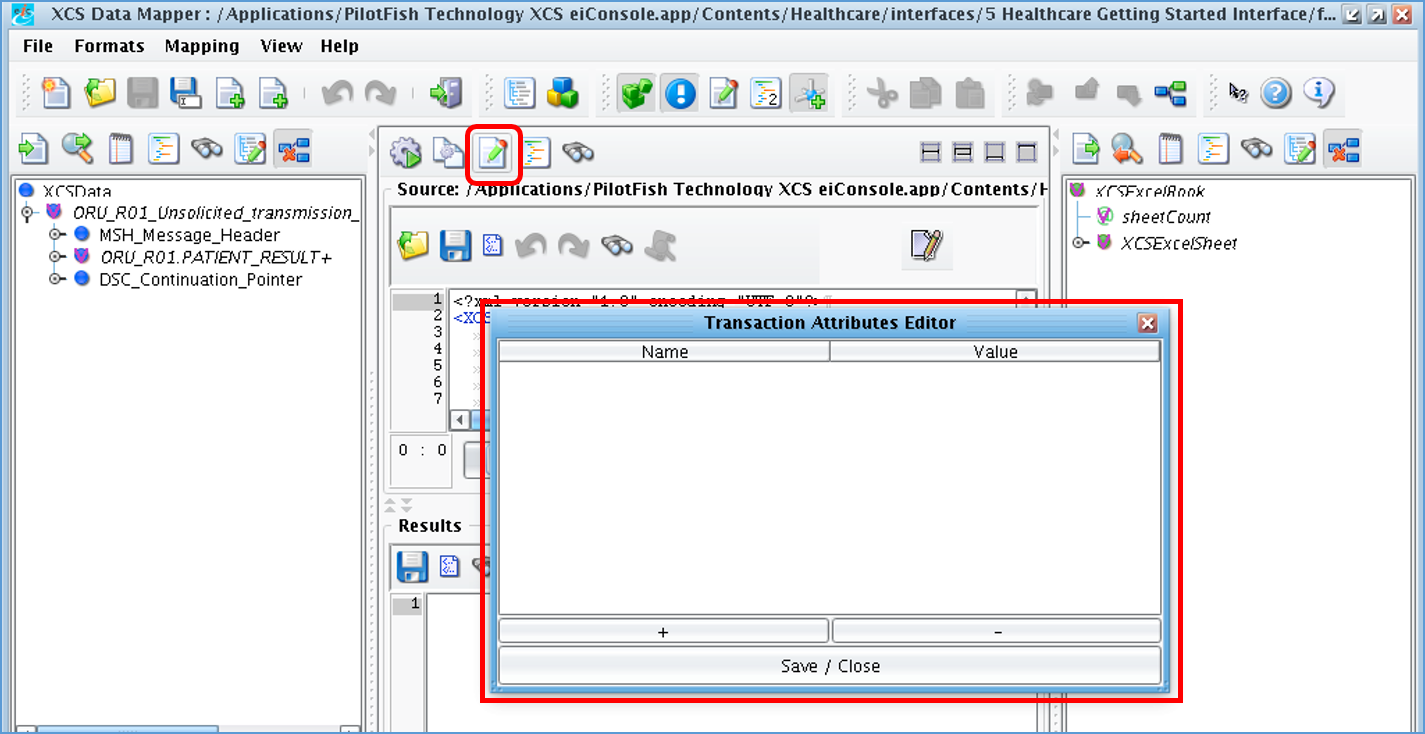
- The “Edit Source Attributes” button in the Testing panel lets you input Transaction Attributes. If you transform references, using the Get Transaction Attribute feature, then you’ll be able to test that functionality using the Testing tab
- The “Edit Source Attributes” button also allows for inputting XSLT Parameters, thus allowing for testing <xsl:param /> inputs.
- It is recommended to use XSLT parameters, inputted from the Advanced tab of the XSLT transformation in the route editing screen, for passing in values from outside of the stylesheet, including Transaction Attributes.
- Always save the test you set up in the Testing panel for later reference for yourself, or more importantly, others

- When working with XSLT transformations in the Data Mapper you should utilize the Testing tab.
- Use Transaction Attribute (Trans Attrs)
- Some Trans Attrs are populated automatically by listeners/transports/Processors, such as ‘com.pilotfish.eip.transactionID’
- Others you will populate yourself using a Processor, such as “Transaction Attribute Population Processor” or “Regex Into Transaction Attribute Processor”
- You will often use Trans Attrs when evaluating OGNL or using transaction data/attrs within XSLT transformations
- Transaction Attributes are your friend, feel free to use them as much as needed
- Transaction Attributes typically add minimal overhead to the routes/interfaces
- Be careful not to store too much in a Trans Attr if you are expecting a high throughput of messages
- Consider storing large amounts of data in a Java object and just put a reference to the object in the Trans Attr
- For example, often it will be better to store an InputStream object reference in a transaction attribute rather than a copy of the data that would be obtained from the InputStream. This will reduce the memory (RAM) footprint and ultimately will allow for better performance of the system. You can reference this InputStream using from OGNL if you need access to the object.
- Use Data Validation
- We recommend always validating “externally sourced” data and consider validation for all interfaces
- Reduces workload by not using processing time on invalid messages that will ultimately fail anyways later on downstream
- External systems will want to know if they are sending invalid messages to a PilotFish system
- Make sure it is the right type of message
- Check headers or validate against the schema
- Make sure all the necessary data is provided
- Use a schema/XSD whenever possible
- You can also use XSLT to check for a limited number of Nodes to be present and have proper data and then you can throw a validation exception from within XSLT itself
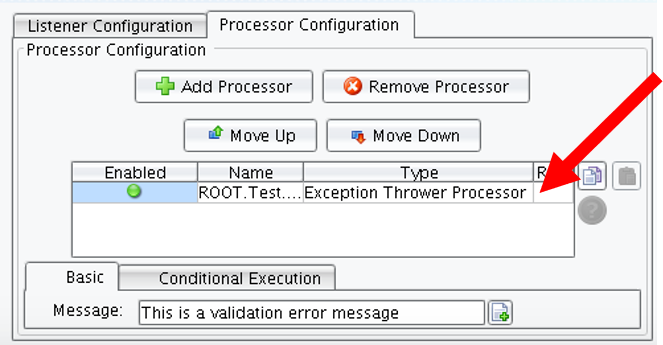
- You can also throw exceptions using the Exception Thrower Processor


- We recommend always validating “externally sourced” data and consider validation for all interfaces
- Use Transformation Modules
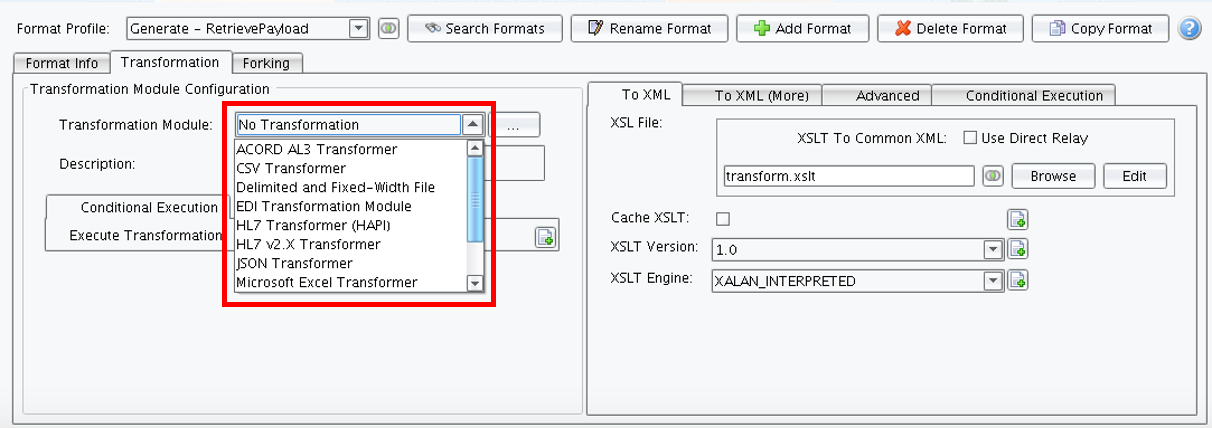
- A Transformation Module lets you convert a non-XML message into an XML message (or vice versa) in a well-defined way.
- Transformation modules are available both on the Source and Target Transform stages.

- Use Drag & Drop in the Data Mapper
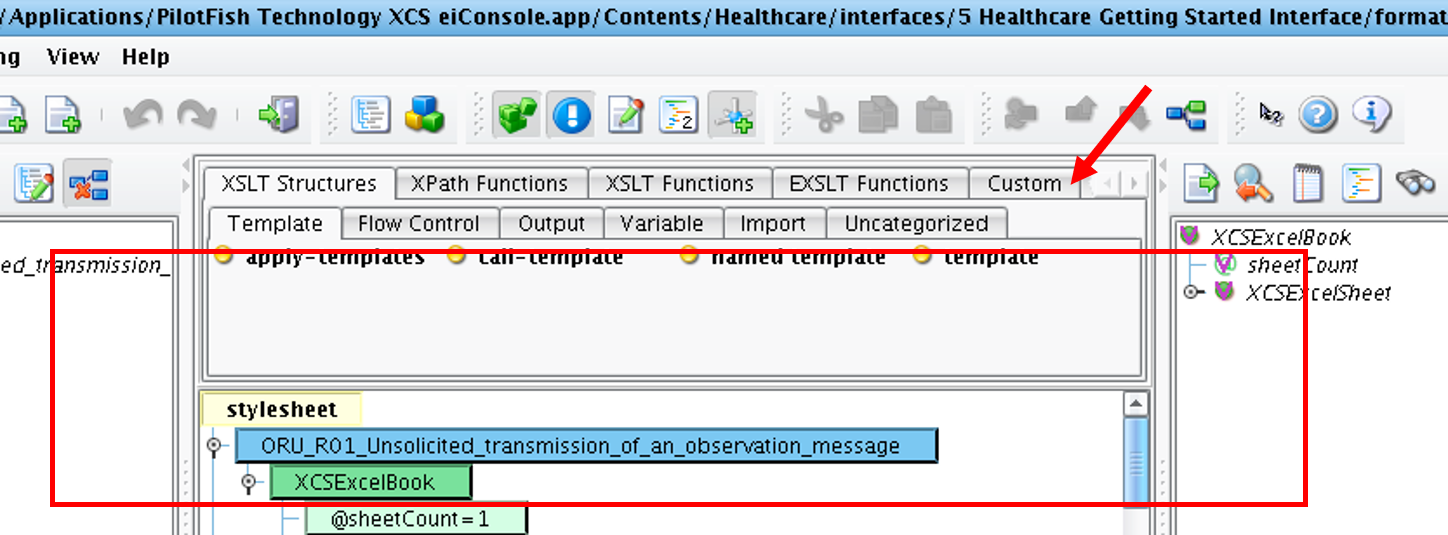
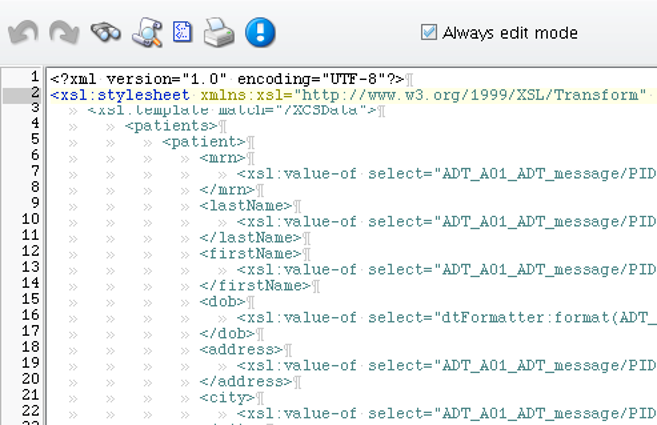
- If you are in the Data Mapper’s XSLT view and struggling with the XSLT, you can switch to the graphical view and use the eiConsole’s palette of XSLT structures and functions for shortcuts
- For example, if you select the palette’s Custom tab you’ll have access to Date & Time formatting as well as Attribute and other Uncategorized functions

- For example, if you select the palette’s Custom tab you’ll have access to Date & Time formatting as well as Attribute and other Uncategorized functions
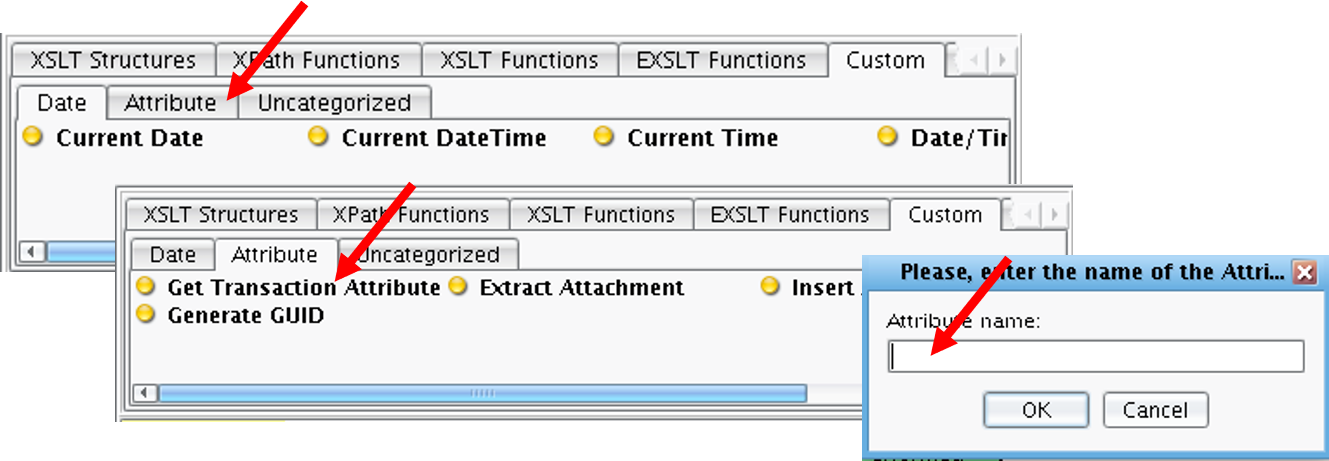
- Or for example, if you select the Attribute tab you’ll have access to Get Transaction Attributes
- Select Get Transaction Attribute and drag it to the appropriate area of your mapping and drop it. The Attribute name panel will open. Enter the name and click OK. The eiConsole’s Data Mapper will create all of the conditional logic in XSLT. Trying to manually set this up can be cumbersome and error-prone

- Select Get Transaction Attribute and drag it to the appropriate area of your mapping and drop it. The Attribute name panel will open. Enter the name and click OK. The eiConsole’s Data Mapper will create all of the conditional logic in XSLT. Trying to manually set this up can be cumbersome and error-prone
- If you are in the Data Mapper’s XSLT view and struggling with the XSLT, you can switch to the graphical view and use the eiConsole’s palette of XSLT structures and functions for shortcuts
- Data Mapper Tips
- You’ll need to practice using the drag & drop feature because it’s not always intuitive as to where you can drop these automated functions and structures
- Verify that the XSLT was generated properly after you’re done dragging & dropping items
- A set of human eyes will help make sure that the XSLT transformation is constructed properly

- A set of human eyes will help make sure that the XSLT transformation is constructed properly
- Use XSLT and Practice It
- Transformations are often done using XSLT
- Spend the time to learn XSLT and practice it.
- You can learn XSLT at W3C Schools by following their free tutorial:
https://www.w3schools.com/xml/xsl_intro.asp - Learn and understand the following:
- Conditional logic using (choose/otherwise), loops, identity transforms, templates, OGNL within XSLT, and Java callouts
- Use the Data Mapper’s Format Builders
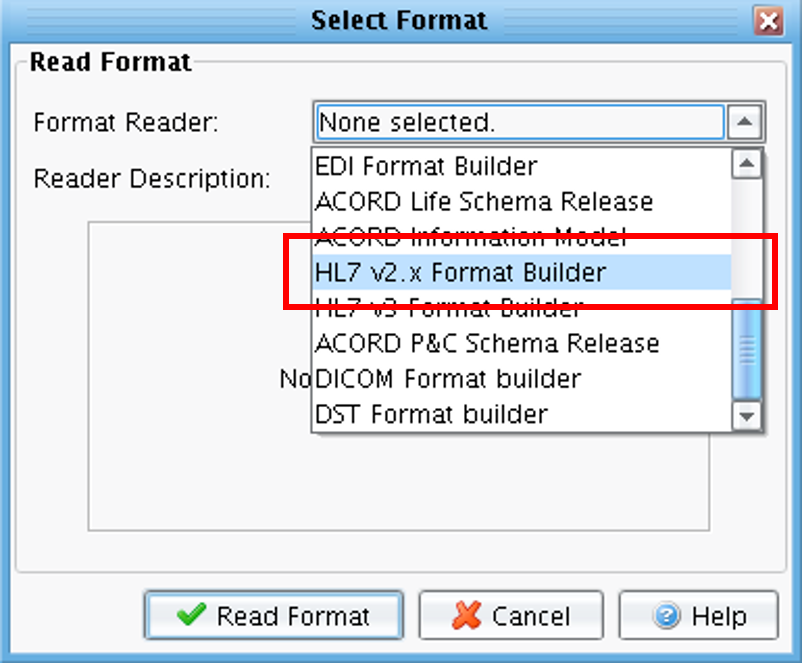
- Use the format builders when using the data mapper in the eiConsole to transform from one message type to another
- There are several types of format builders that built into the eiConsole for convenience. They include:
- Excel
- HL7
- SQLXML
- EDI
- DTCC
- ACORD
- And more …
- The format builders make it easy to see which fields are available in each format and you can easily drag-n-drop fields from one side to the data mapper visual view to correspond to a field on the other side
- This way you don’t have to memorize where all the data lives in each format, just use the format builder and drag-n-drop to map one format to another

- This way you don’t have to memorize where all the data lives in each format, just use the format builder and drag-n-drop to map one format to another
- The format builders produce XML that always matches the transformation modules
- Also, use the XSD Format Builder to map any format that is not built-in
- The XSD Format Builder lets you load any schema file (XSD XML document) into the data mapper for use in the same manner as the built-in format builders
Note: Some XSD’s can be huge so be aware there might be performance issues if you try to load an entire XSD into the format builder

- Use OGNL, Learn It & Practice It
- Use parentheses very liberally when using OGNL to make sure your code executes in the order you intend it to
- OGNL can be very complicated looking and is usually just on one line, so using parentheses helps keep the code clean & readable. It will also help ensure the OGNL code is working as desired
- Use the OGNL editor to evaluate your OGNL so you know it will work
- Evaluate entire OGNL at once
- Evaluate selected snippet of OGNL
- Bookmark the reference guide!
- Set Trans Attr values when evaluating OGNL to see what the actual results will be during runtime evaluation of the OGNL
- While common OGNL expressions are provided from the OGNL Expression Dialog, OGNL is very powerful and capable of highly complex expressions if necessary.
- For help constructing more complex expressions, please consult Apache’s guide.
- Use parentheses very liberally when using OGNL to make sure your code executes in the order you intend it to
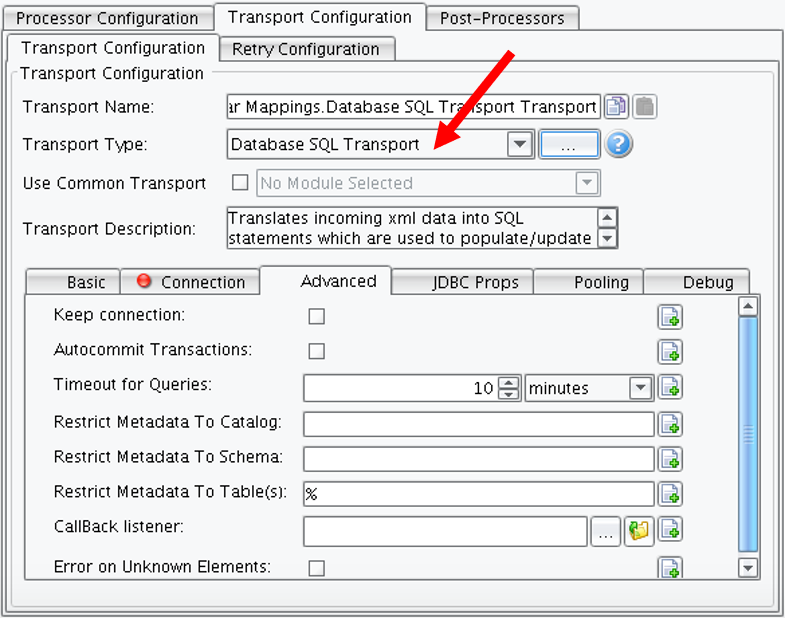
- Restrict Metadata To Increase Performance With Database SQL Transport
- When the Database SQL Transport connects to the database it will load all the metadata, but this operation can be very time consuming if there are a large number of tables, schemas, and catalogs in the database

Note: Some of the terminology for tables, schemas, and catalogs varies slightly between database implementations such as MySQL vs. SQLServer
- You can restrict the Metadata based on:
- Catalog
- Schema
- Table(s)
- Be sure to restrict the metadata so it only loads the metadata you need for the task you are trying to accomplish
- This is often a trial-and-error process but, ultimately it is very beneficial
- Metadata loading can be completely disabled by putting some nonsense string into the Restrict Metadata fields. Most of the time, metadata loading is not essential.
- When the Database SQL Transport connects to the database it will load all the metadata, but this operation can be very time consuming if there are a large number of tables, schemas, and catalogs in the database
- Consider Local-name() Notation For XPath
- Have you ever wondered why your XPath isn’t working when it appears to be written correctly?
- It is often because there are no namespaces specified in the incoming XML
- Verify that your XPath is correct using an external tool such as XMLQuire
- If no namespaces are specified in a message you need to evaluate some XPath against, then you will need to know to use the local-name() notation in your XPath
- Avoid using local-name() notation if namespaces are provided
- It’s always safer to use namespaces if you can because it removes the risk of clashing names between different message formats
- It’s also more difficult to read an XPath string when it’s using local-name() notation
- Have you ever wondered why your XPath isn’t working when it appears to be written correctly?
- Use OGNL To Access SQLXML Results Inline In XSLT
- You can use OGNL to obtain results from a query made using SQLXML
- You can iterate over the results to do additional transformation work after you’ve obtained some results from the database
- You can also check the results to see how many records, if any, were returned
- Make note that this can be difficult to test and you would have to use either Testing Mode, Debug Mode, or the eiPlatform Emulator to test SQLXML that utilizes the iterate feature of SQLXML
- This is because OGNL cannot be evaluated until runtime so you have to force a situation where it will be able to evaluate, such as Testing Mode, Debug Mode or eiPlatform Emulator
- You can use OGNL to obtain results from a query made using SQLXML
Transport Layer Design
- Understand Synchronous Responses
- Synchronous Responses allow for the body of the transaction to be returned to the caller. For example, an HTTP listener a synchronous response could return the HTTP return code and status line.
- This is typically accomplished by configuring the listener for a synchronous response and then using a Synchronous Response Transport or Processor.
- You will need to put the response you want to send back into the Transaction Data
- You don’t always need to send back anything useful in the content of the response unless it’s required on the other end. Many times it’s sufficient just to put the Synchronous Response Transport in place
- Synchronous Responses – RabbitMQ
- When using a message queue like RabbitMQ, you will also use a synchronous response when using the RabbitMQ listener
- Prior to hitting a synchronous response transport or processor for RabbitMQ message processing, you will need to add the RabbitMQ Response Processor and select the appropriate response code to send back:
- ACK – success acknowledgment
- NACK_TIMEOUT – failure acknowledgment that will tell RabbitMQ to re-queue the message to be re-processed and available to be picked up again immediately
- NACK_REQUEUE – failure acknowledgment that will tell RabbitMQ to re-queue the message to be re-processed, but you can set a delay period where it won’t be available to be picked up again for some specified amount of time
- NACK_DLQ – failure acknowledgment that will tell RabbitMQ to send the message to an associated dead letter queue
- The DLQ is set up in the RabbitMQ Management UI
- Understand Differences Between FTP, FTPS, And SFTP & Nuances Of Each
- It’s important to discern between these three types of FTP servers
- You will have to handle each of these differently using different listeners/transports/processors or different settings within one
- Regular FTP

- FTPS (FTP w/SSL security)
- Requires a certificate that matches what the FTP server has
- FTPS has two modes Explicit or Implicit based on the server configuration

- SFTP (SSH FTP / Secure FTP)
- Both highly secure and generally easier to configure than FTPS.
- It’s a good way to connect to an FTP server if available
- Uses the same port for the control channel and the data transfer channel
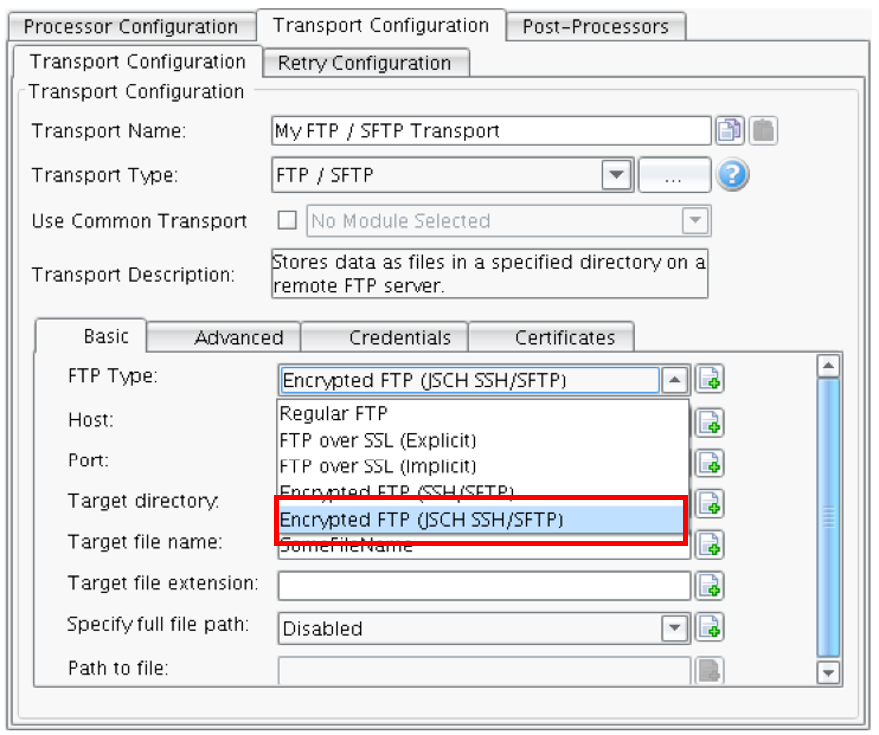
Note: there are 2 ways to use SFTP in PilotFish. Note the settings selected are shown right. Encrypted FTP (SSH/SFTP)
- 2nd Way to use SFTP in PilotFish
- Note the settings selected shown right for Encrypted FTP (JSCH SSH/SFTP)
- JSCH is “usually” higher performing than SFTP
- Different servers behave differently, use the SFTP option that works best in your environment

- Deciding which one to use is usually dictated by the FTP server you are trying to connect to, and the security requirements of that server
- Always use the “FTP” Listener and Transports but change the configuration settings depending on which FTP mechanism you are going to use

- We recommend using the JSCH option (highlighted, right) when performance might be an issue
- We have seen that JSCH tends to perform better than the other options

- We have seen that JSCH tends to perform better than the other options
- Use “Null Listener” For Triggers Based On Interval
- It’s not intuitive, but you would use a “Null (Empty/Trigger)” listener in order to have it wake up based on a set interval
- You can set up a scheduled start time and end time
- It will trigger every interval as long as the current time is within the scheduled start and end times
- If no start and end times are provided then it will assume that it will always trigger every interval
- Use Auth for Http Listener (Web Service)
- Most of the time you will have PilotFish running only within your network and it’s not exposed to the public internet
- Setup Basic Auth, at the very least, to make sure only the appropriate systems and users can access the web service
- We recommend using a filtering reverse proxy to expose our web services to the public internet
- Most of the time you will have PilotFish running only within your network and it’s not exposed to the public internet
- Use Thread Pools
- Thread pooling is built into PilotFish
- Use thread pooling to re-use threads
- Reduce the footprint while processing
- Reduce overhead in creating new threads at run-time
- Restrict to just one thread in the pool if want to guarantee FIFO processing
- We recommend this approach for FIFO processing
- Since only 1 thread will run at a time this will guarantee FIFO processing

- Can set pool settings per route or for all transactions that run through the eiPlatform
- 1) Per Route: pools.xml lives next to route.xml
- Set pool settings per stage
- 2) All Transaction: eipServer.conf :
- com.pilotfish.eip.transact.baseThreadCount
- com.pilotfish.eip.transact.maxThreadCount (recommended to be multiple of cpu core count)
- com.pilotfish.eip.transact.queueSize
- com.pilotfish.eip.transact.idleTimeout
- *ex: if baseThreadCount is 2, each route has 2 threads to start with and grows up to maxThreadCount
- 1) Per Route: pools.xml lives next to route.xml
- Use Message Queues
- Using message queues provides better performance, reliability, and recoverability
- Can be used for load balancing as well
- Reduces chances of losing messages when failures occur, applications crash or servers become unavailable
- You can set up a Dead Letter Queue to handle failed messages better, and it reduces the chance of losing a failed message
- Message Queues are great for testing because it allows you to inject messages anywhere within the system that you have a queue setup
- We generally recommend RabbitMQ as it is easy to set up, use, maintain, and configure
- The eiPlatform can also use JMS, MSMQ (Microsoft) or AS/400 DTAQ’s (IBM)
- There are many JMS providers available as well as JMS adapters for other popular messaging systems (ie RabbitMQ)
- MSMQ works great but doesn’t have a free viewer so it’s difficult to test using it and debugging when it’s involved
- AS/400 DTAQ’s are great and they perform really well but AS/400 systems are difficult to view just like MSMQ, and they can be difficult to maintain (you need a group of people who really understands how AS/400 systems work)
- Use Reverse Proxy to Expose PilotFish Web Services to the Public Internet
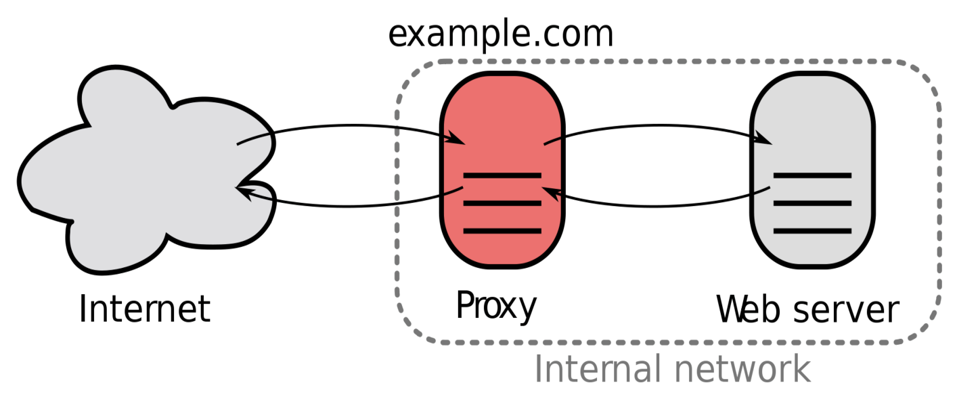
- Reverse proxies receive HTTP requests from web clients then forwards those requests to a backend system. Backend responses are then returned to the proxy which are then passed back to the requesting client.

- A Reverse Proxy is useful because you expose the proxy server to the public internet which then filters, authenticates, etc in order to protect the PilotFish web service from attacks
- This type of proxy can also be used for load balancing between servers where the proxy will only send X number of requests to each server
- Reverse proxies receive HTTP requests from web clients then forwards those requests to a backend system. Backend responses are then returned to the proxy which are then passed back to the requesting client.
Debugging and Logging
- Understand How The Logs Work
- PilotFish Technology saves a few different logs for different purposes
- eip.log – log for the eiPlatform
- This is typically the log you will be monitoring and looking at the most
- eic.log – log for eiConsole
- eas.log – fallback log for either eiConsole or eiPlatform
- You will really only need to look in this log if errors are happening and the other two logs don’t show you the information you were expecting to see
- In some cases, it’s just an error scenario that hasn’t been taken into account yet
- eip.log – log for the eiPlatform
- PilotFish Technology saves a few different logs for different purposes
- Use Log Tailing To Monitor Logs While Testing
- It is important to watch your data flow through the routes and interfaces while you are testing
- We recommend using a tailing log application that lets you easily monitor the logs as data flows through the system.
- Tailing = auto-scrolling to the bottom of the log as new entries come in so you always see the most recent log entry without having to continually manually scroll down
- PilotFish offers a Log processor to include additional log entries to your routes to help you test the data flowing through the routes
- Understand Logging Levels And Use Them While Testing Or Troubleshooting
- By default, the eiPlatform writes all logs to the eip.log file. The Log4j2 configuration can be changed to write the logs to additional locations
- Log4j2 has a built-in feature that discerns different log levels for each log entry
- In the logConfig.xml file in the eiPlatform installation root directory, you can change the logging levels to ERROR, DEBUG, INFO, WARNING, etc … for each different type of error that is logged
- Be careful of turning on too much logging. Performance can significantly decrease and the filesystem can quickly run out of space as more logging is turned on.
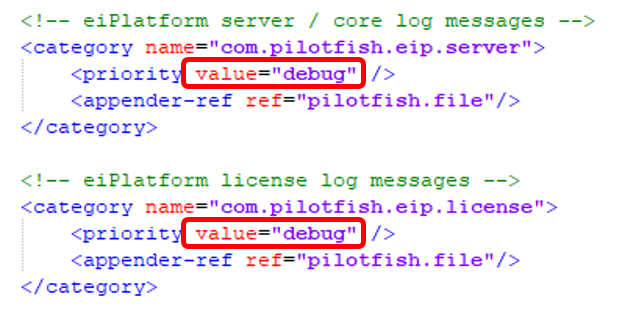
- Example of changing the level of logging:
- Change the priority XML node’s attribute “value” equal to the logging level desired, save the logConfig.xml file, and restart the eiPlatform to apply the change

- Change the priority XML node’s attribute “value” equal to the logging level desired, save the logConfig.xml file, and restart the eiPlatform to apply the change
- Use Debug Tracing (Only Temporarily)
- Only use debug tracing when absolutely necessary
- It’s usually only necessary when you want to see what is going on with a live interface that is deployed to an eiPlatform instance
- Beware: it generates a lot of very large files and can fill up the hard drive quite quickly if you leave it on for too long and a lot of messages are being passed through the system
*Always turn debug tracing off immediately after you are done
- Use the Debug mode
- The Debug mode is a hybrid between the Testing Mode and the eiPlatform Emulator
- In the Debug mode, you can navigate between multiple routes and watch how data is flowing through them
- You can set breakpoints for debugging
- You can inject data at any point if you have breakpoints
- You can evaluate OGNL during runtime
- The Debug mode is great for extensive debugging and testing without having an eiPlatform instance installed
- Debug Mode is very resource-intensive compared to other modes of running routes.
- The emulator is usually a better choice unless the additional graphical features of debug mode are needed.
- Use SQLXML Logging
- If you are having issues with SQLXML or the Database Transport, then turn on SQLXML Logging to see more information in the logs about what is going on with your SQLXML and database calls
- It will show you the SQL queries the SQLXML generates and any parameters being passed into the queries
- This will help you verify that you have constructed your SQLXML properly
- Be sure to turn it off when you’re done
- You never want to leave it on because it can potentially show PHI data in the logs if you have it on in PROD
- You might also want to delete the QA logs after you are done troubleshooting just to be sure there is no PHI data saved on disk in the logs
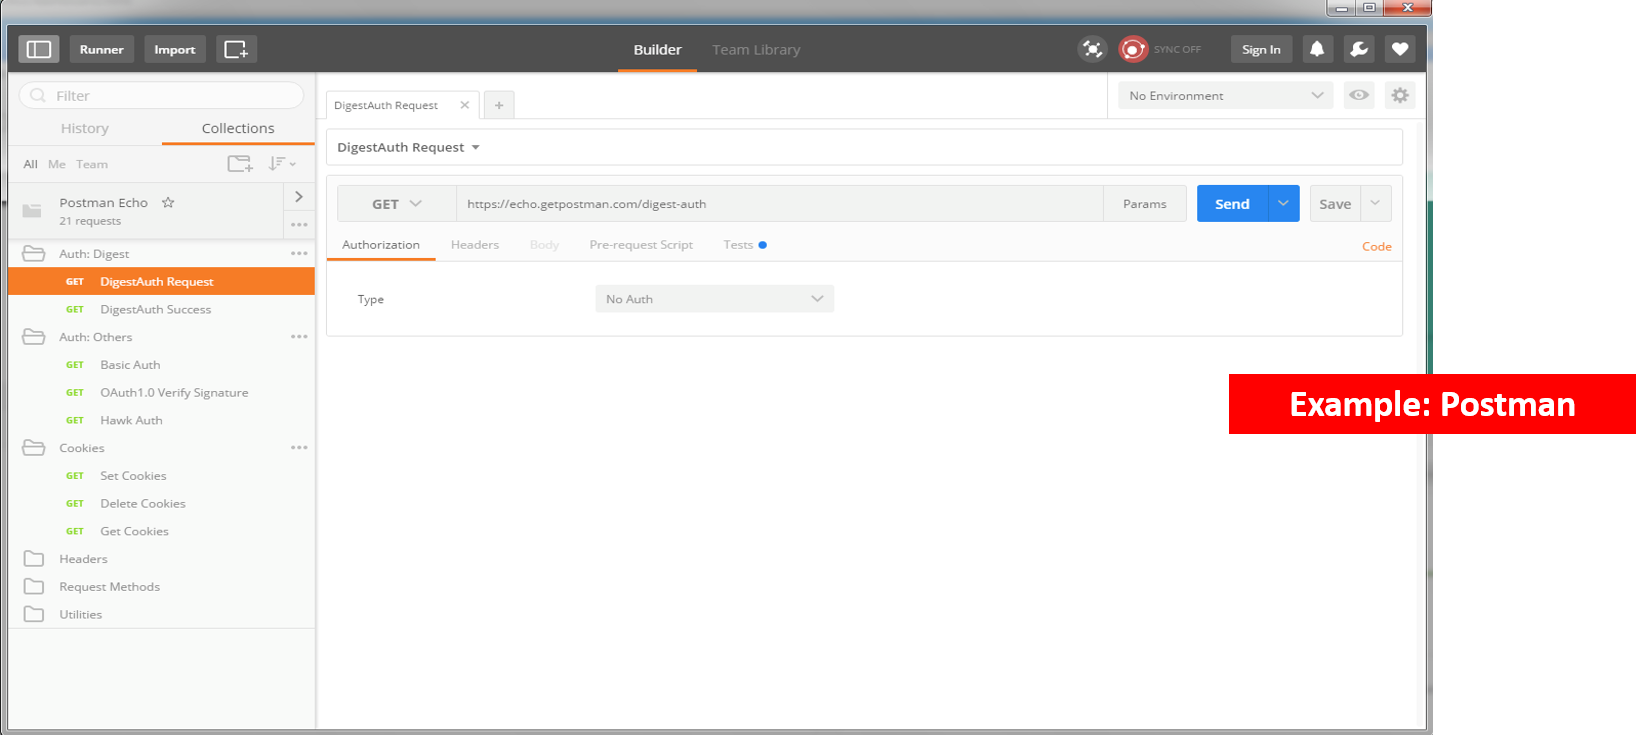
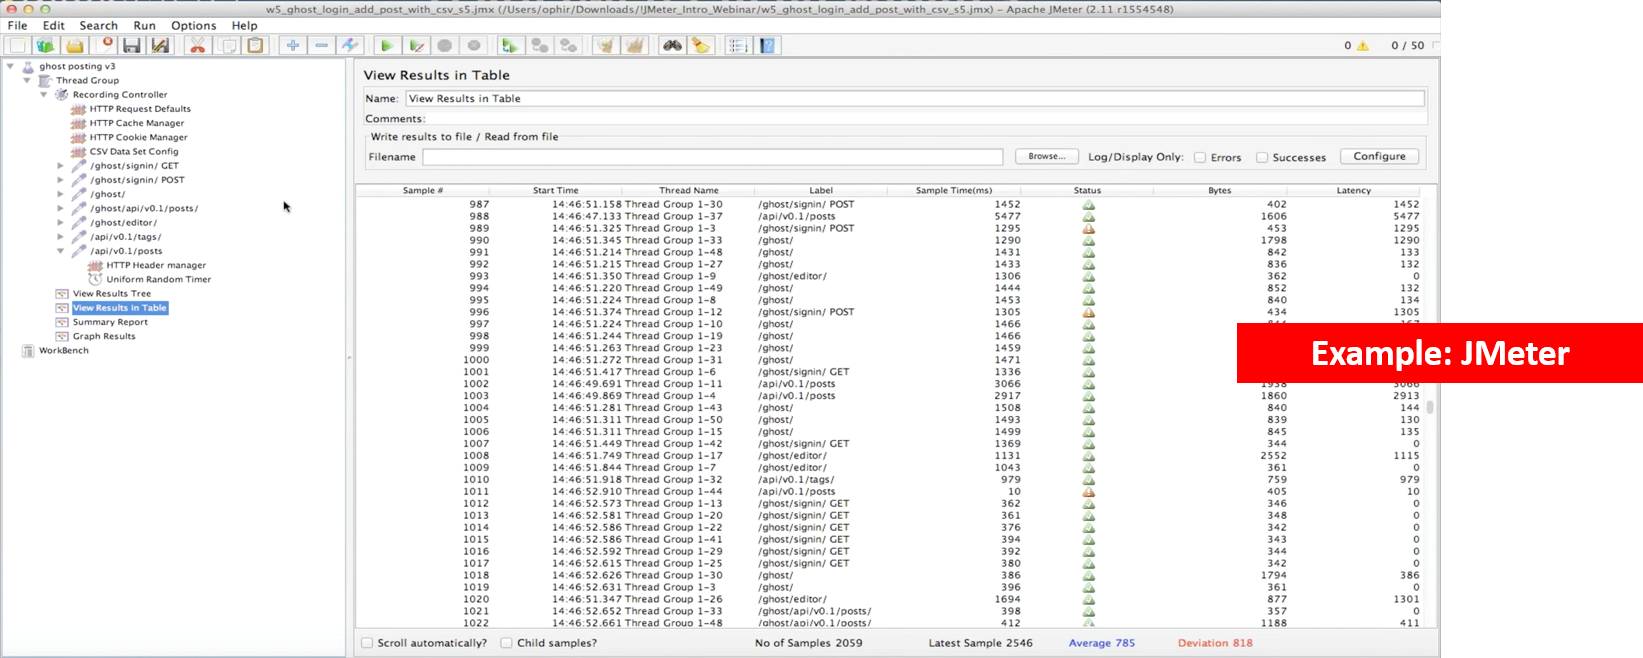
- Use Test Suite Software to Keep Known Working and Not Working Messages for Quick Smoke Testing & Load Testing
- You can save time by putting together a test suite in software such as Postman (Chrome plugin) or JMeter
- Having these suites in place helps any future testers or developers know which scenarios to test for
- It’s less likely you will miss a test scenario
- It saves time because you don’t have to construct the messages for each scenario from scratch each time


