
Welcome back to the XCS Data Mapper XSLT Data Transformation tutorial series. When dealing with different versions or interpretations of an XML schema, it can be useful to build transformations based not on a complete mapping of fields, but based on a list of changes. In this tutorial we’ll use the XCS Data Mapper and the concept of XSLT Identity Transformations to implement several small tweaking transforms. By the end of this lesson you’ll be able to build an identity transformation, remove an element or attribute from an XML document, add a new node. are nodes which have attributes and child nodes. generally they pretty interchangeable. using a good analogy you can think of it this way: node is like fruit an element apple. apple kind class=”lexicon-term”>node to an XML document, and rename node. are Nodes which have attributes and child nodes. generally they pretty interchangeable. using a good analogy you can think of it this way: node is like fruit an element apple. apple kind class=”lexicon-term”>nodes in an XML document.
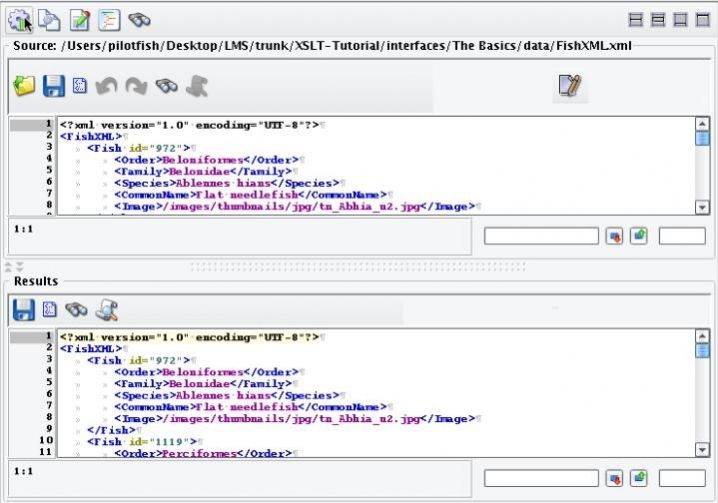
We’ll begin by loading the same format as both our Source and Target.

We’ll be using the FishXML schema familiar to those of you that started this tutorial series from the beginning.


Now that we’ve loaded both our Source and Target, we’ll want to create an identity transformation. To do this, on the XSLT Structures tab drag the Template Node onto your stylesheet.

Then double click to manually enter the match condition. The match condition for an identity transform should match any attribute (indicated by @* or a |) or any other node (as indicated by a ()).

If we switch to XSLT view we can begin to work with our transform. Now that we’re matching every node, we want to take that node that we’ve matched and copy it. To do that, let’s manually enter in the following text… we’ll use the xsl copy tag (xls:copy-of select=””>)…

And in its body we’ll select every node or attribute again. We’ll do that by using xsl:apply-templates>.

And we’ll copy the selection criteria from our top level template.

That’s all there should be to an identity transform. To test this we’ll switch to Testing Mode and execute our test against our sample FishXML. Our Source and Target so far should be identical.
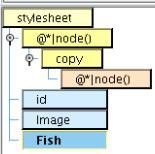
The next thing we’ll want to do is remove a couple of elements. We have an image element and an id attribute in the result. Let’s modify our identity transform to remove each of those. To do this, we’ll add two new templates to our mapping. We’ll drag the template tool, again, on top of our stylesheet node.

We’ll double click on the first and enter in @id, indicating the id attribute from our Source.

For our second we’ll use drag-and-drop. We’ll drag the Image underneath the Fish onto the template match condition.

Returning to the XSLT view, you’ll see we have two new empty XSL templates… one matching the id attribute, the other for the image.
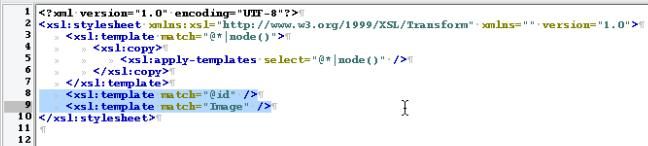
Switching to Testing Mode and executing, we’ll see that the copy transformation catches everything other than the other two that were explicitly noted – the id attribute which is replaced with nothing and the image element, also replaced with nothing. So our result now is everything we had before with the exception of the id attribute or image element.

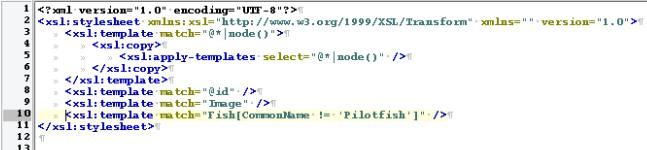
Next, let’s remove a specific sub-set of the Fish nodes. We’ll add a third template…

We’ll drag and drop Fish to match to all Fish…
But then we’ll do
uble click and add the XPath predicate with: [CommonName != ‘Pilotfish’].

You’ll see in XSLT view that we’ve added a third template this time matching any Fish element whose child CommonName element does not contain the text Pilotfish.
In Testing Mode when we execute you’ll now see that our FishXML, along with the other changes, has been limited to only 1 Fish, that one with the CommonName of Pilotfish.

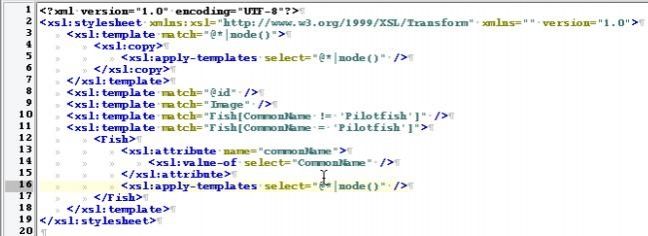
Now let’s do something a little bit more complex. The first thing we’ll need to do is now add another special case for the Fish whose name is equal to Pilotfish. Going back to the XSLT Structures template tag, we’ll add another template to the stylesheet. Again we’ll match the Fish; however, this time we’ll match where: Fish[CommonName = ‘Pilotfish’].

In this case we want to largely do a copy. We want our Fish element to be our root, so we’ll drag that over from our Target.

And then we want to add an attribute. To add the attribute, under the XSLT structures Output tab, grab the attribute tool and drop it onto the Fish.

We’ll double click on the name attribute and give it the name commonName.

We want to populate this with the value of the CommonName element from our Source. So we’ll use the value-of tool under the Output tab, drag it on top of the commonName attribute…

And then drag and drop the CommonName on top of the value-of.

In XSLT view you can see how this appears.

In Testing Mode if we run this, we now see that we have one Fish, the commonName = Pilotfish attribute, but we’ve lost all of the additional detail that we want.

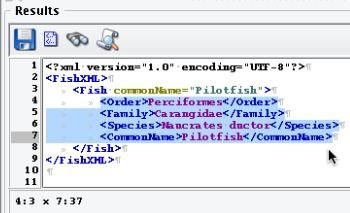
So you’ll note that while we have the Fish with the appropriate commonName attribute, what we haven’t done is copy all of the other relevant information underneath the Fish. To do this, we’ll return to XSLT view and we’ll copy and paste our apply-templates element from our core template…

And we’ll paste it inside our Fish tag.
Returning to Testing Mode and running once again we’ll see that the child elements are now processed as well.
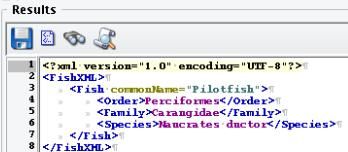
The next thing we want to do is remove the CommonName node. To accomplish this we could do it the same way that we handled image in the id attribute, but to show you a different method let’s return to XSLT view and instead modify the criteria for the applied templates. Let’s apply templates to only those nodes where the local name of the node is not equal to CommonName. This should effectively halt processing of the CommonName element.

Returning back to the Testing Mode and re-running we see that this works as expected.
Finally let’s make one other modification. Let’s dynamically choose the name of our Fish node based on the CommonName, that is rather than having a CommonName attribute, let’s rename the Fish node to the CommonName of the Fish. Again let’s do this in XSLT view. This will now generate an element with a name equal to the inbound CommonName.

Now that we’ve created an XSL element tag, this means that we’ll be creating a new element instead of an attribute, and the name attribute here specifies the name for that element. Since we want this name to be taken from the CommonName of our Source, we’ll use the {}value-of syntax and enter in CommonName.

We can delete the underlying value-of.

This will generate an empty element with a name equal to the CommonName of the Fish that we’re processing. Finally, to include the child elements, we’ll move the apply-templates inside this element, much as the apply-templates was previously inside the Fish tag.

Returning to Testing Mode and executing you can see that the Fish tag has now been renamed Pilotfish. We no longer have our CommonName attribute and all of the appropriate child elements have been copied.

To review what we did in this exercise, we loaded in our FishXML XSD as both the Source and the Target. We then loaded the FishXML sample file and built a simple identity transformation that would copy the Source to the Target without modification. We then added new empty templates to remove the image tag and the id attribute. After that we removed all Fish other than the Pilotfish. Finally, we created special handling for the Pilotfish element which would first move the CommonName element to an attribute, and then structurally change this so the CommonName would be used as the element name as opposed to an attribute or child element. This concludes this tutorial.