eiConsole v.25R1
Tutorial & Interface
eiConsole – Database Tutorials
Creating XML and Delimited Files from MS SQL Data
Note: The Quick Start, Foundation, Topology and Data Mapping & Transformation Tutorials should be completed before proceeding with the Data Mapping & Transformation Tutorials.
Overview
This tutorial demonstrates and explains how to query a Microsoft SQL Server database using SQL-XML, transform the results into a simple XML and a delimited file, and save the resulting files to a directory. In this tutorial, we cover:
- How to add and configure JDBC drivers
- How to configure the Database Polling (SQL) Listener to connect to an MS SQL Server
- SQL-XML basics and the Select instruction, including creating and configuring a database and its tables and then selecting data from it
- How to transform the resulting database query XML into a simple XML
- How to transform the resulting database query XML into a delimited file
- Storing the resulting files in a directory
The tutorial expands on basic eiConsole topography and configuration, so users should be familiar with those concepts before beginning this tutorial. If you are unfamiliar with these concepts, please review the basic, intermediate and advanced tutorial sections.
Important: The installation and configuration of an MS SQL Server are outside the scope of this tutorial. Before beginning the tutorial, the user must have access to an MS SQL Server database and have the following information on hand:
- Database name
- Database username
- Database password
- Database server hostname
- Database server connection port
The database user must be able to create tables and insert data into them.
Preparing the Working Directory
Working Directory
Download the MS-SQL-Server-to-XML-and-Delimited-File-Working-Directory.zip file with the sample Working Directory and unzip it on your computer to a convenient place.
In our case, it’s c:\Users\{USER _NAME}\PilotFish eiConsole Working Directories\MS-SQL Server to XML and Delimited File where {USER_NAME} is the user’s name.
Preparing the Database
We’ll start by preparing an MS SQL Server database for this exercise. You can use any database that is accessible via JDBC drivers, though we’ll be using Microsoft SQL Server for this exercise. If you do not have access to an MS SQL Server, please contact your IT department or, if authorized, download and install Microsoft SQL Server from this link. Installation and configuration of an MS SQL Server are outside the scope of this tutorial. If you have problems installing or accessing the MS SQL Server or need credentials to access it, please contact your IT department.
Once you have access to the MS SQL Server, you will need to create the database that will hold the data used in this tutorial and also a user that eiConsole will use to connect to the newly created database. You can use any tool you like to create the database and user or you can ask your IT department to create them for you.
For this tutorial, our newly created database will be called tutorialdb and will be accessed using the following credentials:
- User name = testuser
- User password = testpass
Once the database and user are created, you can use the downloaded people_create_insert_script.sql script file to create the database table and data required. Once the script is executed you should see a new table called PEOPLE that contains 100 rows. If you have problems or need help running the table generation script please contact your IT department. Creating an MS SQL Server database, user and database table is outside the scope of this tutorial.
Once you finish all these steps, please copy all these values in a separate file or notepad as we will use them later in the tutorial. In addition to these values, you will also need the hostname or IP address of the server hosting the database to which we are connecting and the connection port. For this tutorial, our hostname will be TEST_SERVER and the connection port will be 1433.
To recap, the values we are going to be using for this tutorial are:
- User name: testuser
- User password: testpass
- Database name: tutorialdb
- Database table: PEOPLE
- Server host name: TEST_SERVER
- Server connection port: 1433
Adding the Database JDBC Driver
Now that the tutorialdb has been created, the testuser has been added to it and the tutorial PEOPLE table and data have been created using the downloaded script, we are almost ready to proceed with the creation of our Route.
Before proceeding with the creation of the route, we need to make available to the eiConsole the JDBC driver for the database server to which we will be connecting. In this case, it is the MS SQL SERVER. As of the publishing of this tutorial, Microsoft JDBC drivers can be downloaded by clicking this link
The JDBC driver will be a file with a jar extension specific to the database to which you want to connect. If you have problems figuring out the correct JDBC driver file please consult the database company’s help information on their website or contact your IT department. In our case, the JDBC driver file we will be using to connect to our MS SQL SERVER is called mssql-jdbc-12.4.1.jre11 and was provided by Microsoft.
Put this jar file in the directory C:\Program Files\PilotFish Technology\eiConsole\runtime\lib and restart the eiConsole.
Opening the eiConsole
Open the eiConsole, browse to your MS SQL Server to XML and Delimited File directory and open it. The fully configured MSSQL to XML and Delimited Files – Example route is included in the Working Directory. Your Route File Management screen will open, as shown below.
Next, follow the tutorial and walk through it step-by-step. You may check your work against the provided Route (sample data) at the end of the tutorial.
Creating a New Route
Next, we’ll create a new Route in the eiConsole called MSSQL to XML and Delimited Files:
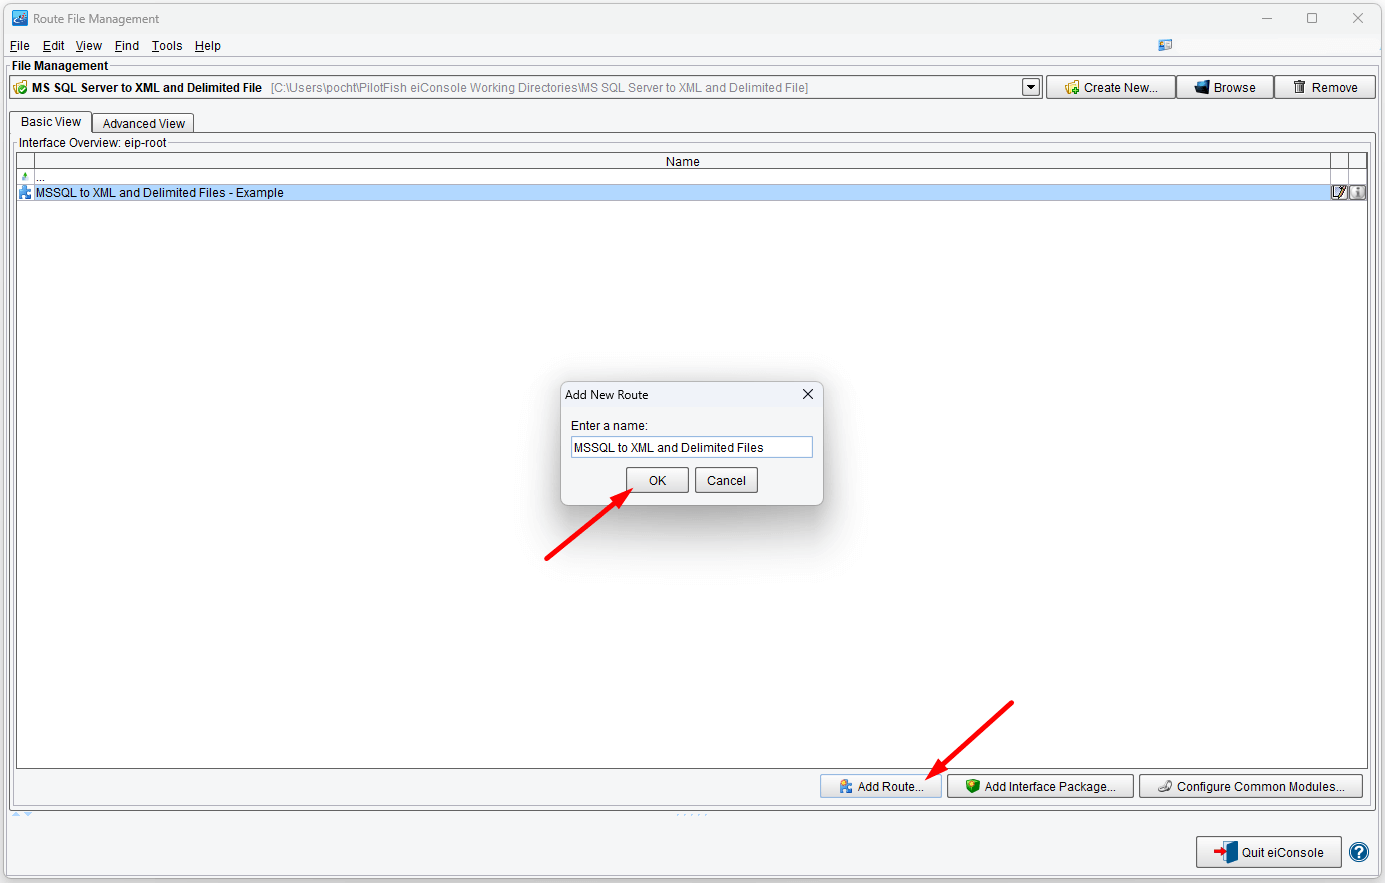
Double-click the Route you just created.

To interact with our database, we have a few standard components available to us:
- Database Polling (SQL) Listener
- Database SQL Transformation Module
- Database SQL Transport
Each of these uses a PilotFish language called SQL-XML, which can be summarized as an XML-based, database agnostic set of SQL instructions.
Each module can be configured using an input file referencing a file containing SQLXML or, if this is not provided, by assuming that the contents of any transaction reaching that module are SQL-XML. In either case, the SQL-XML received will be interpreted and executed against a configured database connection, which can be a Data Source or JDBC-driven.
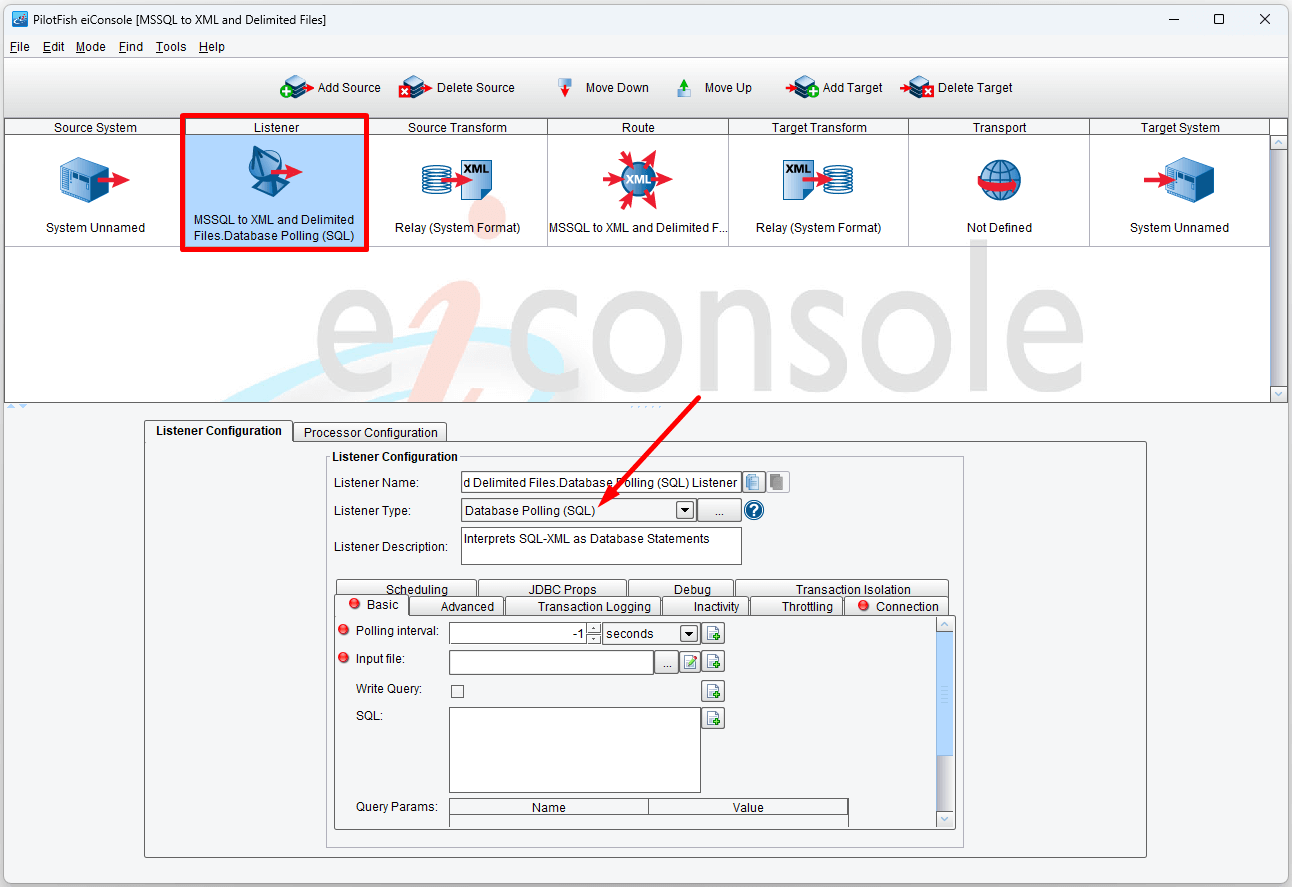
Configuring a Basic Database Polling (SQL) Listener
We’ll start by configuring a basic Database Polling (SQL) Listener. Add a new Source and select that Listener from the Listener Type drop-down:
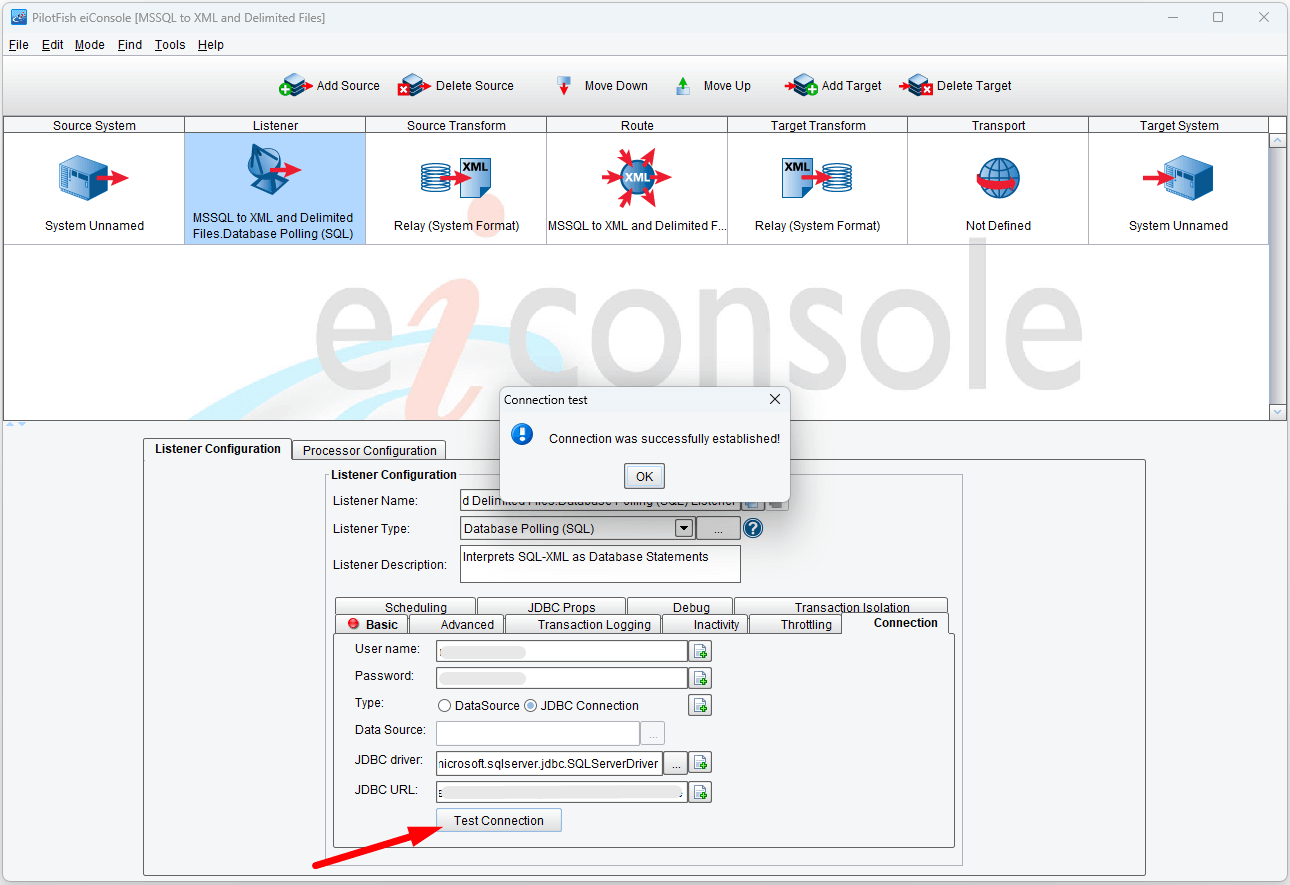
Next, go to the Connection tab and provide the user name and password we created earlier.
For the JDBC URL value you will need to provide a URL with the following format and use the previously copied values:
jdbc:sqlserver://<Server host name>:<Server connection port>;Database=<Database name>
For the JDBC driver value, click on the … button to the right of this text field and select the desired JDBC driver name from the pull-down menu that will pop up. For an MS SQL SERVER driver, the name will usually contain the words microsoft and sqlserver in the name. If you don’t see an entry with these words you can type the driver name directly in the JDBC driver field; for this tutorial, you can type com.microsoft.sqlserver.jdbc.SQLServerDriver. If you get any errors later related to the JDBC driver, please review the steps under Adding the database JDBC driver above.
In our example, the values used are:
- User Name: testuser
- Password: testpass
- JDBC Driver: com.microsoft.sqlserver.jdbc.SQLServerDriver
- JDBC URL: jdbc:sqlserver://TEST_SERVER:1433;Database=tutorialdb
With the values entered, you can click on the Test Connection button. You should receive a “Connection was successfully established!” message. If you get an error message, please review the previous steps.
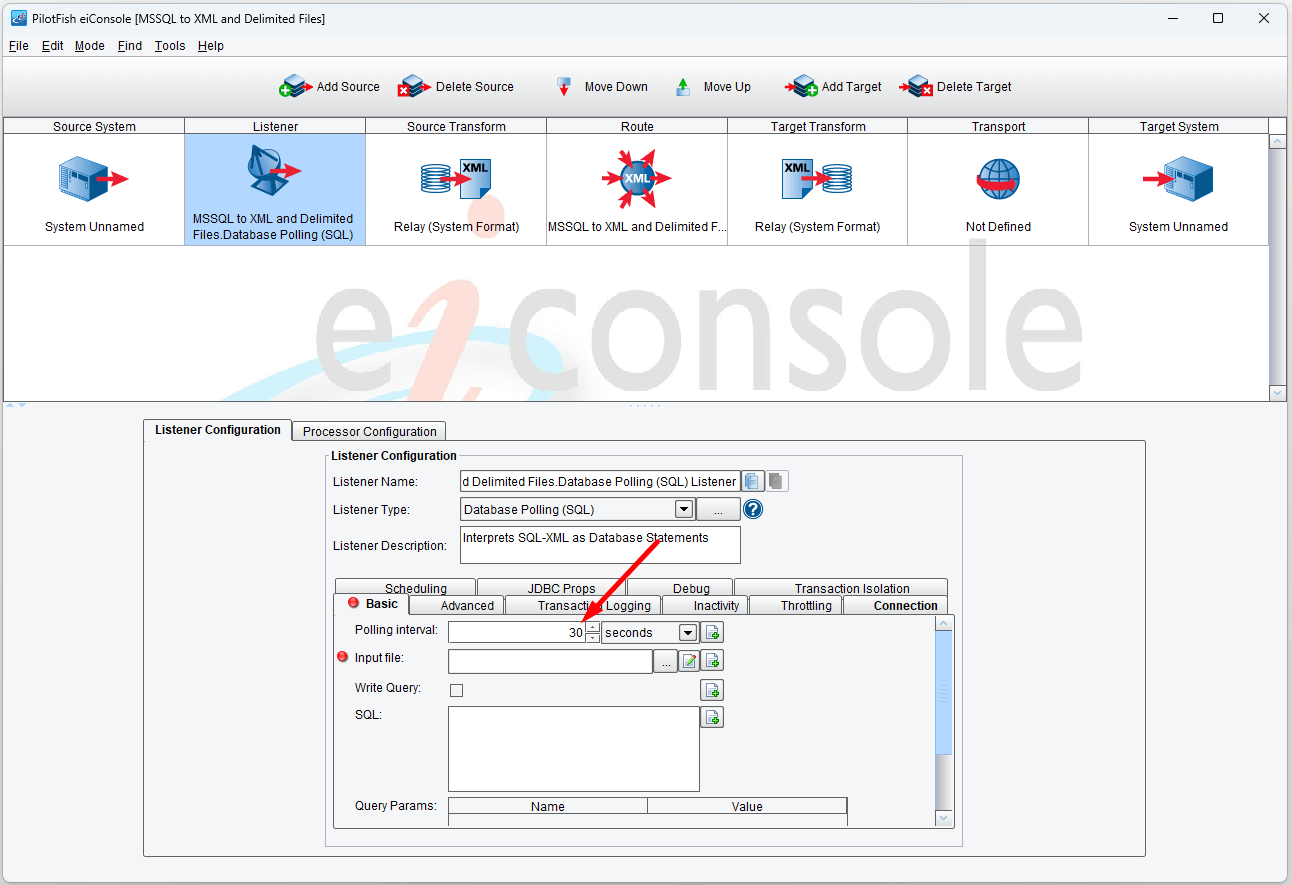
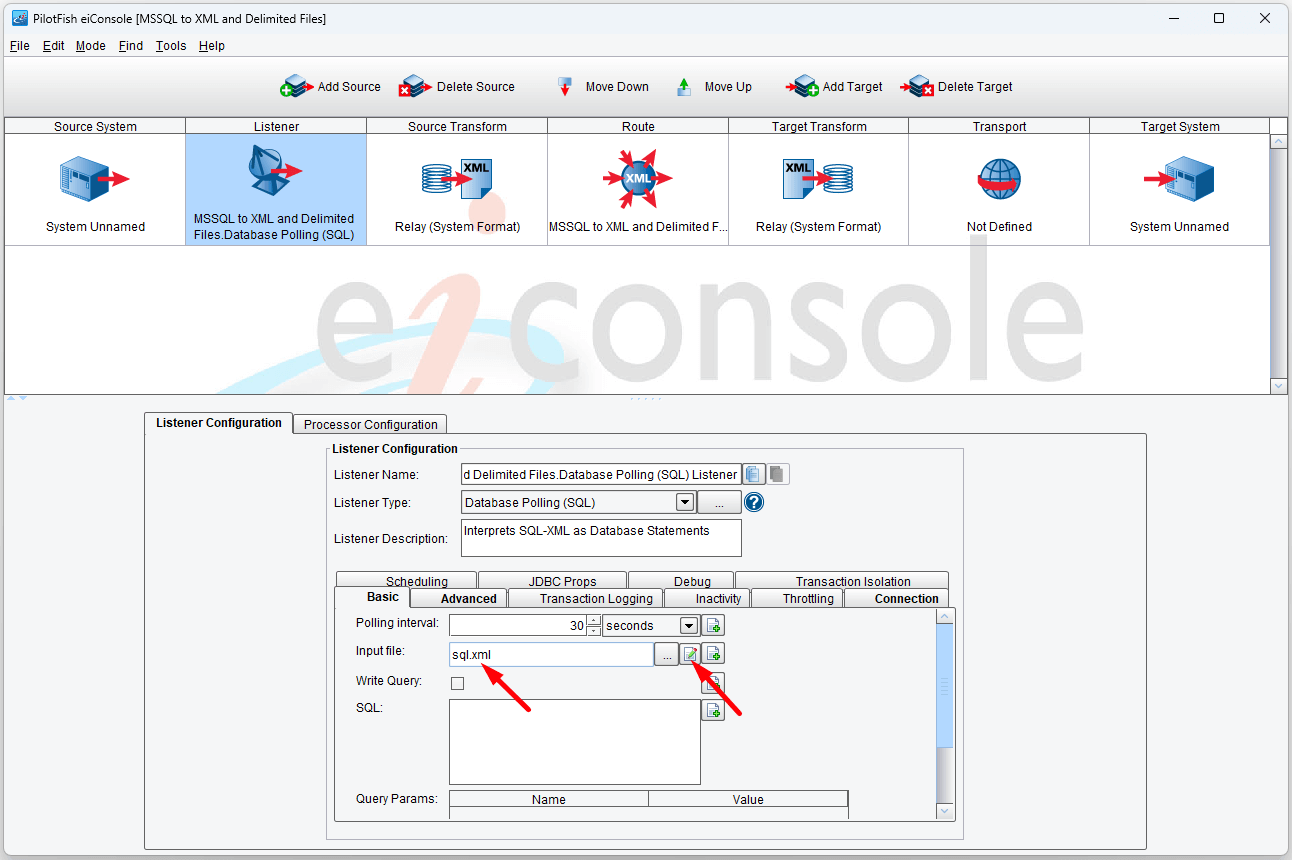
On the Basic tab, we’ll need to first provide a Polling Interval, which is how often our SQL-XML is executed against the provided database connection. Since this is a tutorial, we’ll assume 30 seconds is sufficient:
Next, we’ll need to create our SQL-XML file. Type sql.xml into the Input File field, then click the Edit button.
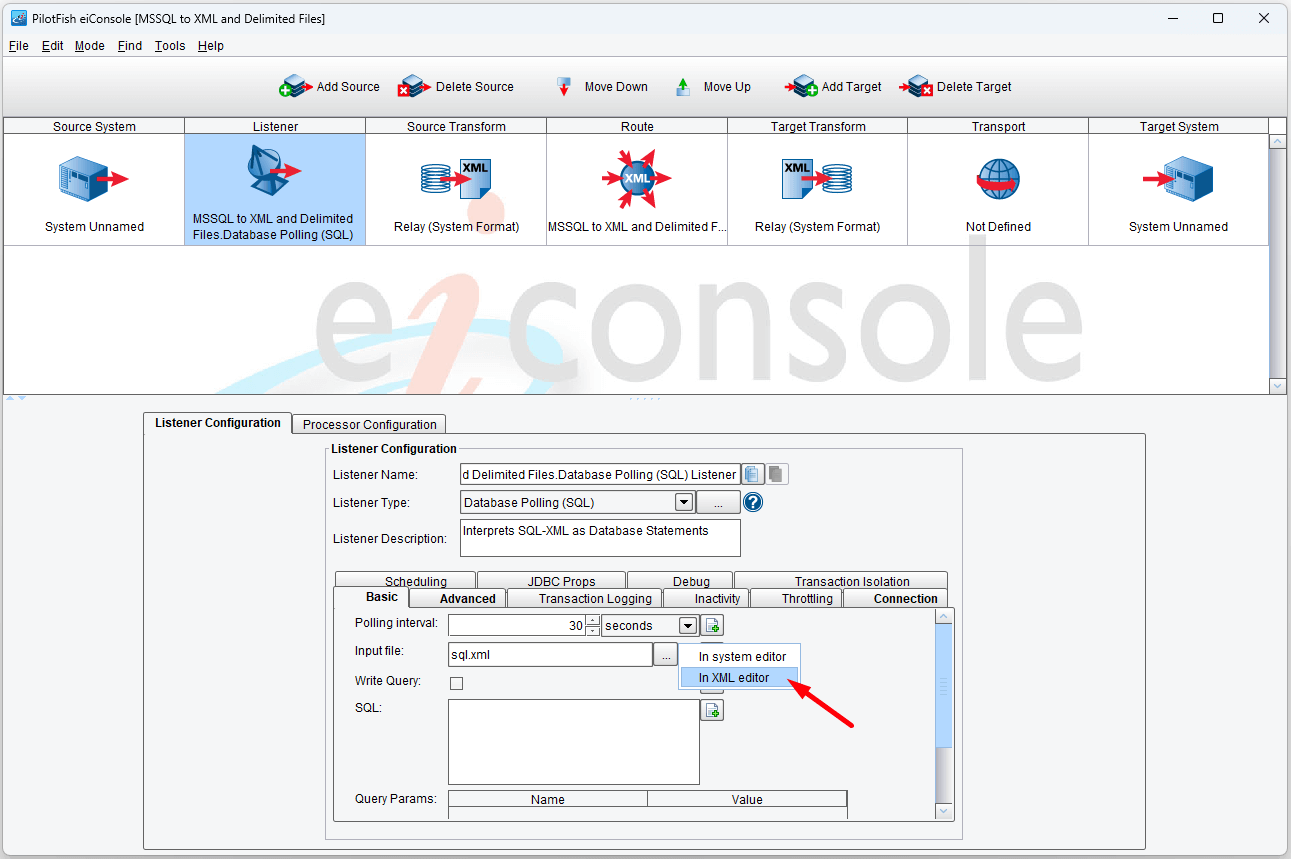
Click on In XML Editor from the drop-down.
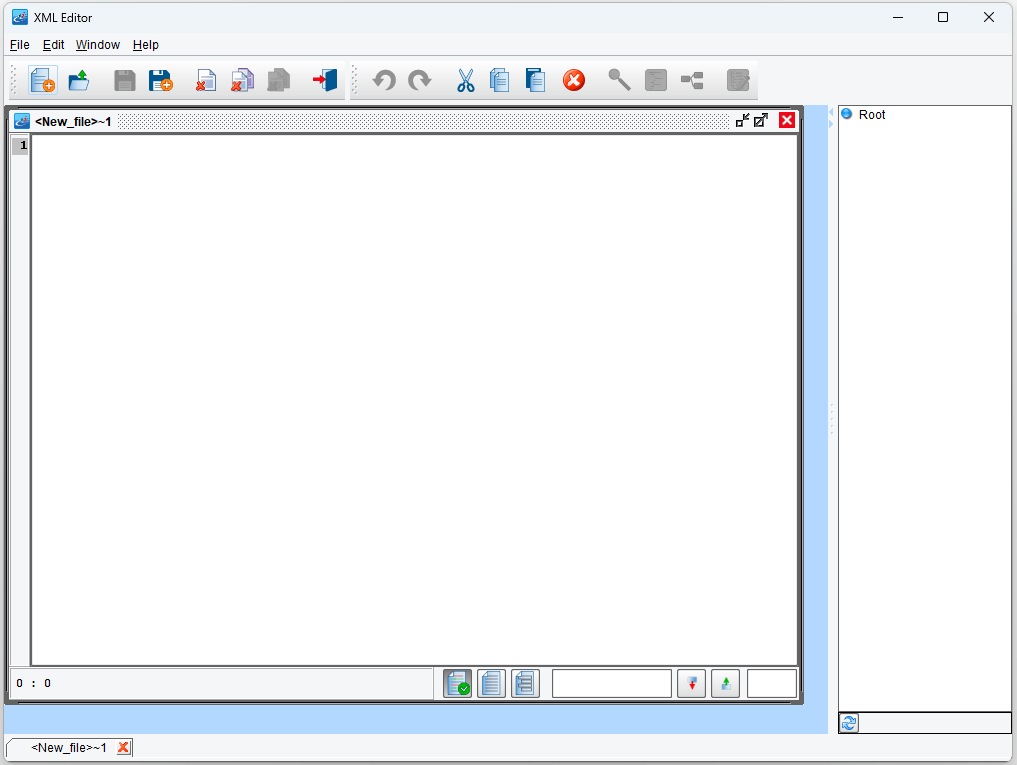
The new file for editing should be opened.
As this is an XML file, we’ll start by providing the basic XML header:
<?xml version="1.0" encoding="UTF-8"?>
Our next line will be the root element, SQL-XML. There’s a particular namespace associated with SQL-XML, so we’ll define that using the xmlns attribute:
<SQLXML xmlns="http://pilotfish.sqlxml"> </SQLXML>
We can now provide a number of different SQL-XML instructions inside the SQL-XML body, including Execute, Select, Insert, Update, and Delete. We’ll use the Select instruction. The Select element has a required attribute called into which will specify the name of a variable for the selected rows to be placed in. We’ll call our records:
<Select into="records"> </Select>
Our output should look something like this so far:

The structure of the Select instruction is pretty simple; it expects a single child element to share names with the table selected from. Please note that different databases may impose different restrictions on case sensitivity. Underneath the table name element, we’ll provide empty tags matching the names of columns we’re interested in retrieving. These are as follows:
<?xml version="1.0" encoding="UTF-8"?>
 <SQLXML xmlns="http://pilotfish.sqlxml">
 <Select into="records">
 <PEOPLE>
 <FIRST_NAME />
 <MIDDLE_NAME />
 <LAST_NAME />
 <GENDER />
 <SSN />
 <BIRTHDATE />
 <OCCUPATION />
 <VEHICLE_MAKE />
 <VEHICLE_MODEL />
 <ADDRESS_LINE_1 />
 <ADDRESS_LINE_2 />
 <CITY />
 <STATE />
 <ZIP />
 </PEOPLE>
 </Select>
 </SQLXML>
Our output:

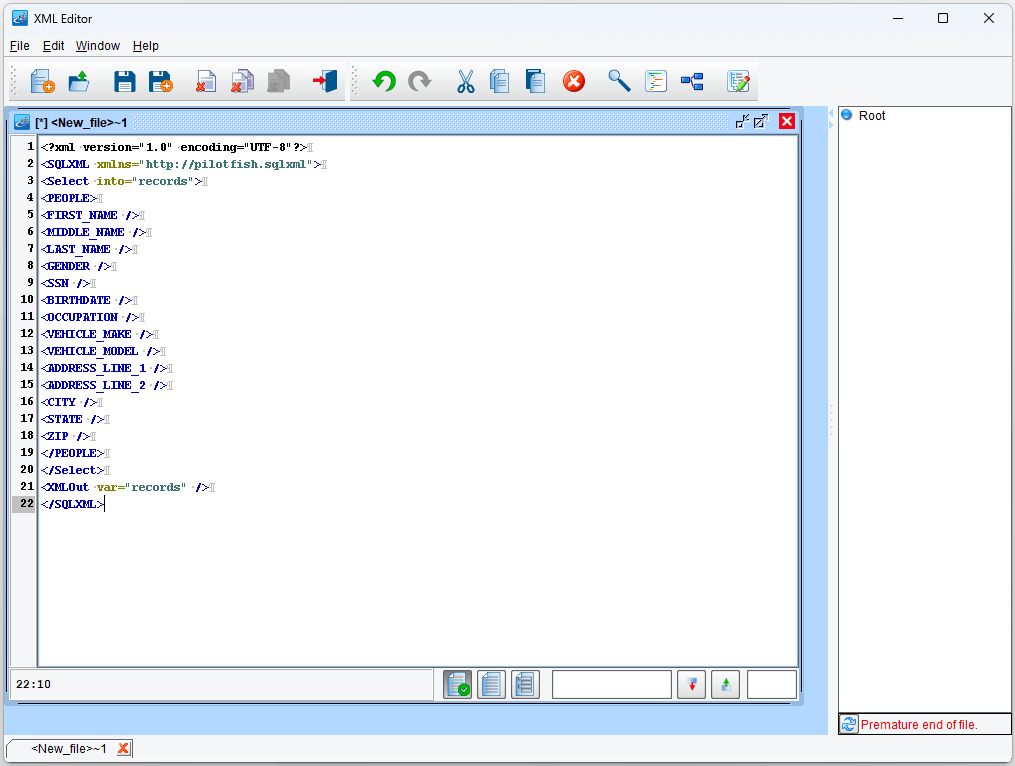
The Select instruction should now create an SQL query fetching the columns from the PEOPLE table. The results will be stored in a variable called records. Now we simply need to output this variable to XML. To do so, we’ll add another instruction next to Select called XMLOut with an attribute called var specifying our records variable:
<XMLOut var="records" />
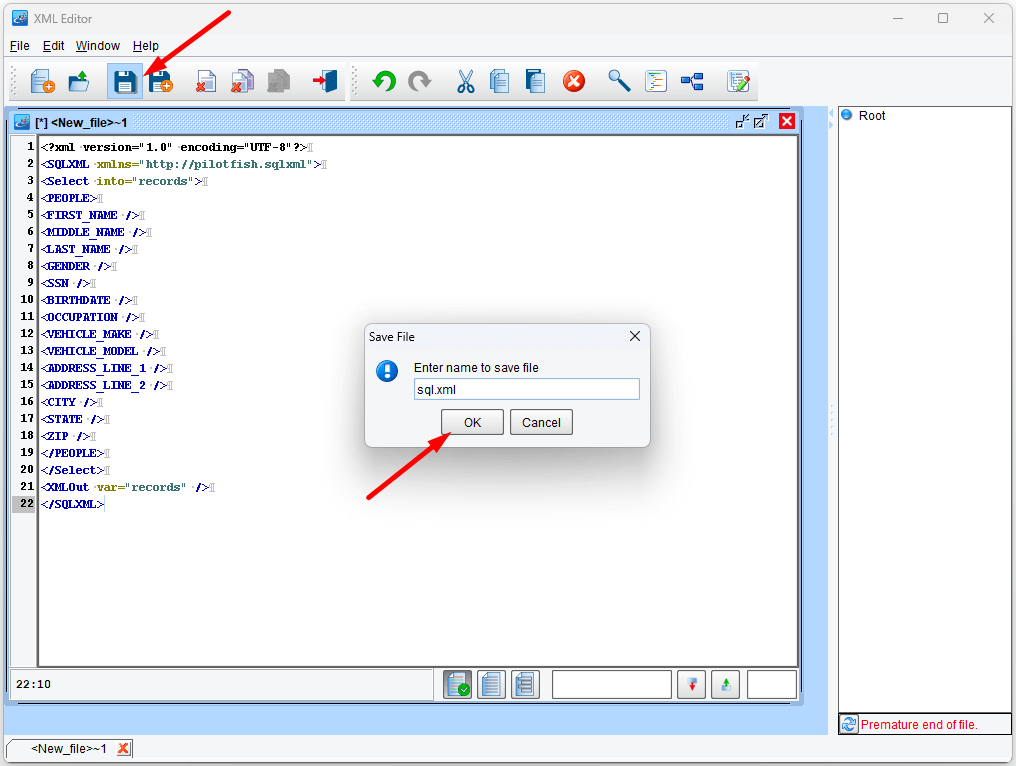
Our completed SQL-XML file should look like this:
Now, save your file. Click the save button and save the file as sql.xml and close the XML Editor.
We’ll change one more configuration value under the Advanced tab. To enable it, check the Use Single Output Stream option.

This will cause all selected rows to come back in a single eiConsole transaction. Unchecked, and by default, the Listener will produce a separate transaction for each row selected.
Saving the Database Polling (SQL) Listener output for use later as a Source format
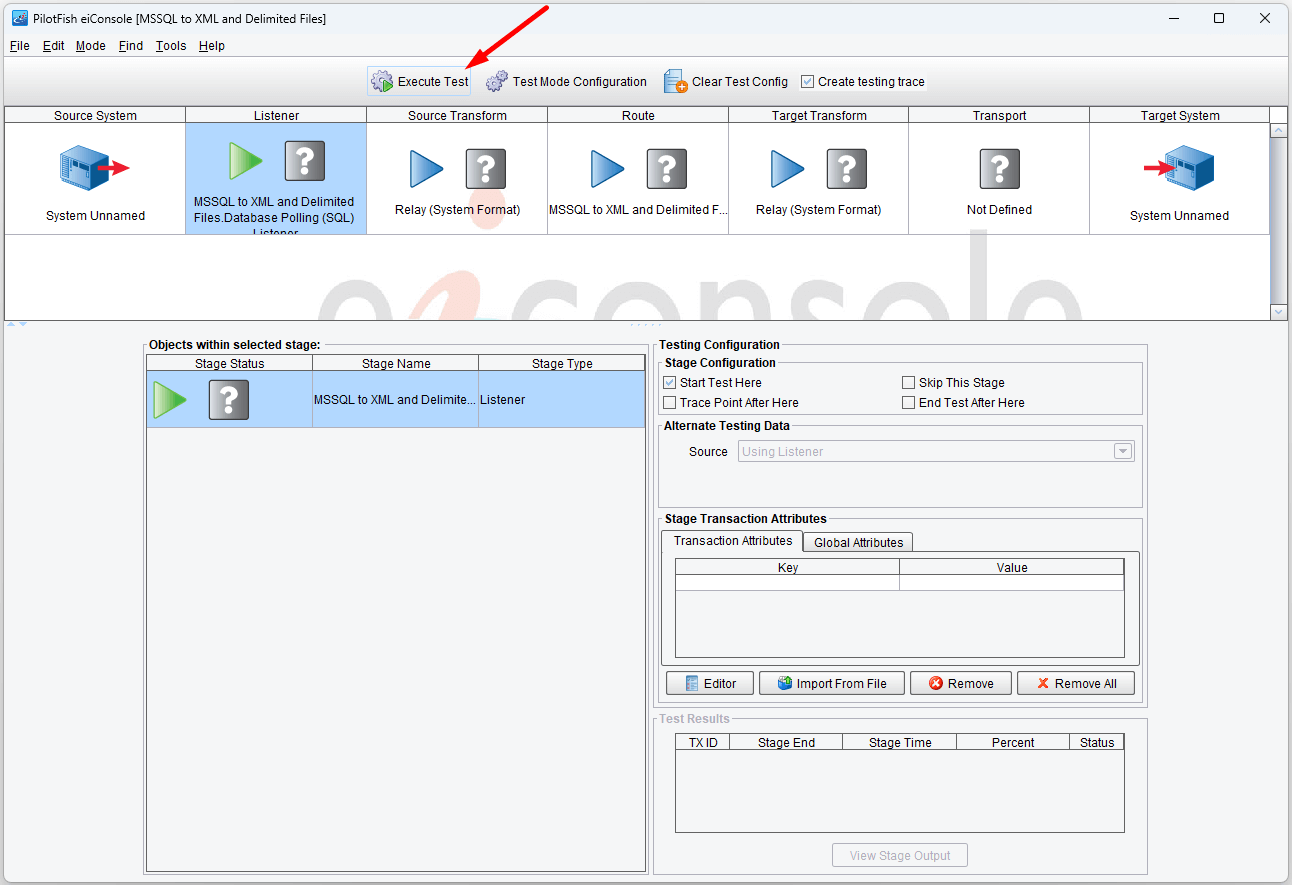
Save the route and choose Mode >Testing Mode from the top menu and select Execute Test at the Listener stage.
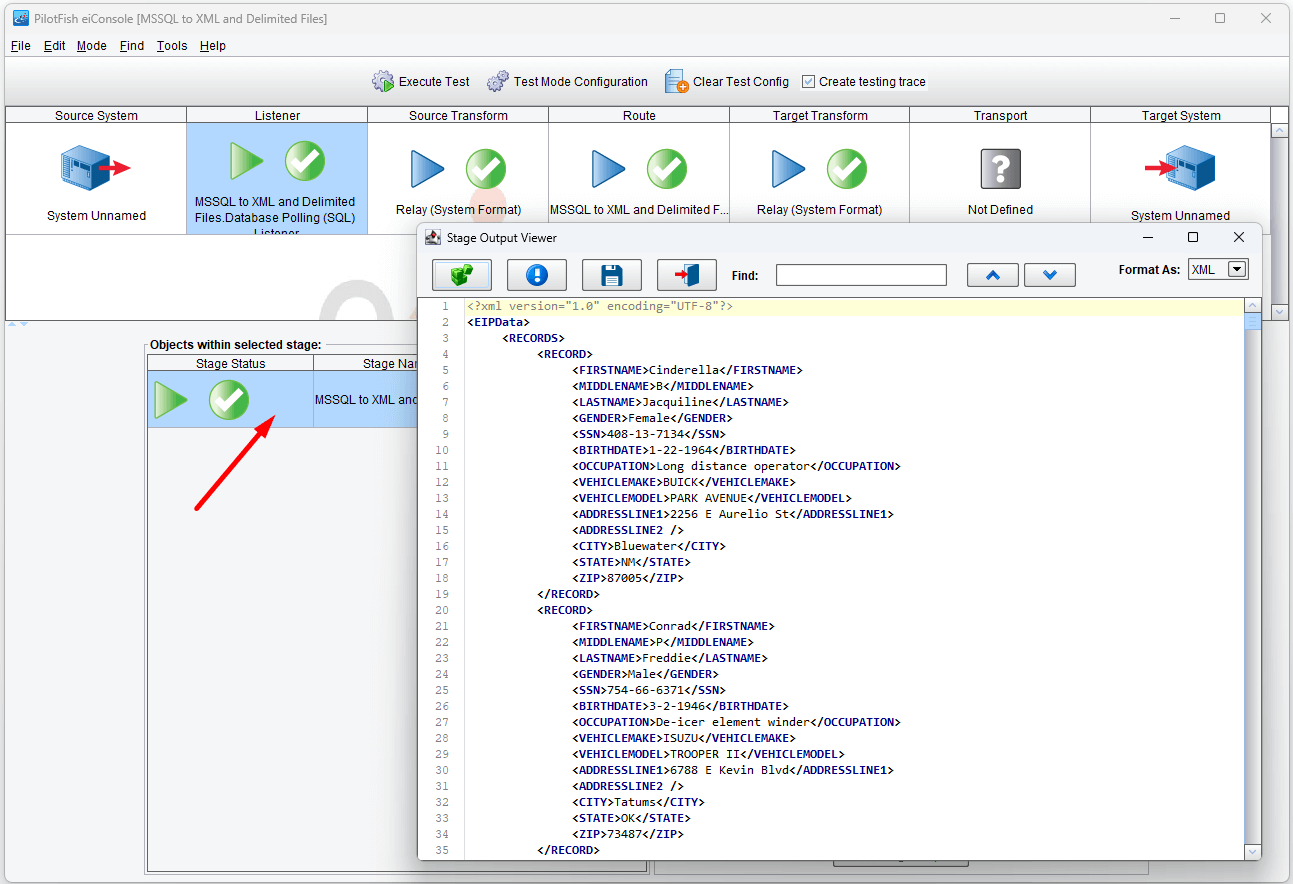
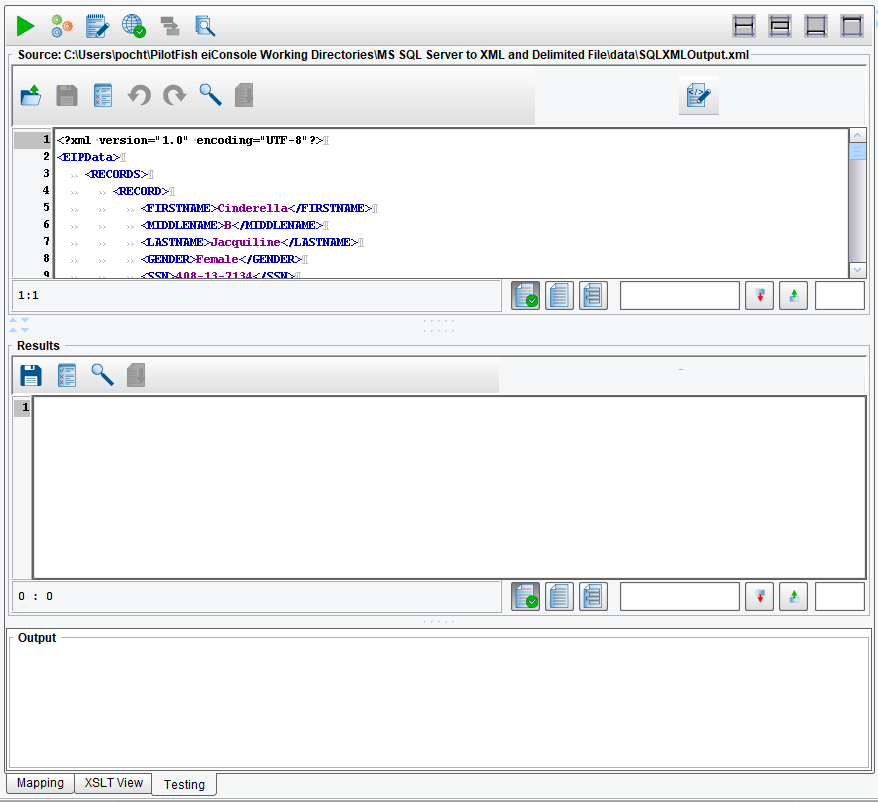
Double-click the first line under the Listener stage. The resulting database polling XML should look like this:
Now, we are going to save this output file for later use as the Source when creating the transformations to XML and delimited files. Click on the Save button on the top bar, name your file SQLXMLOutput.xml and save it in a local directory. Be sure to remember the location because we will be using this file later on.
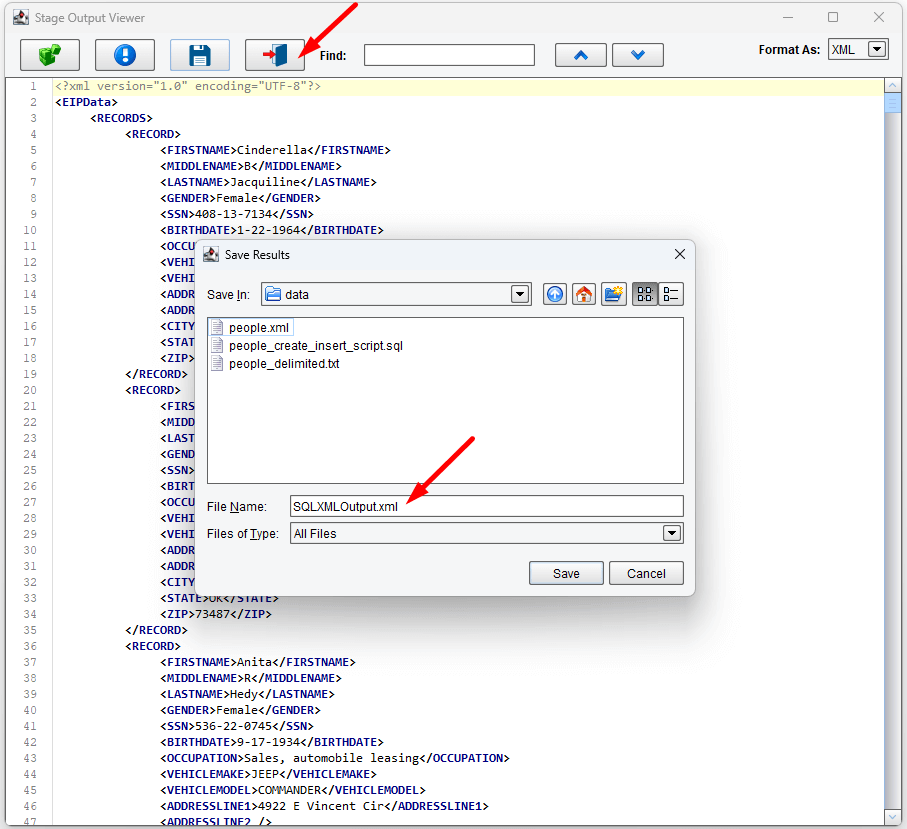
In our case we saved our file in the data directory under our working directory, c:\Users\{USER _NAME}\PilotFish eiConsole Working Directories\MS-SQL Server to XML and Delimited File\data.
Close the result window and go back to Mode >Editing Mode in the top menu.
Adding the Polling Output XML to XML XSLT
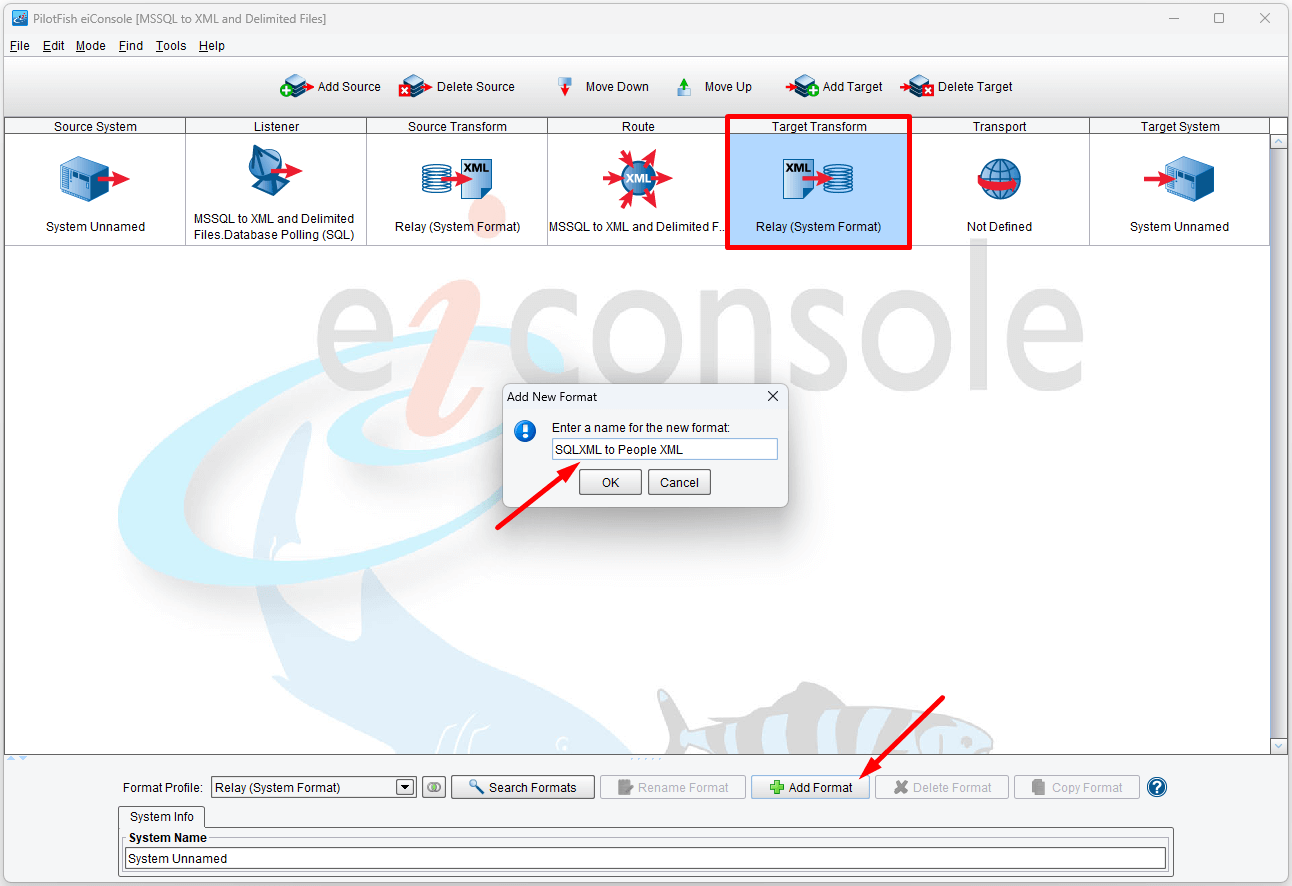
You can configure XSLTs at either the Source or Target Transform. The reasons for choosing one or the other are usually due to topographical concerns. For this tutorial, it does not matter which we use, so we’ll just arbitrarily choose the Target Transform.
Select this stage and add a new Format. We’ll call this SQLXML to People XML.
Editing a New Mapping
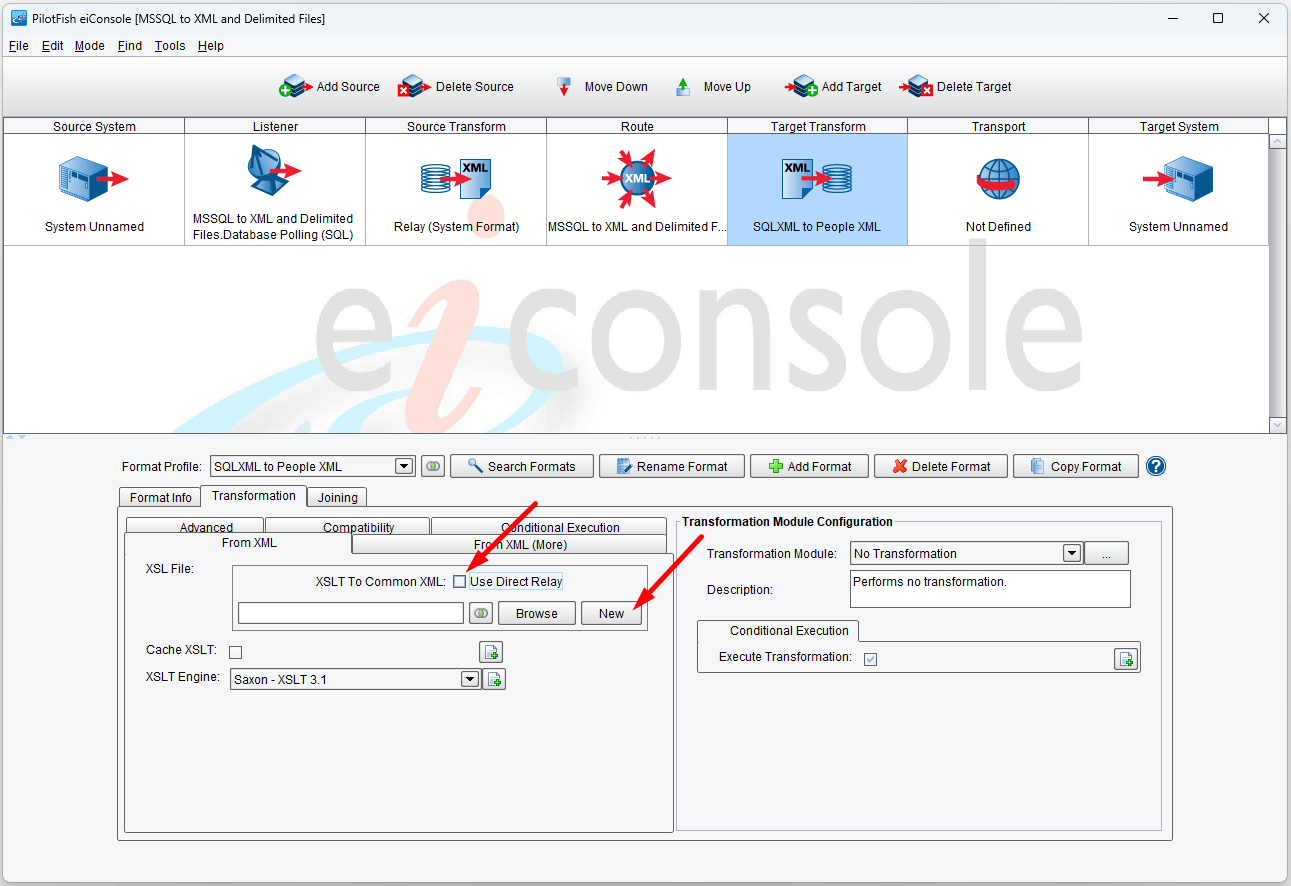
To use XSLT, uncheck the Use Direct Relay option. You now have a variety of options available to you. You can type in the name of an existing XSLT file, browse to one, edit a selected one, specify if you wish to cache the XSLT, enable 2.0 support, and even select which XSLT engine to use. Using the defaults for these options is more than sufficient for most transformations regardless of complexity.
As we have no existing XSLT document to edit, simply clicking the New button with no document selected will open the Data Mapper, allowing you to create a new mapping.
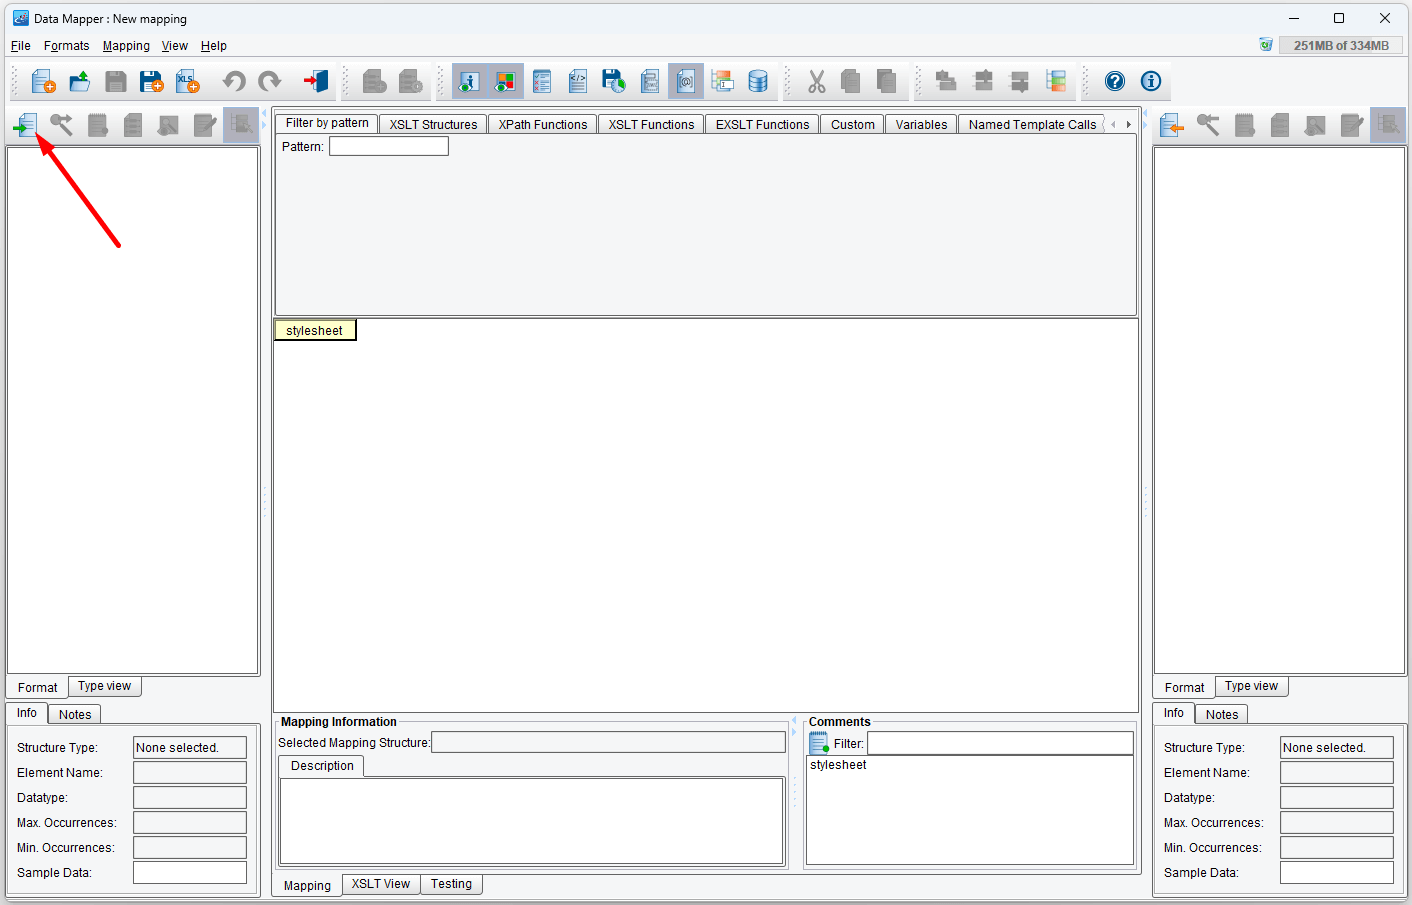
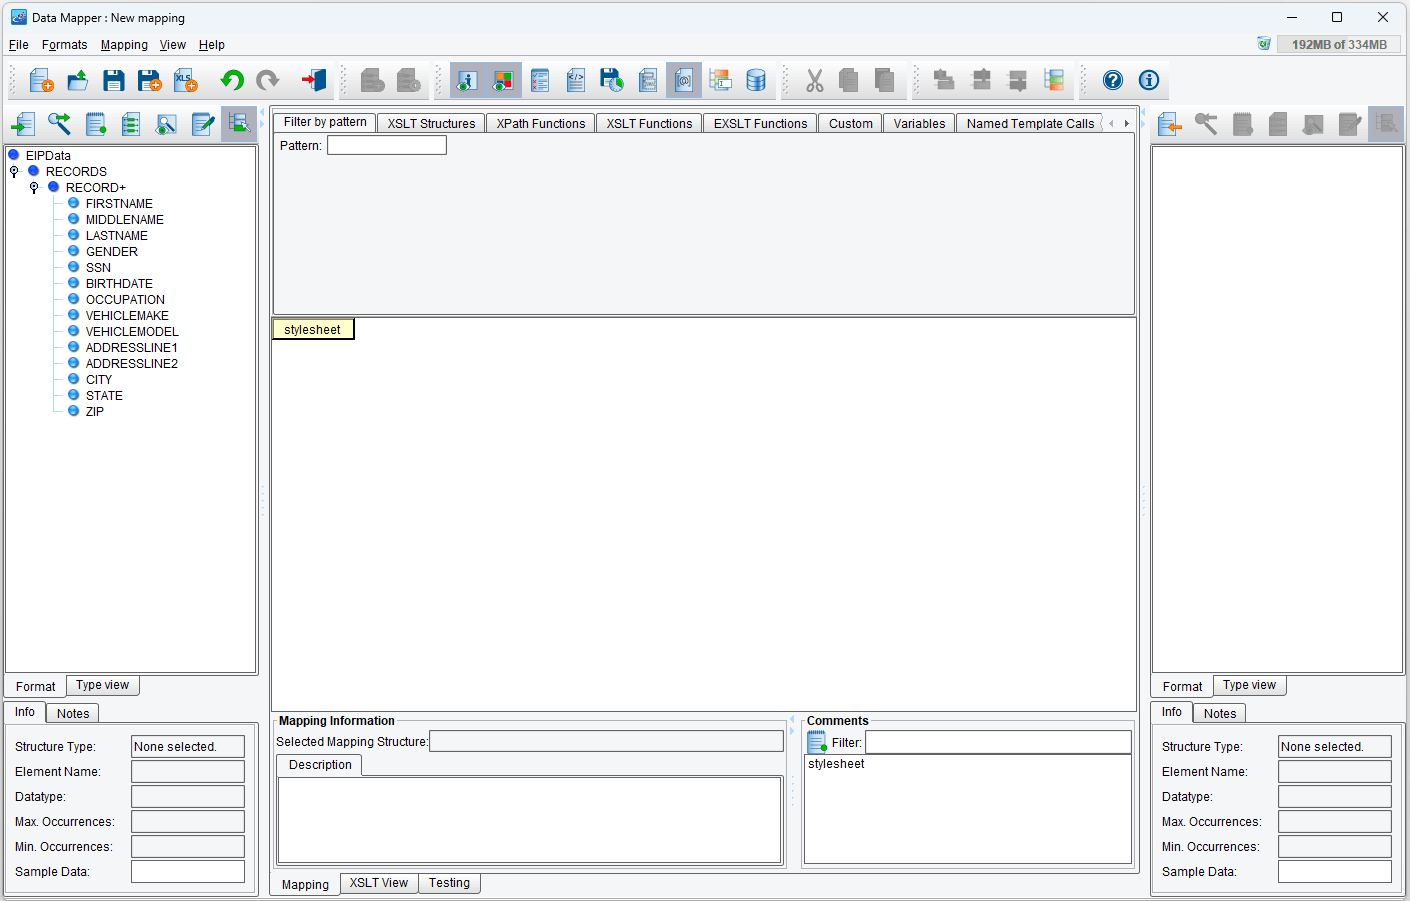
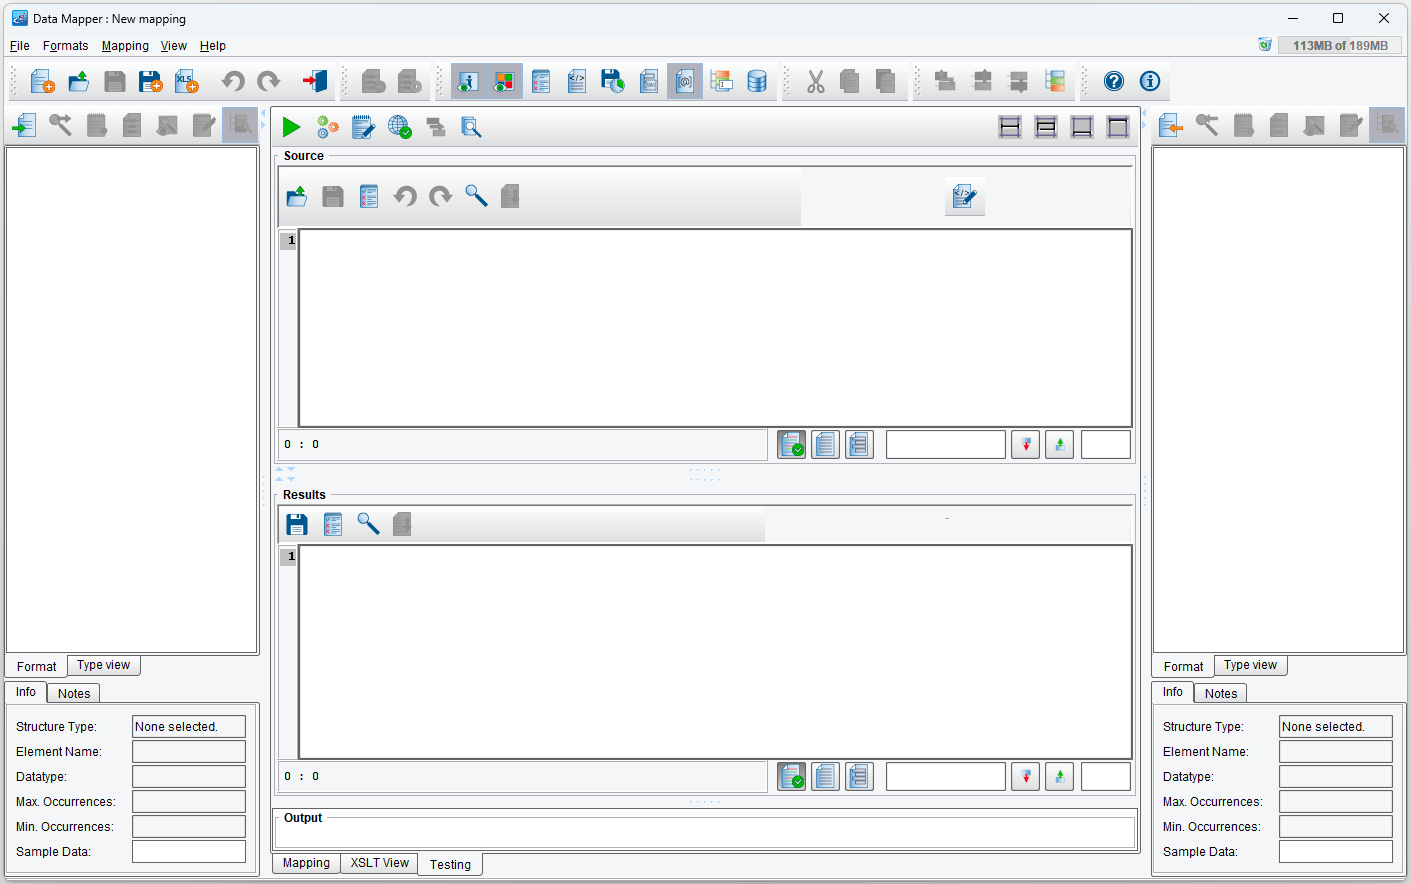
This will open the Data Mapper.

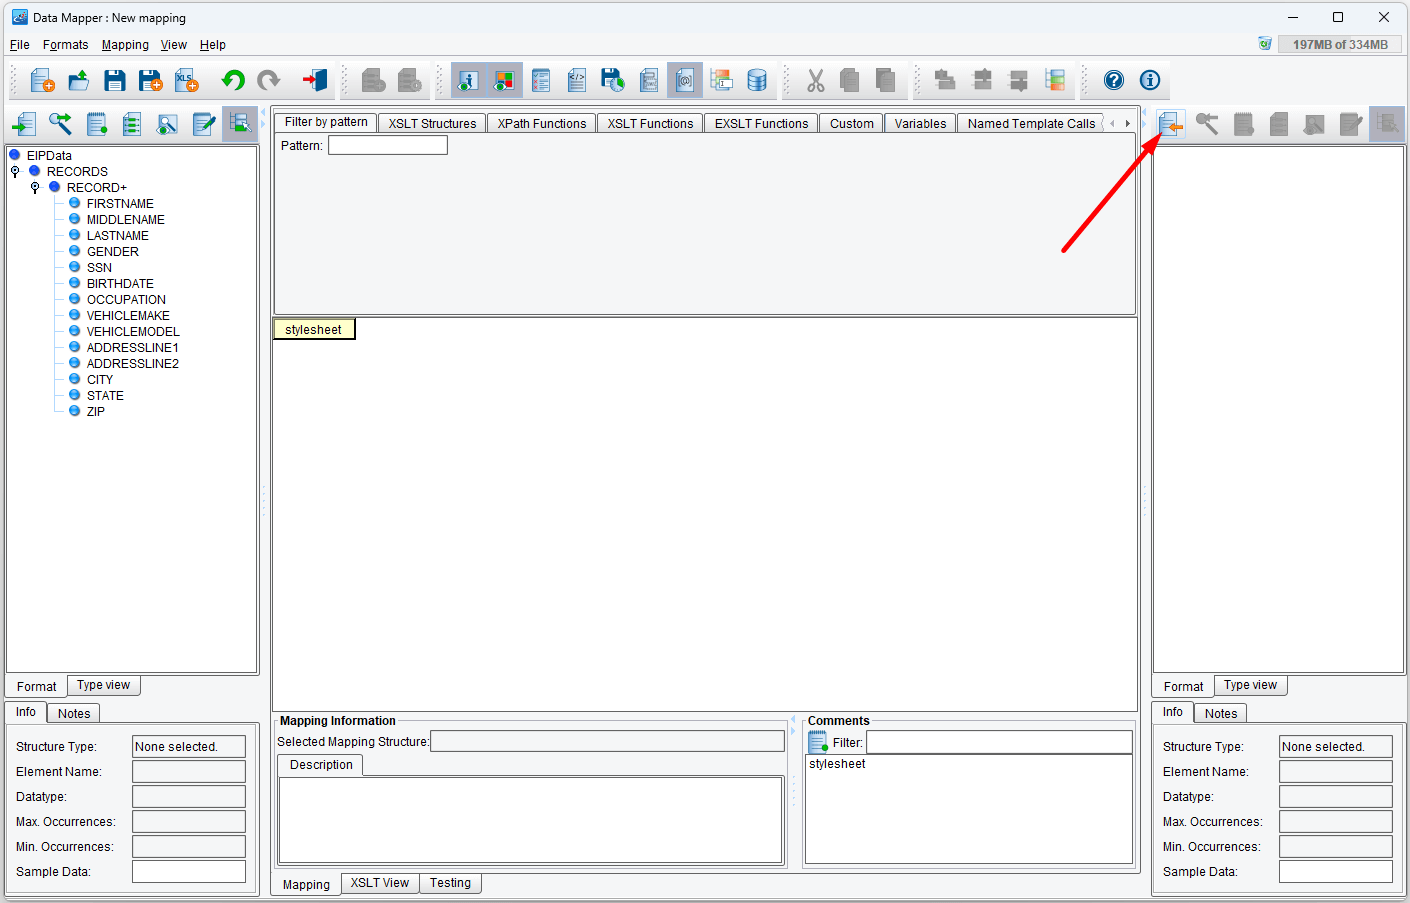
The Data Mapper makes use of 3 main panels. On the left side of the screen is a tree representing the Source format. On the right side of the screen is a tree representing the Target format. The middle panel represents the mapping logic, also organized into a tree. At the bottom center of the screen are tabs for switching between Mapping, XSLT View, and Testing modes.
Reading the Source Format
The first thing you’ll typically do when creating a new mapping is to load in the Source and Target formats you’ll be working with. For each panel, click the Open Source Format button at the top. We’ll start by loading the Source format.
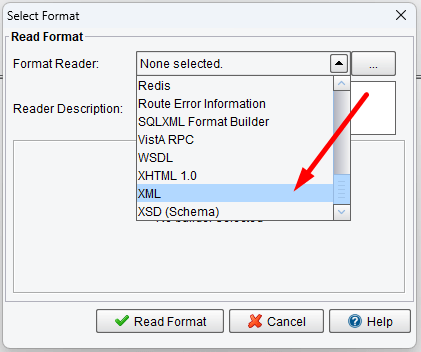
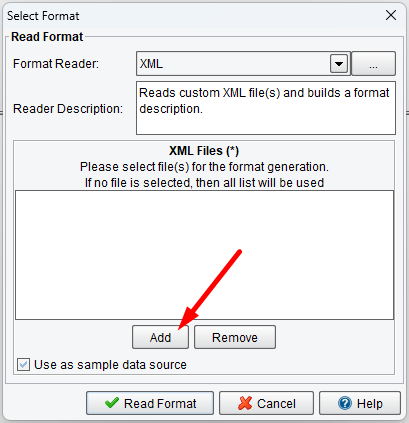
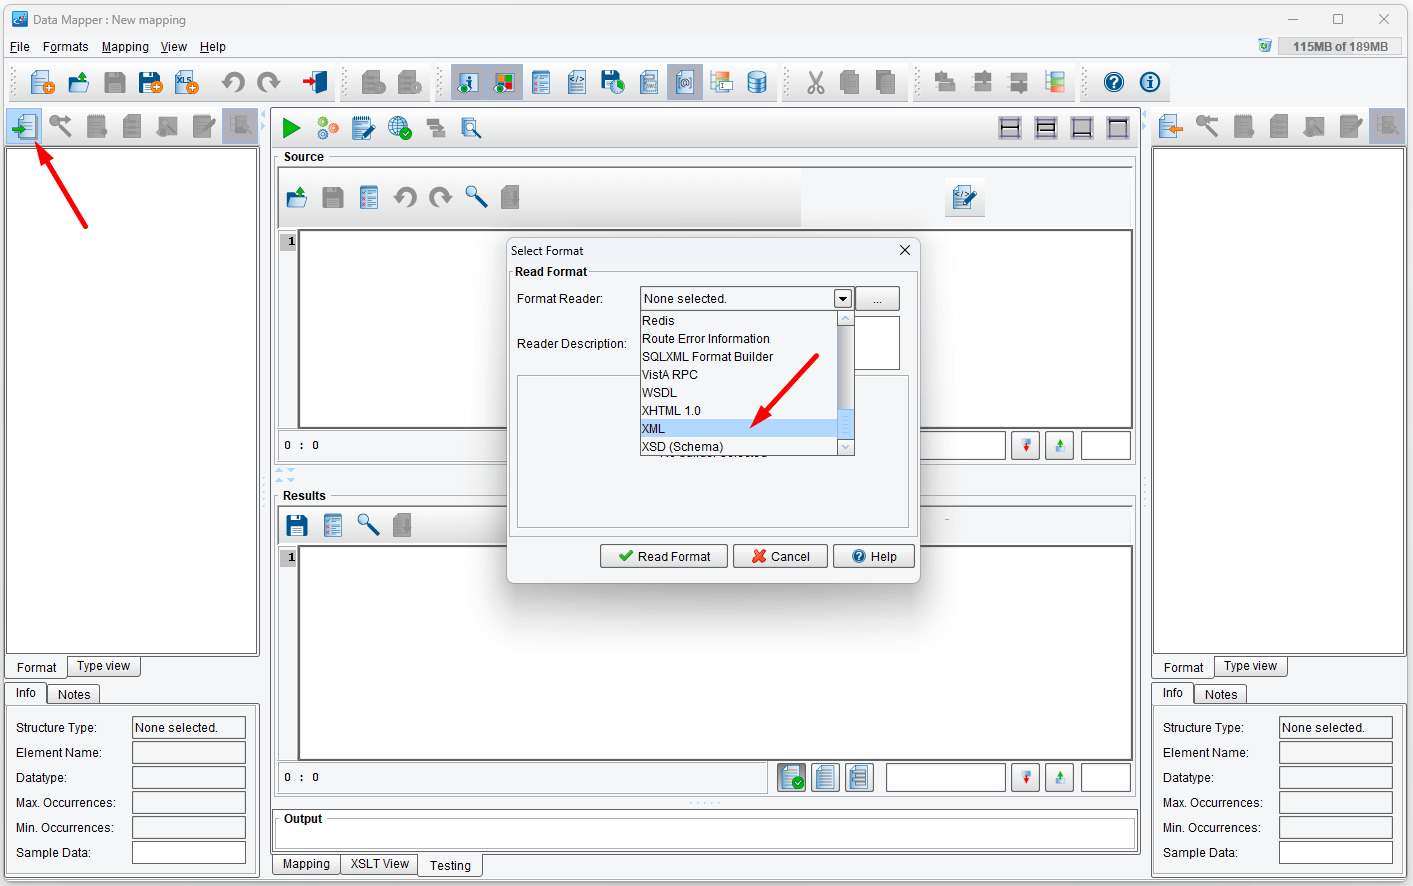
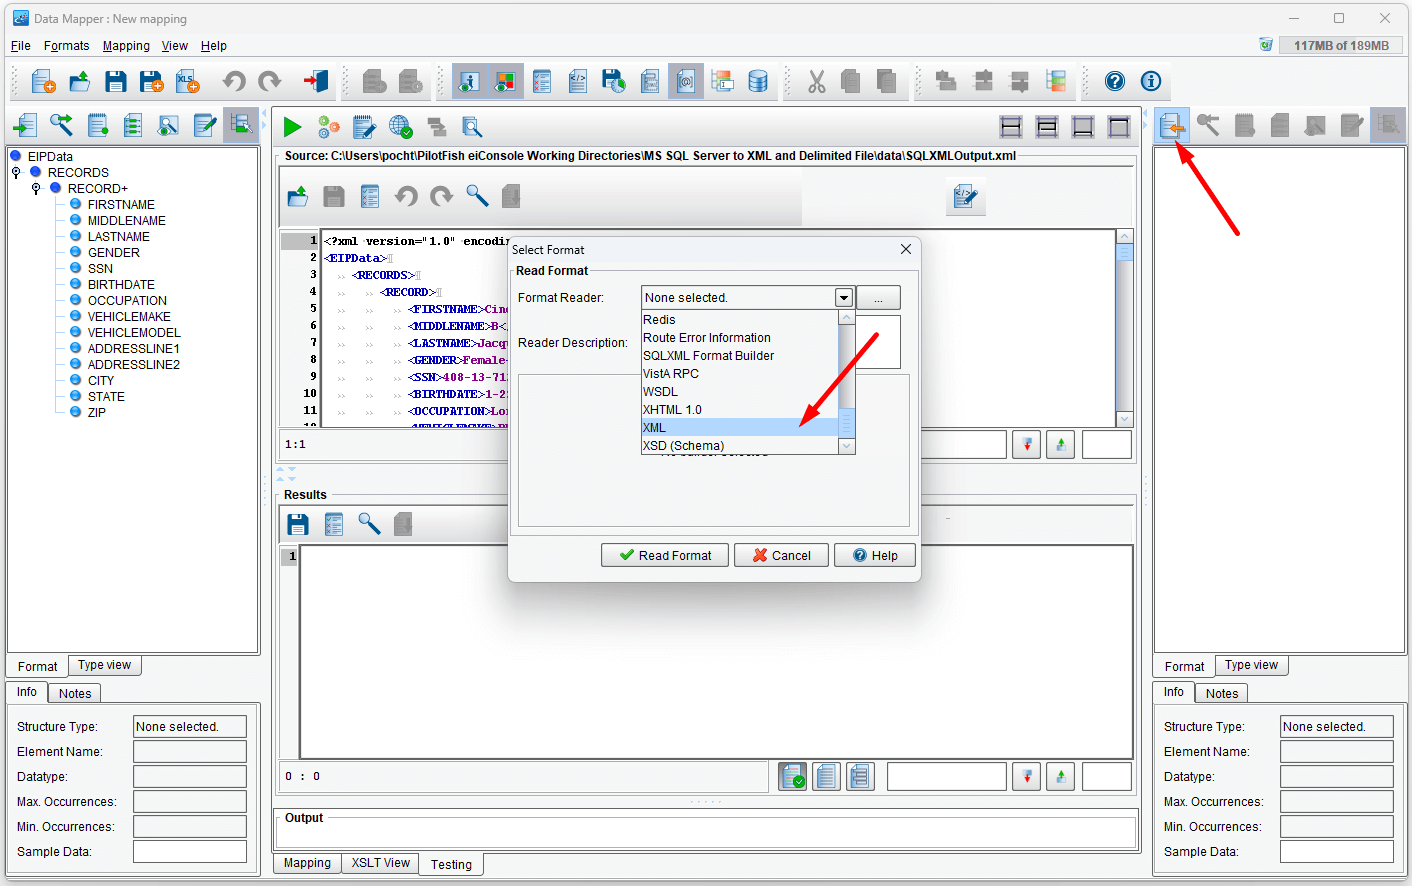
This will raise a dialog allowing you to pick from a list of Format Readers. Format Readers are components that generate a format structure from some Source, be it an XML file, schema file, file specification, database, etc. For this tutorial, we’ll use the XML Format Reader, which allows us to use an XML sample file to infer a structure from:
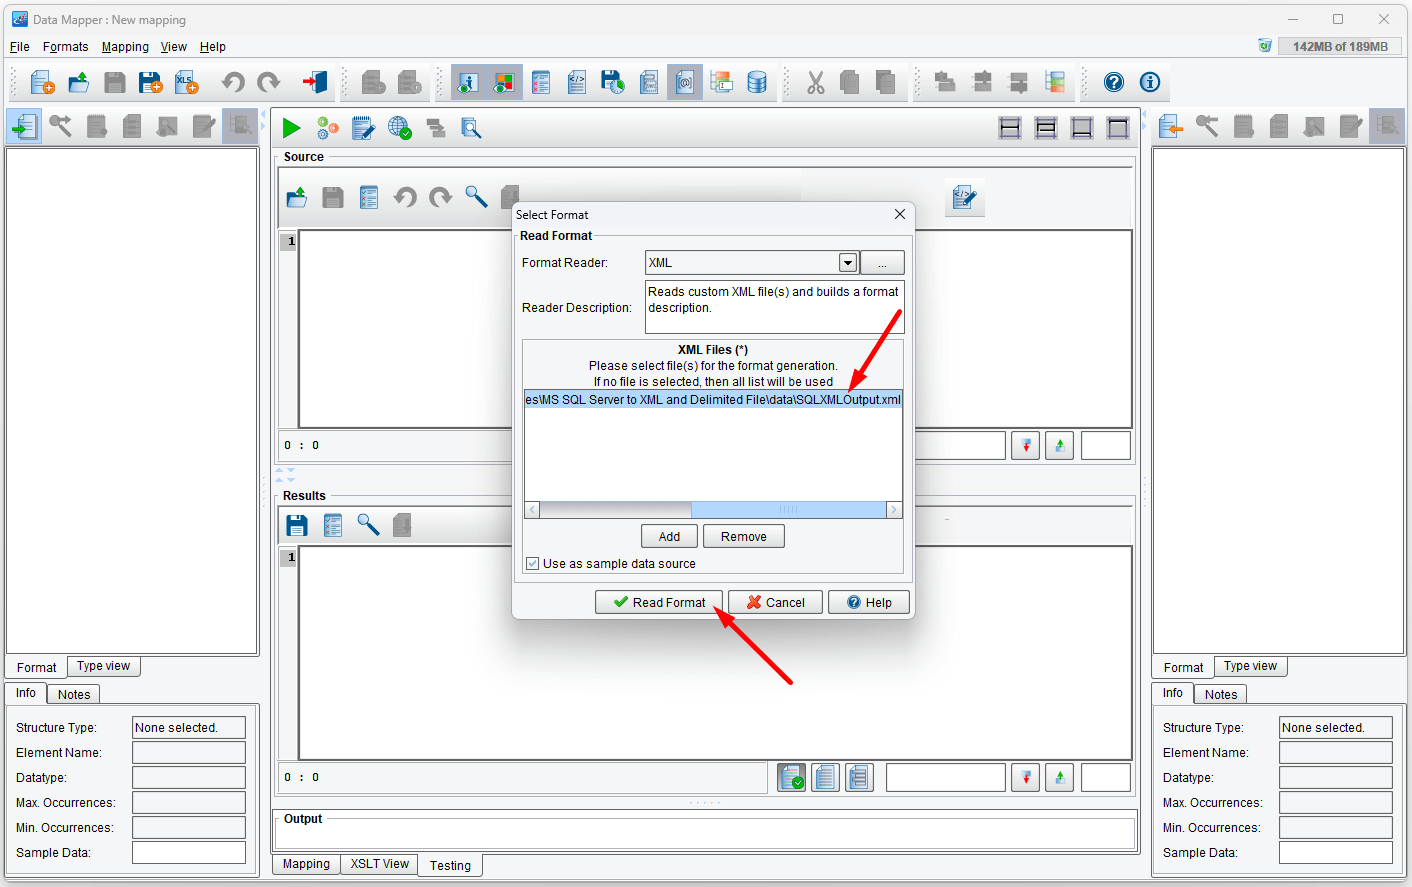
Next, we’ll need to add our sample file. Click Add and browse to SQLXMLOutput.xml, which you created in the Listener test step:
In our case, we saved our file under c:\Users\{USER _NAME}\PilotFish eiConsole Working Directories\MS-SQL Server to XML and Delimited File\data
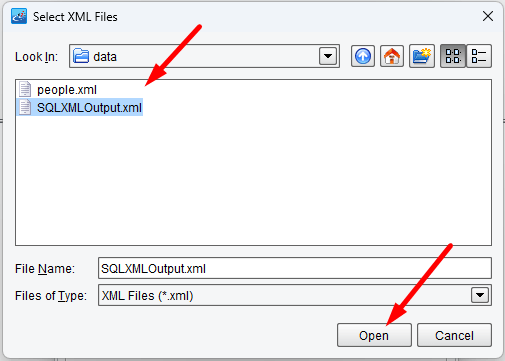
The selected XML file should appear under XML Files. Click Read Format:
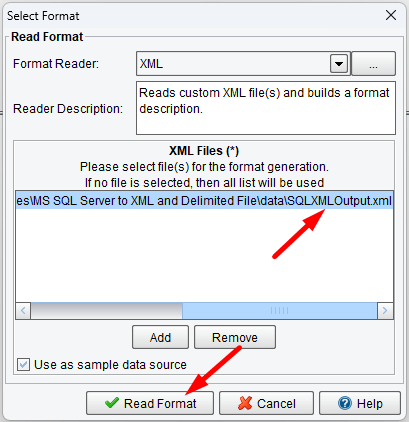
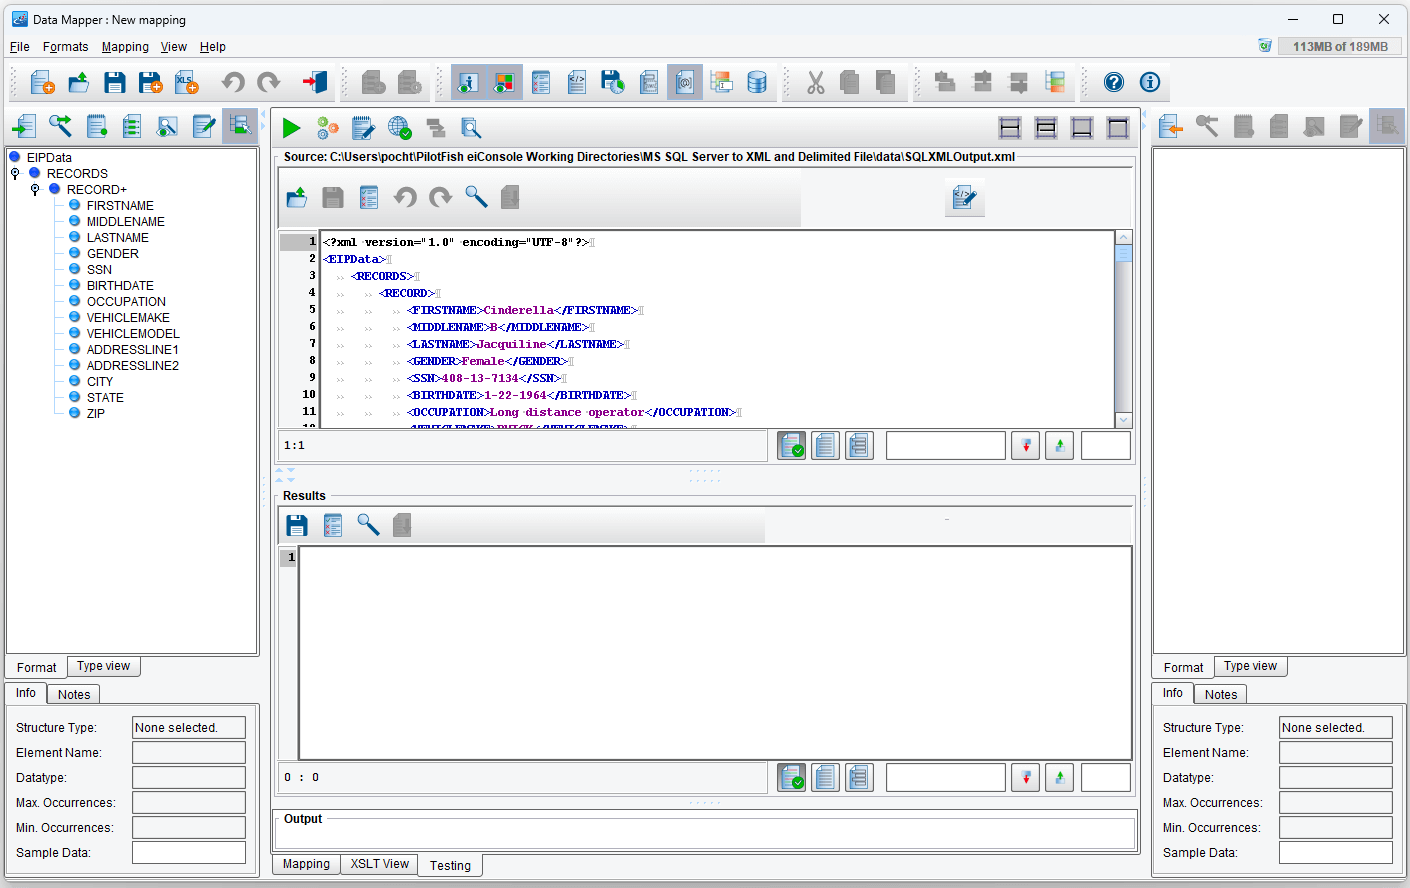
You should now have a Source panel that resembles this:
Reading Our Target Format
We’ll now read our Target format. Select the button on the Target panel on the right side of the screen and then select the XML Format Reader again.
You should see the previous sample listed. Click Add and this time, browse to where you saved the downloaded sample files and select the people.xml file. The selected file should be a sample file with the desired format for the output of the transformation. Once the transformation takes place, the database polling the output SQL-XML file will be transformed to an XML having the format of people.xml.

Once the file is added, it should appear under XML Files. Next, click on Read Format:

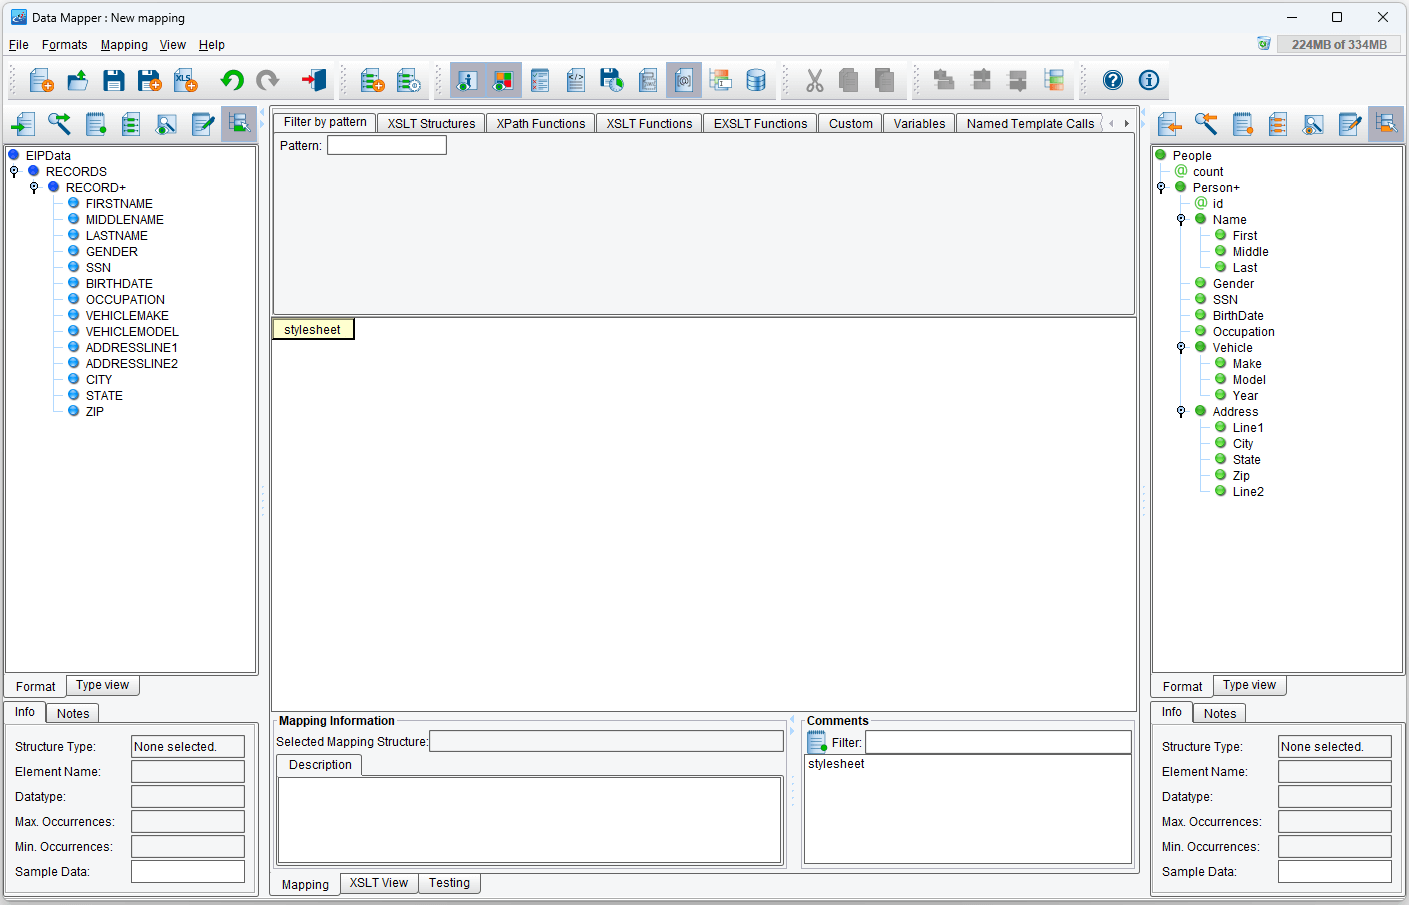
Now you should have a Target panel that resembles this:
Now that we have our Source and Target structures we will proceed to create the XSLT using the graphical user Interface.
Constructing the Mapping
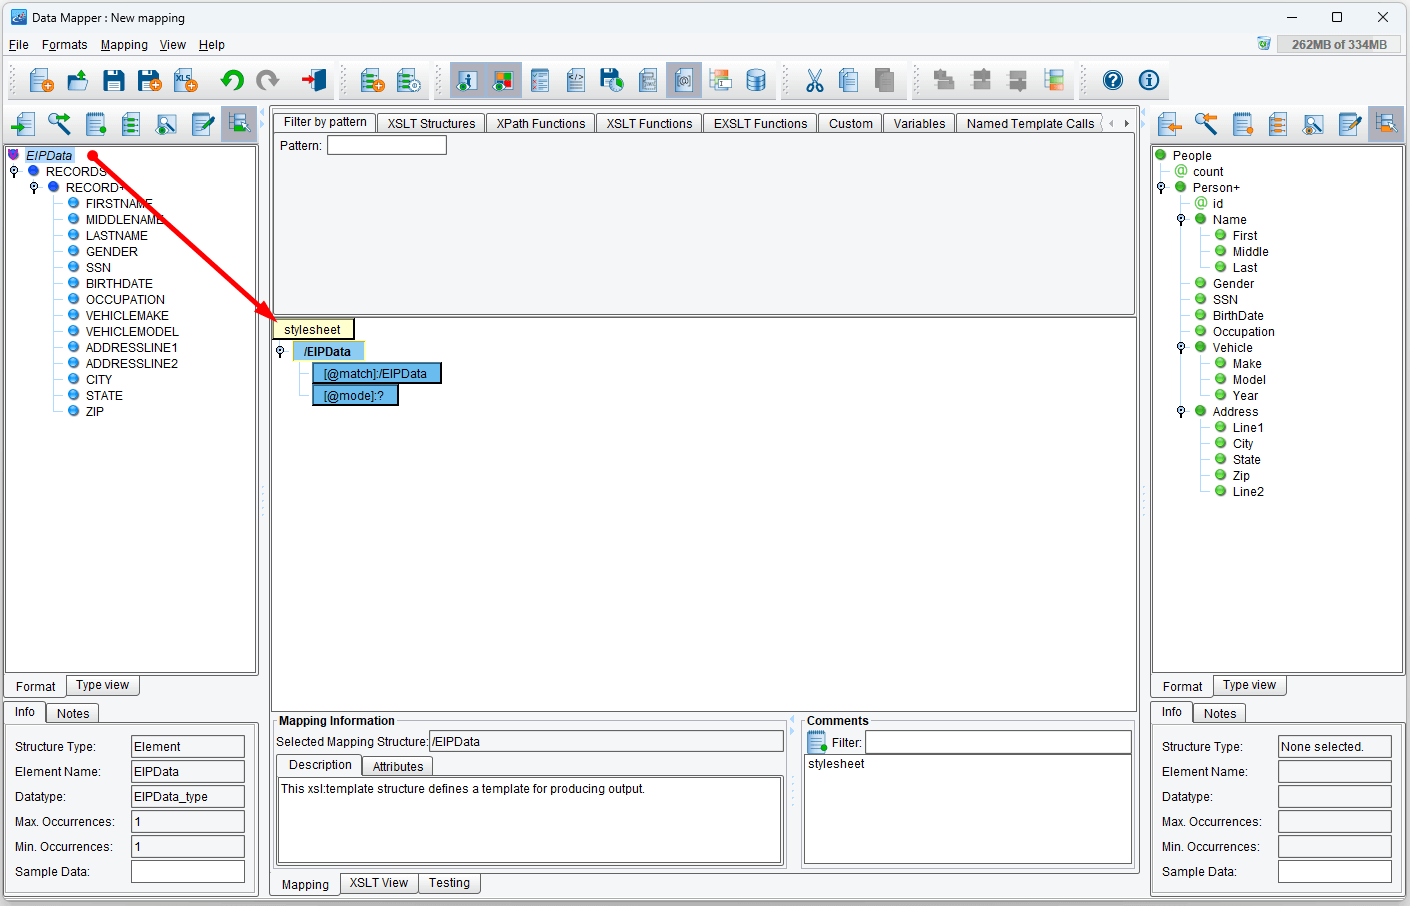
The first thing to do in constructing the mapping itself is to provide a template match. This is some element from the Source that we’ll match against and take some set of actions against. Select the EIPData element from the Source and drag & drop it onto the stylesheet element in the center. This will create an EIPData template in the center.
Creating the People Element from the Target
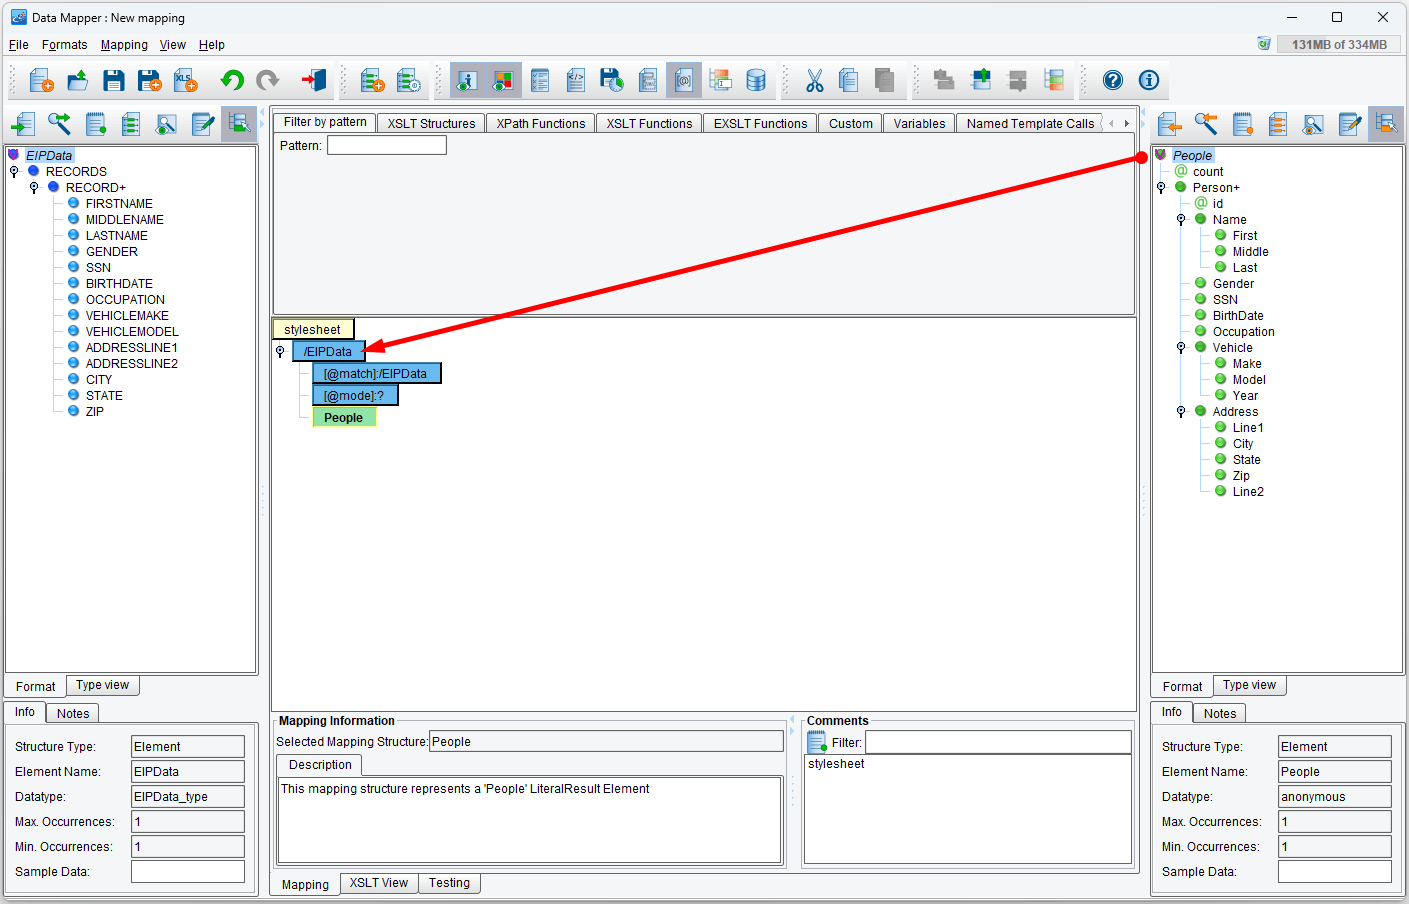
In XSLT, this is creating an instruction called a template with an attribute called match containing the XPath expression for the EIPData element in the Source. It effectively means, “When I encounter some EIPData element, run these instructions.” The action we want to take is to create a People element from the Target; effectively, we want to say, “When I encounter some EIPData element, I want to create a single People element.” To do this, drag People from the Target format onto EIPData in the center:
If we were to test this mapping against our Source sample, we’d get an XML output with only a People element. In order to create the desired XML we must map the rest of the elements under People to the database polling results. These results are stored under the DATA element, which means that each DATA element is a record resulting from our database poll. So, before continuing, we must tell the transformation that the mapping we are about to do is going to be done for each instance of the DATA element. This can be done using an XSLT structure called for-each.
In the middle panel, select the XSLT Structures->Flow Control tab. Drag the for-each structure to the People element we added before.

Next, drag the RECORD+ element from the Source structure to the [@select]:? element of the for-each structure just added.
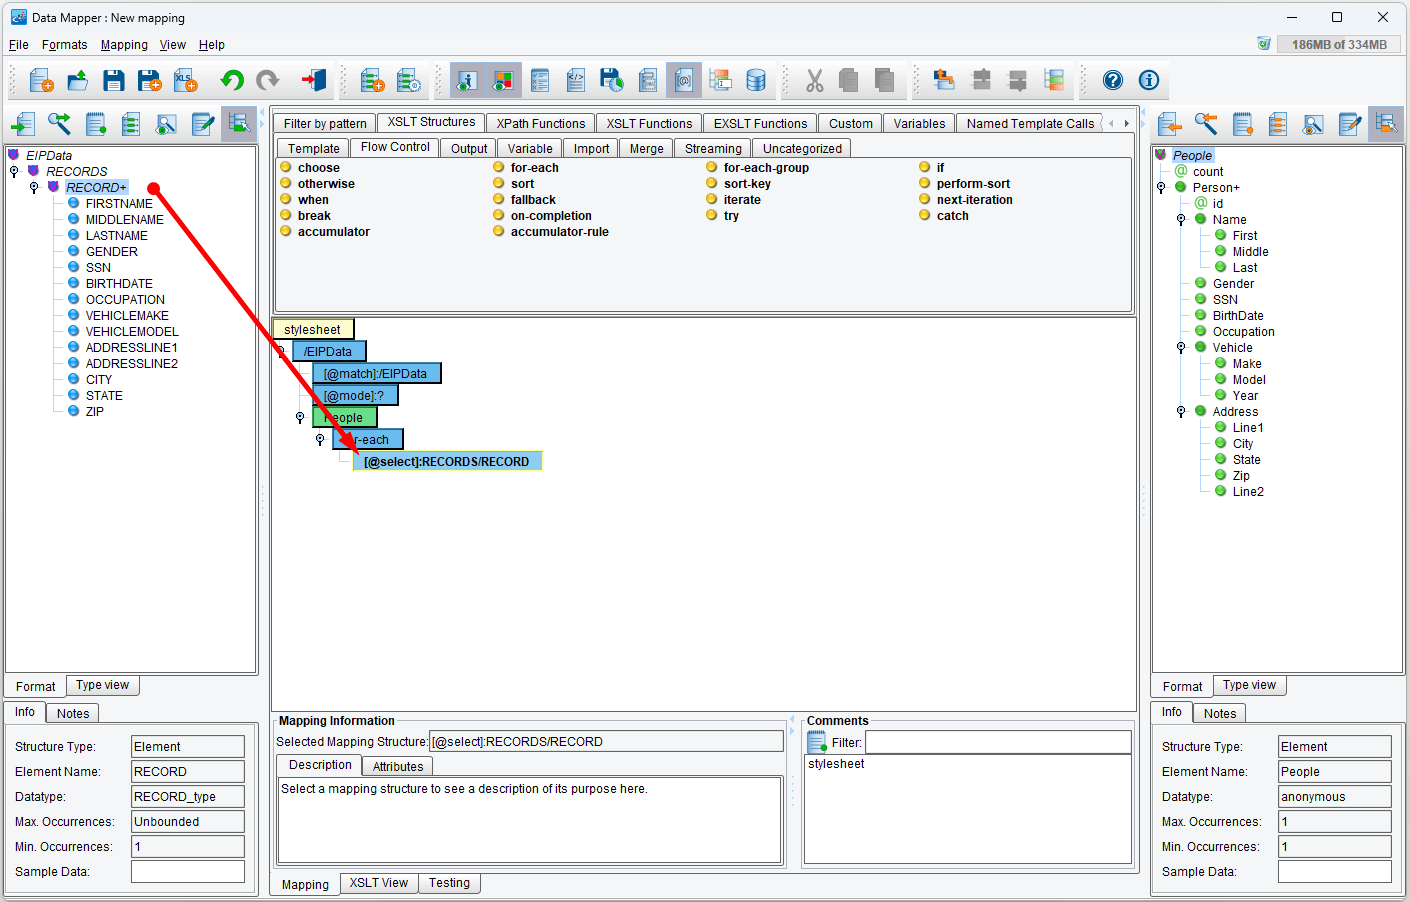
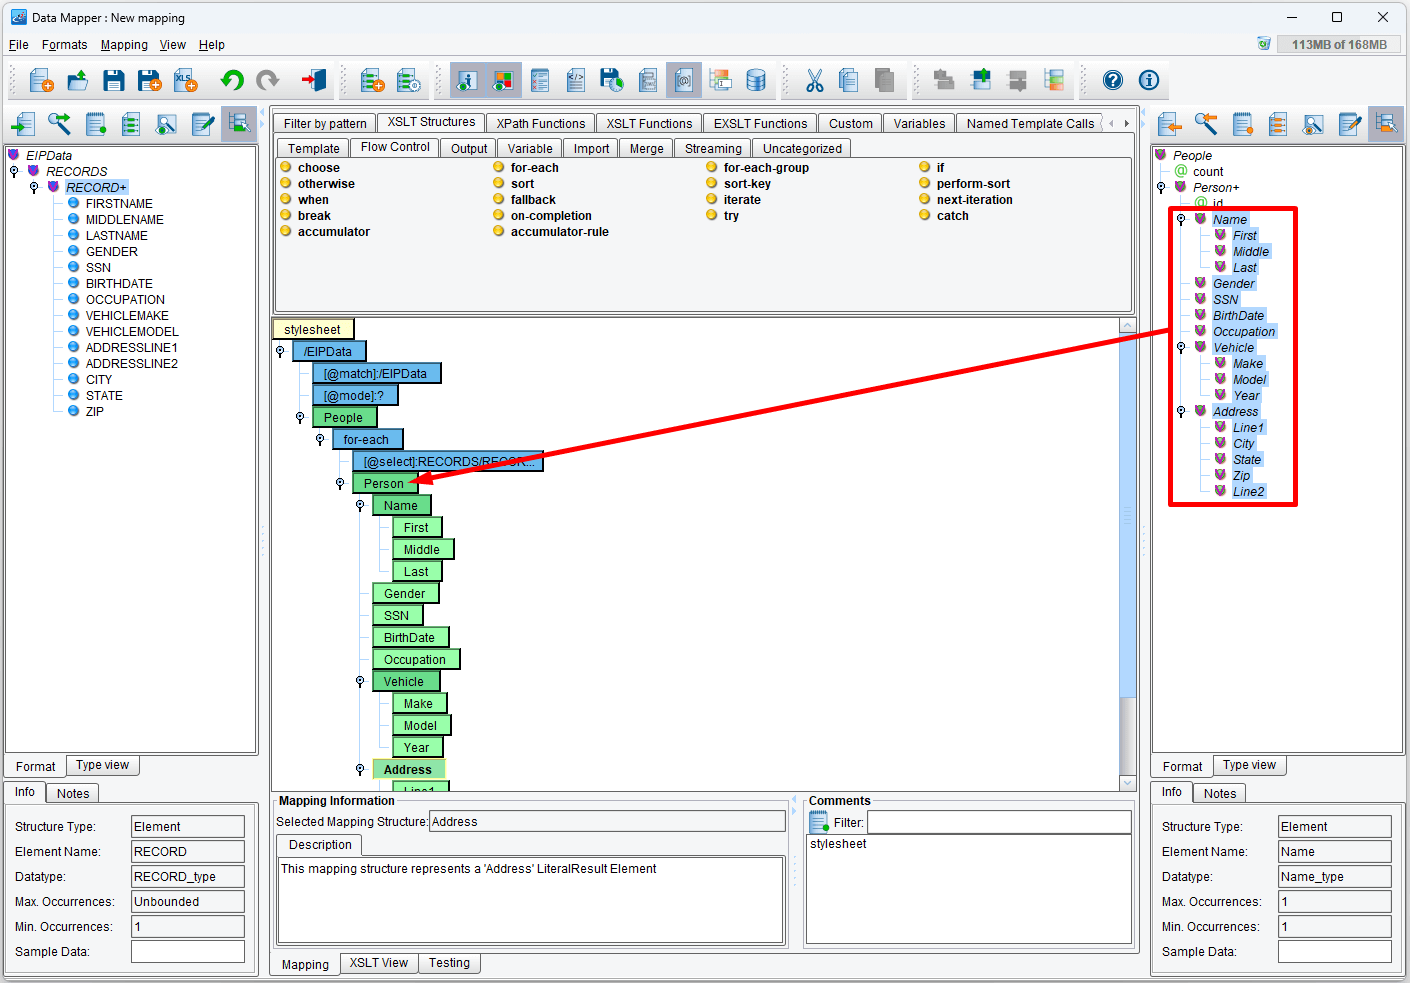
Lastly, drag the Person+ element from the Target structure over the for-each structure. This will tell the transformation engine to create a Person+ element for each RECORD+ element found.

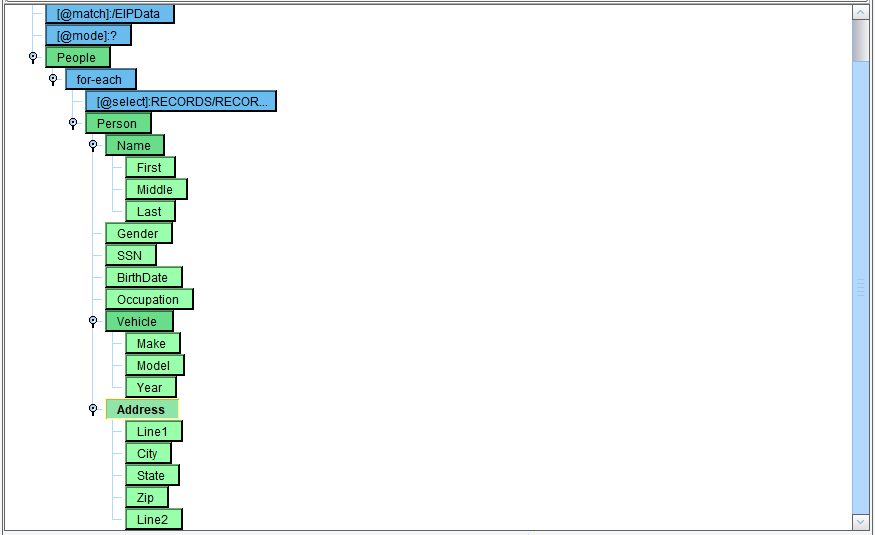
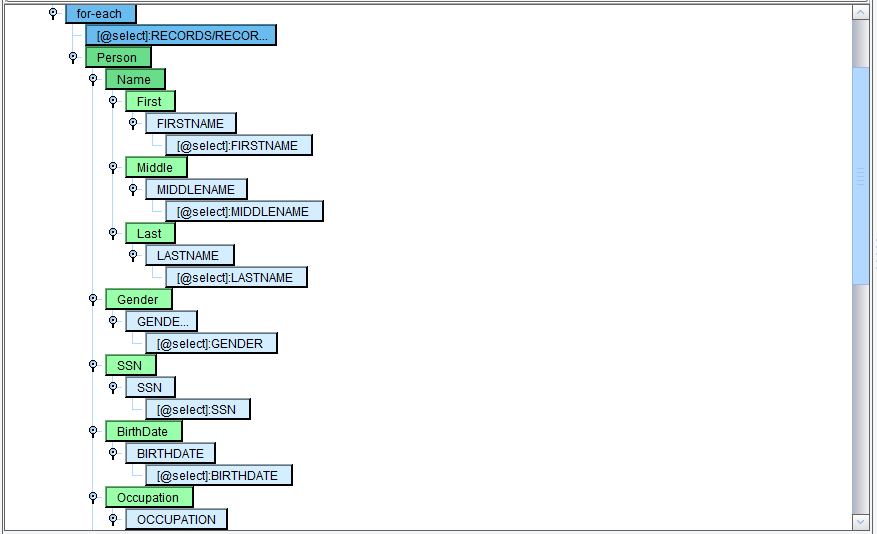
We’ll now want to create the various elements shown in the Target format. Drag & drop each of the elements under the Target Person+ element onto the Person+ in the center; you can skip the attribute elements (elements with @ next to their name) for this tutorial. Note that child elements will need to be dragged onto the respective parents. For example, First should be dragged onto Name instead of onto Person:
The center mapping should look exactly like this:
Providing Values
If we were to run this transformation now, we’d get a single People element with lots of empty child elements. What we need to do now is to provide each of these with values. To populate the First element, drag the FIRSTNAME element from the Source format onto it:
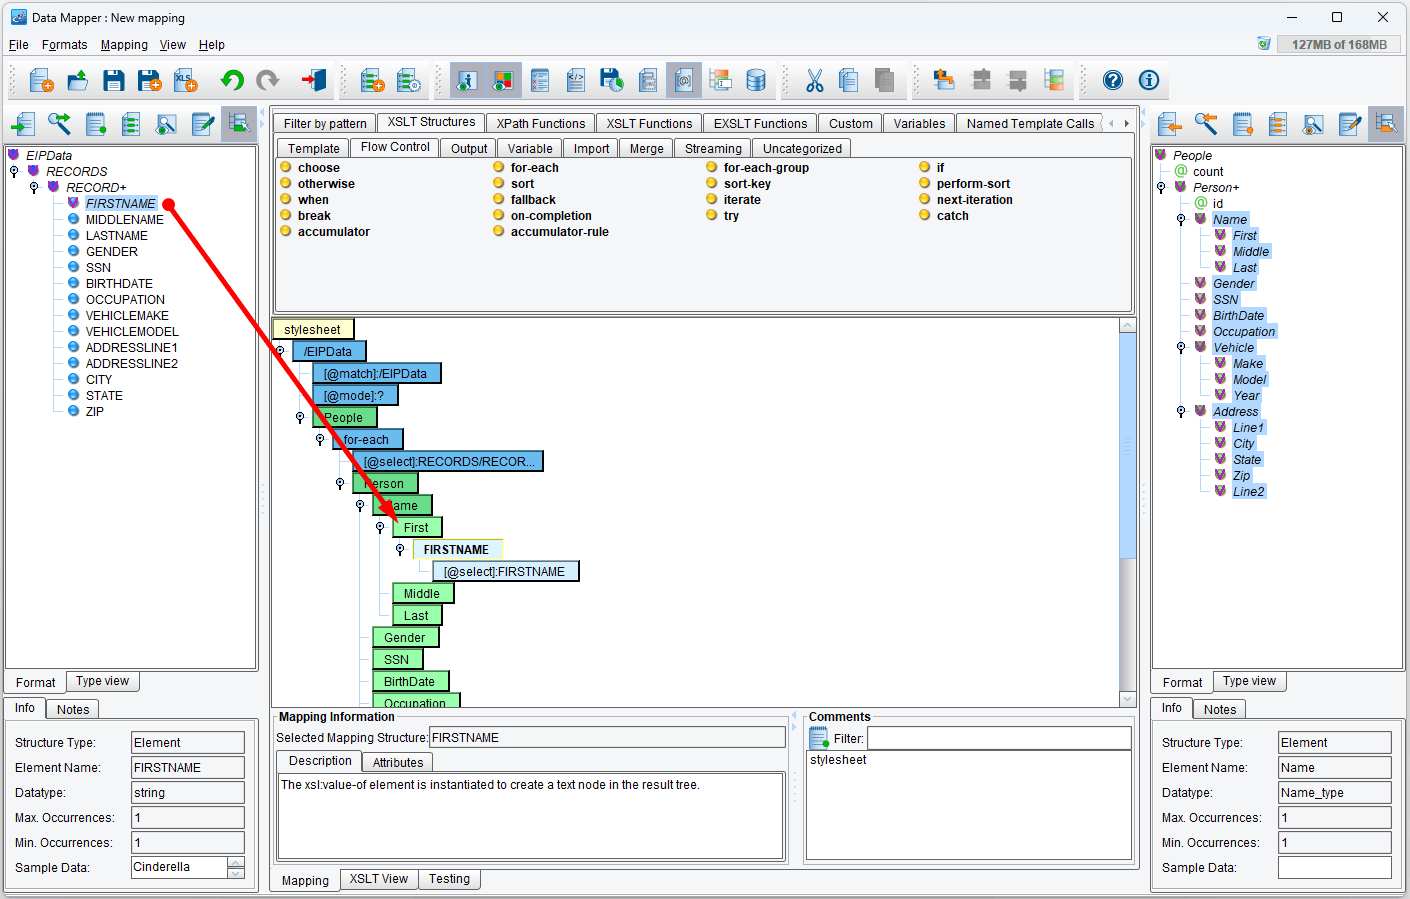
Continue this for each of the values. Note that you will not drag FIRSTNAME or LASTNAME onto the center Name – only its child elements (so FIRSTNAME onto First, LASTNAME to Last, and so on). There is no Source value for the vehicle year so that field will show empty when we perform the transformation. When you’re finished, it should look something like this:
We have two other sections to investigate now. First, click the XSLT View tab at the bottom of the screen.
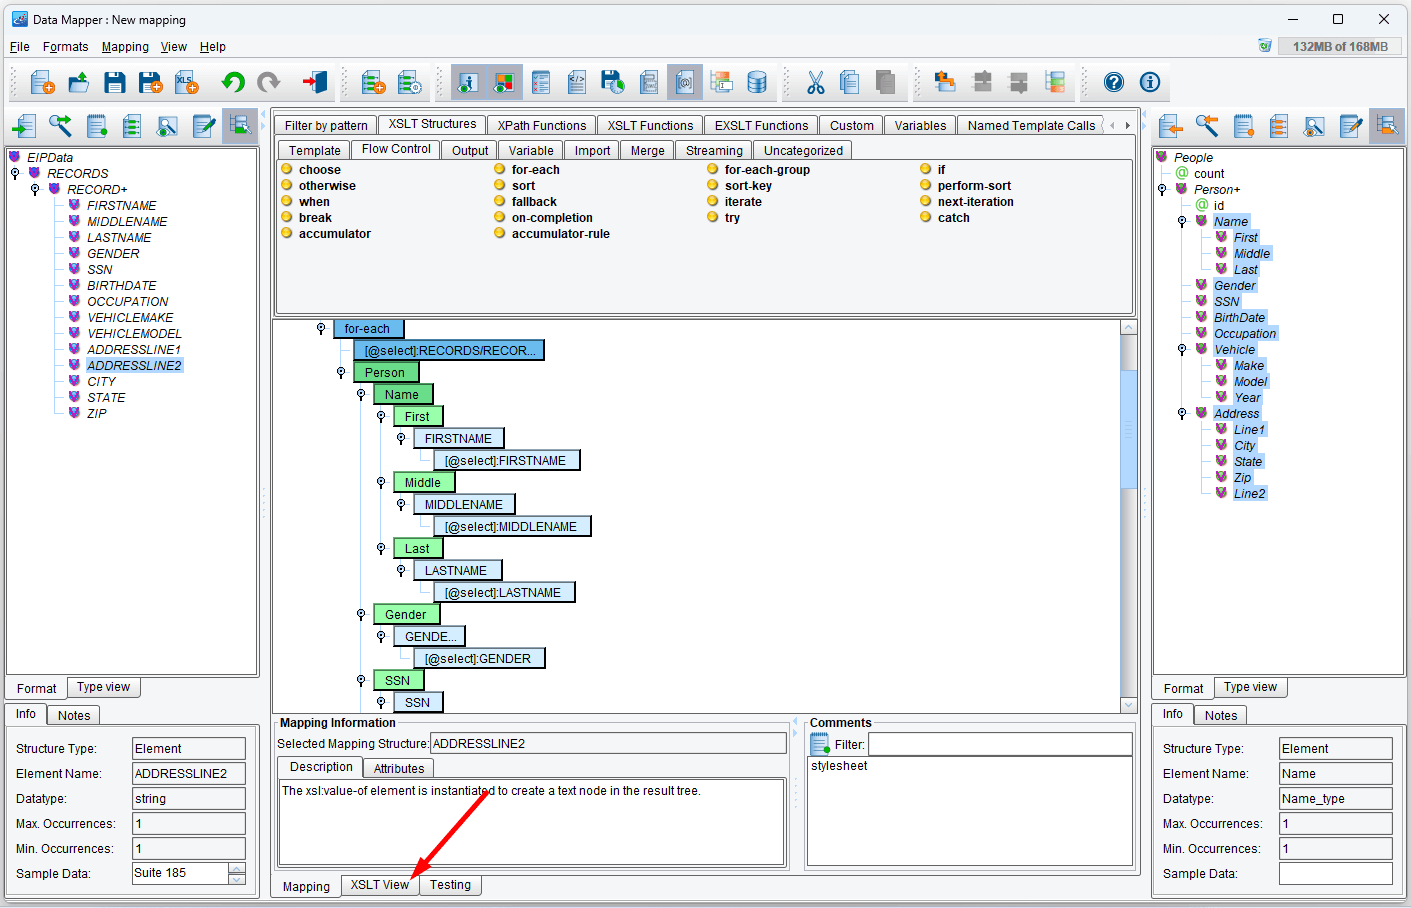
This will change the mapping panel to show the underlying XSLT.
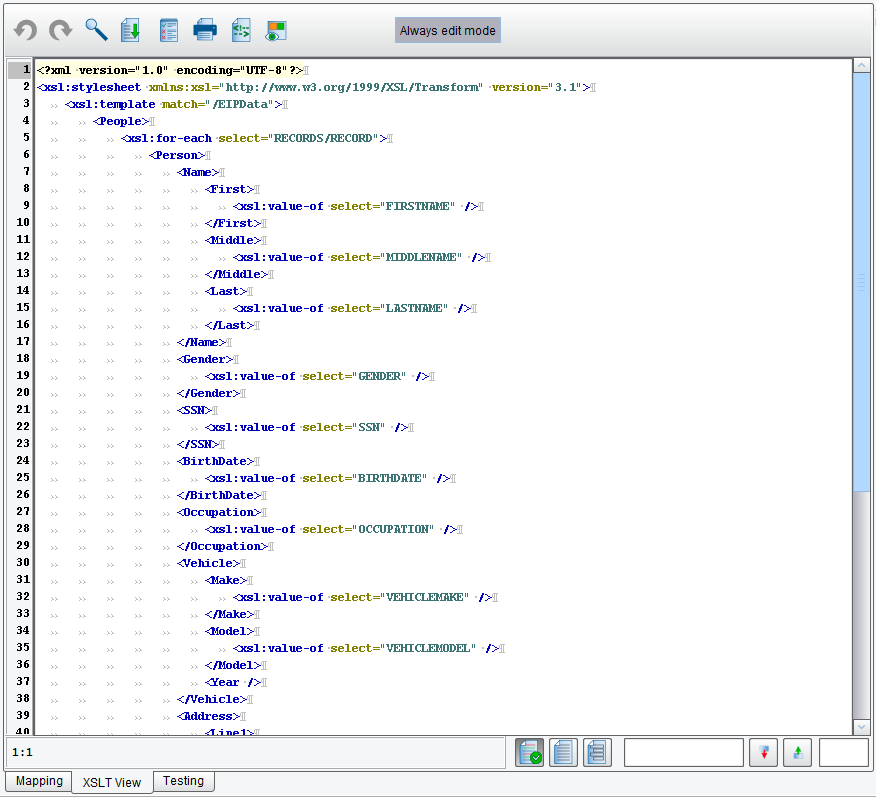
You can make changes directly to the XSLT view and they will show up in the Mapping (GUI) view. This particular editor features auto-completion, auto-formatting, and a few other useful features for performing manual editing. Next, click the Testing tab.
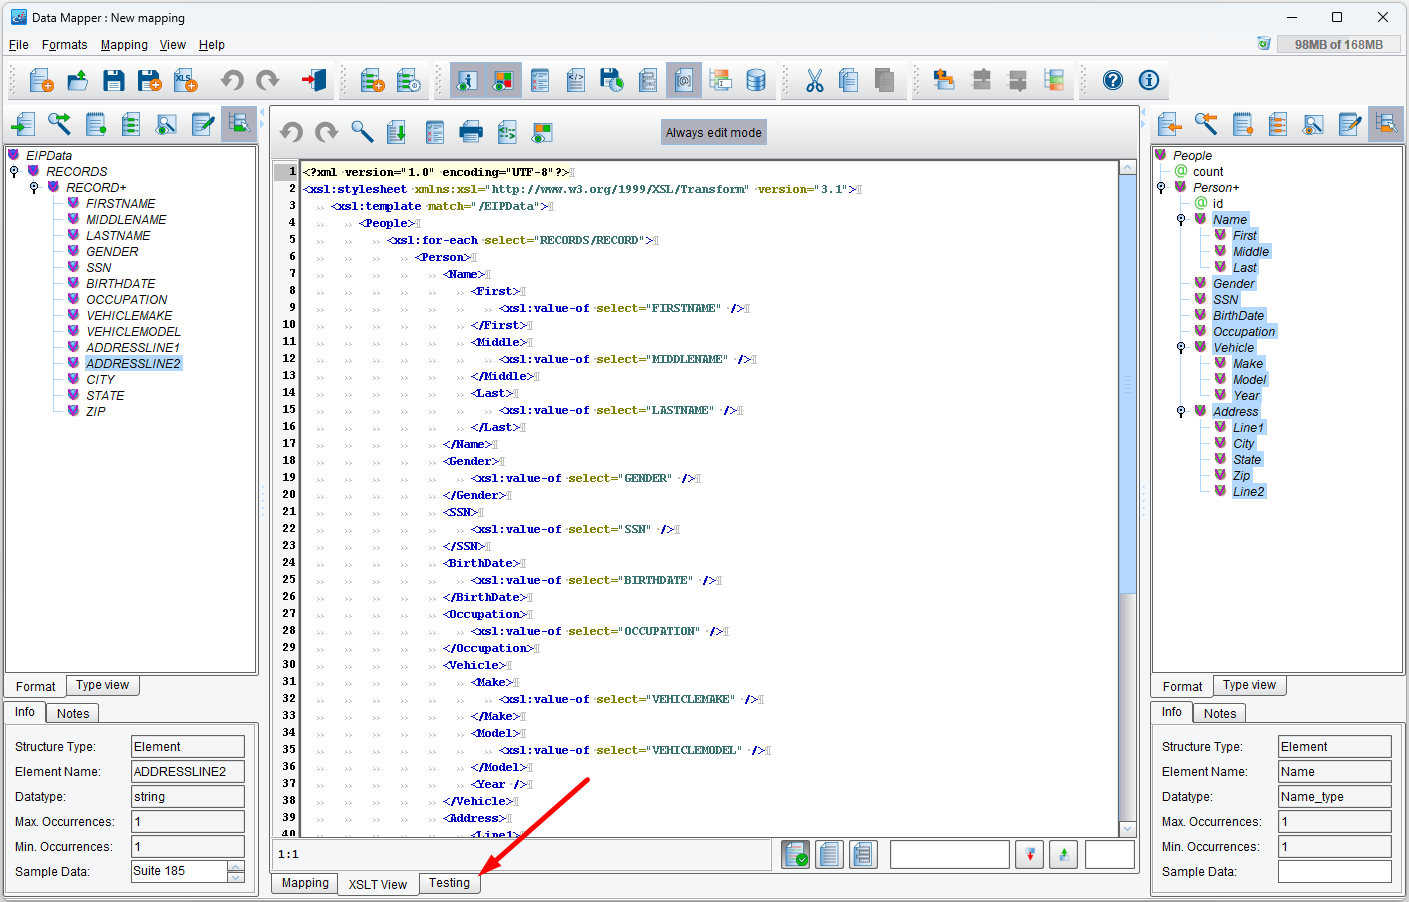
This will open the Testing mode for the Data Mapper.
This is made up of 3 panels. The first is the Source sample, which, if you used the XML Format Builder, should already have our SQLXMLOutput.xml file loaded for testing. The second panel is the Results panel, which shows the transformation results Finally, the Output panel shows any messages from the XSLT engine, such as errors or warnings.
Executing the Transformation
To execute the transformation, click the Execute Transformation button.
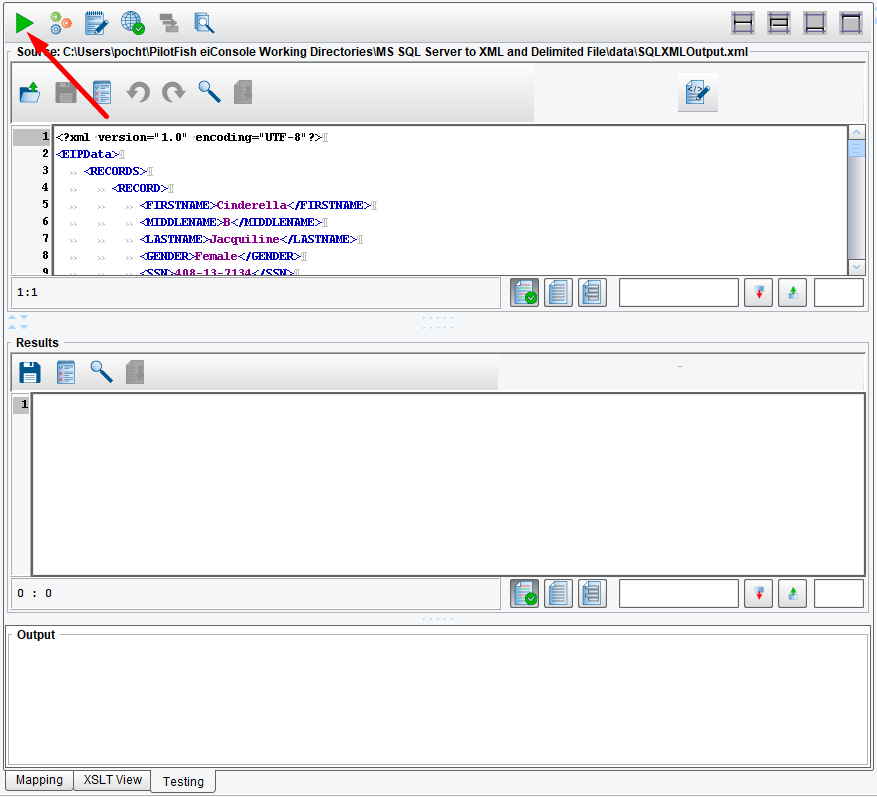
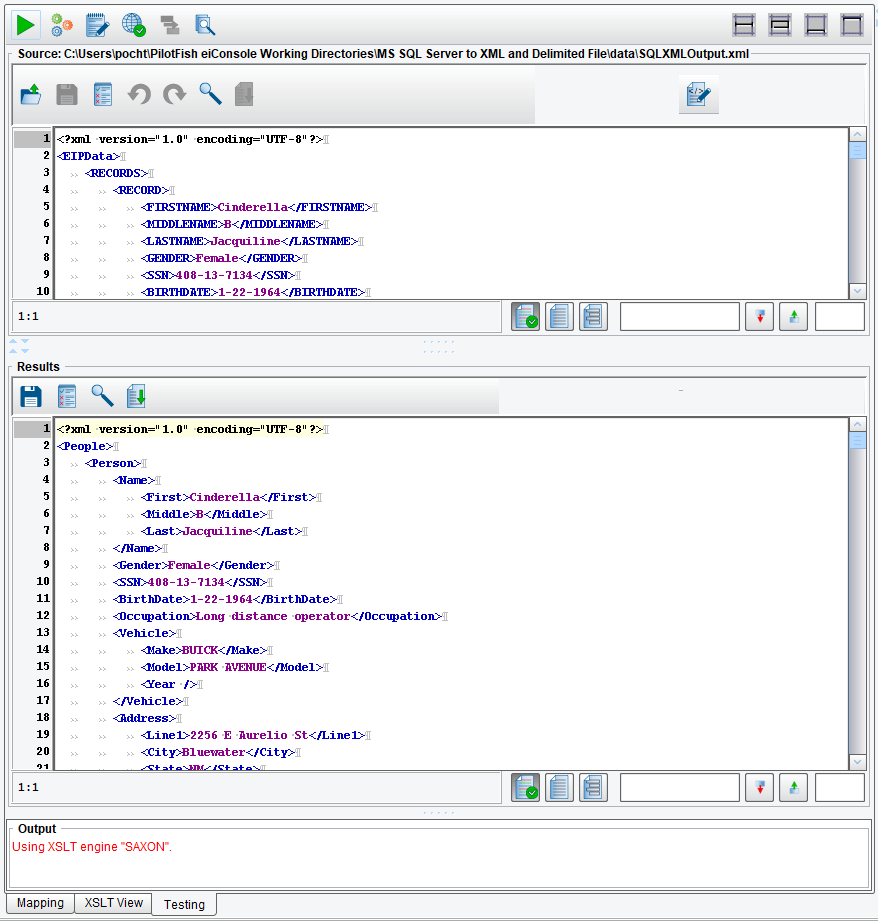
The Results panel will change to show the results of the transformation:
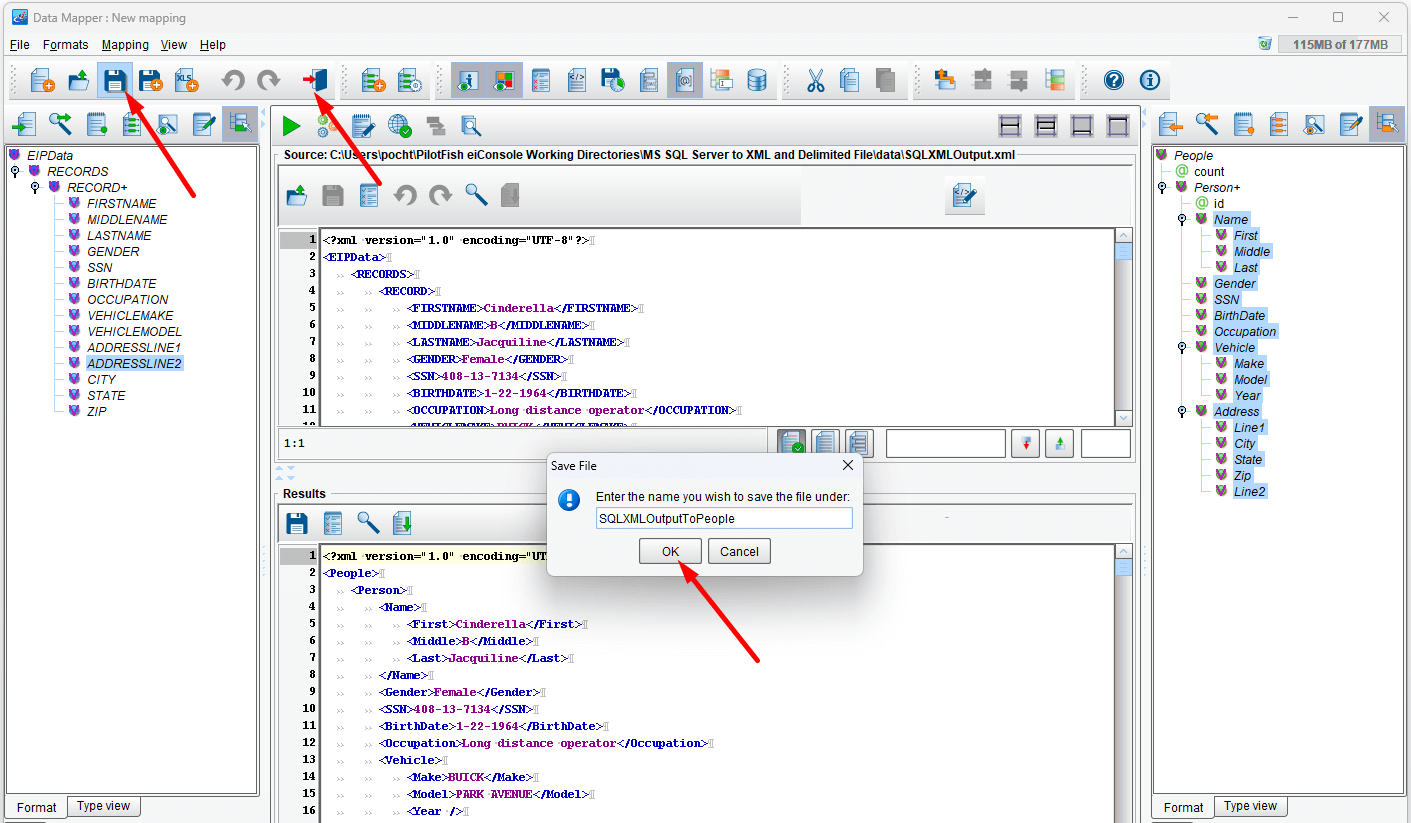
We’ve now completed our basic mapping. Save the mapping using the Save button or menu item (we’ll name ours SQLXMLOutputToPeople) and close the Data Mapper to return to the eiConsole.
Adding the Polling Output XML to Delimited File XSLT
Now that we have created our SQL-XML output to XML transformation we will add an SQL-XML output to a delimited file transformation in this route. This will create a delimited file with the data polled from the database concurrently with the XML created in the previous steps.
To get the database polling output XML to the desired delimited file we need to perform an XSLT transformation. This transformation will convert the database polling output XML to a predetermined format required by the Delimited and Fixed-Width File Transformation Module. Then we will configure this module to transform the resulting XML file into our delimited file.
We will start by adding a new Target. While in the Route Editing window, click the Add Target button:
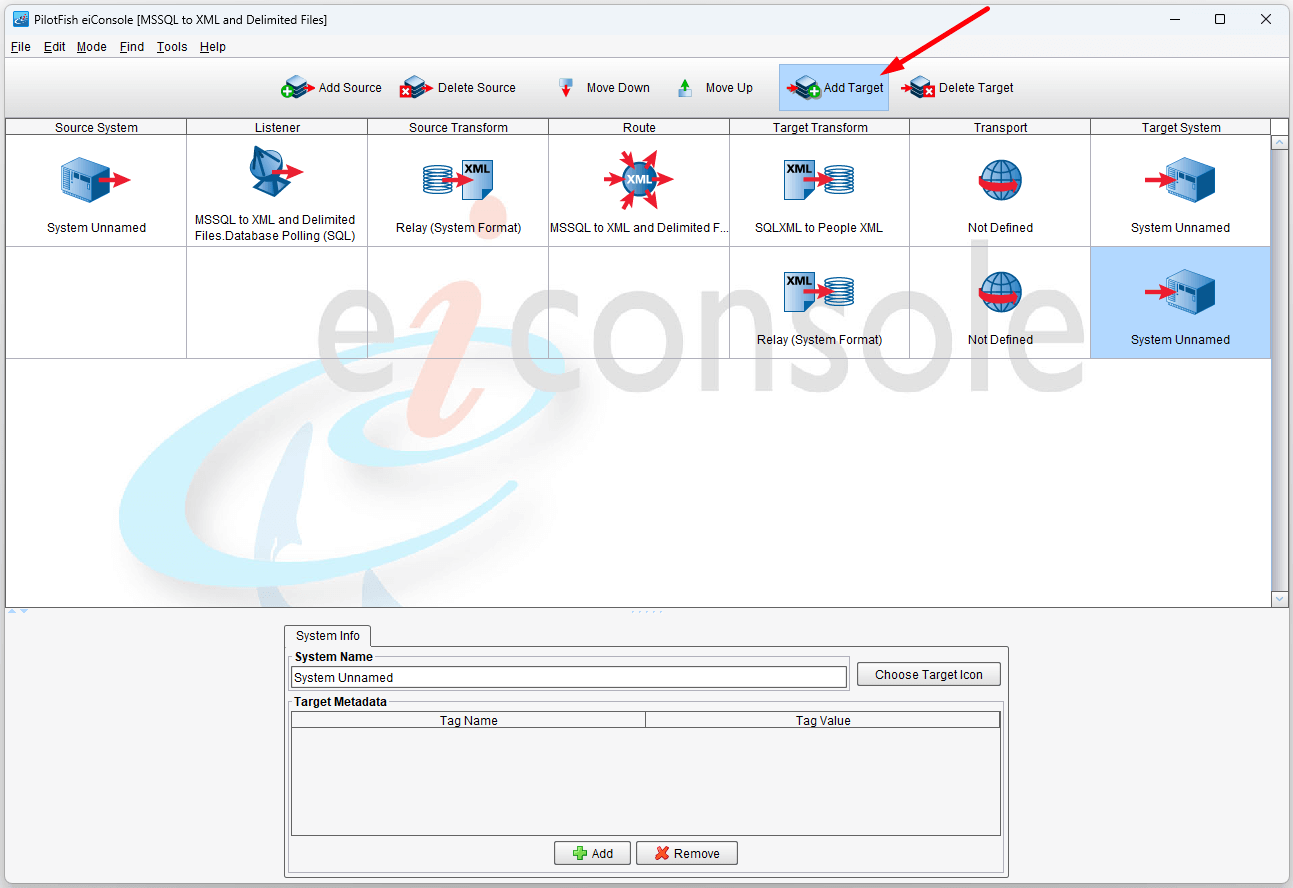
Adding the New Format
Now we will add our new Target Transform Format. One important concept to note is that the direction of a Transformer is determined by where it appears in the Route. If we configure our Transformer on the Target Transform stage then it will expect XML as input and convert that to the described delimited format. Conversely, configuring the Transformer on the Source Transform will assume delimited input and produce XML output.
The purpose of this transformation is to take the database polling output XML and transform it into a delimited file recognizable by your system. We have provided a sample delimited file with this tutorial called people_delimited.txt. This file will represent, for the purpose of this tutorial, a sample of the type of delimited files the system would expect.
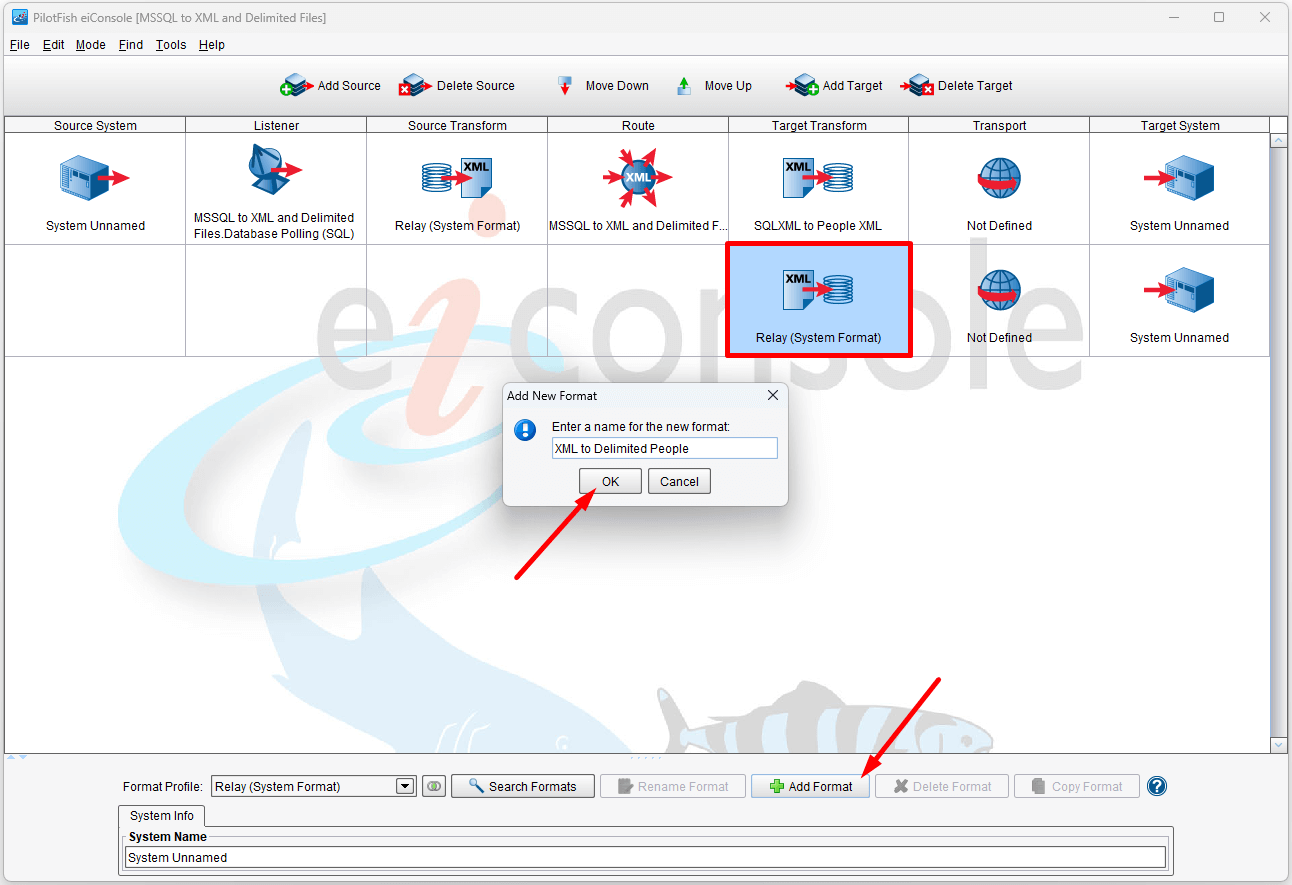
Because we wish to convert from XML to a delimited format, we’ll want to add our Format to the Target Transform stage. Click that stage, then click Add Format.
We’ll name the Format based on the transform direction and the name of the structures. We’ll be using a sample called people_delimited.txt, which was provided with this tutorial, so the Format will be named XML to Delimited People.
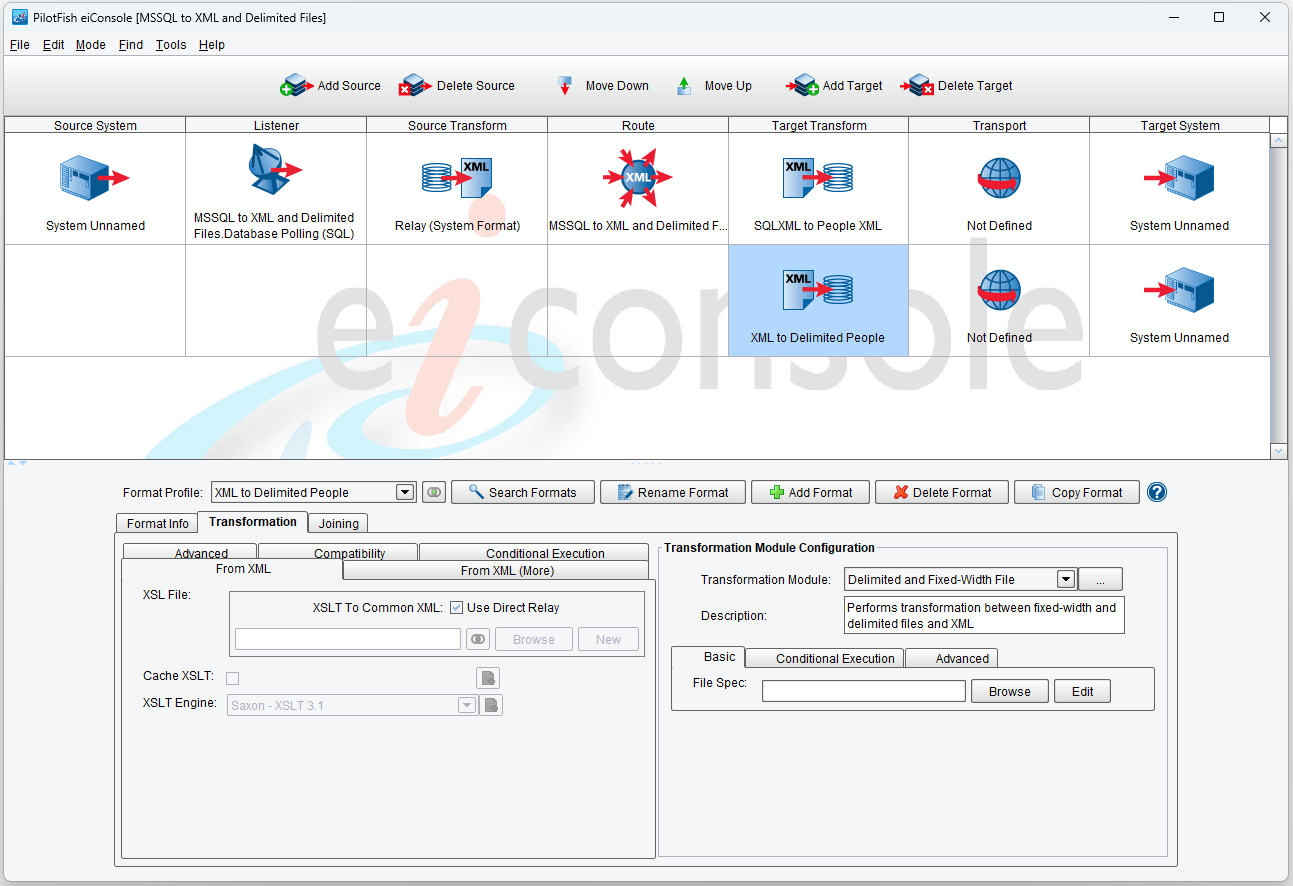
With the Format added, the bottom half of the eiConsole screen changes to reflect the Format configuration. It is at this point that we will add the two steps we mentioned before to get the database polling output XML to a delimited file: 1) configure an XSLT to get the database polling output XML to a predetermined XML format and 2) configure the Delimited and Fixed-Width File transformation module to transform the newly transformed XML file to a delimited file. We will start with the second step so that we can obtain the predetermined XML from format to be used by the XSLT in this step.
Configuring the Delimited and Fixed-Width File Transformation Module
We are going to start with the Transformation Module section of the bottom panel. Selected Delimited and Fixed-Width File from the Transformation Module drop-down.

With the Delimited and Fixed-Width File Transformer selected, you should see a configuration panel like the following:
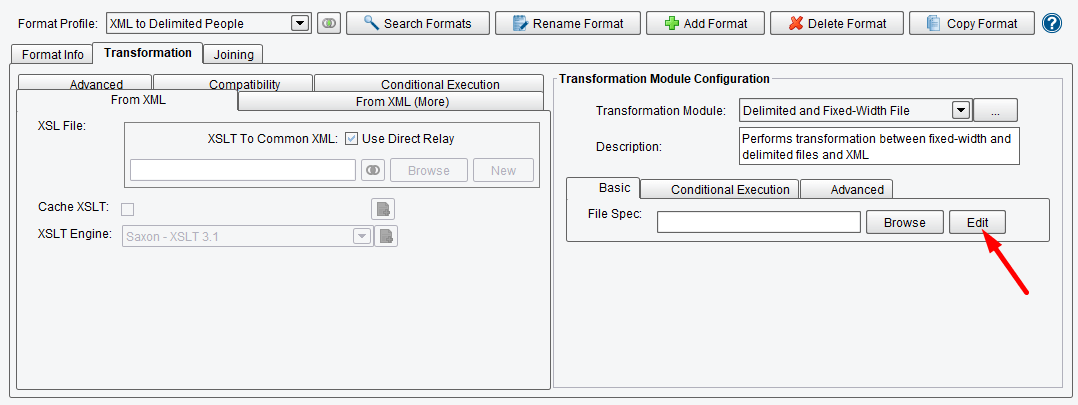
This particular Transformer makes use of an XML format informally called a File Specification. The configuration item specifies the name (and relative location) of such an XML description. If you had such an existing file, you could click Browse and select it, which would then copy it to the appropriate location. For this tutorial, we’ll assume that we’re starting fresh. Clicking the Edit button without any File Specification selected will open the File Specification Editor. Do this now.
Building a File Specification from Scratch
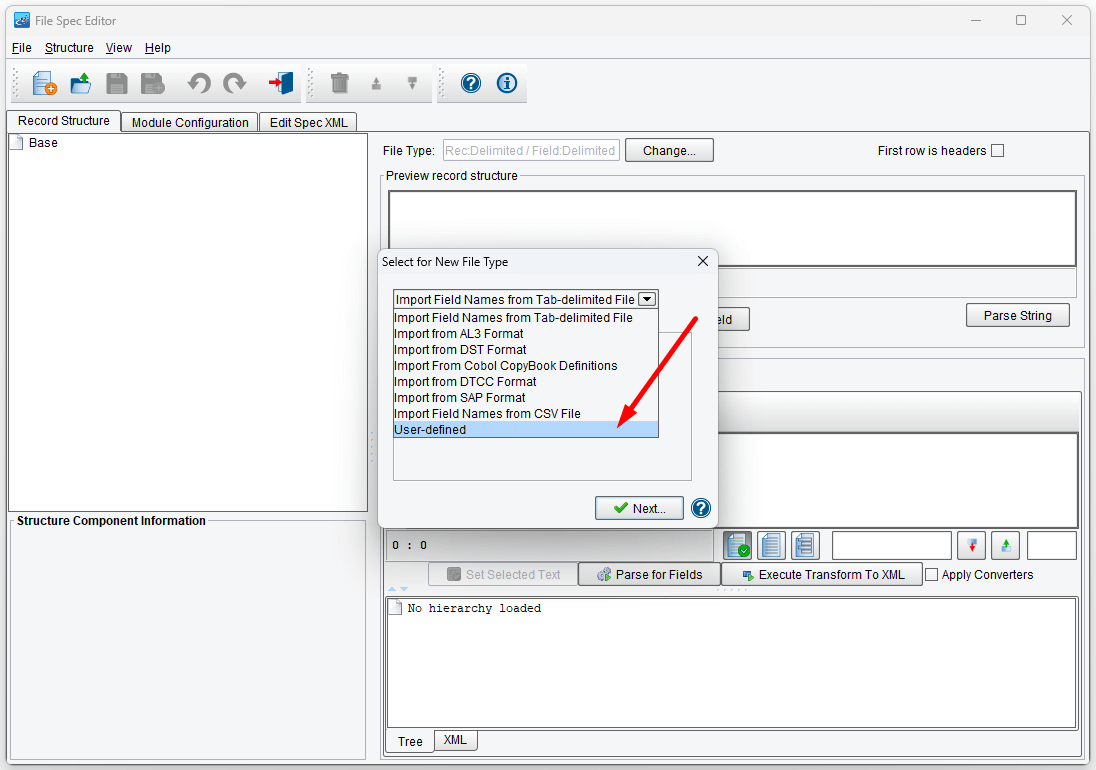
The various options in this drop-down are ways to automatically build or import the structure of a file specification. For example, you could read in definitions from a CSV file, a Cobol Copybook or import various industry-specific formats (depending on what eiConsole version you have).
If you wish to build a file specification from scratch, you’ll want to select User-defined from drop-down list.
This dialog asks you to describe the style of records and fields. A file specification is made up of records with additional records and fields as children. In most Formats, records are delimited, meaning that some character or set of characters separates each record. In our people_delimited.txt sample, each line in the file represents a Person, which is a type of record.
Select Delimited under Record Style.
The next item is Record Delimiter, which specifies what separates each record. The default value, \n, represents a line feed. The convention used for escape characters is that used for Java (and most languages). Most formats use either a single line feed or a “carriage return” (\r) and a line feed (\r\n). Our sample file uses only a line feed, so set the Record Delimiter to \n:
Next, we’ll need to define the style of Fields. In our sample file, each Field within a Record is separated by a pipe (|) character. Delimited files typically use tabs (\t), commas (,), pipes, and other such characters. Fields may also be Fixed Width, meaning that each field has a specific length. For example, the First Name field might be exactly 10 characters long.
Because our sample file is delimited by pipes, select Delimited under Field Style and set the Field Delimiter to |.

Finally, click the Save button to open the main File Specification Editor window.
Reviewing the File Specification Editor
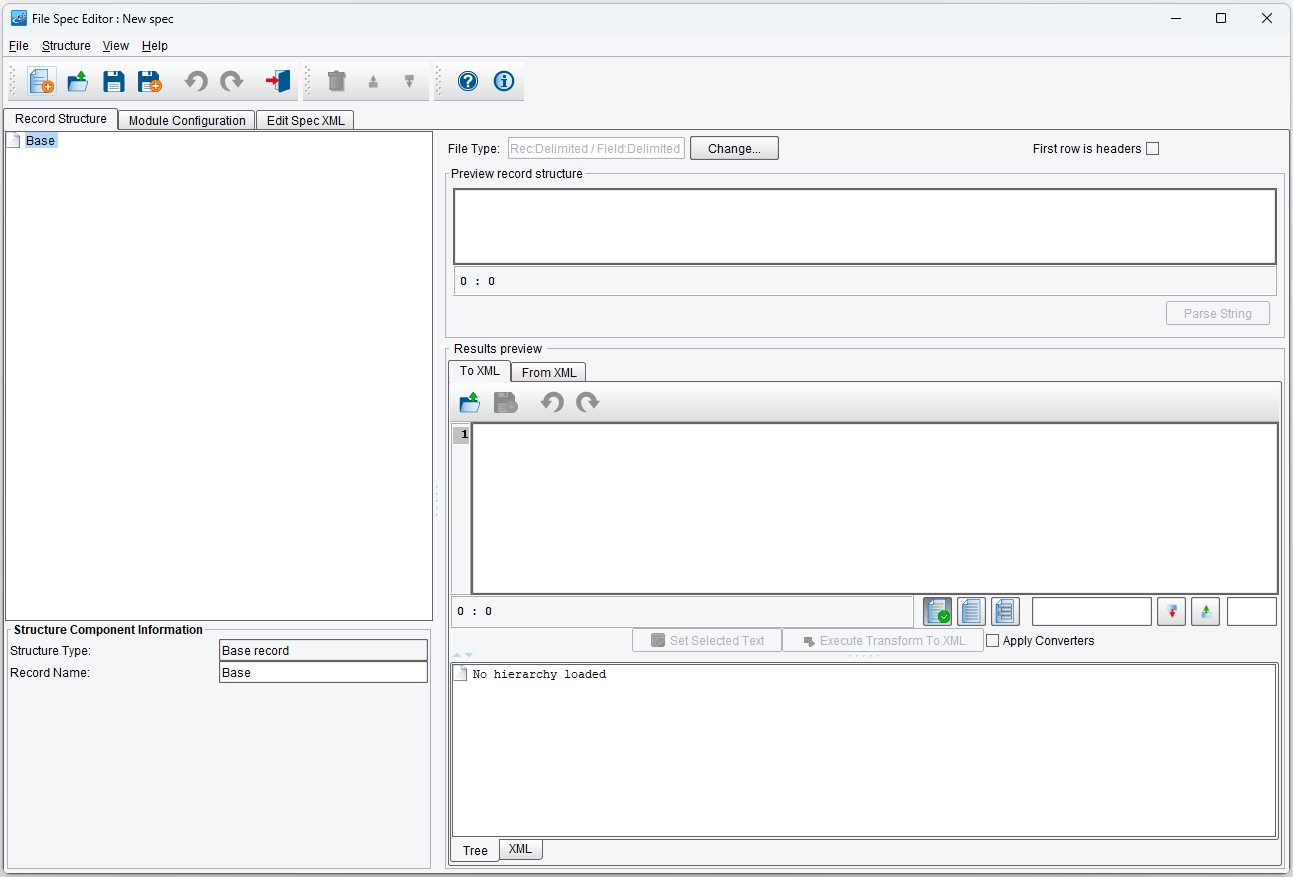
There are a lot of panels and areas for the File Specification Editor, but we’ll review each of these in turn to explain them.
On the left side of the screen is the Record Structure panel. This panel contains the structure (so far, it’s empty) of the file specification, defined as a hierarchy (a tree) of records, sub-records, and fields. The bottom half of the panel is used to provide information and configurations for the selected record or field.
The top-right panel is used to show currently loaded sample data with highlighting for a selected record. Until we have a structure defined and a sample file loaded, this will be empty and fairly uninteresting.
Finally, the Results Preview panel. This panel is used to load and/or edit a sample file, transform it, and see the results. We’ll start here.
Defining the File Specification
Click the Load icon in the results preview and select the people_delimited.txt file you downloaded at the start of this tutorial.

With the sample file loaded, the sample file panel should resemble the following:

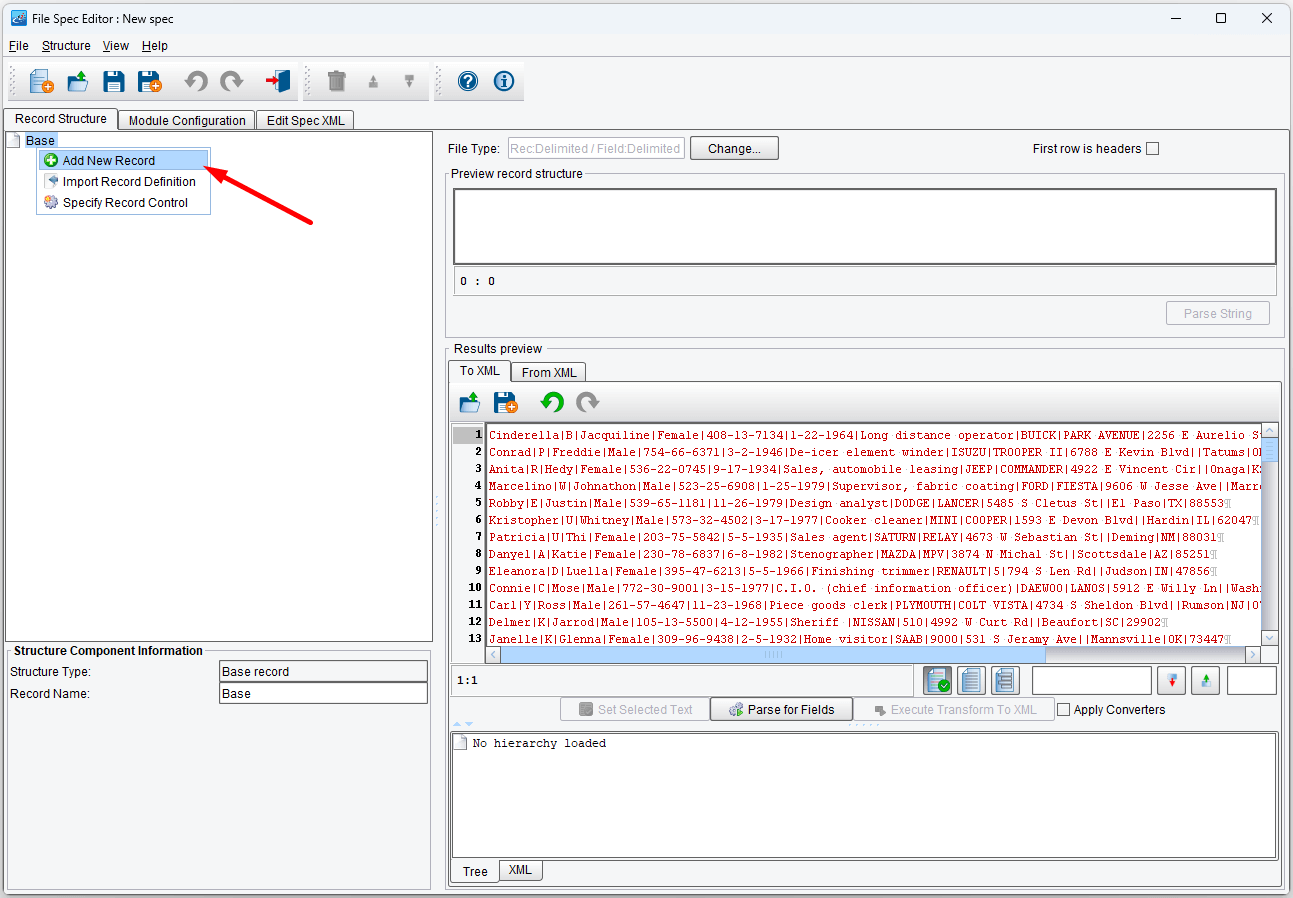
Defining Our Structure
We’ll now need to define our structure. We can start by defining a record to represent each Person in our sample file. Right-click on the root Node (labeled Base) and select Add New Record.
You will next be presented with a dialog where you are expected to name the new record. Since this record will represent a person, we’ll name it accordingly:

Click the OK button and you should see the Person record shown in the structure underneath Base.

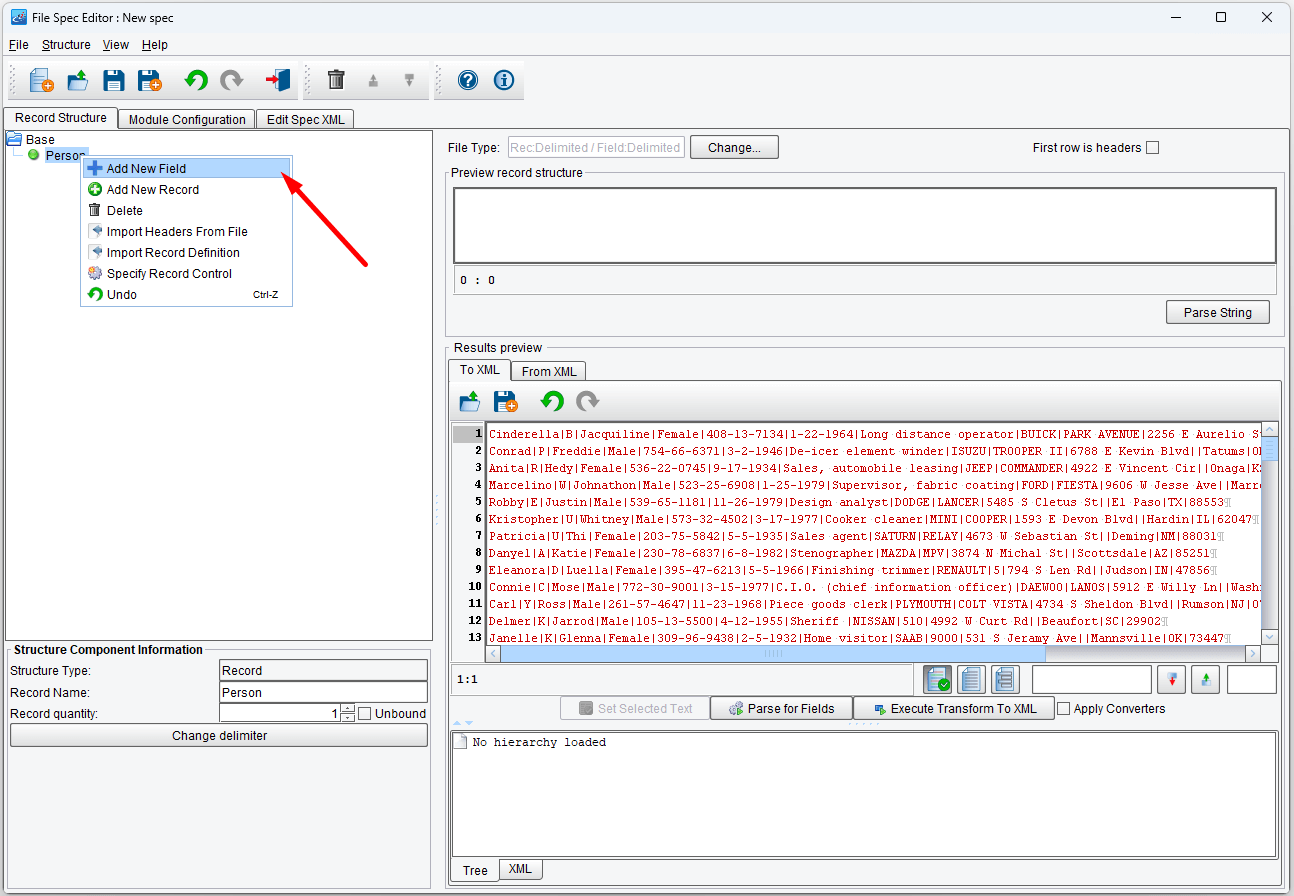
Adding Fields to the Person Record
We’ll now start adding fields to the person record. To do so, right-click on Person and select Add New Field.
Once again, a dialog will be raised asking you to name the field. Our first field is the person’s first name, so we’ll name the field First Name.
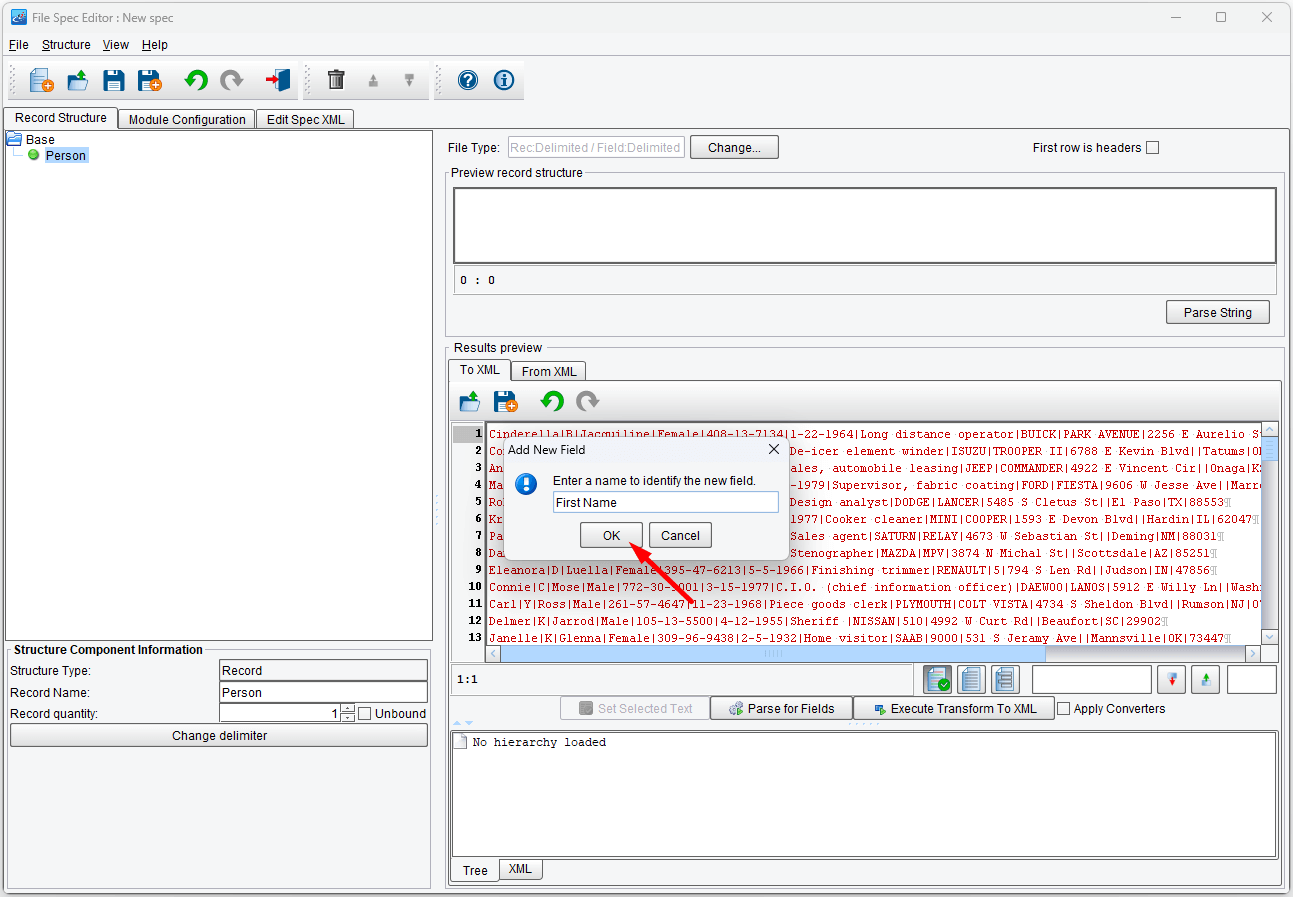
Click the OK button and you should see the field displayed under Person:
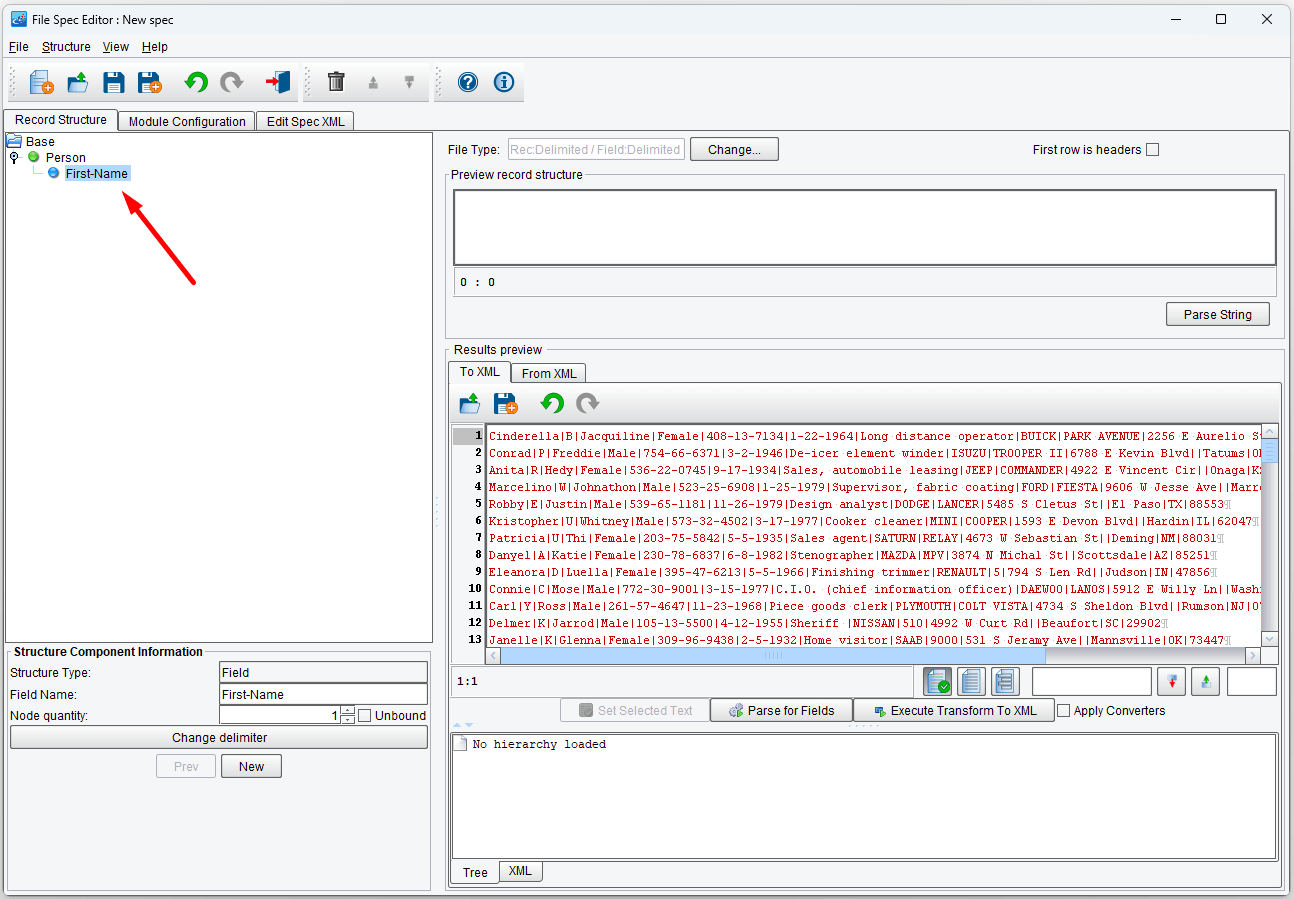
For defining the remaining fields, you could continue to right-click on Person and select Add New Field or, with the First-Name field selected, simply hit Enter on your keyboard.
Continue adding fields for each of the following:
- Middle Name
- Last Name
- Gender
- Social Security Number
- Date of Birth
- Occupation
- Vehicle Make
- Vehicle Model
- Address Line 1
- Address Line 2
- City
- State
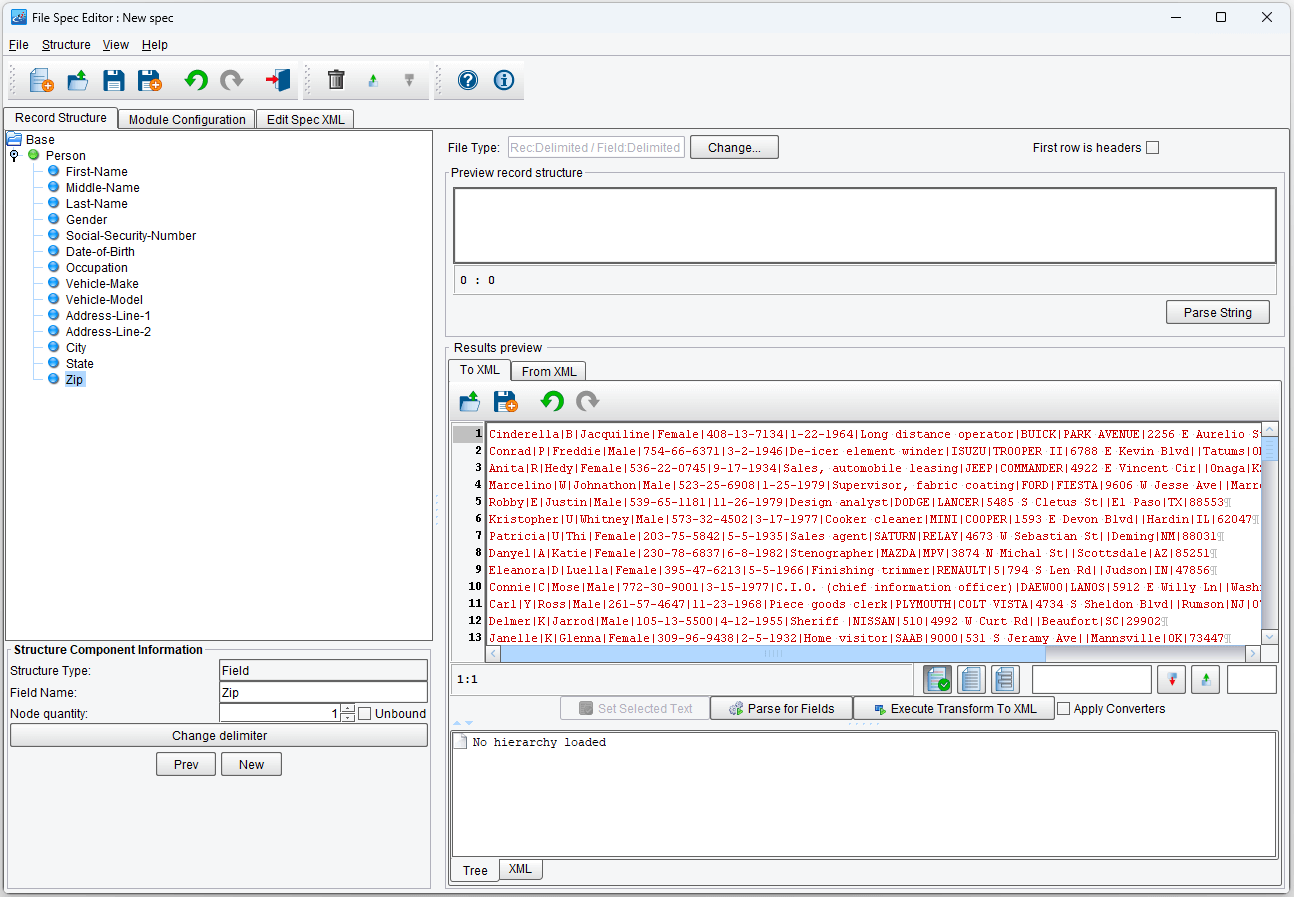
- Zip
When you are finished, the structure should look like this:
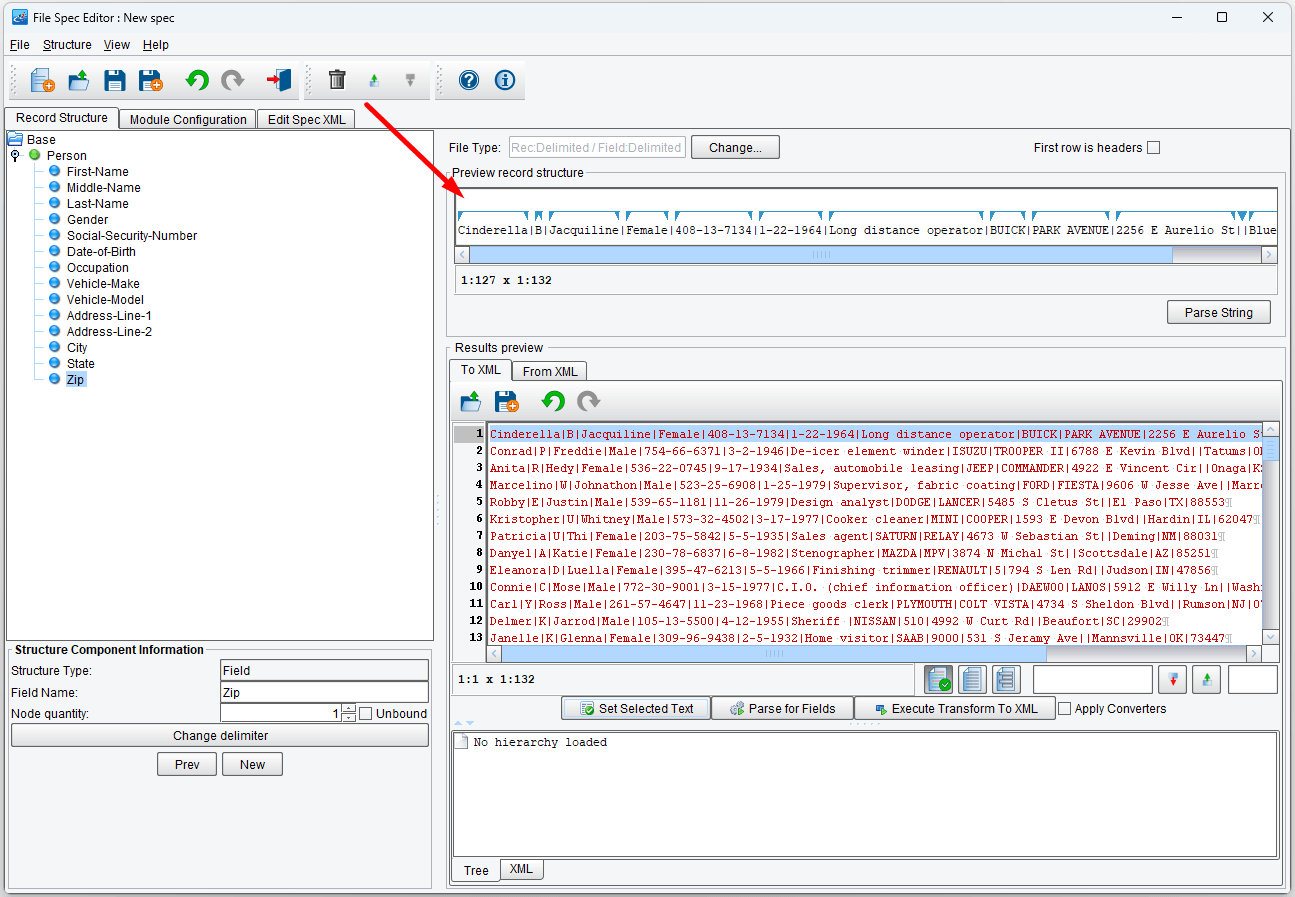
Our structure is now fully defined. Next, select the Person record and then highlight a single line of the sample file. This might be easier if you click at the beginning of that line, hold the Shift key and hit End. If you are on Windows, hold Shift+Command. On a Mac, hit the right-arrow key.
Next, click Set Selected Text:

You’ll notice the top panel now has various fields shown, as well as blue arrows:
If you click on the various fields in the structure, the appropriate field will be highlighted in this panel. For example, if we click Occupation, we’ll see Long distance operator highlighted:
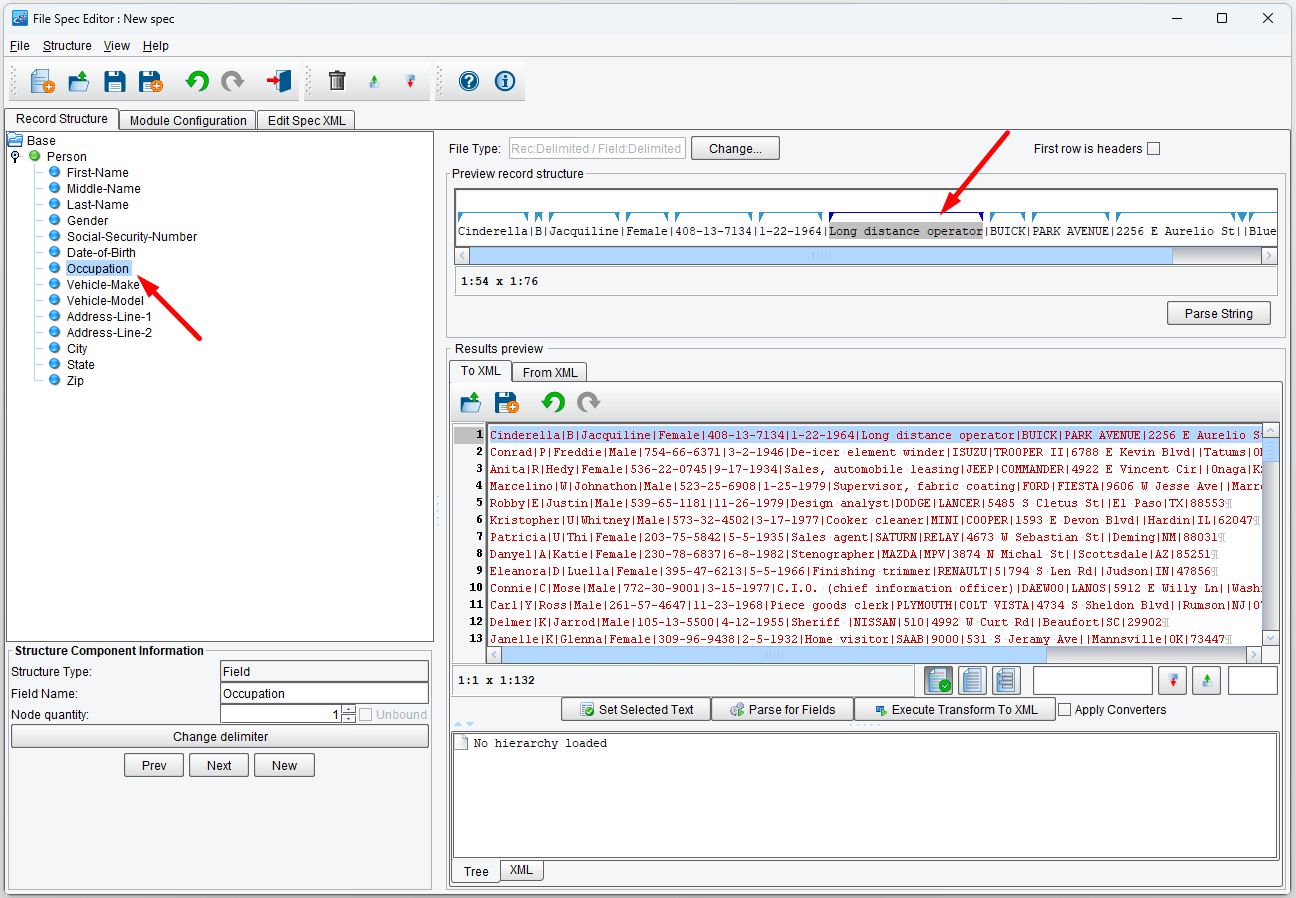
This panel allows you to visually confirm that your structure matches your sample or vice-versa. While this is less important in delimited files, it can be an enormous time saver when dealing with fixed-width formats.
Testing Our Definition
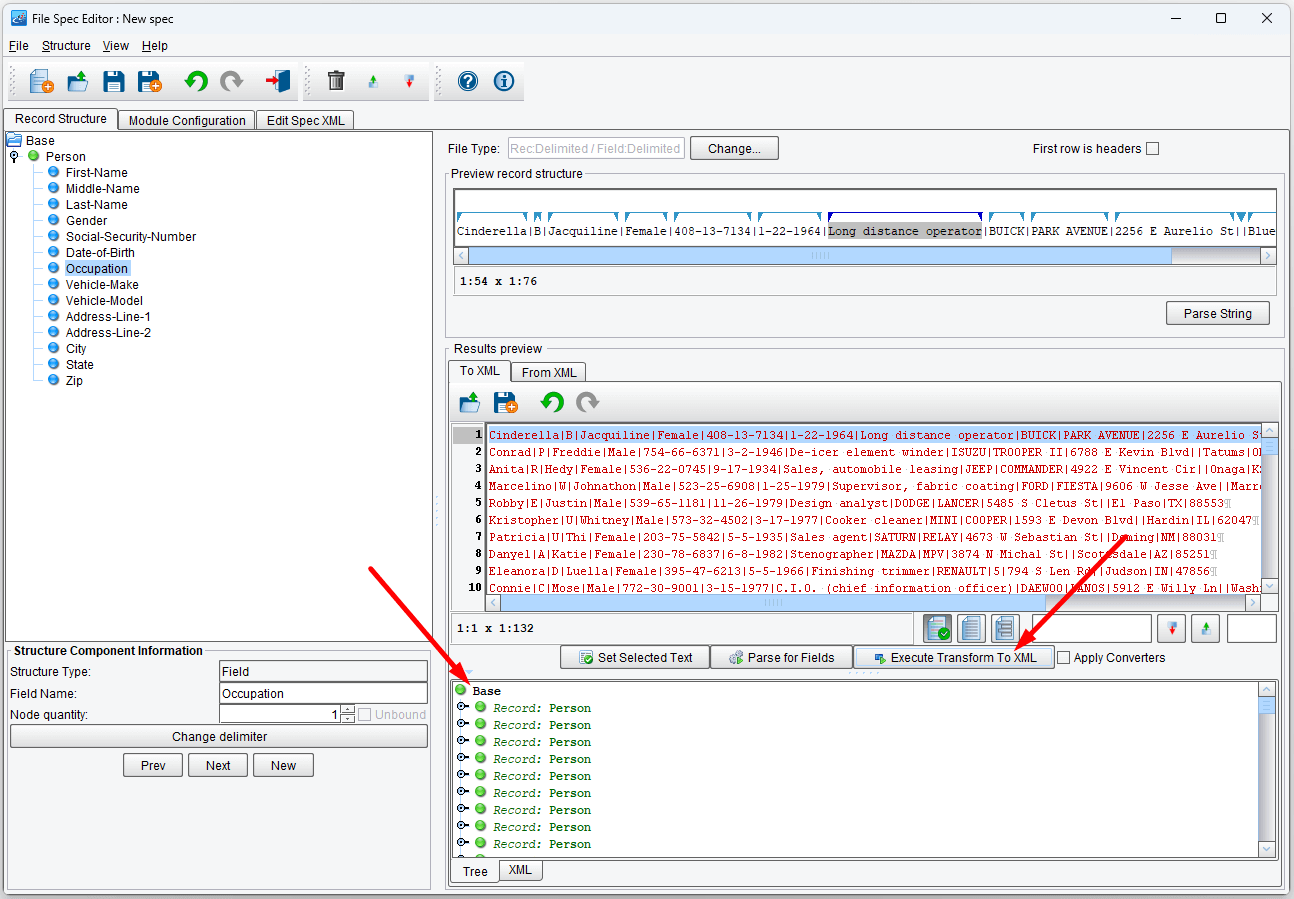
Next, we’ll test our definition. Click the Execute Transform to XML button.
You should see various Person elements appear in the results panel:
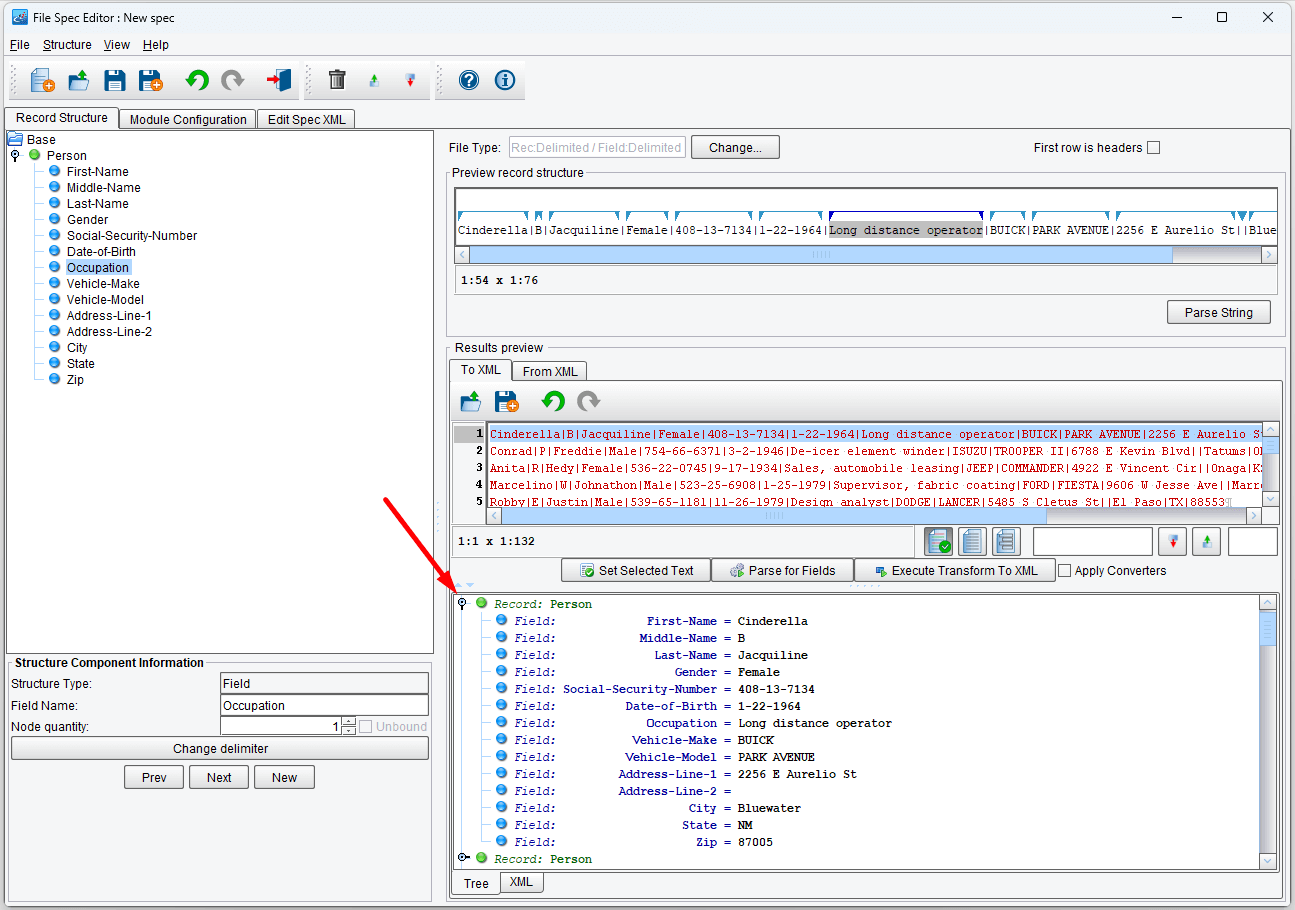
If you click to the left of these elements, it will expand them to show their respective child elements and values. For example, the first Person element should resemble this:
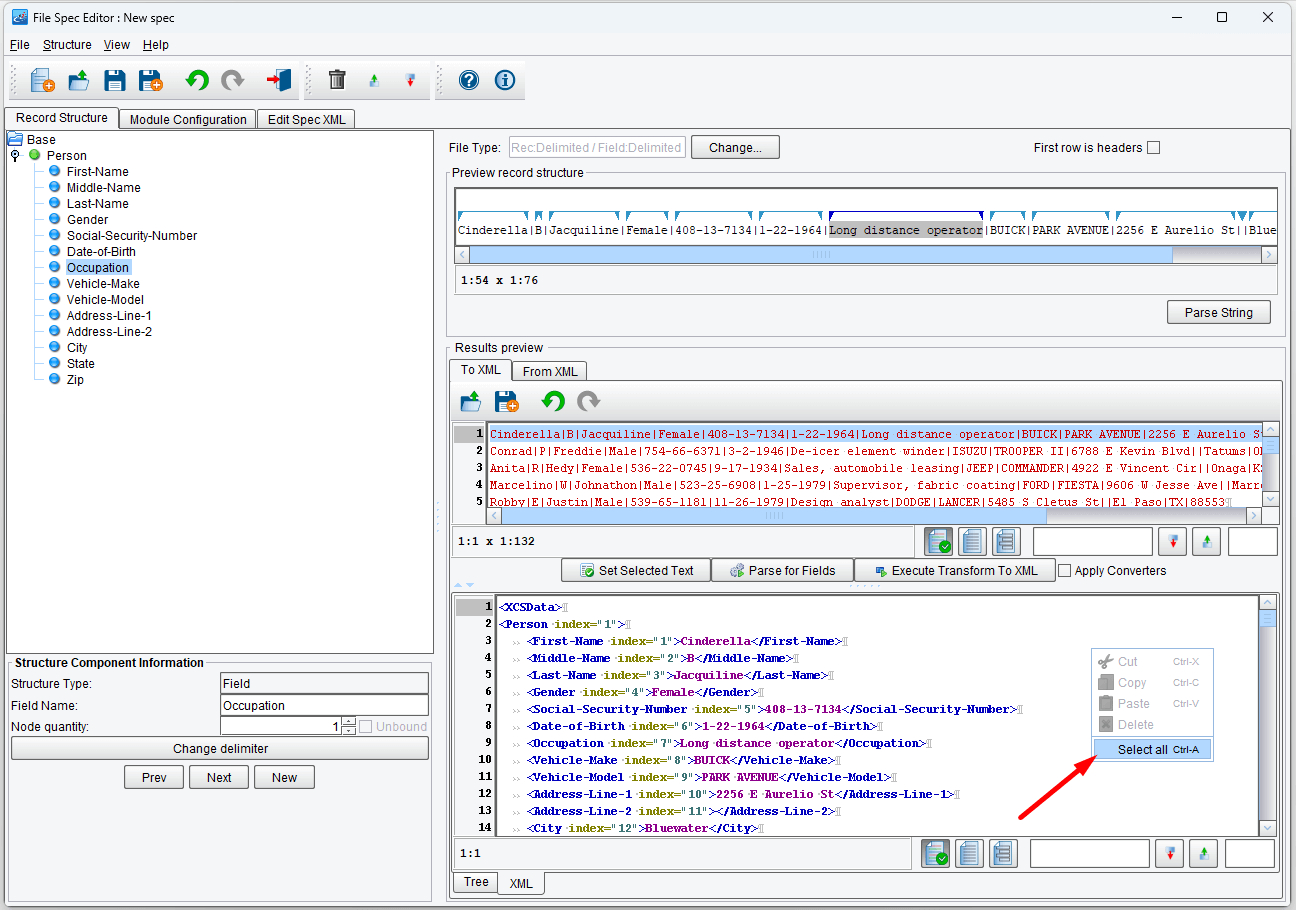
If you click the XML tab, you can also view how this would look in the resulting XML. The resulting XML should look something like this:
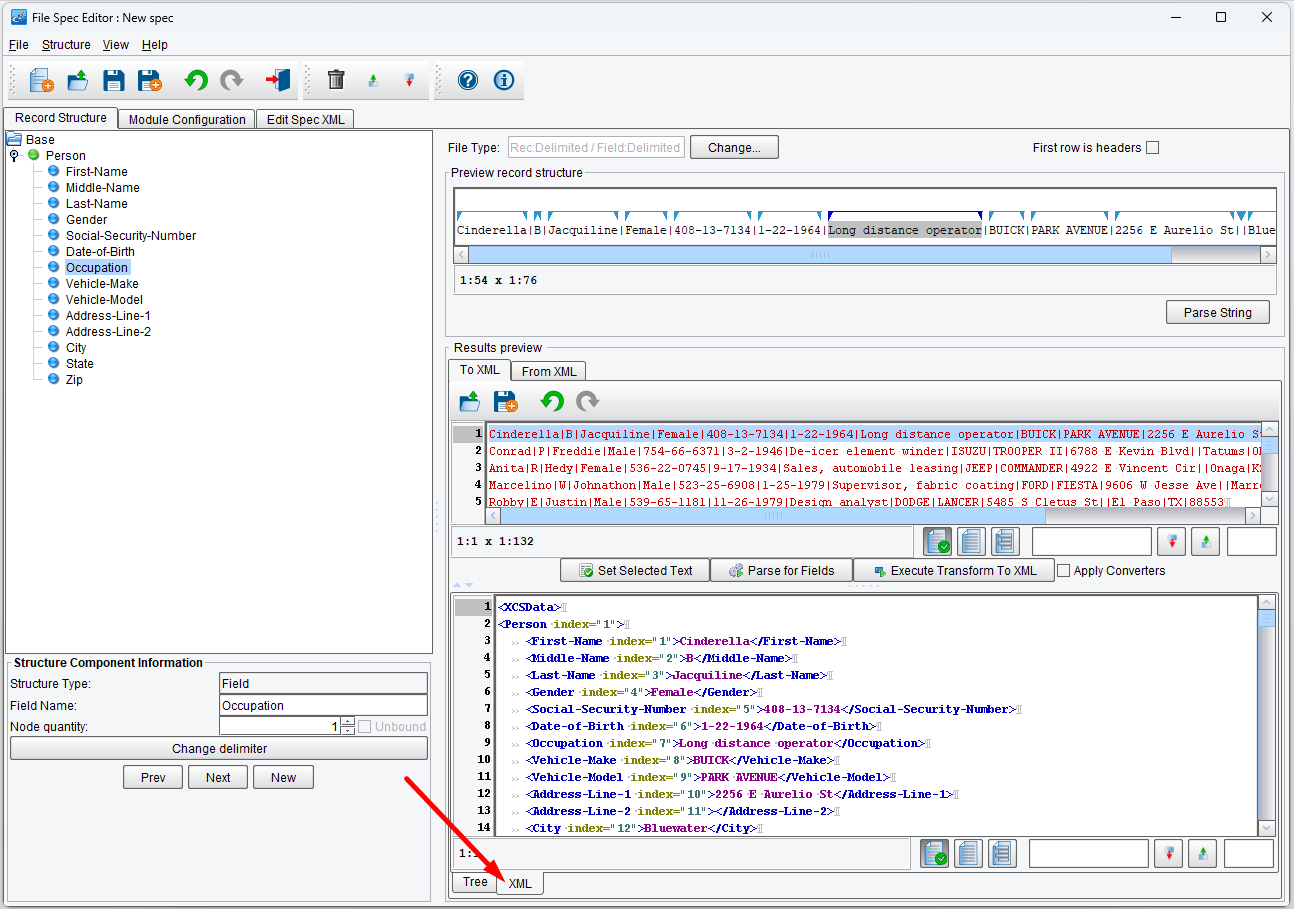
The XML shown in this tab is the “predetermined format XML” we mentioned before we started configuring the current format. We now need to save this XML for later use in the XSLT creation process. Right-click anywhere over the XML and click Select All:
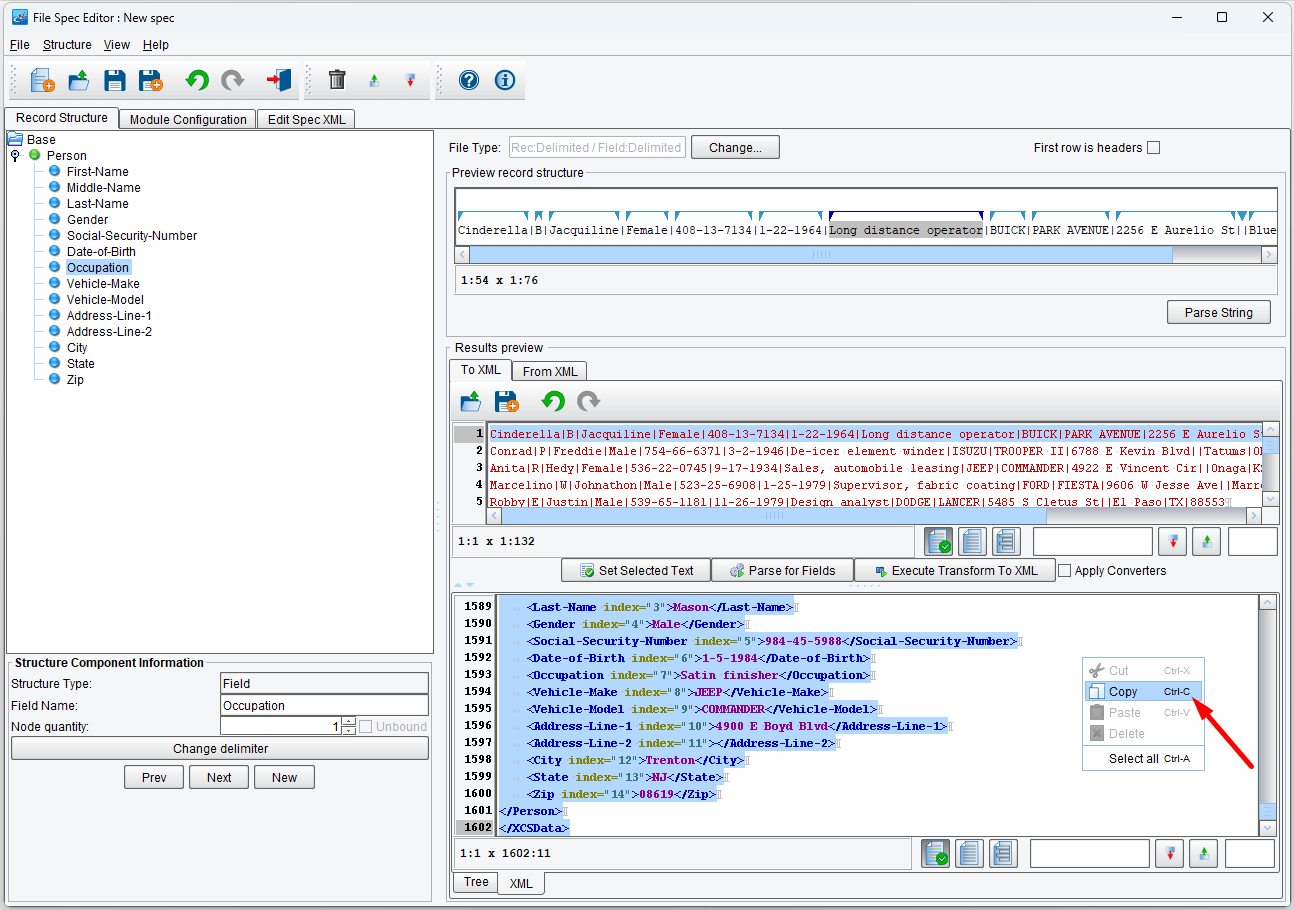
Once the entire XML is selected, right-click over it once more and click Copy. This will send the selected XML to your clipboard so that you can paste it into any text editor and save it for later use.
Now open your favorite text editor, paste in the copied XML, and save it. You can name it anything you like as long as you remember the name since we are going to use it later. We will name the document people-predetermined-format.xml. Be sure to write down where you saved your file.
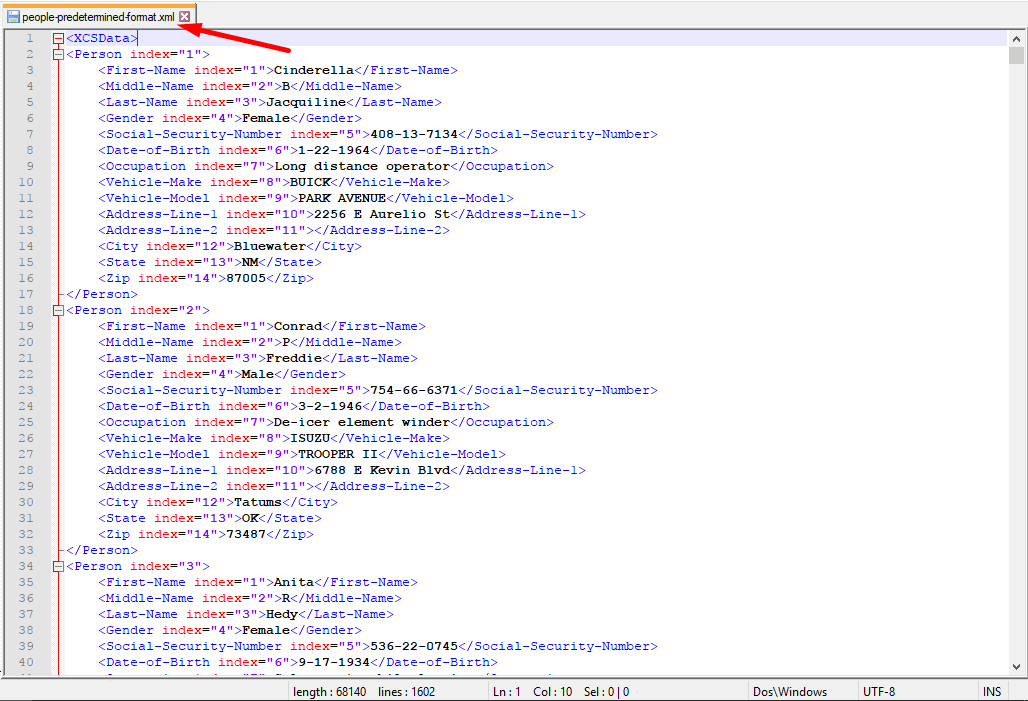
In our case we saved our file in the data directory under our working directory, c:\Users\{USER _NAME}\PilotFish eiConsole Working Directories\MS-SQL Server to XML and Delimited File\data
Our file specification is now fully defined. One interesting aspect to note is that this specification will convert an XML file to the “people delimited” format or the resulting delimited file back to the XML format without any additional configuration or changes; file specifications are inherently bi-directional.
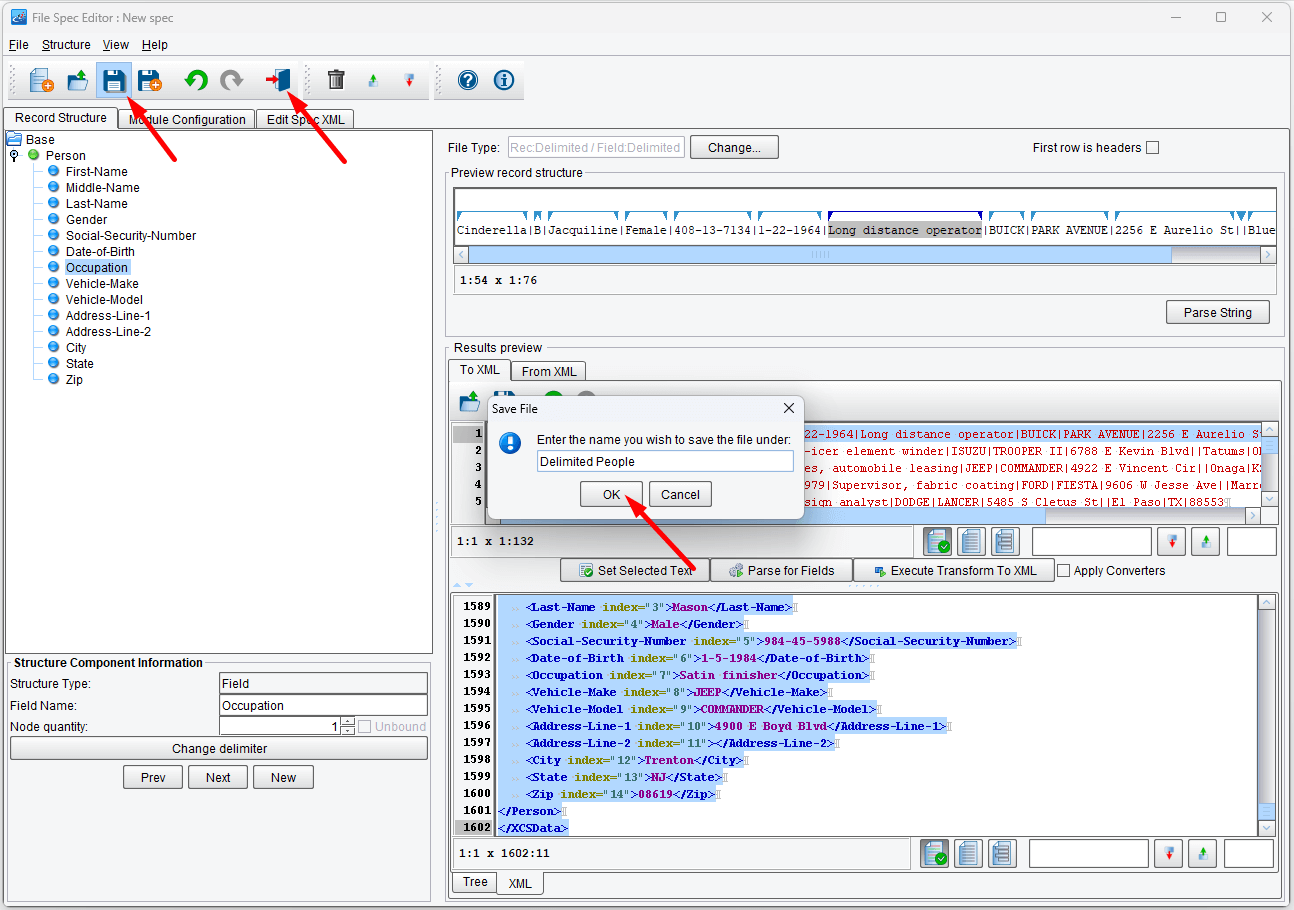
Save your specification with the Save button, providing any name you feel appropriate (we’ll use Delimited People in the example):
Creating the XSLT for the XML to Delimited File Transformation
Now we are going to perform the second step in configuring this Target Transform, creating the XSLT that will be used for transforming the database polling output XML to the predetermined format XML needed by the Delimited and Fixed-Width file Transformation Module. The steps are going to be the same as we followed in the Transform the database output XML to an XML file XSLT before, with the slight difference that we are going to use the people-predetermined-format.xml file we created in the previous step as the Target format.
Let’s start by unchecking the Use Direct Relay option.

Editing a New Mapping
As we have no existing XSLT document to edit, simply clicking the New button with no document selected will open the Data Mapper to edit a new mapping:
Reading the Source Format
We are now going to load the Source and Target formats you’ll be working with. To do this for each panel, click the Open Source Format button at the top. We’ll start by loading the Source format. Select the XML Format Reader from the list of available format readers. This will allow us to use an XML sample file to infer a structure from.
Next, we’ll need to add our sample file. Click Add and browse to SQLXMLOutput.xml, which you created in the Listener test step:

The selected XML file should appear under XML Files. Click Read Format.
You should now have a Source panel that resembles this:
Reading our Target Format
We’ll now read our Target format. Remember that this time we are going to use the people-predetermined-format.xml file created before as the Source format.
Select the same button on the Target panel at the right side of the screen and select the XML Format Reader again.
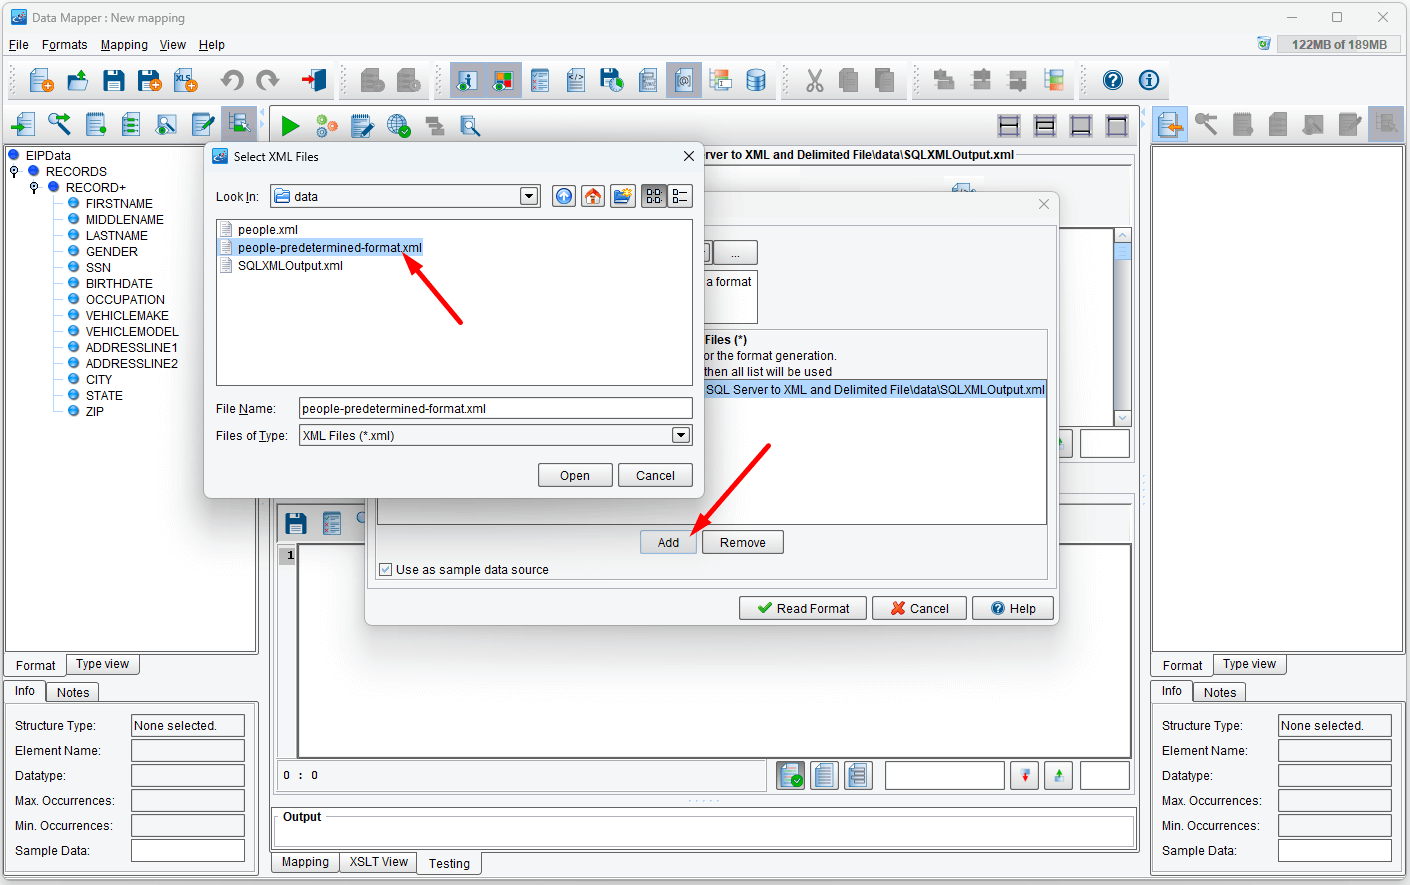
You should see the previous sample listed. Click Add and this time, browse to where you saved the people-predetermined-format.xml file and select it. The selected file in this step should be a sample file with the predetermined format needed by the Delimited and Fixed-Width File transformation module. Once the transformation takes place the database polling output SQLXML file will be transformed to an XML having the format of people-predetermined-format.xml.
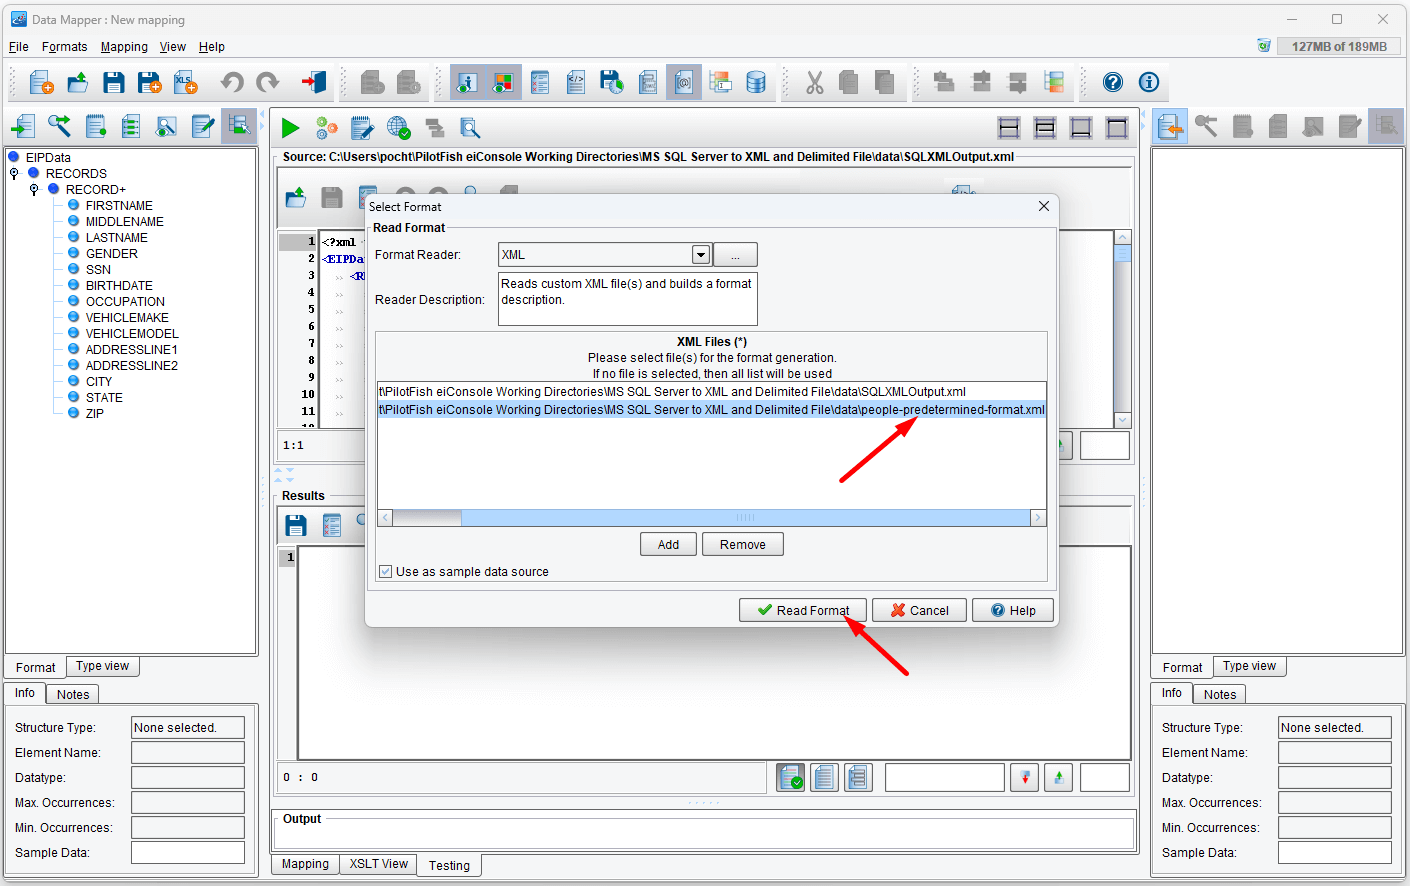
Once the file is added it should now appear under XML Files. Next, click on Read Format:
Now you should have a Target panel that resembles this:

Now that we have our Source and Target structures. We will proceed to create the XSLT using the graphical user interface.
Constructing the Mapping
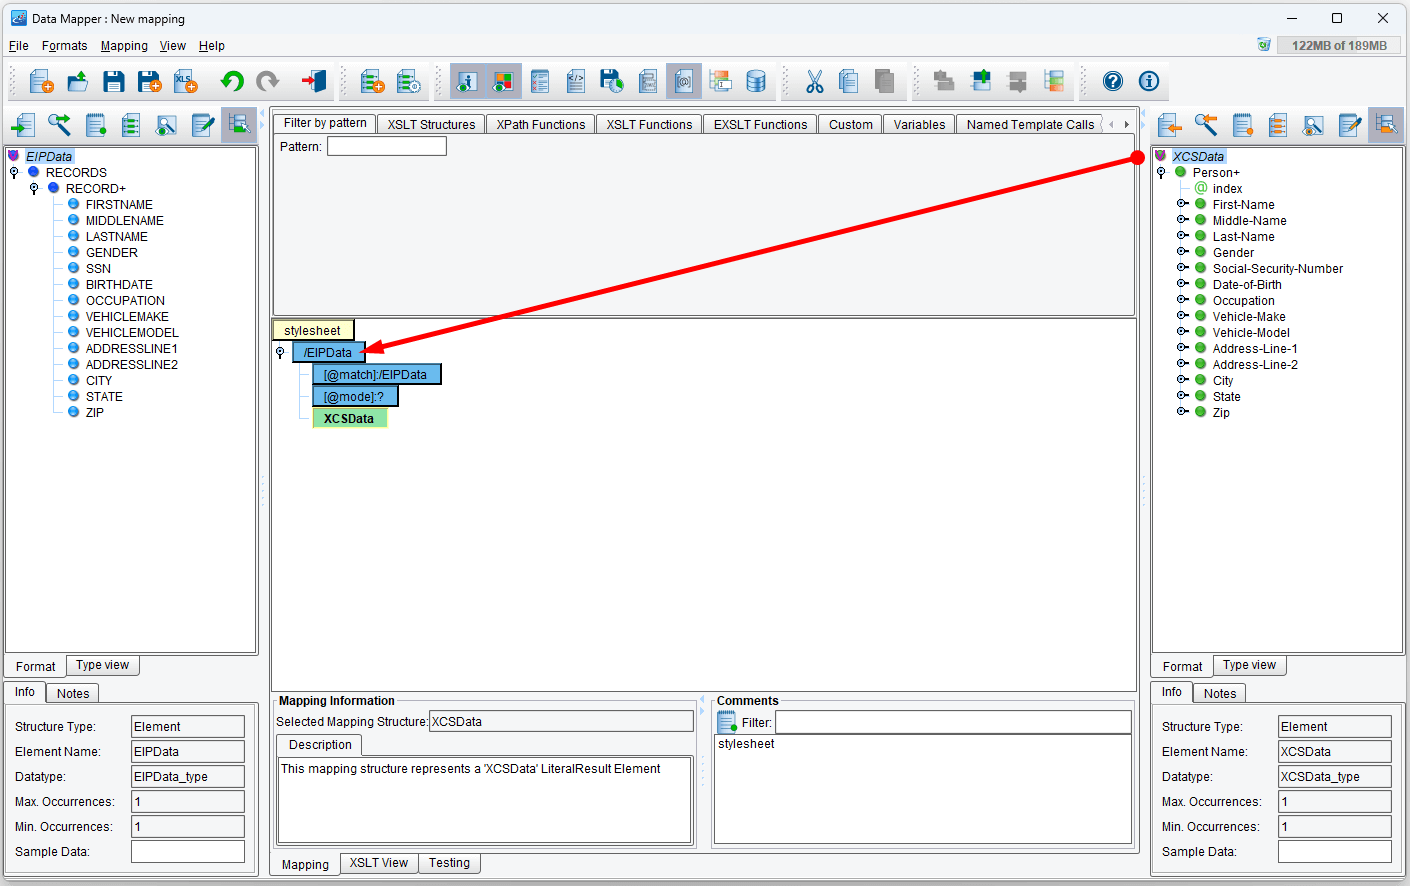
The first thing to do in constructing the mapping itself is to provide a template match. Select the EIPData element from the Source and drag & drop it onto the stylesheet element in the center. This will create an EIPData template in the center.
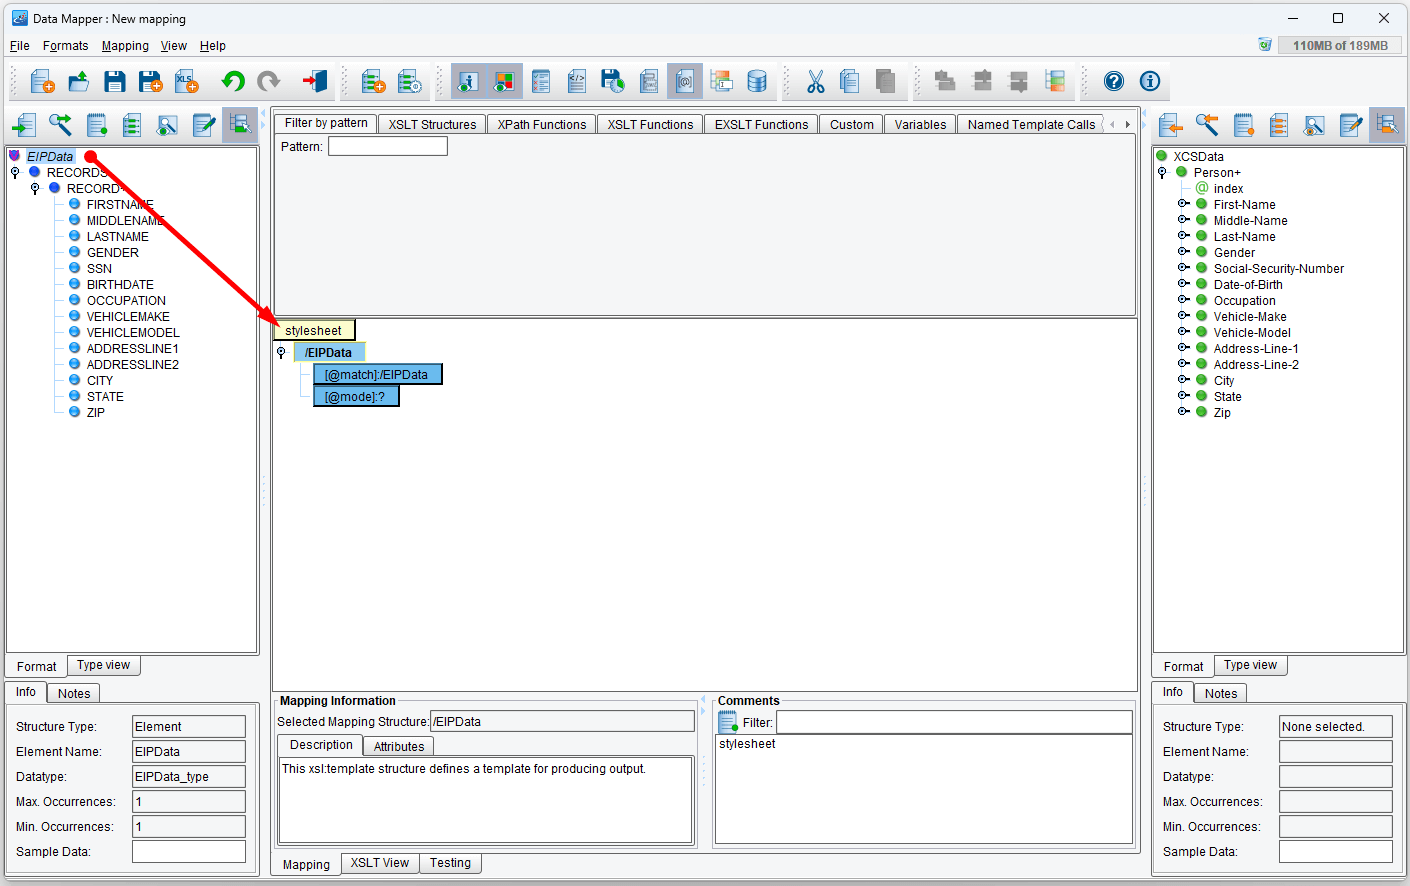
Creating the XCSData Element from the Target
Drag XCSData from the Target format onto EIPData in the center:
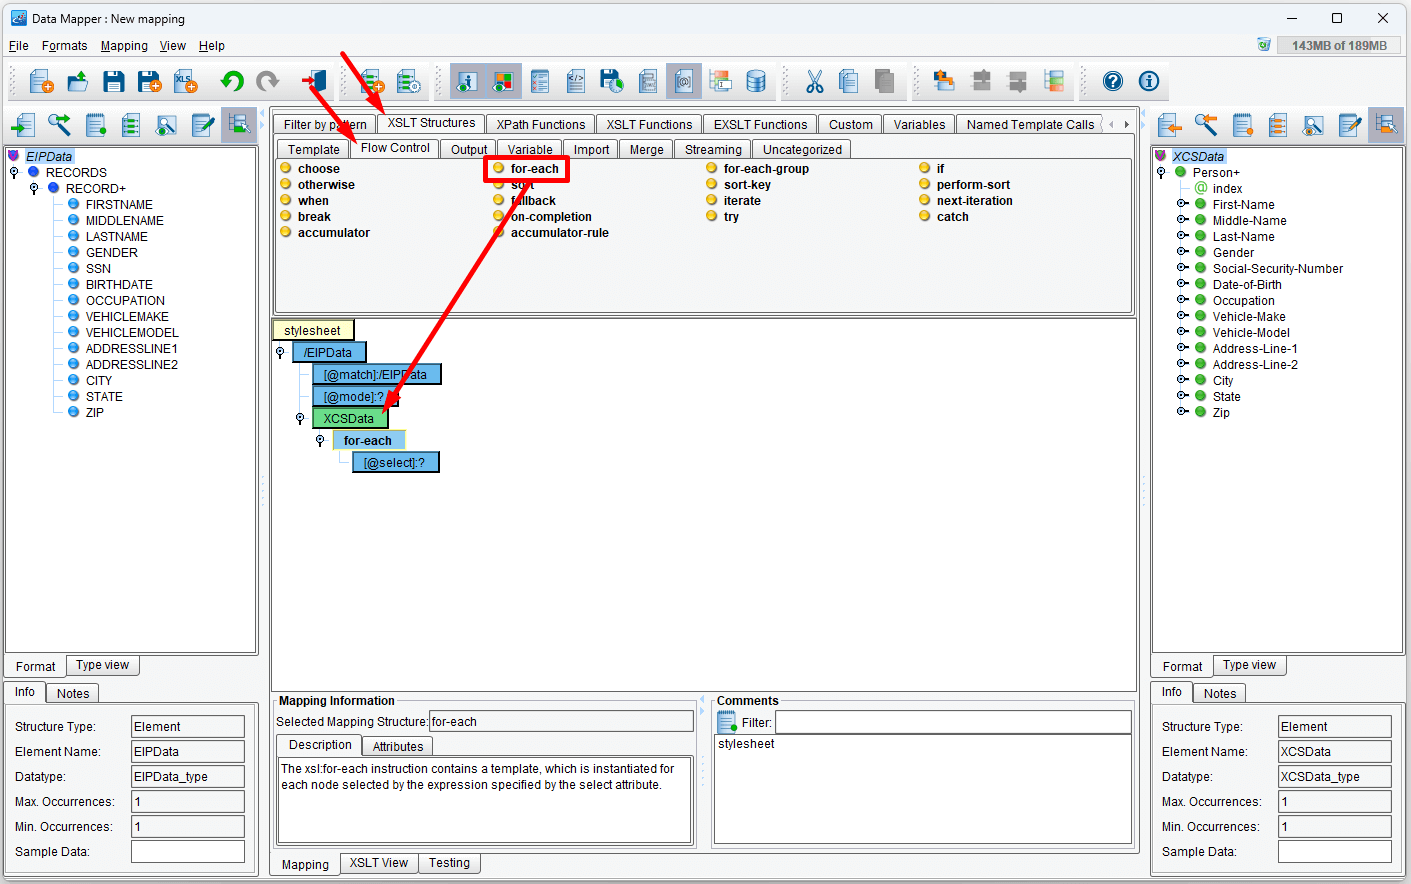
In the middle panel, select the Flow Control tab. Drag the for-each structure to the XCSData element we added before:
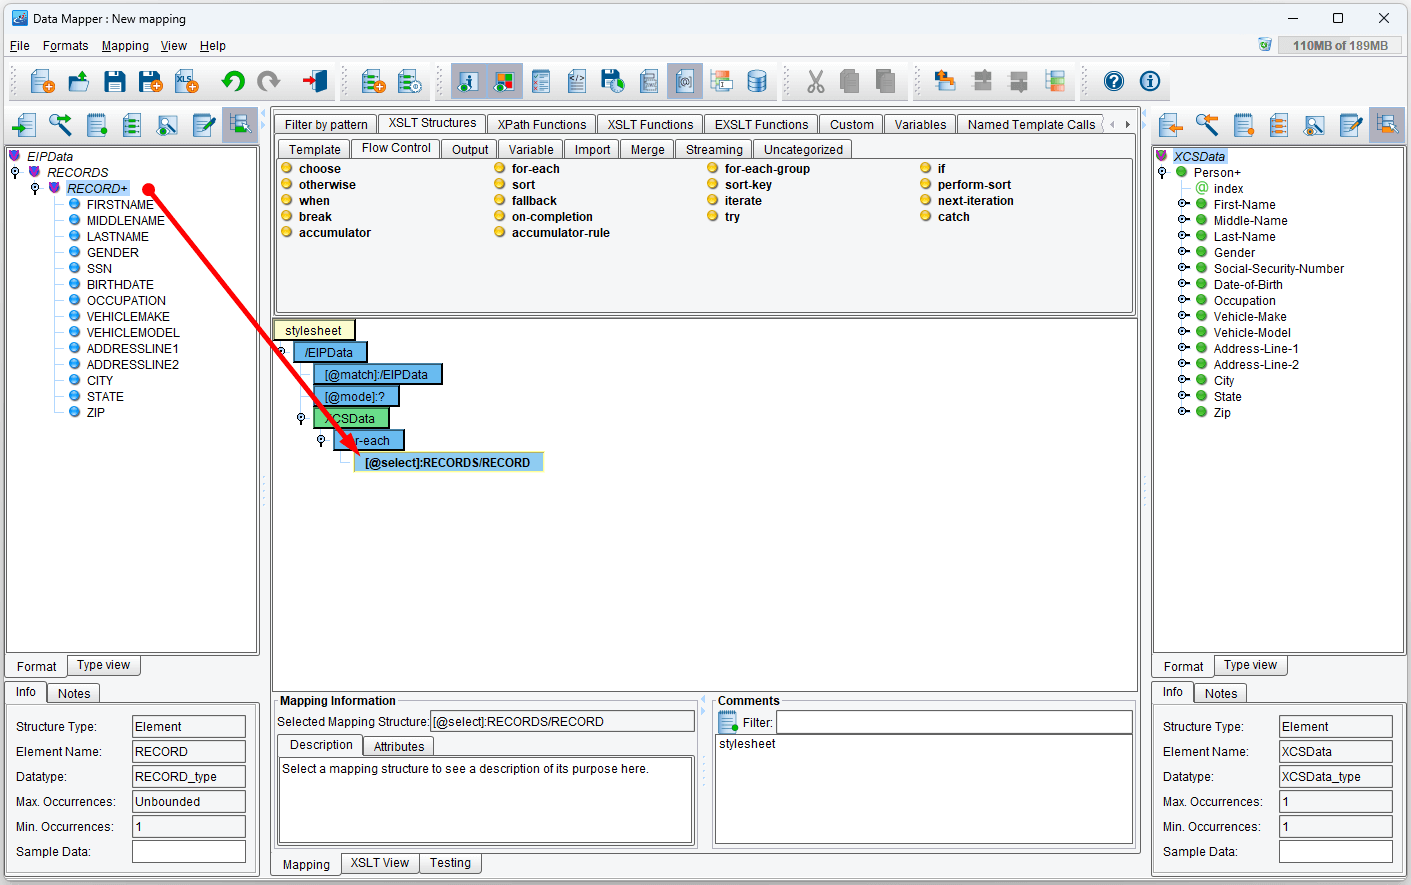
Next, drag the RECORD+ element from the Source structure to the [@select]:? element of the for-each structure just added:
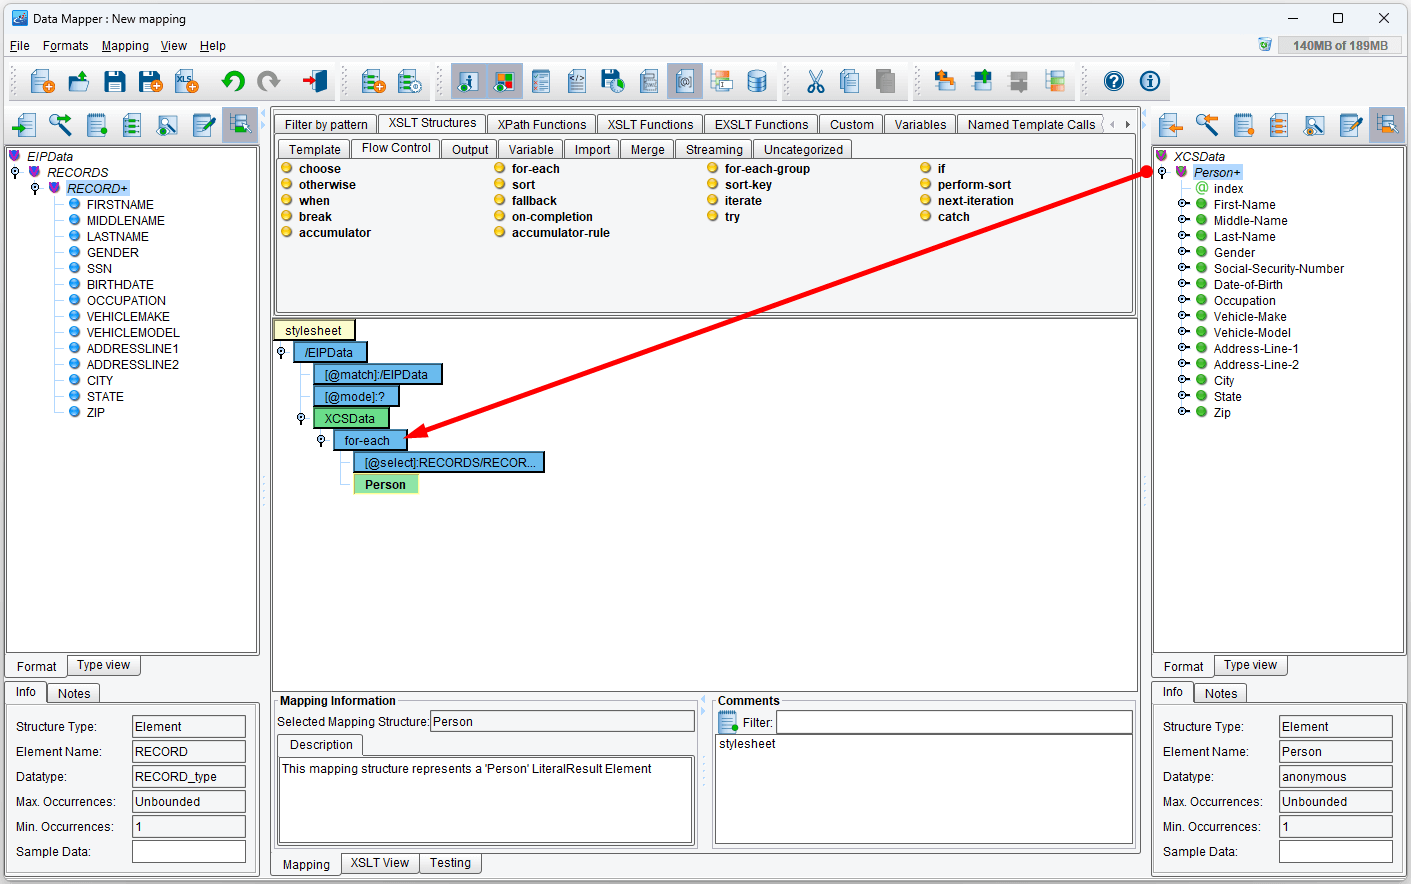
Lastly, drag the Person+ element from the Target structure over the for-each structure. This will tell the transformation engine to create a Person+ element for each RECORD+ element found.
We’ll now want to create the various elements shown in the Target format. Drag & drop each of the elements under the Target Person+ element onto the Person in the center; you can skip the attribute elements (elements with @ next to their name), for this tutorial.
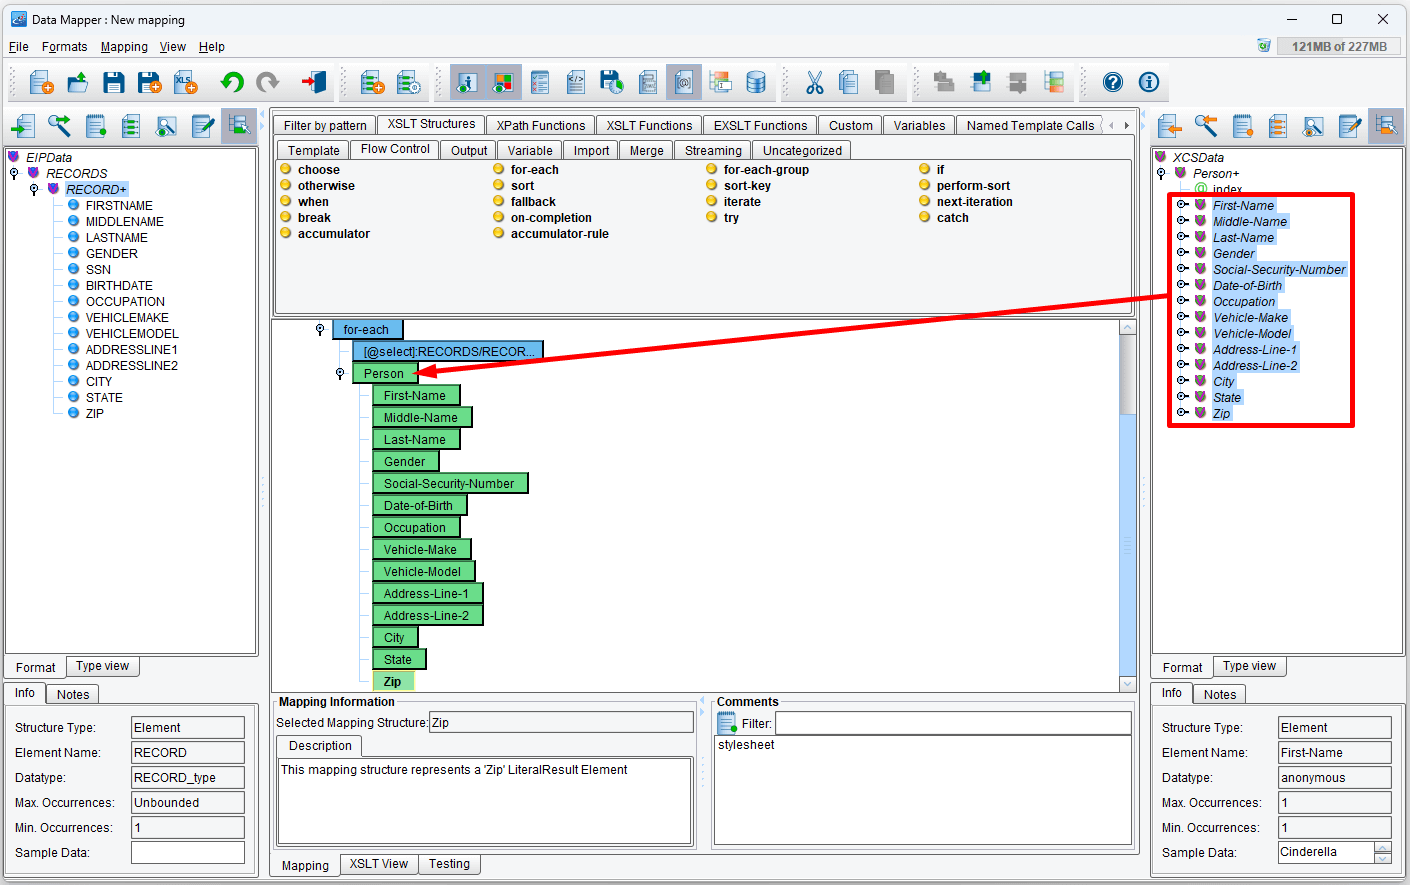
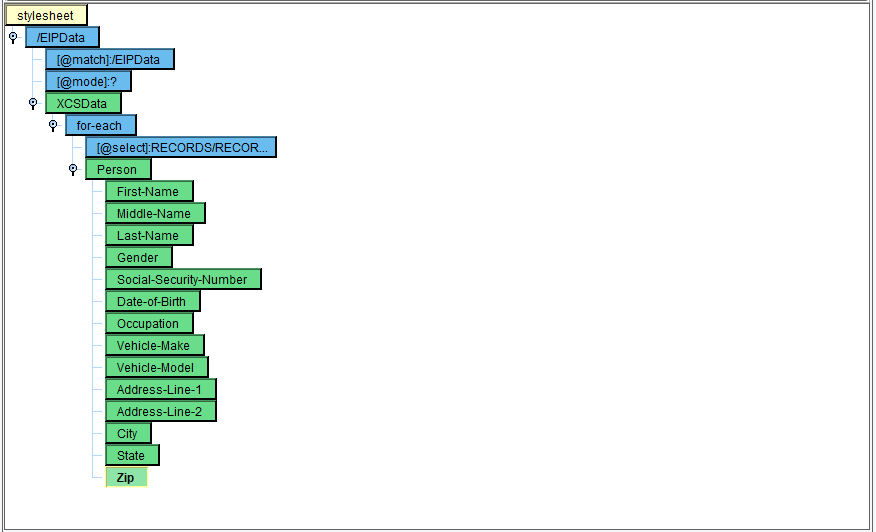
The center mapping should look exactly like this:
Providing Values
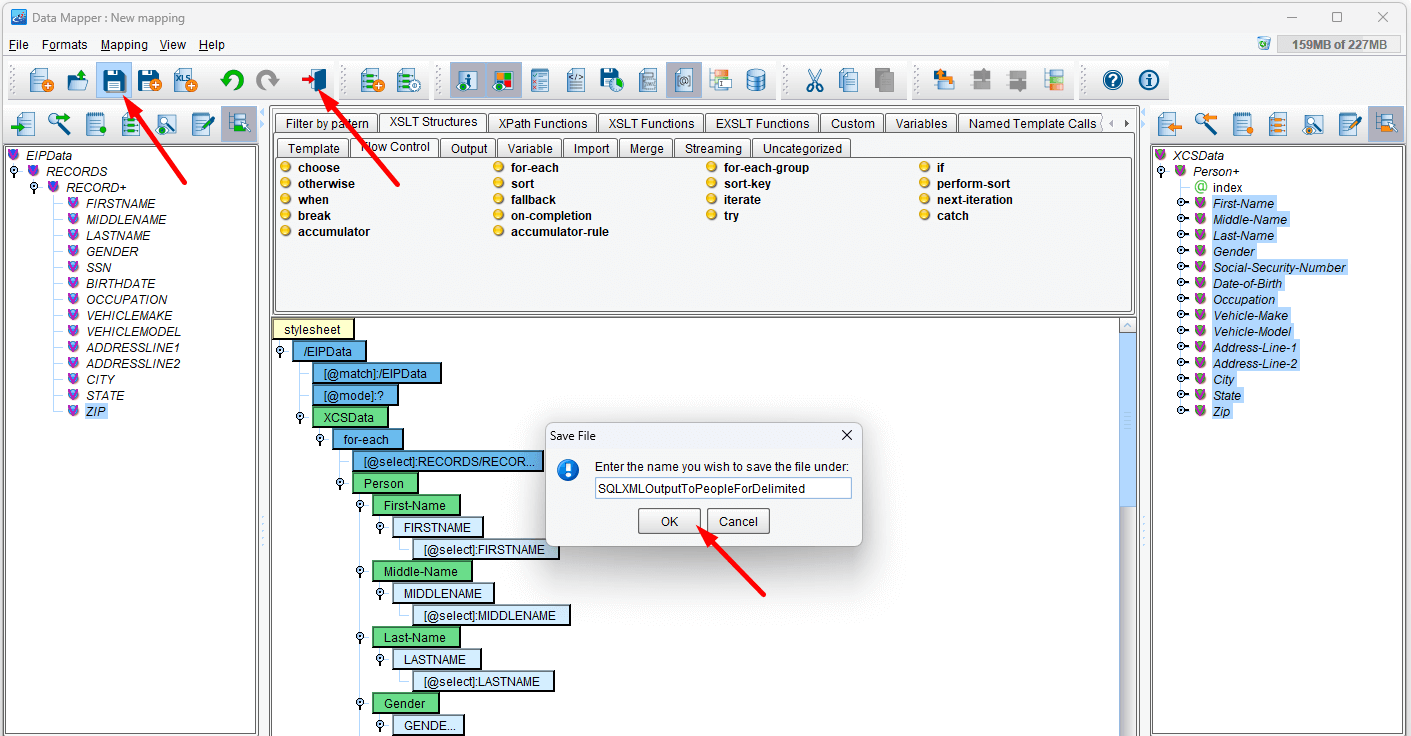
To populate the FIRST-NAME element, drag the FIRSTNAME element from the Source format onto it:
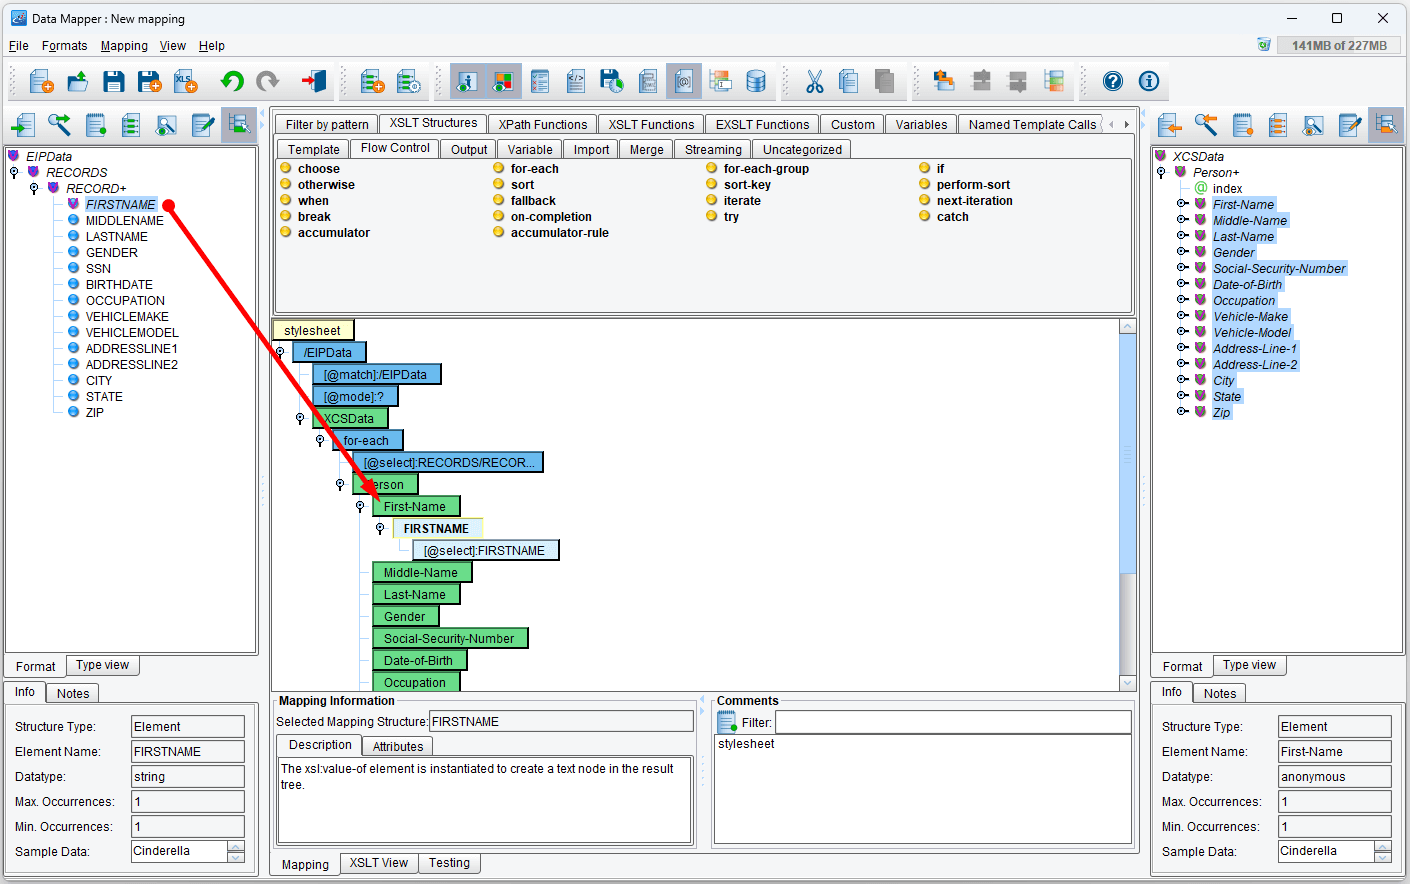
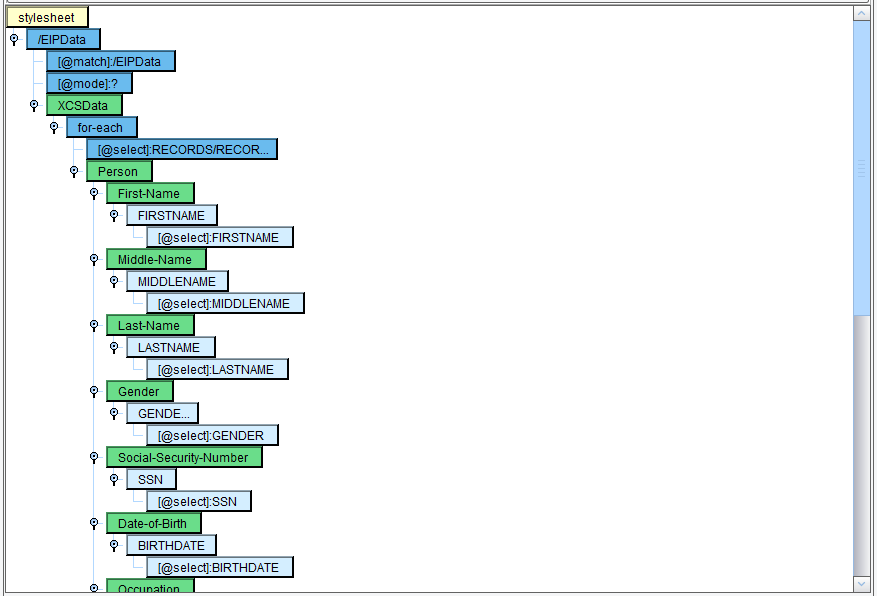
Continue this for each of the values. When you’re finished, it should look something like this:
We’ve now completed our basic mapping. Save the mapping using the Save button or menu item (we’ll name ours SQLXMLOutputToPeopleForDelimited) and close the Data Mapper to return to the eiConsole.
Send Transformed File to a Directory
Now that we have extracted some information from a database and transformed the extracted data into an XML and a delimited file we need to deliver these files to the desired destination. For this tutorial, we will save both files to a local directory. The steps for each file are the same with the exception of the filenames we will use for saving the files.
Saving the Target XML to a Local Directory
In order to deliver the output of a transaction, a Transport needs to be configured. We will start by configuring the Transport for our SQLXML to People XML transformation.
Start by clicking on the cell labeled Transport next to the SQLXML to People XML transformation. Once highlighted, the Transport Configuration panel will appear below. Select the desired Transport Type from the Transport Type drop-down. For this tutorial, we will select the Directory/File Transport:
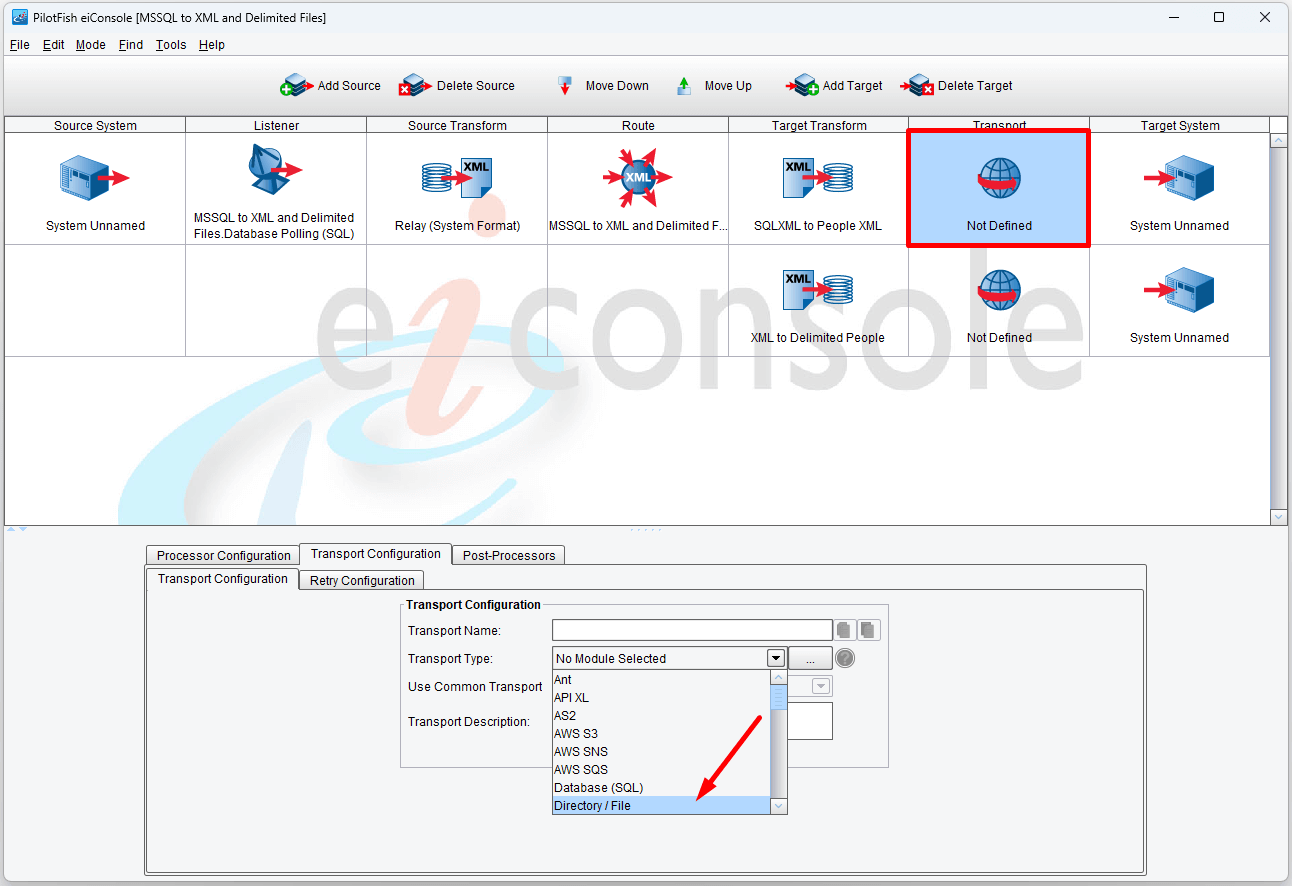
Once selected, the Transport configuration panel will appear. The tabs and configuration options will vary depending on the module selected in the Transport Type drop-down.
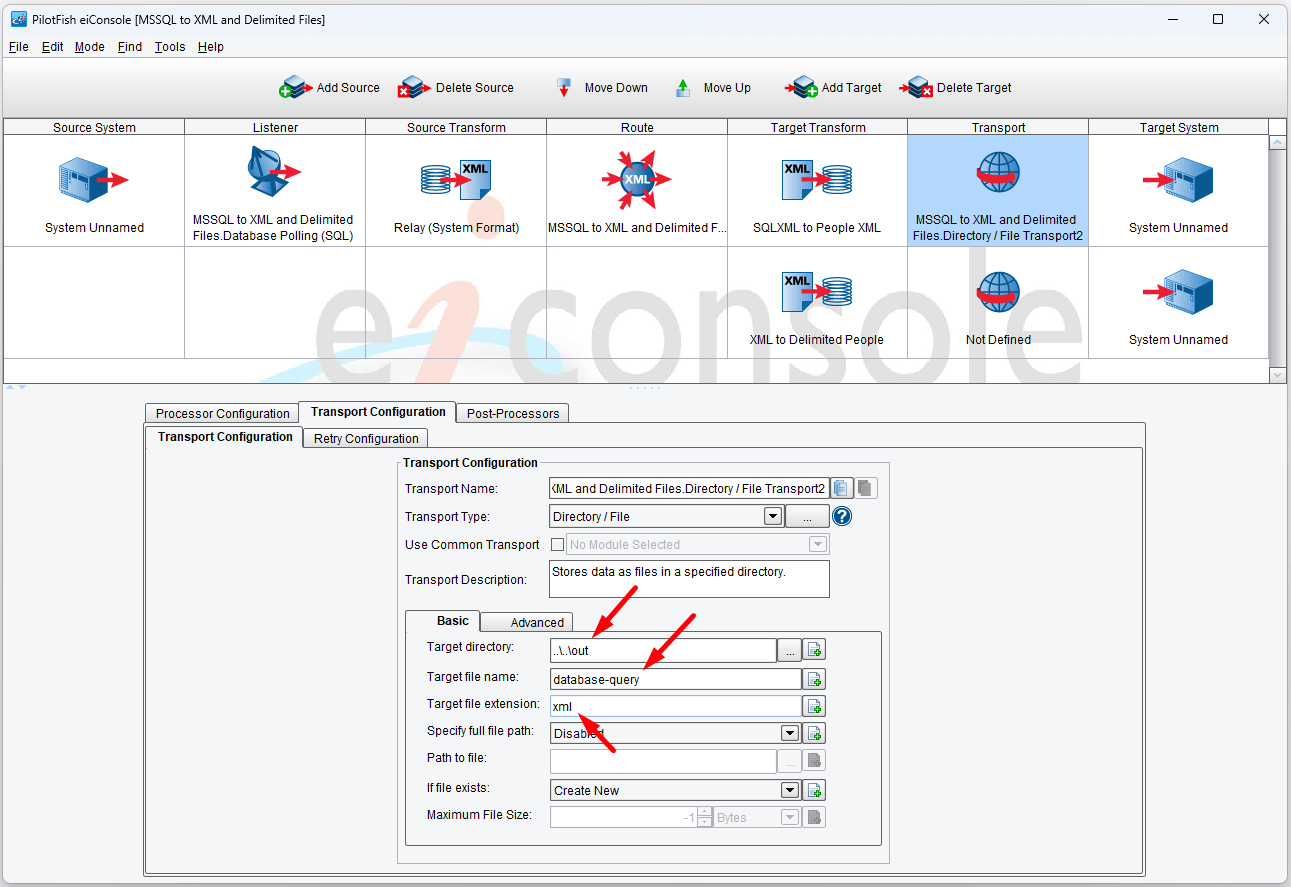
Next, we will fill in the configuration details in the Transport Configuration panel. Start by selecting the desired destination folder. You can type in the destination folder’s path or click the … button, browse to it, and select it. In our case, we are going to set our destination folder to ..\..\out. In our case, it will be in:
c:\Users\{USER _NAME}\PilotFish eiConsole Working Directories\MS-SQL Server to XML and Delimited File\out
Note that the ..\..\out is using relative pathing and the route is stored in c:\Users\{USER _NAME}\PilotFish eiConsole Working Directories\MS-SQL Server to XML and Delimited File\route.xml so you basically go back two directories to get the directory.
Please remember your directory name. When we test the route, you will search within it for the resulting files.
Now, we need to name our output file, database-query.xml. To name your file, enter the desired filename (database-query) in the Target File Name field and the file extension (xml) in the Target File Extension field.
You can set other options for this Transport, but the ones we just set are enough for now. After this tutorial, you can explore the other options.
Saving the Target Delimited File to a Local Directory
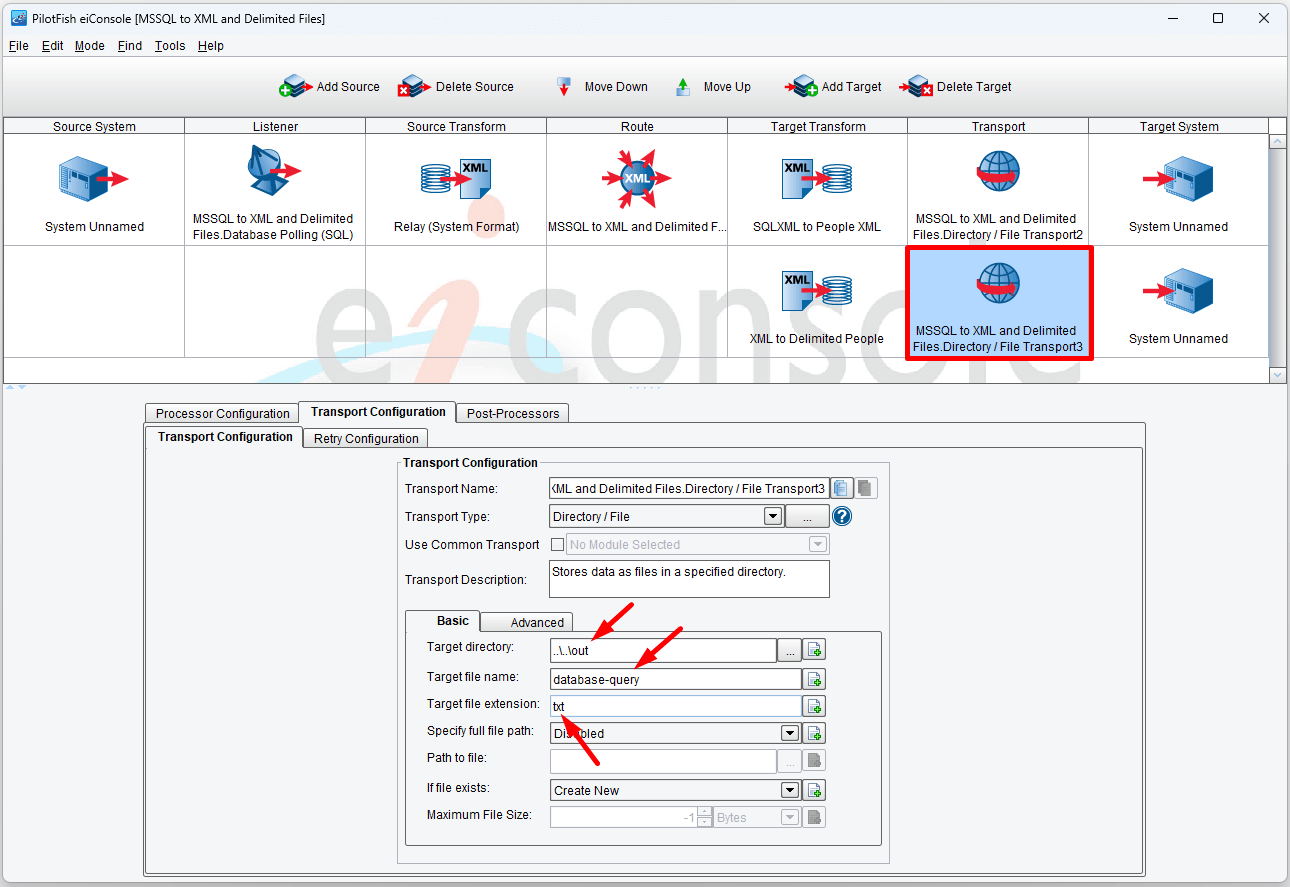
Now we need to configure the Transport for the XML to Delimited People transformation. The steps to follow are the same as for the SQLXML to People XML transport just with a different filename. We will name the output file for this transformation database-query.txt.
Start by clicking on the cell labeled Transport next to the XML to Delimited People transformation.
Note that the ..\..\out is using relative pathing and the route is stored in c:\Users\{USER _NAME}\PilotFish eiConsole Working Directories\MS-SQL Server to XML and Delimited File\route.xml so you basically go back two directories to get that directory.
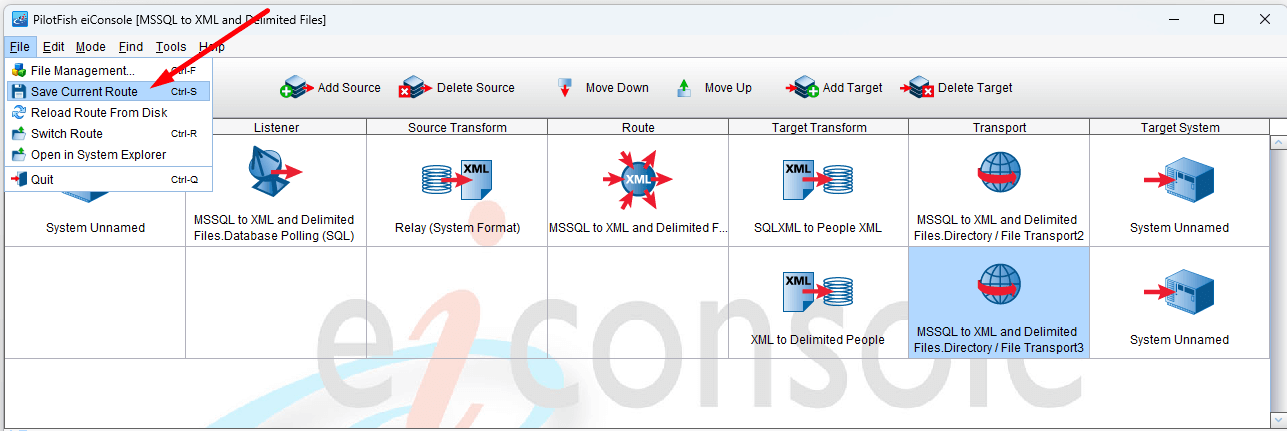
Your Route is complete. Now open the File menu and click on Save Current Route to save your new route:
Testing the Route
Now that the route is configured from Source to Target you can test its behavior. Within the Mode menu, select Testing Mode.
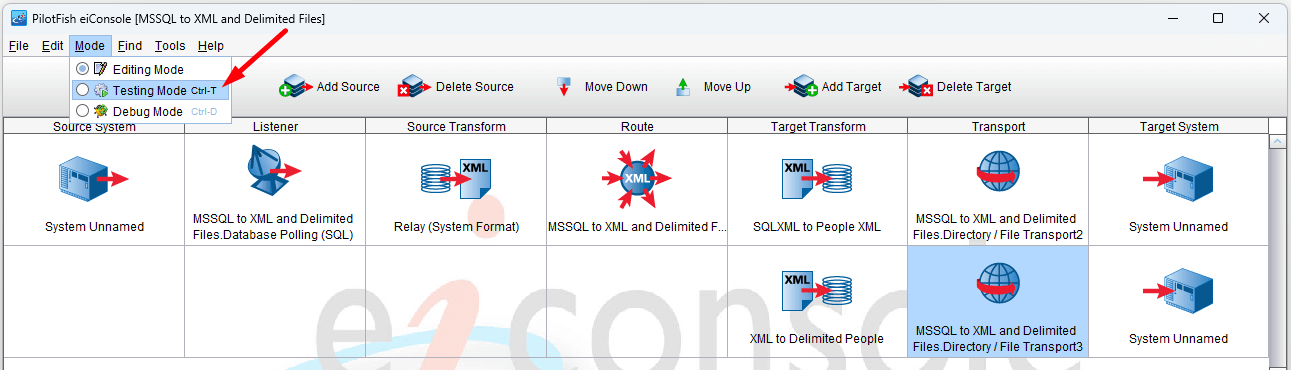
When you switch to Testing Mode, all of the icons between the Source and the Target become question marks, indicating Stages that you may choose to test.

For this tutorial, we will use the default testing configuration since we want the route to connect to the database, retrieve the data and deliver the resulting transformed files to a local directory.
To execute the complete Route from Source to Target just click on the Execute Test button in the top toolbar.
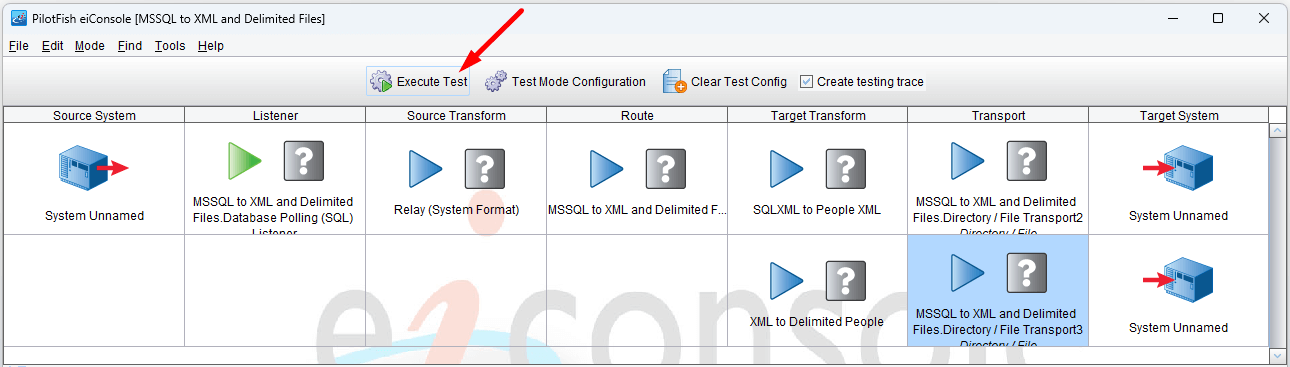
Our Listener will extract the data from the database in a few seconds. As each stage is completed, the question marks will be replaced by green checkmarks, indicating that the stage has been completed successfully.
If there’s an error, the blue question mark will become a red X. You can click on the stage with the red X to view the errors. If for example, the x is in the Source Transform stage, you may want to retrace your steps for that stage to see if you missed a step, failed to check a box, enter a field, etc.
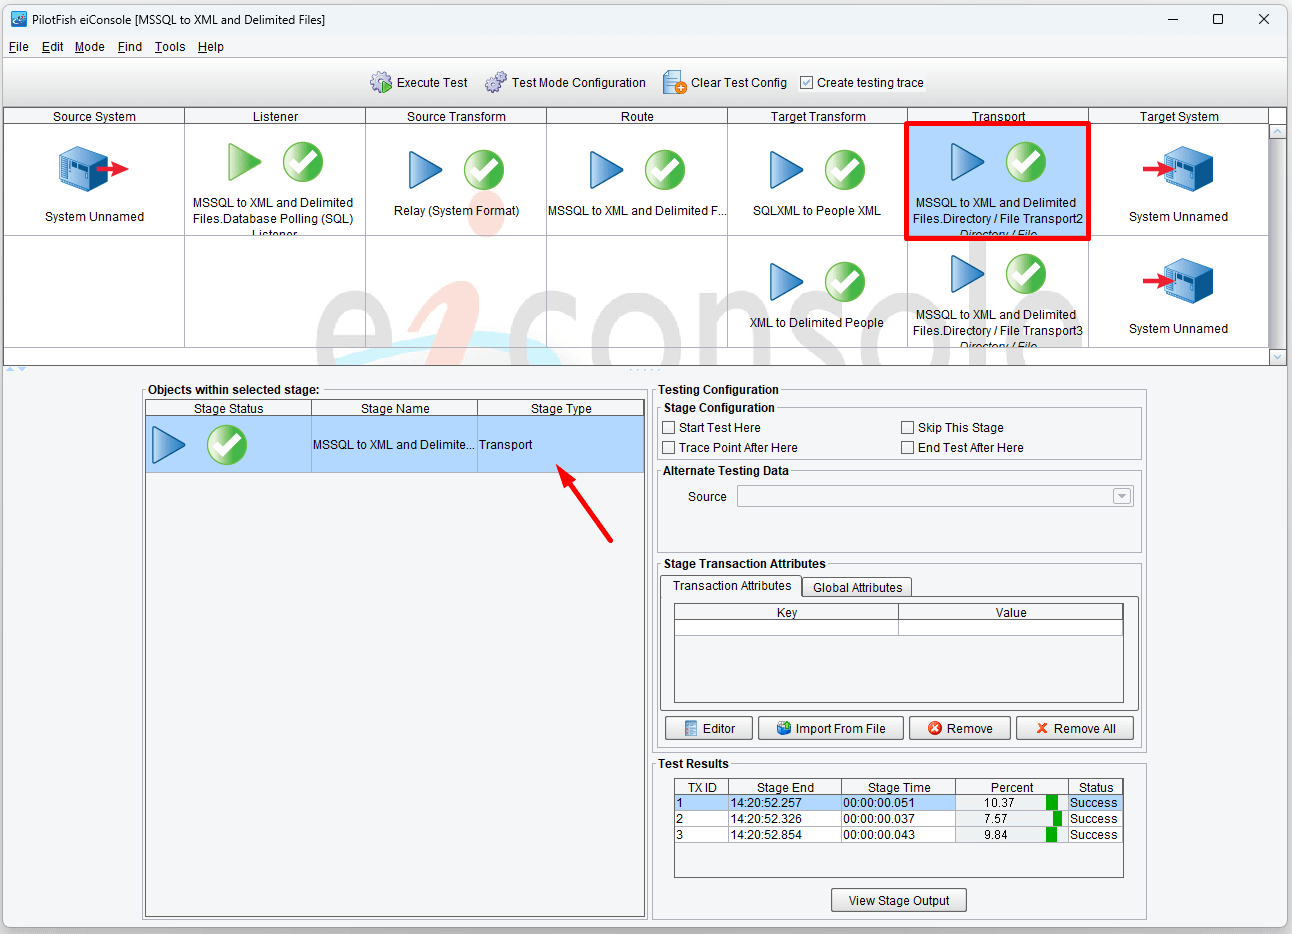
Once all the stages have finished you may click the Stop button. If everything worked correctly you should see green checkmarks in all the Stages.
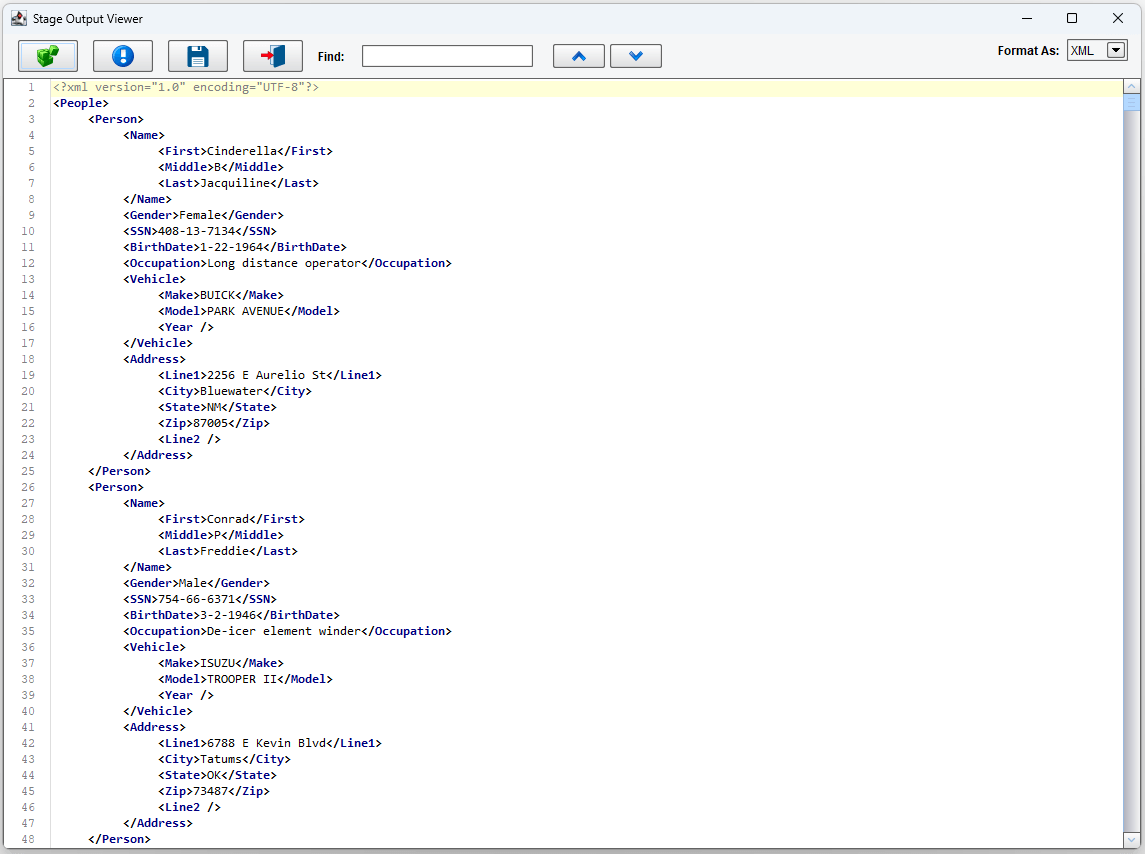
Click View Stage Output in the first Transport stage:
You should see this result:
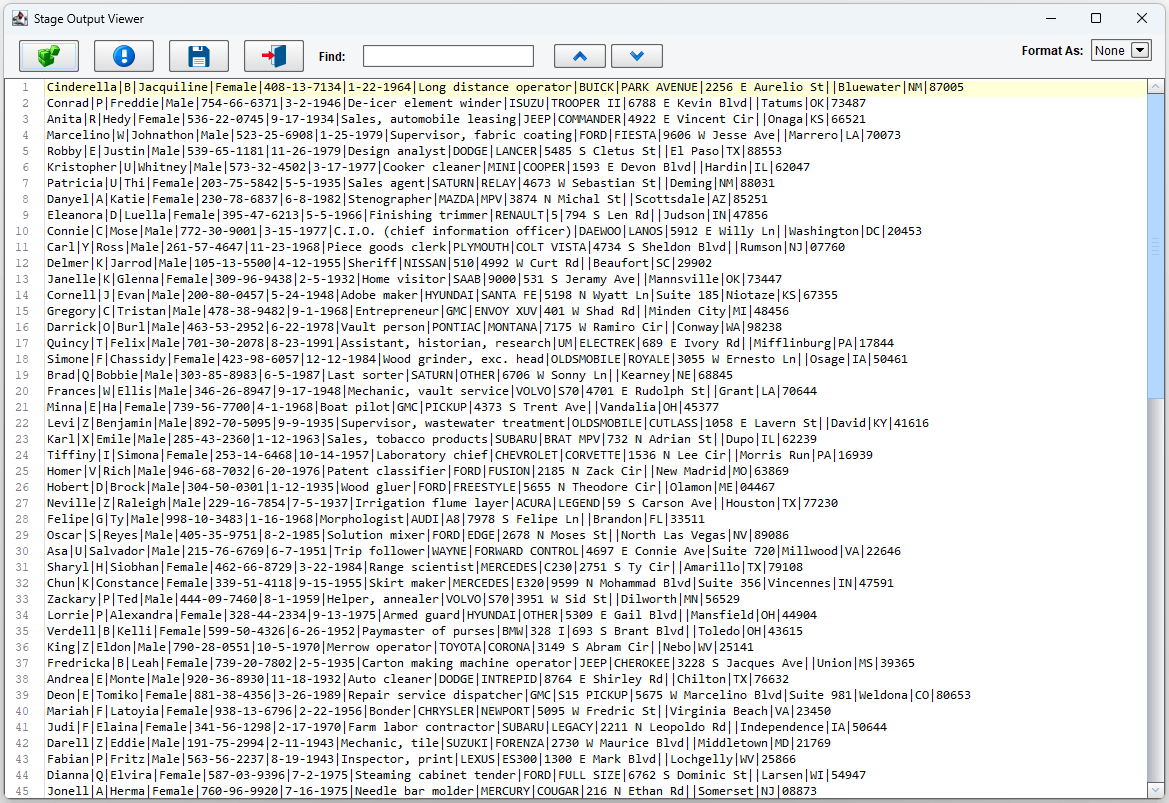
Click View Stage Output in the second Transport stage:

You should see this result:
You can also look at the files (database-query.xml, database-query.txt) directly in:
c:\Users\{USER _NAME}\PilotFish eiConsole Working Directories\MS-SQL Server to XML and Delimited File\out
This concludes the tutorial. If you did not get the desired output or if you received an error in any stage please go over the steps for that section again.