eiConsole for ACORD (LAH) Getting Started Tutorial
The General Quick Start Tutorial is the prerequisite for this tutorial. If you still need to complete it, please do so now. The ACORD LAH tutorial builds on concepts learned in the Quick Start tutorial that are not repeated here and are required to complete this tutorial. Before we begin, click the eiConsole Update to download and install the latest slipstream release.
Before You Begin
Download the ACORD-LAH-Getting-Started-Working-Directory.zip file with the sample working directory and unzip it on your computer to a convenient place. In our case, it’s c:\PilotFish\ACORD LAH\
Open the eiConsole and open a new working directory.
Welcome to the eiConsole for ACORD LAH Getting Started Tutorial. During this tutorial, you’ll build your first interface using the PilotFish eiConsole for ACORD LAH. In this tutorial, you’ll translate a proprietary formatted fixed-width flat file into an ACORD TX Life 203 Holding Inquiry. This interface will take the average user 1 hour and 50 minutes.
Note: Your ACORD LAH Templates Package contains a list of template transactions for all of the various TXLife Trans Types.

We begin on the Route File Management window. As you learned in the Quick Start Tutorial, the green icons (above) indicate an eiConsole Interface Package.
You should have 2 eiConsole Packages in the Interface Overview grid.
Double-click the 1 ACORD LAH Getting Started Tutorial package row.

The sample interface, My-Holding-Inquiry, appears in the Interface Overview grid. The blue icon indicates that this is a fully configured interface. It is the same interface you will be configuring from scratch in this tutorial. The sample Route is located in your Working Directory. In our case, the path is c:/PilotFish/ACORD LAH/interfaces/1 ACORD LAH Getting Started Tutorial. Note the location, as you will require some files from there as you do the tutorial. This sample configured interface consists of a single route. Feel free to double-click the sample interface to browse through the configuration screens and interface. Or, if you run into a problem in the tutorial, you can always review the sample interface for reference.
We’ll now return to the main Working Directory. To do so, double-click anywhere in the row above My-Holding-Inquiry.

You’ll return to the original Route File Management window, which will show Packages 2 in the Interface Overview grid. The next thing you’ll want to do is to double-click the second row, 2 ACORD LAH Getting Started Interface.

The Route File Management window opens with a Route, 203 Holding Inquiry, in the Basic View tab. Note the red icon indicates that this interface is not configured. We will be copying the formats from this interface.
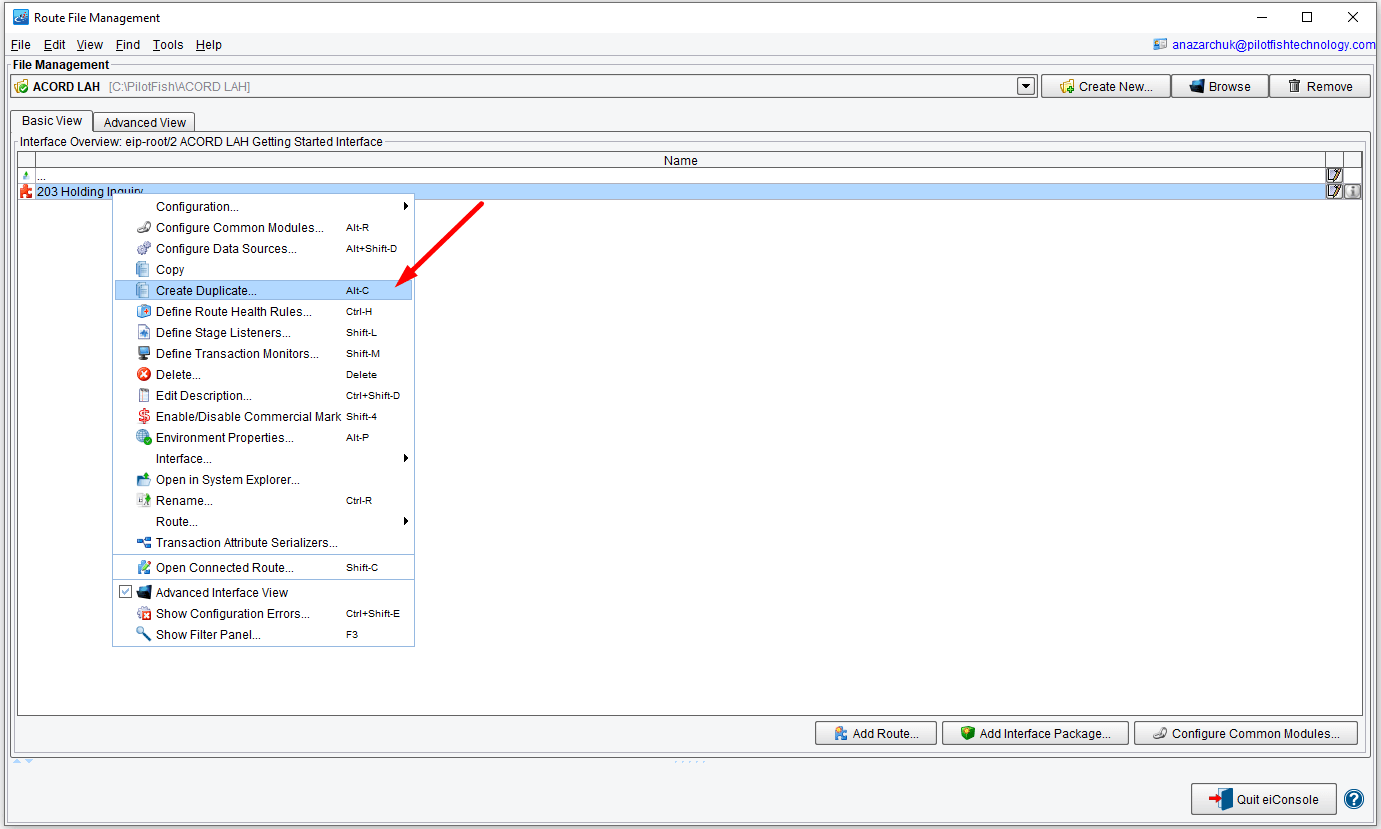
Select the 203 Holding Inquiry template and right-click to open the drop-down menu. Scroll down to Create Duplicate… and select it.
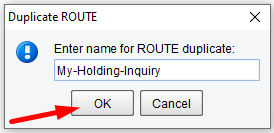
The Specify Copy Name dialogue opens. Enter “My-Holding-Inquiry” and click OK.

When the Route File Management window refreshes, you’ll see My Holding Inquiry along with the original 203 Holding Inquiry Route. Again, the red icon indicates this is a template and not a fully configured route. In this tutorial, you will modify the imported formats – as part of the tutorial. Next, double-click on My Holding Inquiry – you can do so anywhere in the row.
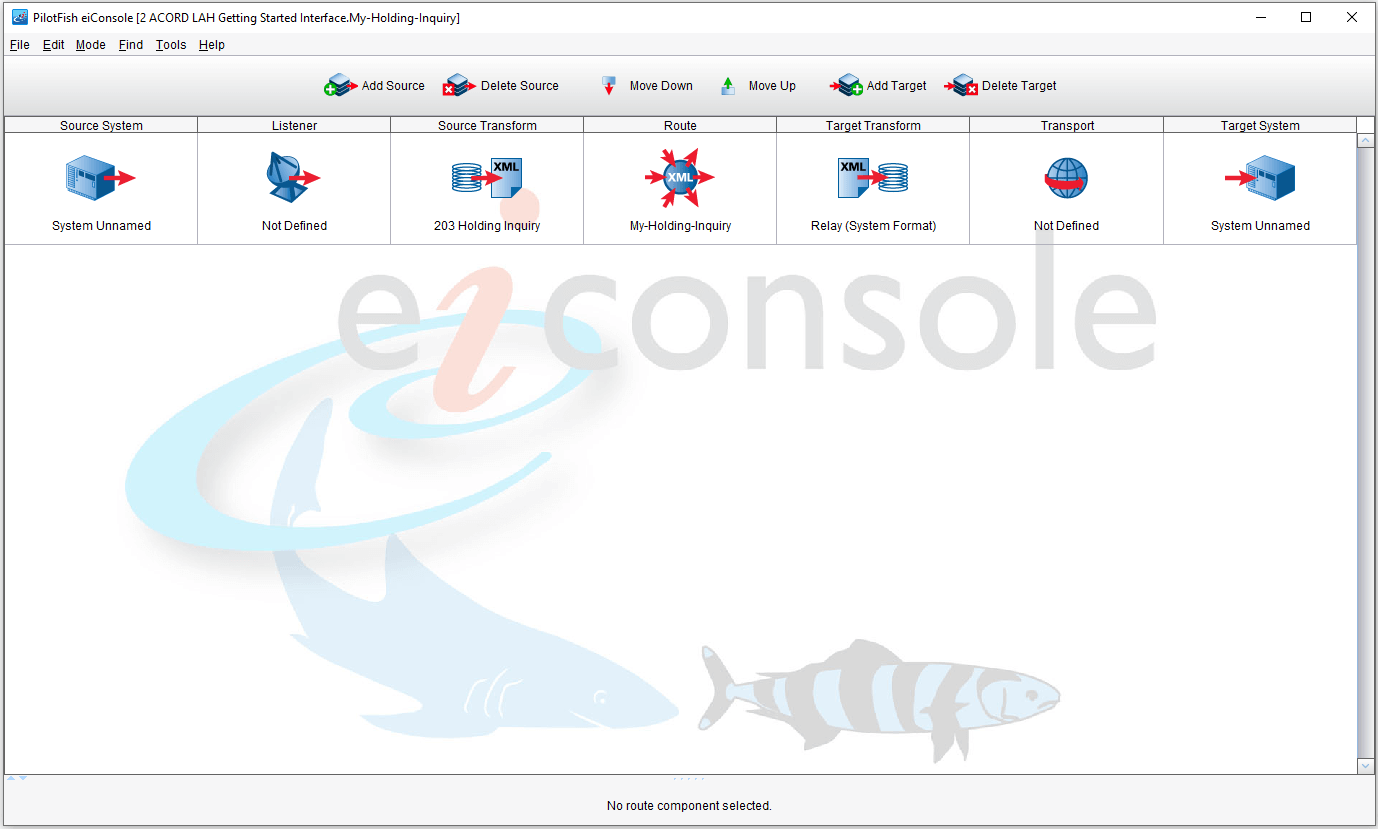
When the window opens, you should see the eiConsole Main Route grid as it appears above. Unlike the Quick Start Tutorial, the Main Route grid is partially configured with the Source Transform configured for the 203 Holding Inquiry. The grid depicts the flow of the interface from the Source System to the Target. Your next task will be to configure each one of the stages in between. For this interface, you’ll take a proprietary formatted fixed-width flat file and translate it into an ACORD TX Life 203 Holding Inquiry.
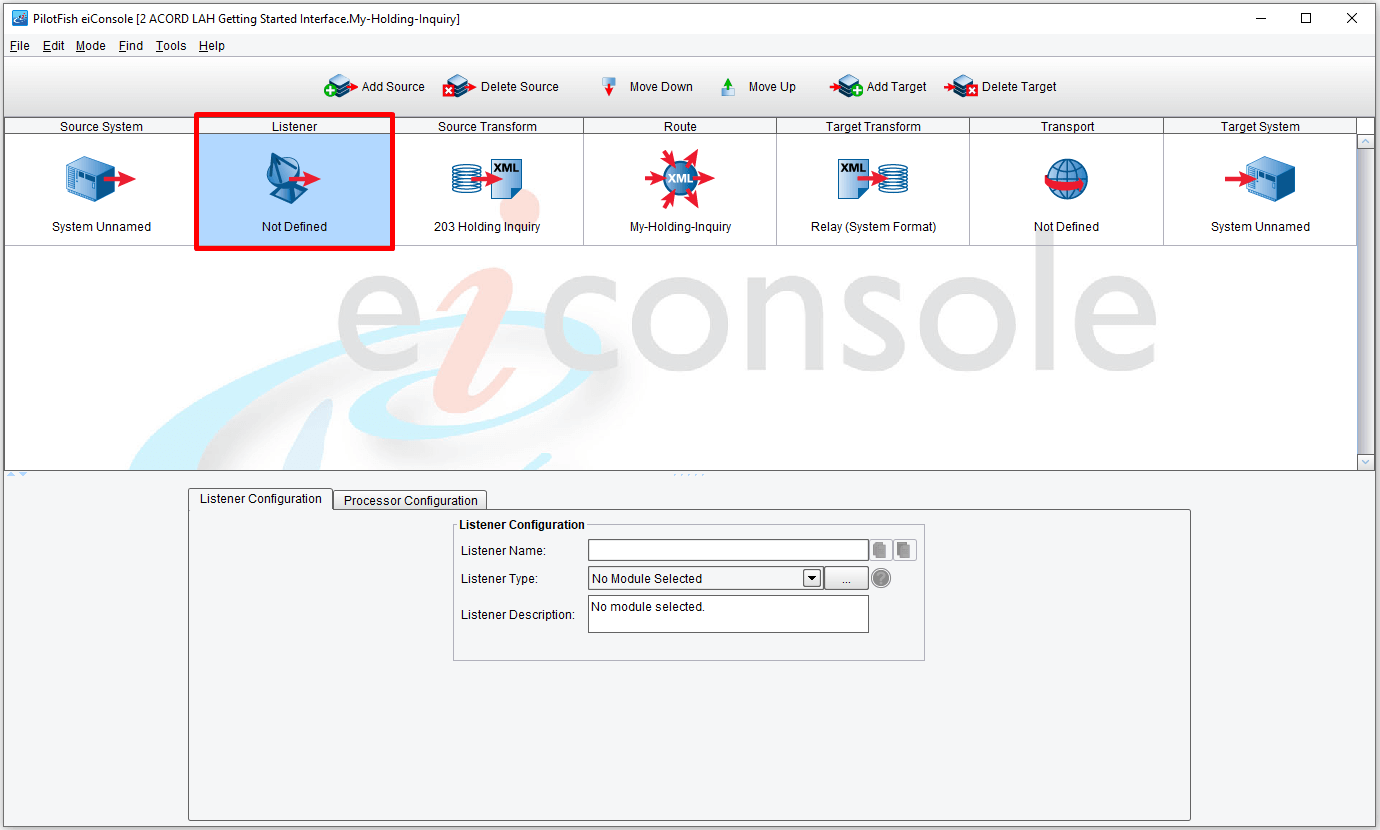
Then, you will need to configure the various stages from left to right across the grid. You’ll begin with the Listener stage. Click the Listener stage. Below that, the Listener Configuration panel tab appears.
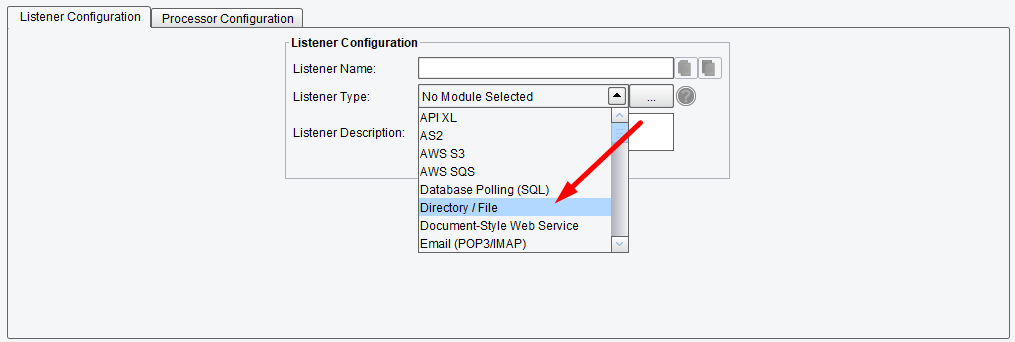
You’ll pull your information from a Directory. From the Listener Type drop-down, select Directory/File.
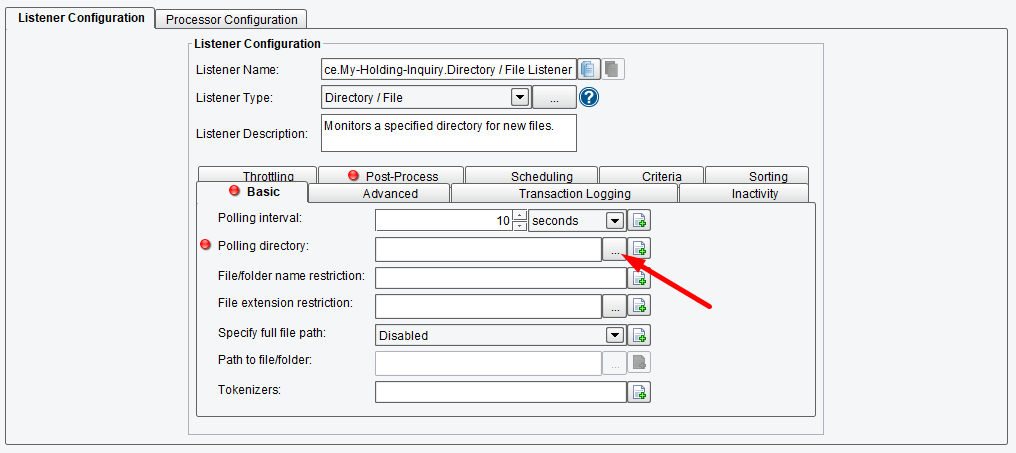
A set of configuration tabs will appear. The configuration items associated with the red icon are required. In the Listener Configuration tab, you must fill out a Polling interval and a Polling directory. Next to the Polling interval configuration item, enter “10” into the text box. Then, you’ll need to choose a Polling directory. Click the three dots (…) to the right of the Polling directory text box. This will bring up a file selector.
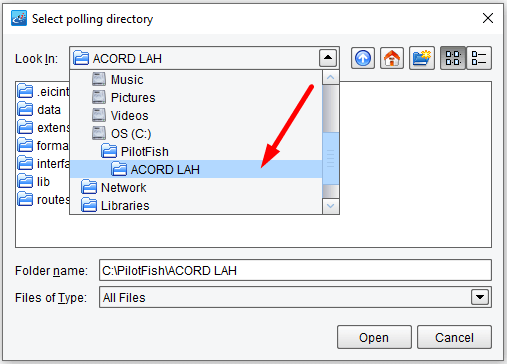
The Select polling directory window will open. Navigate to your new Working Directory. In our case, it’s c:/PilotFish/ACORD LAH/.
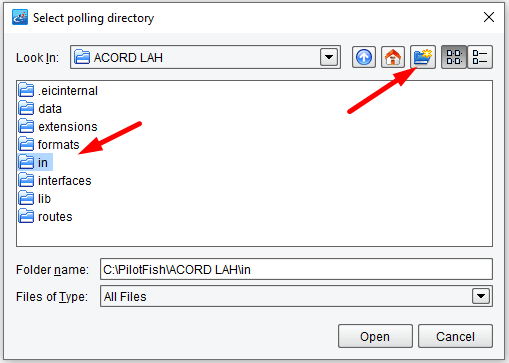
Click the New Folder icon and name the new folder “in”.
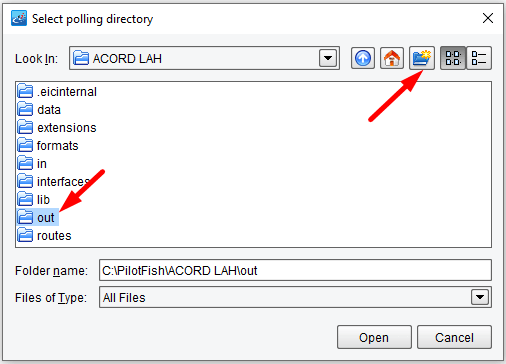
Then click the New Folder icon again. Name that folder “out”. (We’ll need this folder later in the tutorial.)
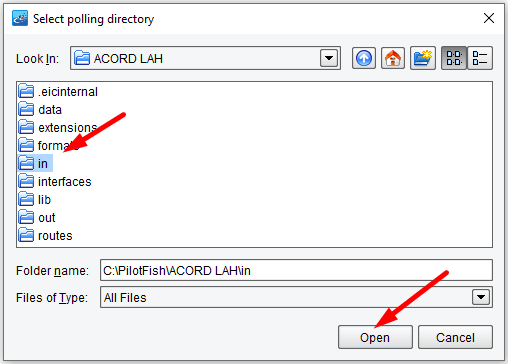
Next, select the newly created “in” folder and click Open.
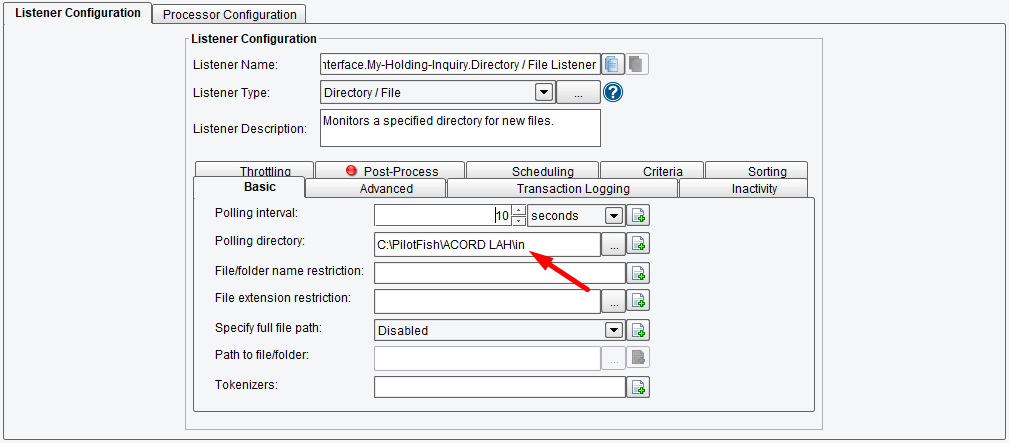
The path to the inbound folder “in” will populate the Polling directory configuration text box.
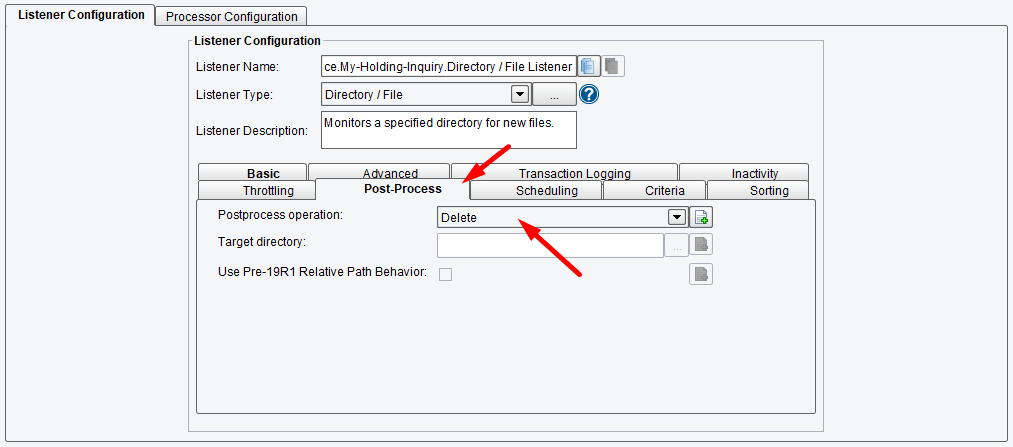
Set the Post-process operation.
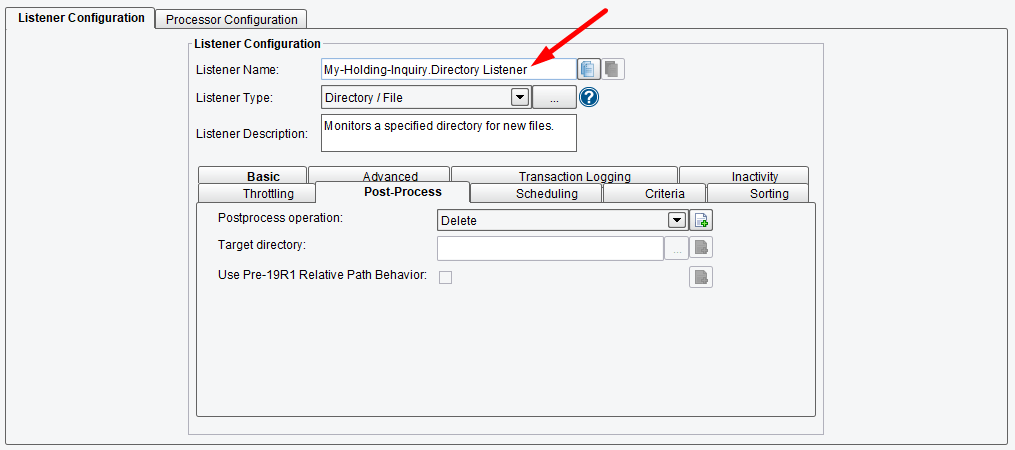
Note: By default, the eiConsole names your Listener by the interface name – the Route name and the Listener type. I suggest giving it a shorter or more meaningful name.
In the Listener Name text box, enter “My-Holding-Inquiry.Directory Listener”. Next, click the Processor Configuration tab.
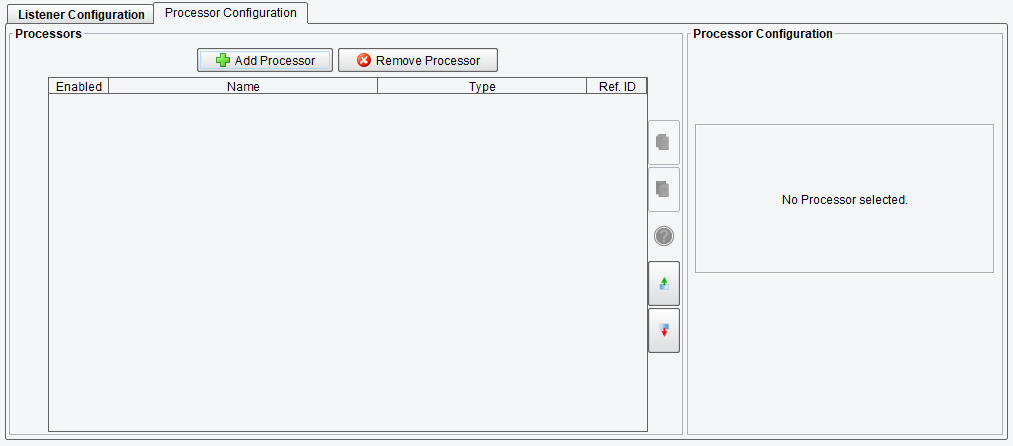
The next stage is Processors.
Note: Immediately after the eiPlatform accepts data, you will have the opportunity to apply Processors. Similarly, before sending data to a Target System, you can again apply Processors. Processors are a mechanism to do general work over the data stream, either directly after it is received or immediately before it is sent. You can implement as many Processors as you would like at these two locations.
In the Processor Configuration panel, you can add or remove Processors using the buttons but won’t need to configure any Processors for this particular example. So, we shall move along the Assembly Line without any configuration needed here.
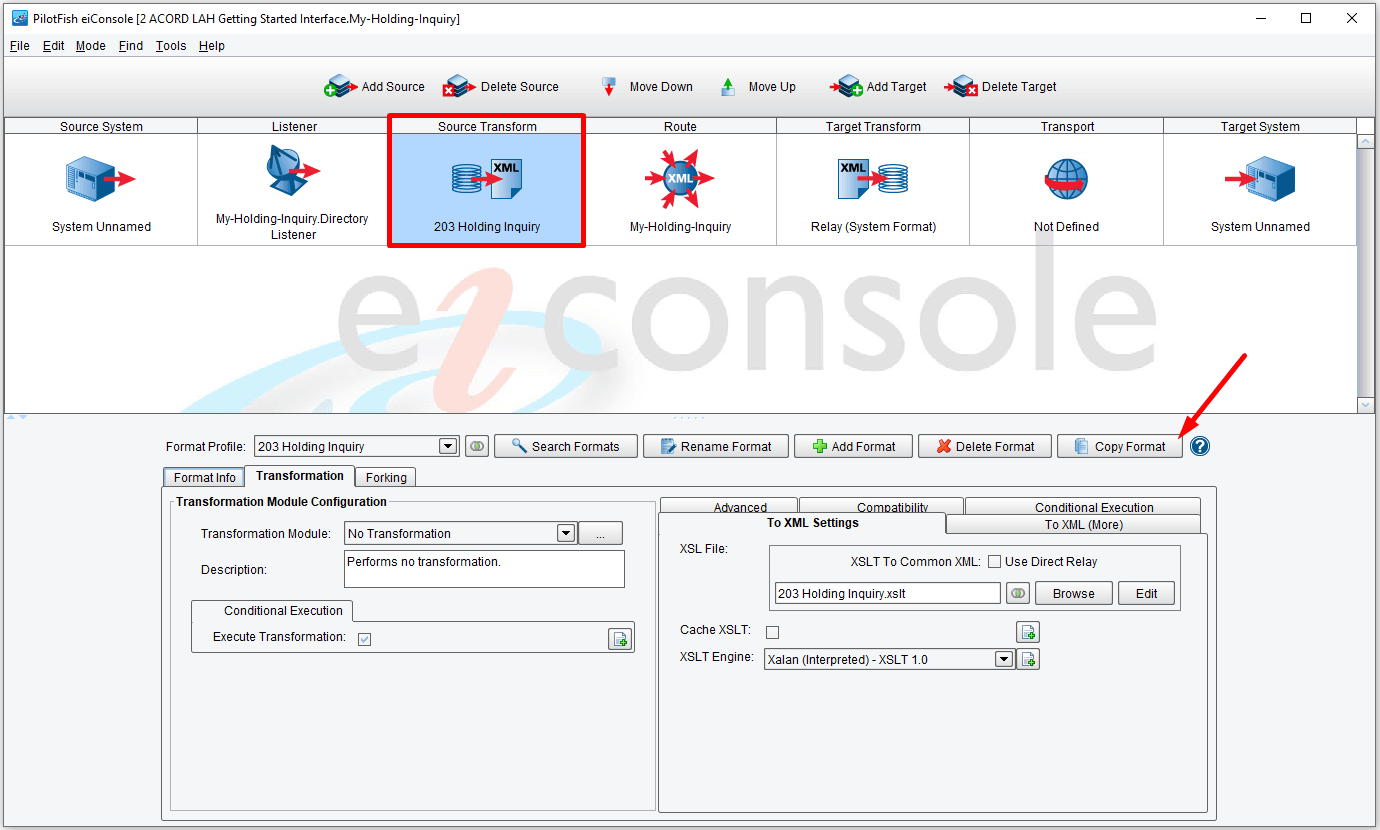
Next, we’ll move on to Source Transformation. Click on the Source Transform stage in the Main Route grid.
The Transformation configuration area will appear below. Transformations in the eiConsole are made up of 2 stages. First, if the data is not XML already and is not self-describing, you’ll use a Transformation Module to translate it into an XML format. Then, as required, you’ll use XSLT and the Data Mapper to handle the logical mapping from that format onto your common or canonical format. In this case, because you started with a template, you’ll see the 203 Holding Inquiry Format Profile as your base. The first thing you’ll need to do is copy this format. Click the Copy Format button at the end of the Format Profile row.
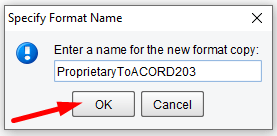
Since this will be a transformation from the proprietary Holding Inquiry to the ACORD format, enter “ProprietaryToACORD203” in the Specify Format Name text box. Then click OK.
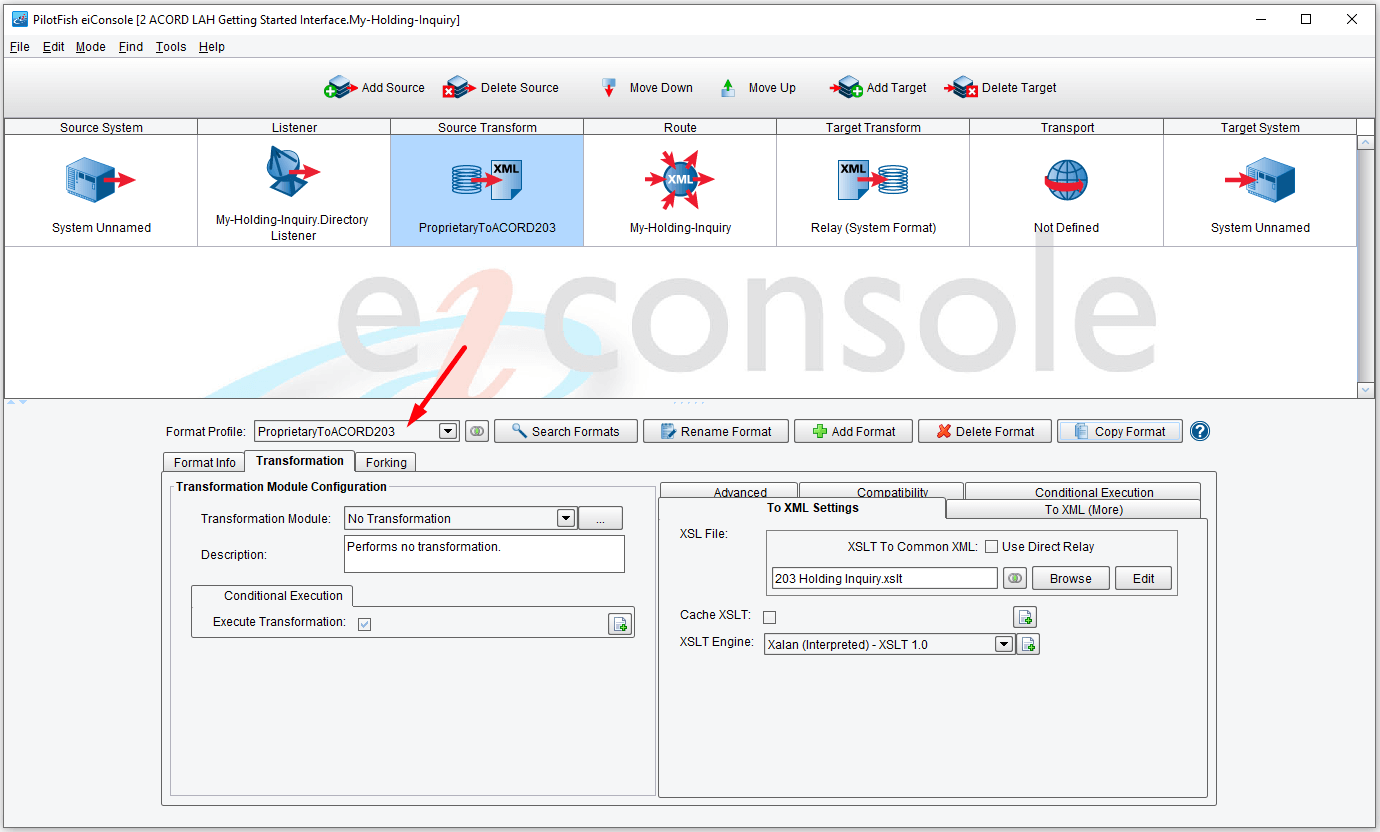
The Format Profile, ProprietaryToACORD203, should now be selected in the Format Profile drop-down. The first thing you’ll need to do to configure the transformation is to describe the format of the flat file that you’ll be working with. In the data folder of your Working Directory ( ../ACORD LAH/data), accompanying this tutorial, you’ll find several files. You’ll see a PolicyFlatFile.txt that represents a sample file that you’ll be processing. You’ll also see a Policy-Layout.txt file – which is a Tab-Delimited file that you can open in tools like MS Excel and describes the general layout of that file.

Shown above is the Policy-Layout.txt.

Above is the PolicyFlatFile.txt.
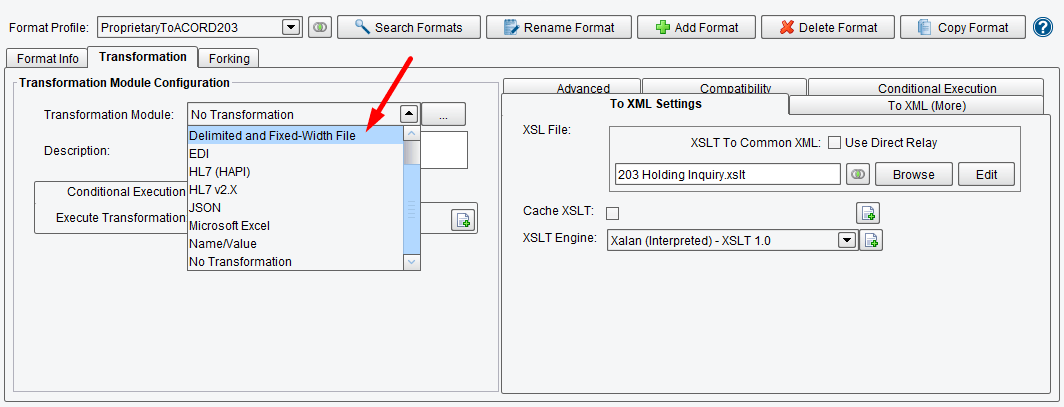
Your first task will be to parse the PolicyFlatFile to turn it into an XML format for easier mapping. To do that parsing, you’ll need to use the information in the Policy-Layout file. To handle the transformation of the proprietary flat file into XML, you’ll need to use the Fixed-Width File Transformation Module. From the Transformation Module drop-down found in the Transformation tab, choose Delimited and Fixed-Width File.
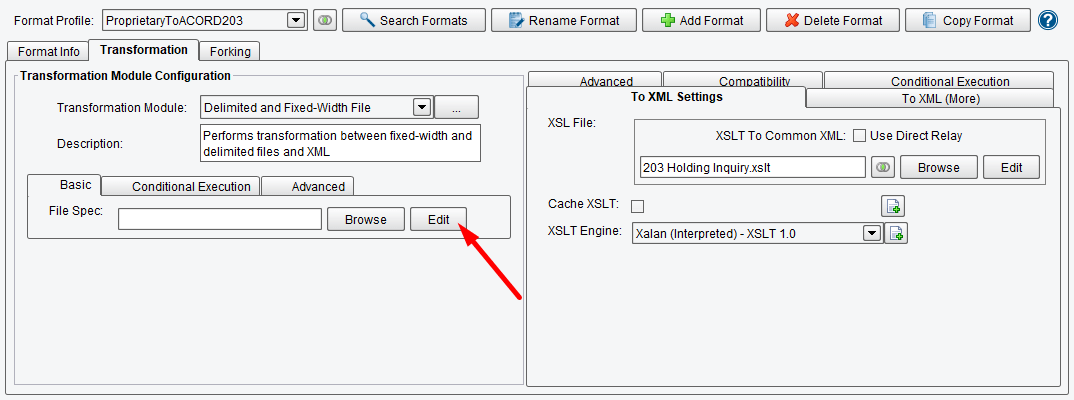
Then click the Edit button.
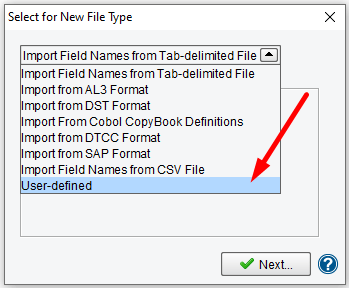
The File Specification Editor will appear. The Select for New File Type wizard will appear. From the corresponding drop-down, choose User-defined and then click Next.
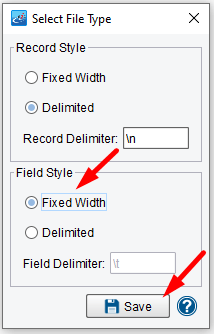
The file you’ll be working with has Delimited records but Fixed-Width fields. In the Select File Type dialogue, Field Style area, select the Fixed-Width radio button and click Save.
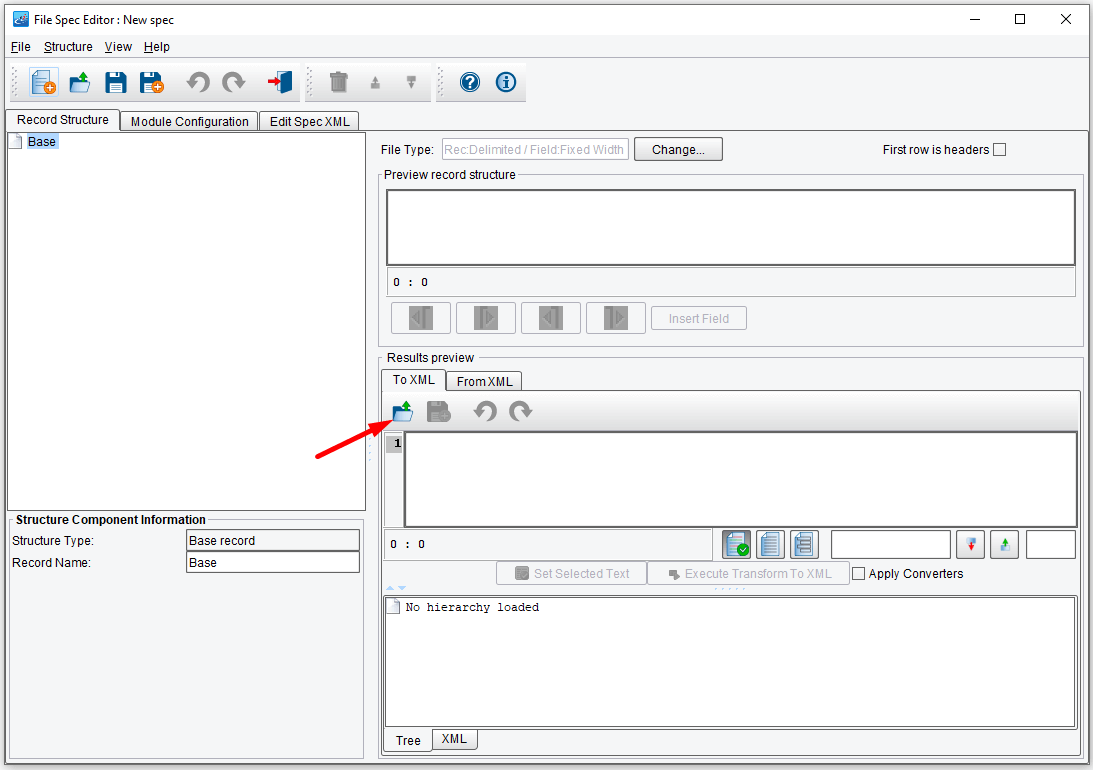
You need to generate the logical format of the flat file you’ll be working with. The first thing to do is open up a sample of that flat file. To do that, on the To XML tab in the Results Preview area, click the Load Text from File icon.
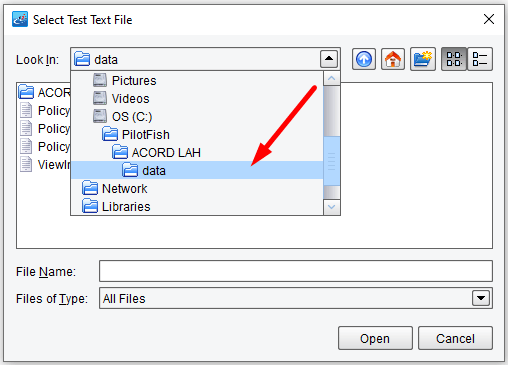
In the data folder of your sample interface…
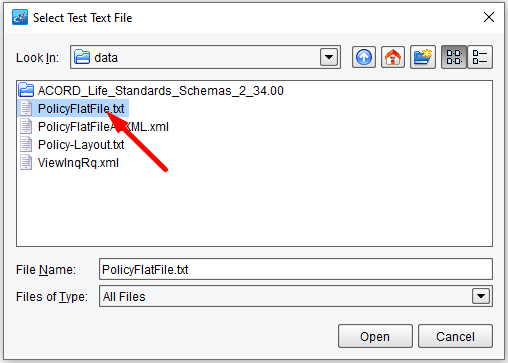
…load in the PolicyFlatFile.txt that you just looked at and click Open.
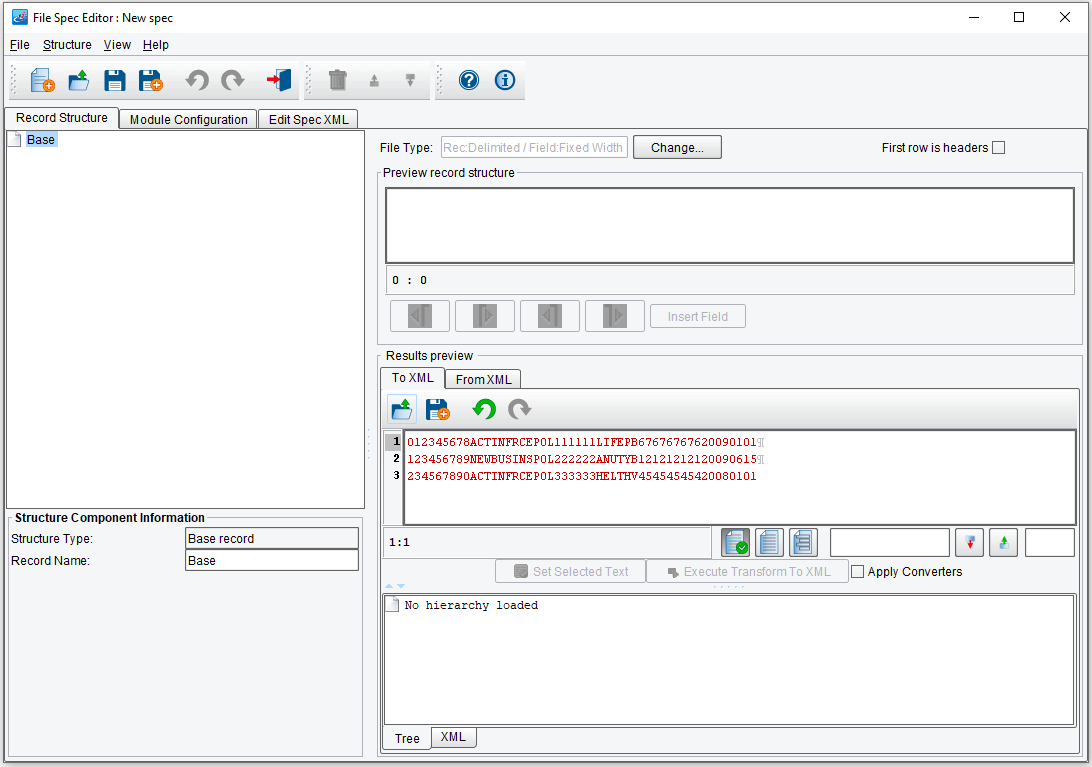
You’ll see that you have 3 new line-delimited records, each with a set of Fixed-Width fields.
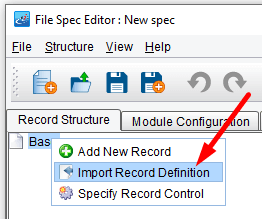
You’ll need to import the definition of these fields into the File Spec editor. Left-click on the Base icon in the Record Structure tab, then right-click and choose Import Record Definition.
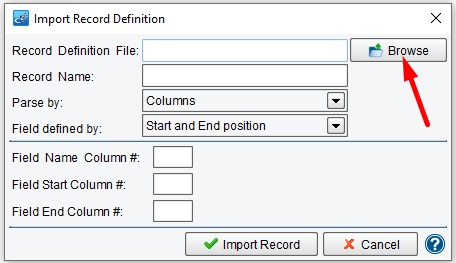
The Import Record Definition dialogue will appear. The Import Record Definition dialogue allows you to import records as defined in a spreadsheet-like format. Click the Browse button next to the Record Definition File configuration item.
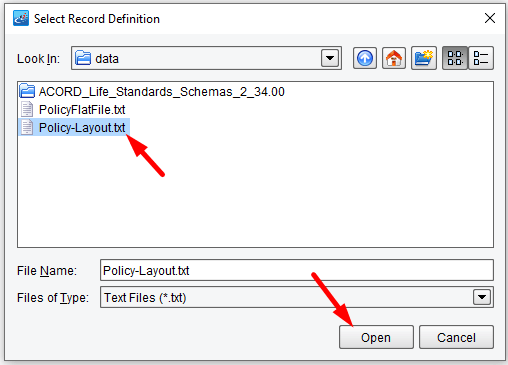
In your data folder, navigate to the Policy-Layout.txt file. This folder is located at ../ACORD LAH/data. Select it and click Open.
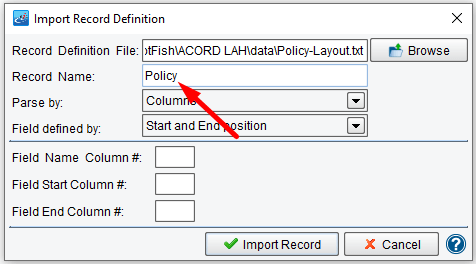
Next, you’ll need to enter a Record Name. In this case, each row represents a policy – so you’ll give each Record the name, “Policy”. In the Record Name text area, enter “Policy”. You’ll want to parse the fields out by the Columns in the file and the Field defined by: you should see Start and End Position, so you can leave those two drop-downs alone.
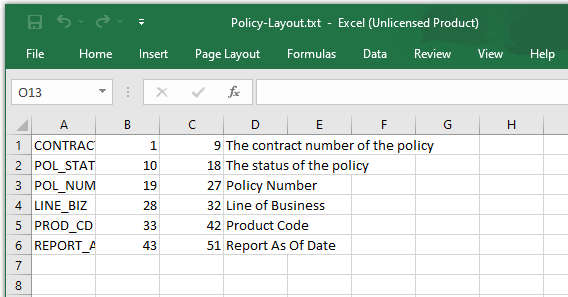
You’ll need to refer to the Policy-Layout.txt file again. So open that now (if it’s not still open).
Next, you’ll need to enter the column where the field name can be found – the field where the start position can be found and the field where the end position can be found. You’ll see that the field name is in the first column, the start position in the second, and the end position in the third.
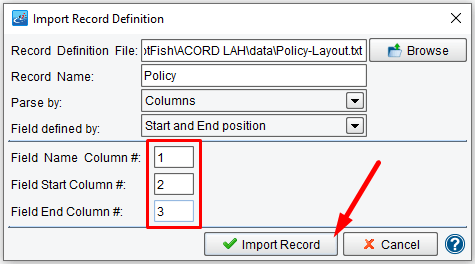
Enter 1, 2, and 3 in their respective text boxes. Now click the Import Record button.
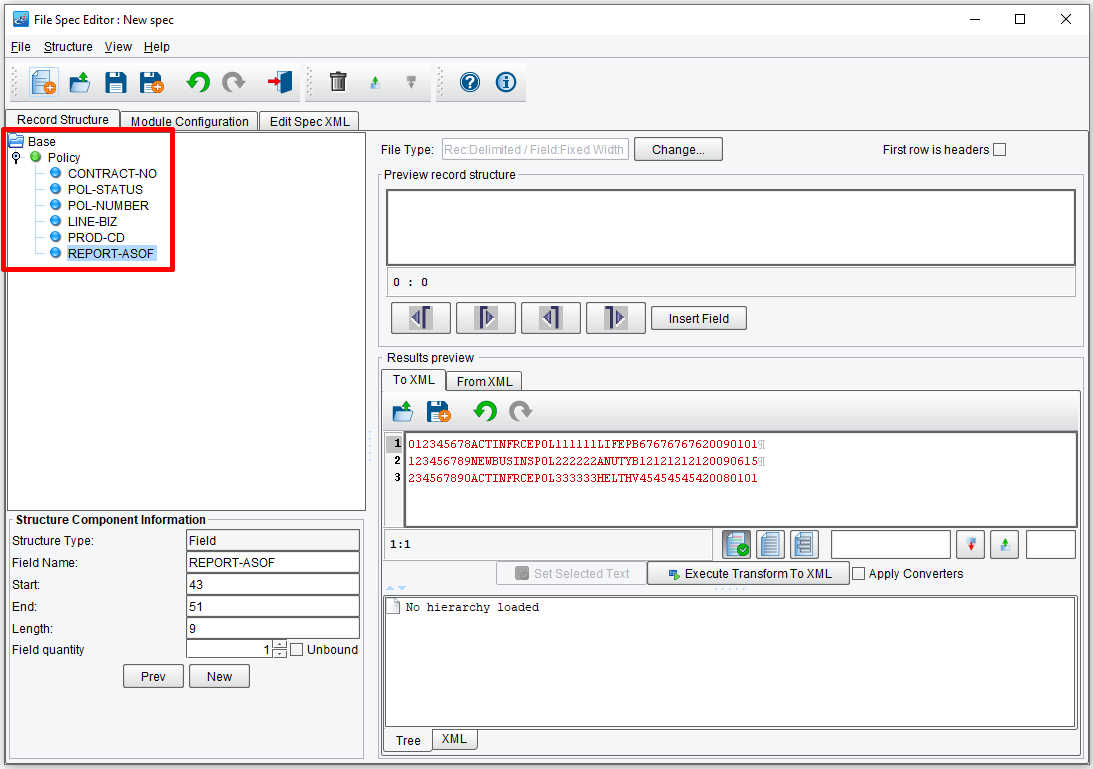
The Record Structure of your flat file will appear on the left-hand side of the screen.
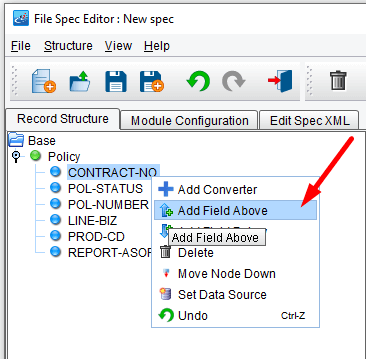
Now, I’ll mention here, that you could have also built this manually by right-clicking and adding fields and records.
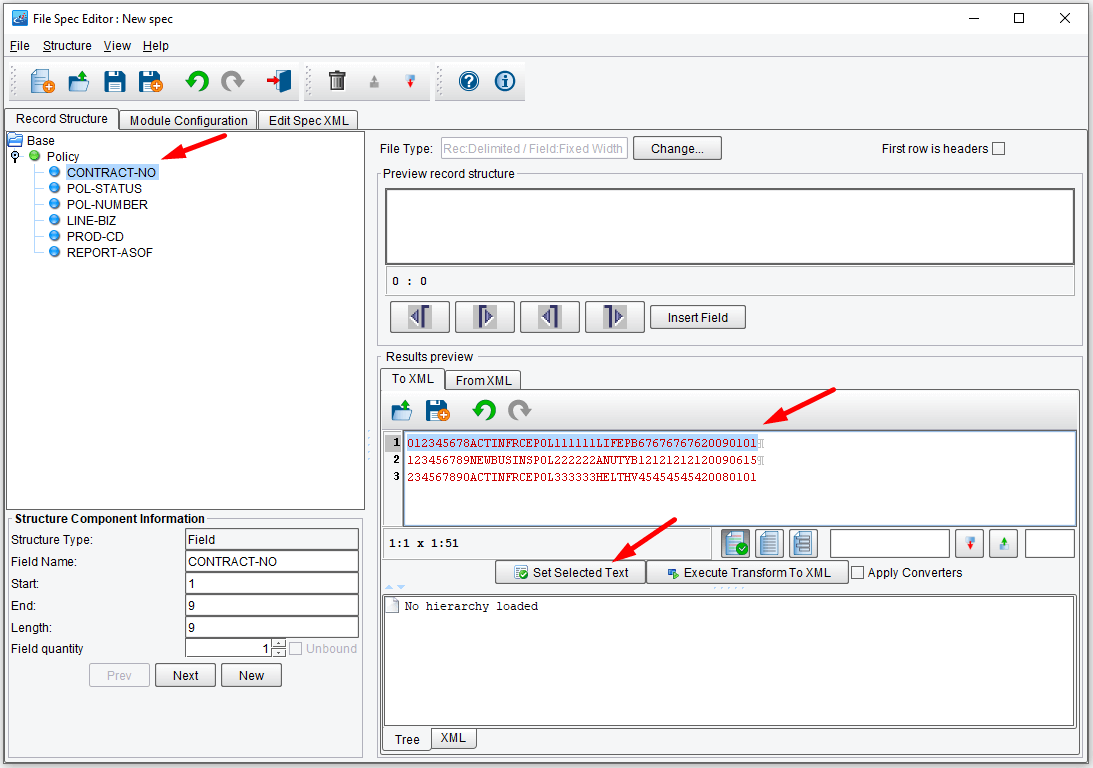
Note: If you’re not sure that your particular definition is correct – you can select a particular portion of the sample file, select a corresponding record (such as the green Policy node) and click the Set Selected Text button.
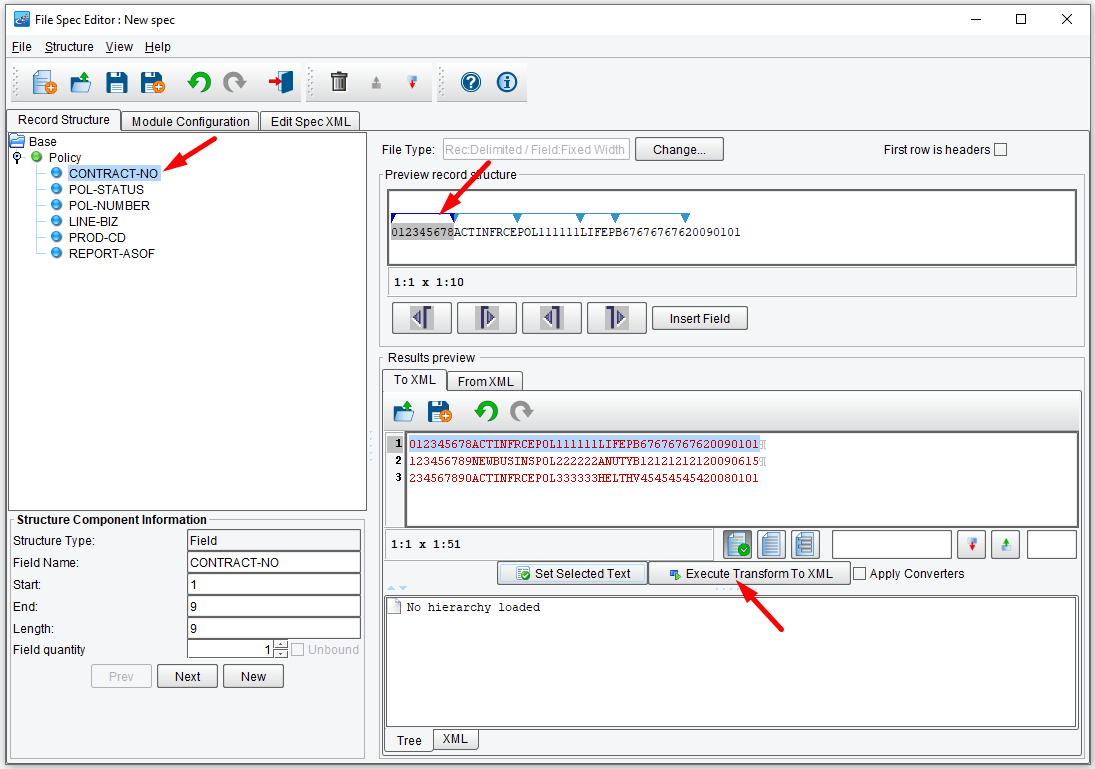
This will allow you to navigate through the various fields to make sure that the definitions match.
Once you’re confident of this, you can click the Execute Transform to XML button.
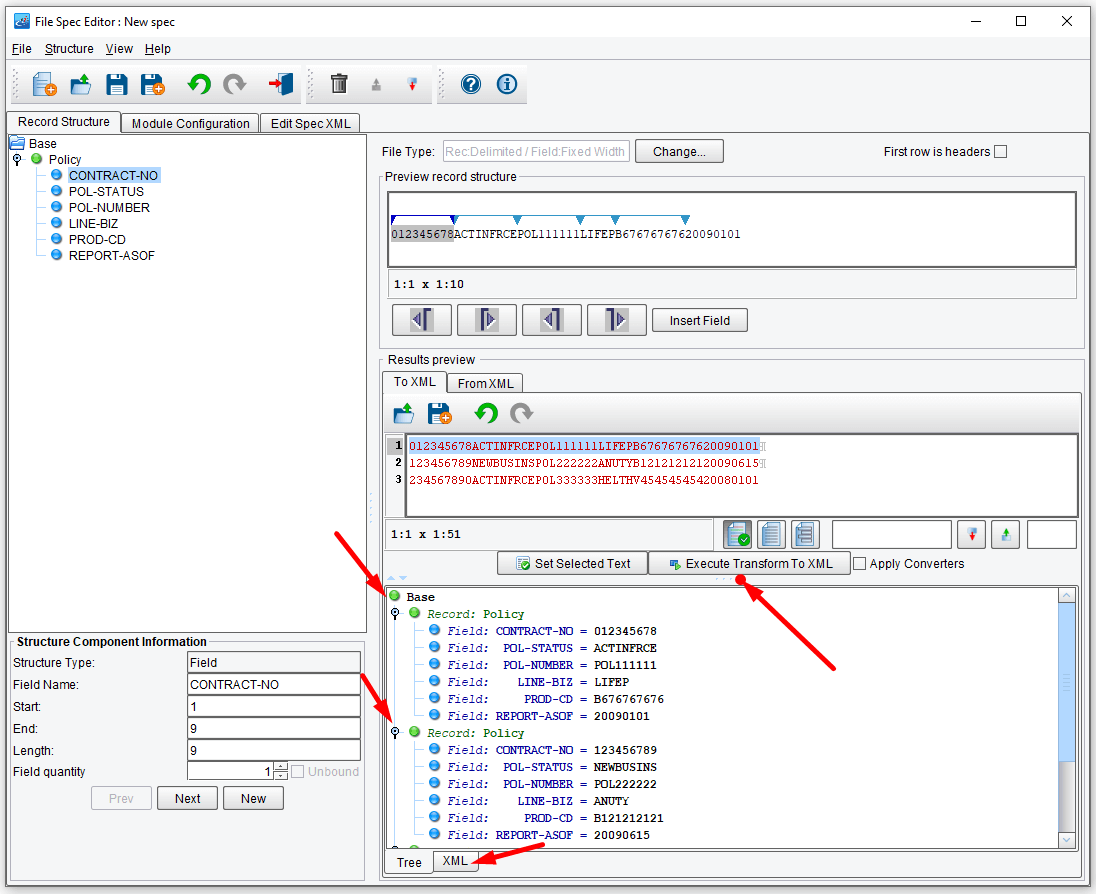
You’ll see that it’s parsed the full sample file into three policy records, each one with the corresponding fields.
Note: You can click & drag on the top border to expand the window height. Likewise, you can drag the eiConsole right window corner to expand the height and width of the eiConsole, as shown here.
To preview the XML that will be generated, click the XML tab.
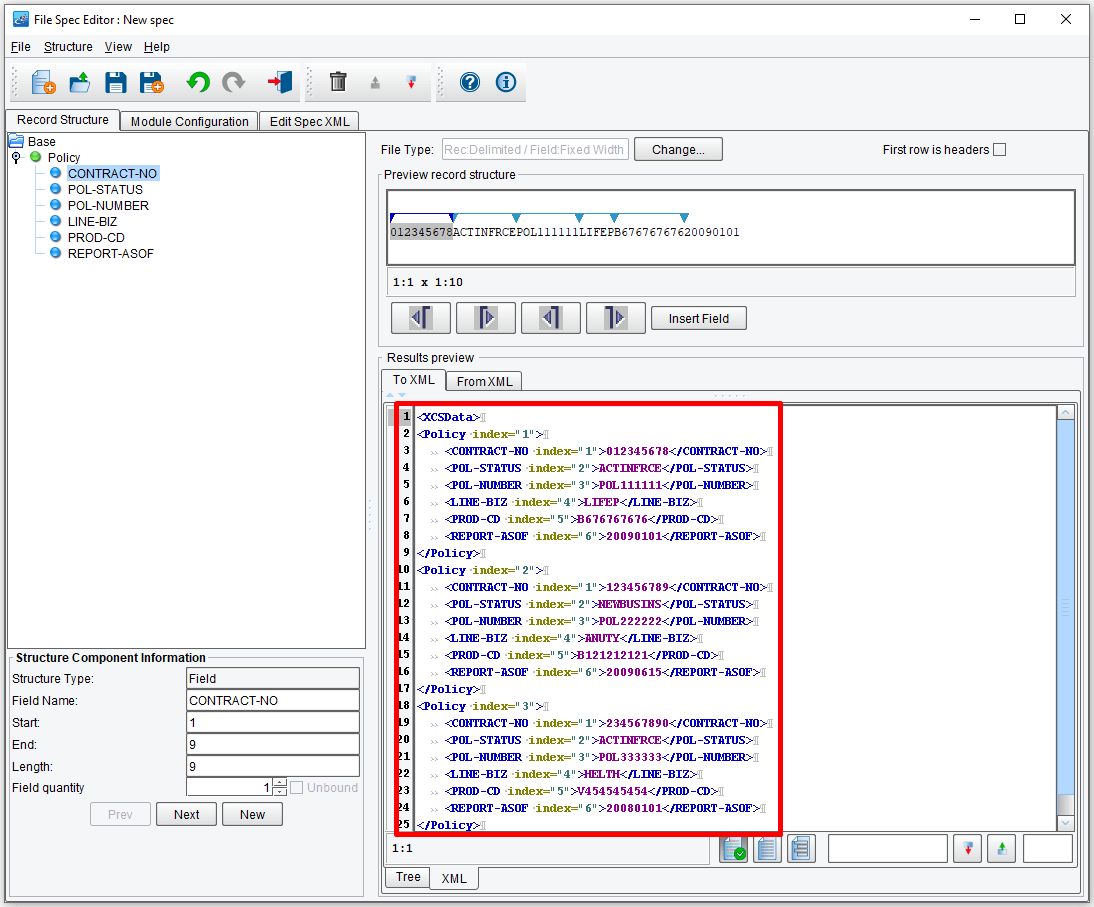
You’ll see that you have 3 policy tags, each with sub-tags representing the fields within the record.
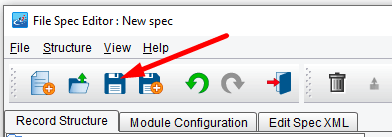
You’re now done with the file specification, so save it. Click the Save Current File Spec button in the toolbar.
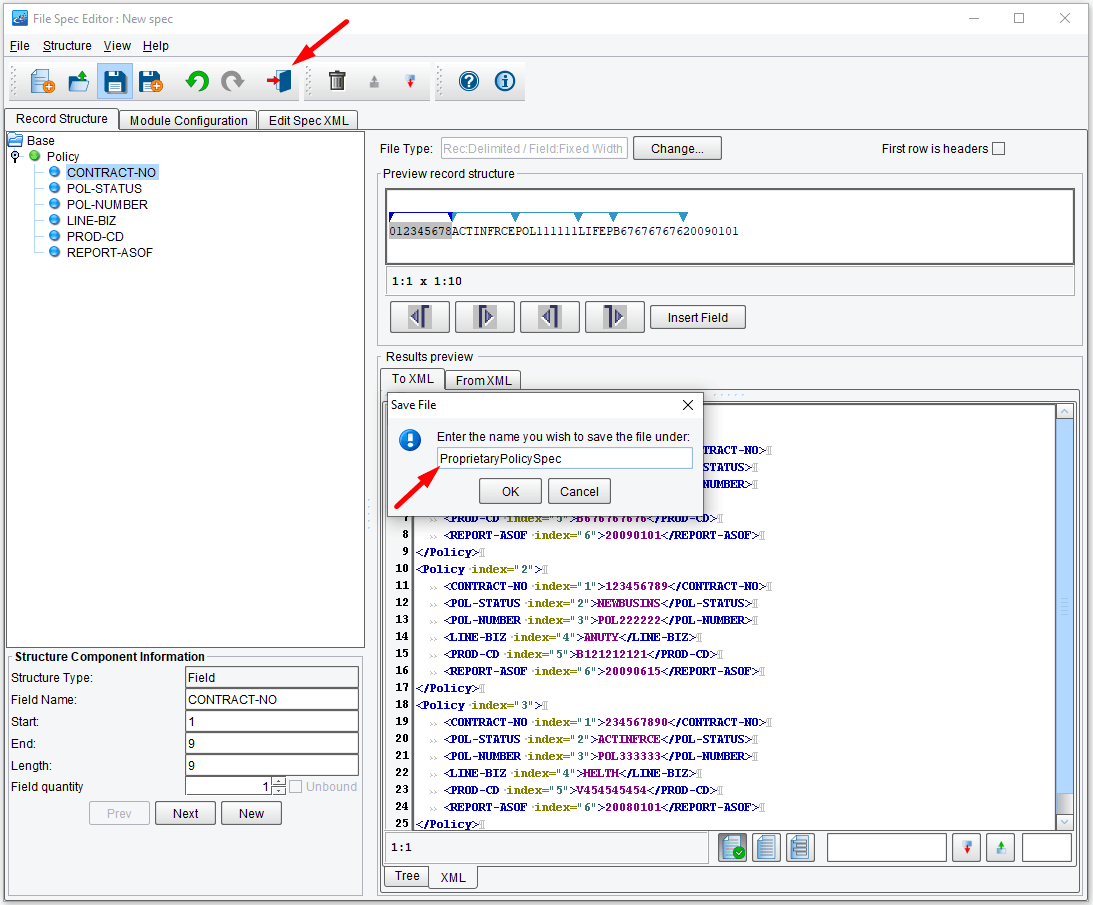
The Save File dialogue will open. Enter the name “ProprietaryPolicySpec” and click OK.
Then click the Return to Console icon on the toolbar at the top.
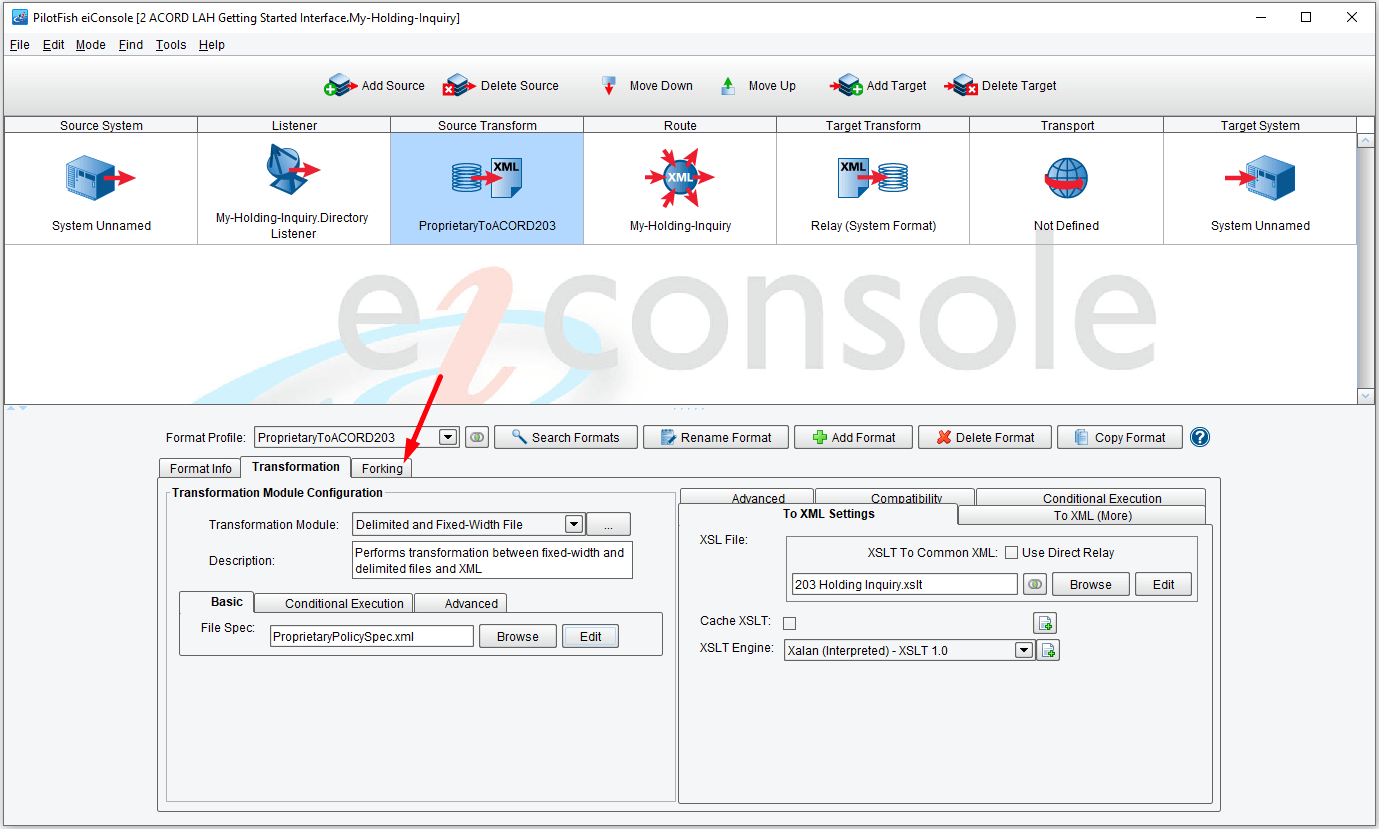
Now that you’ve translated the flat file into XML, you’ll want to split it up into individual transactions so that each policy that you’re inquiring about is treated as a separate TX Life data stream. To accomplish this, you can use the eiConsole’s forking capability. Click on the Forking tab.
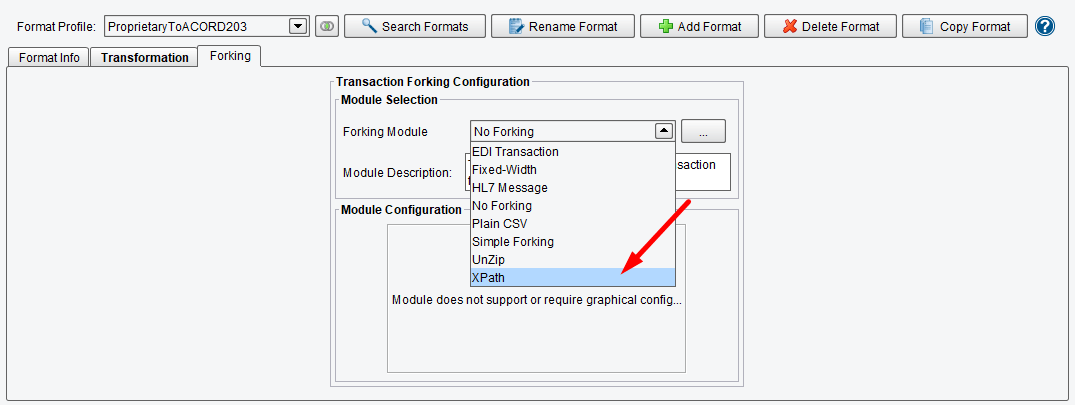
The Transaction Forking Configuration panel will appear. In the Module Selection, Forking Module drop-down area, select XPath.
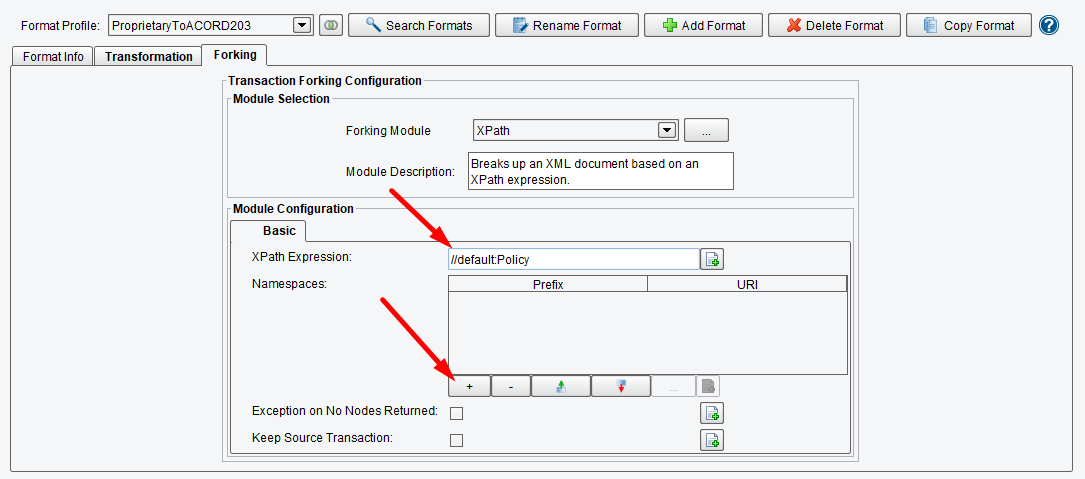
The Module Configuration tab will appear with one required configuration item, the XPath Expression. This allows you to choose the XPath that you’ll use to create the node set from which each item will become a unique transaction or document.
Enter “//default:Policy” in the XPath Expression text box. This indicates that you want to take any policy tag, treat it as its own transaction and that Policy will be in the default namespace.
The last step is to add the default Namespace to the Namespace table. Click the + button underneath the Namespace grid.
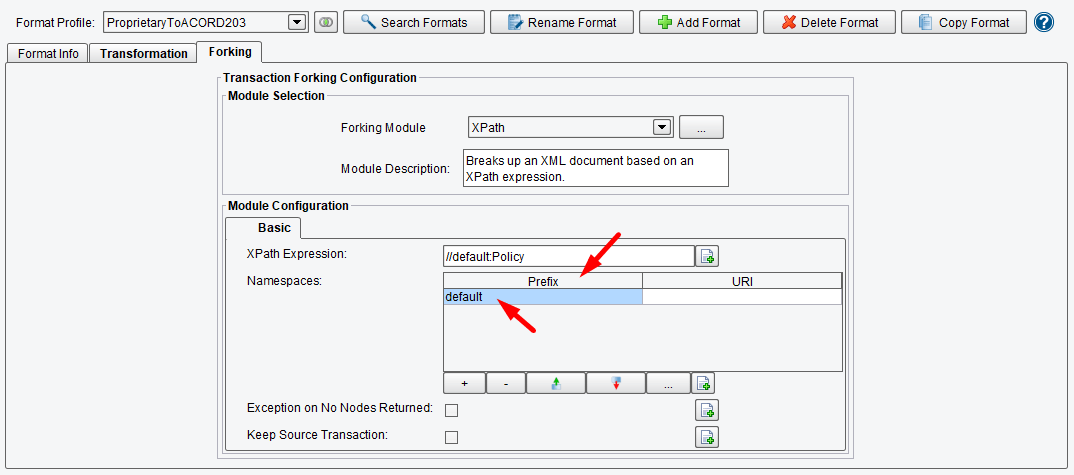
Then double-click the Prefix column and enter the same text, “default”. Since there is no URI associated with this default prefix, you can leave that blank.
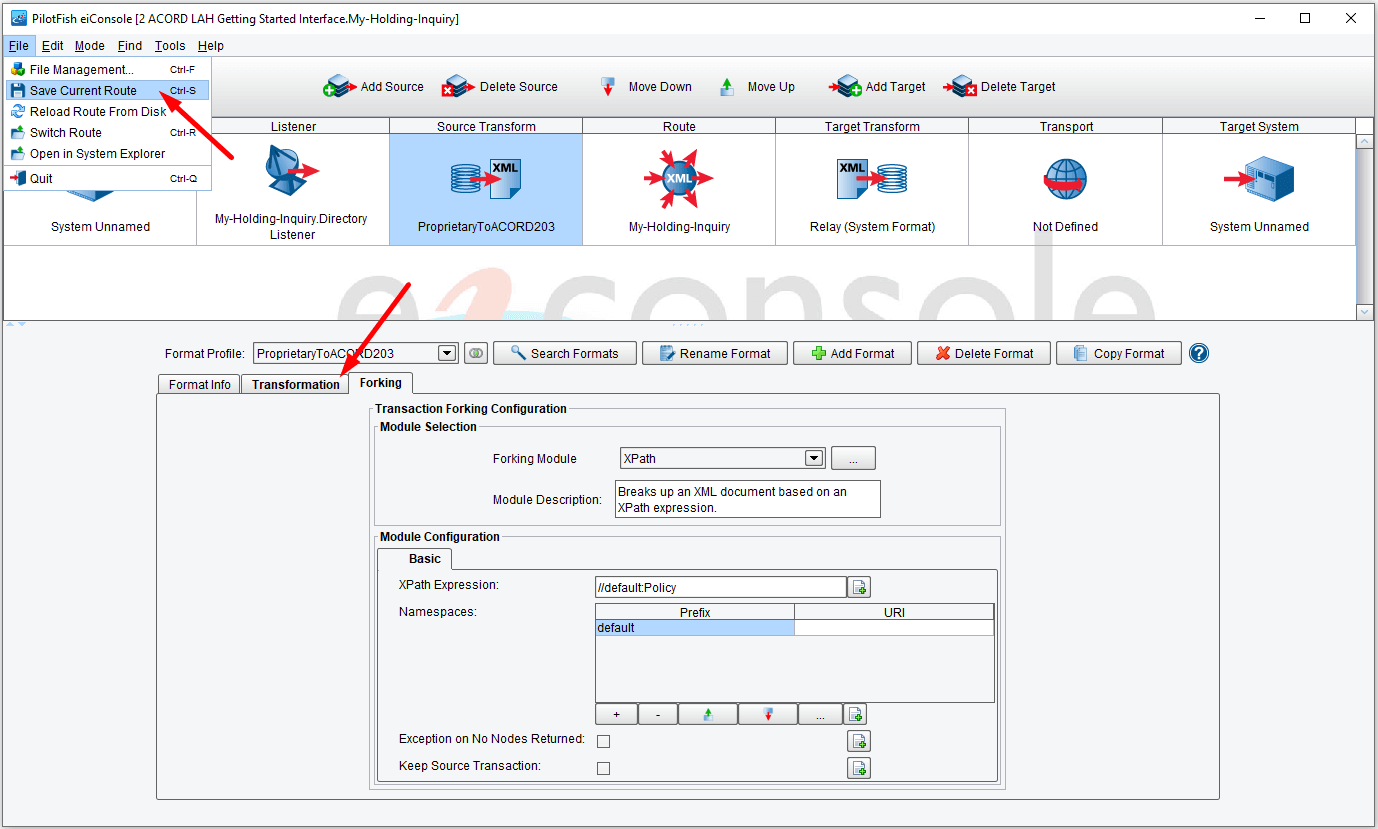
Next, save your work. Under the File menu, choose Save Current Route. Then select the Transformation tab.
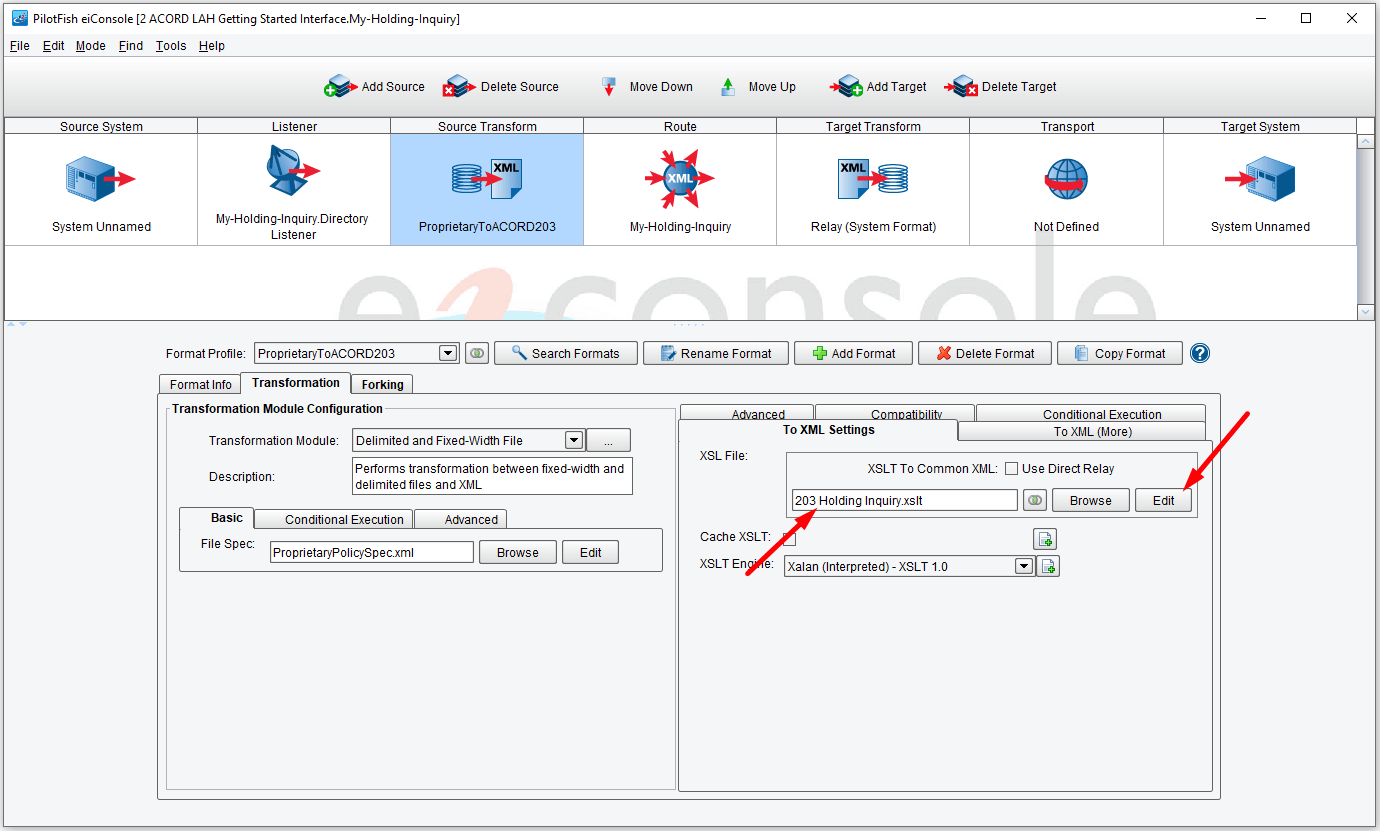
Next, you’ll configure the XSLT. You’ll notice that this area is already pre-populated with the 203 Holding Inquiry.xslt. This is because you’re starting with an existing interface template and you copied that format to create this new transform. Now, you’ll need to map your proprietary fields onto the pre-existing 203 Holding Inquiry template. To do this, you’ll use the Data Mapper. Click the Edit button to launch the Data Mapper.
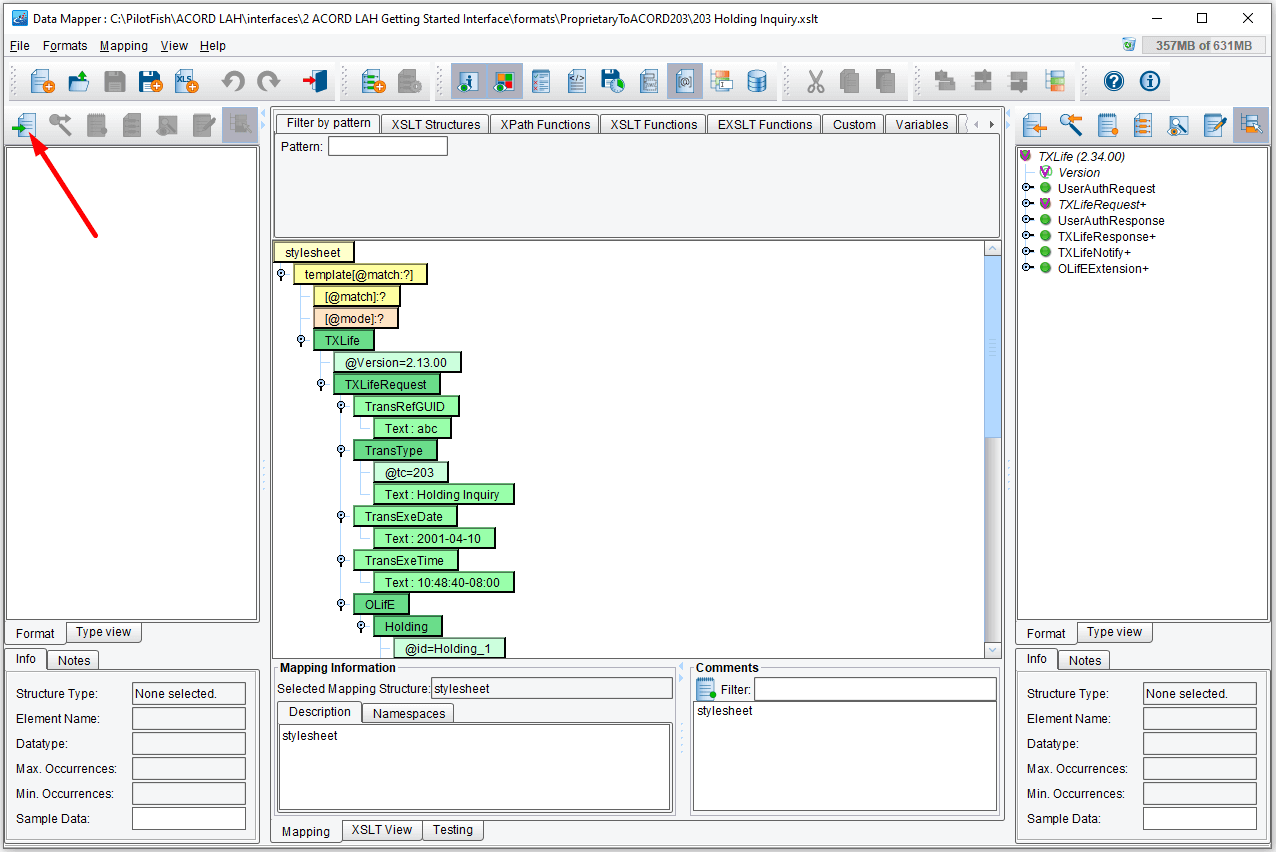
When the Data Mapper launches, you’ll see 3 panels. The panel on the left-hand side will be used to represent the structure of your Source data. On the right-hand side, you have the structure of the Target data – which, in this case, is the ACORD TXLife schema. In the center is the transaction-specific template, which will eventually also contain the mappings of your Source fields onto this template.
Note: If you recall in the Quick Start tutorial, when you first launched the Data Mapper, you had to load in the Source and Target formats. You can see how utilizing the ACORD templates provides you with a huge head start. When you begin a mapping using a template, the Target format tree will already be pre-populated with the structure of the output format. The center panel will also contain a default “mapping” containing a skeleton of the Target message. This saves you the time of defining the structure of your output from the Target schema. Instead, you can focus your time on the logic required to map your unique Source format to this pre-defined target. Also, note that elements may be added or removed from the pre-defined template as deemed necessary.
To begin, you’ll need to load your Source format. Click the Open Source format button above the Source format tree.
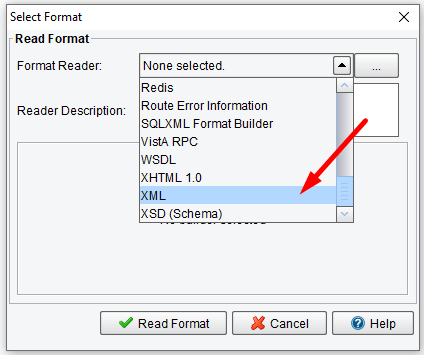
The Select Format dialogue will appear. You’ll read in a sample XML file that represents one of the Policy elements that you would have generated in the File Specification Editor. Choose the XML from the Format Reader drop-down.
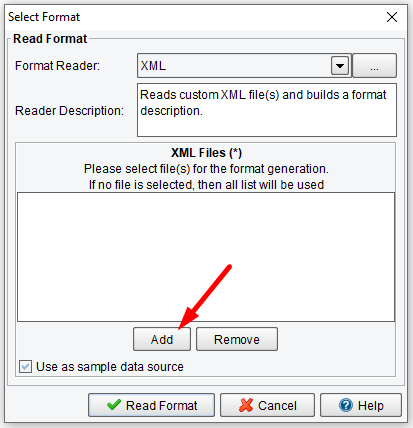
Then, click the Add button underneath the XML files list.
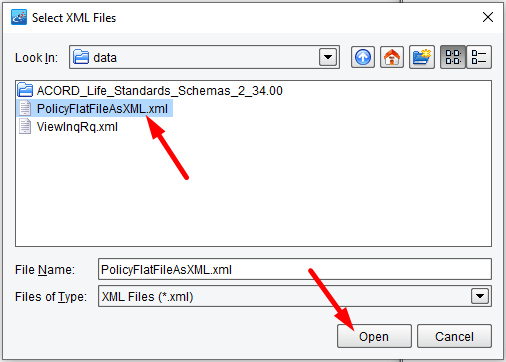
Again, in the sample tutorial, docs folder, a PolicyFlatFileAsXML.xml sample has been provided for you.
Note: This could also have been generated by copying the data from the File Specification Editor into a text editor and saving it (or by generating this in the eiConsole’s test mode).
Select this file and click Open.
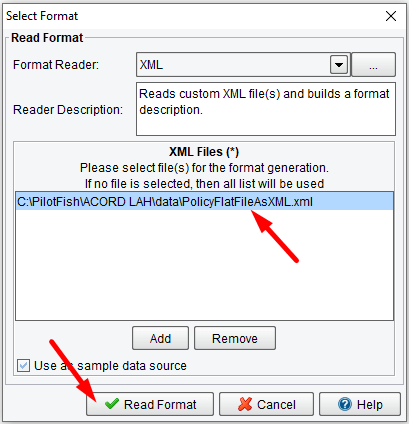
When the Select Format dialogue opens, click Read Format.
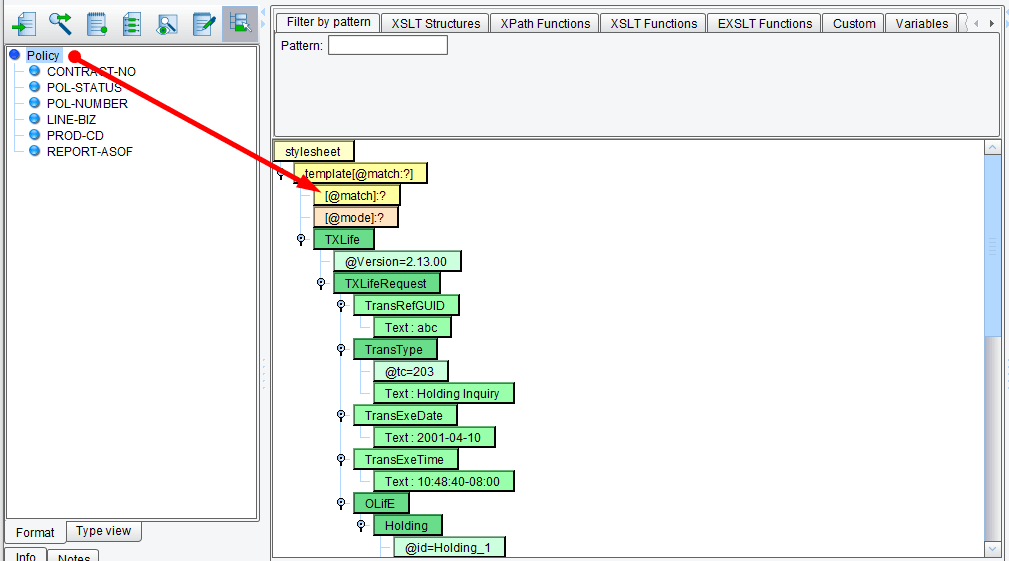
You’ll now see the structure of your Source data on the left, ACORD on the right and the transaction template for the 203 Holding Inquiry in the middle. If you were to run this transformation now, the result would be the same as the XML represented in the template; that is the static values in the template would be in your result. What you need to do at this point is replace those static values with dynamic values that you’ll populate from the Source format. You’ll work your way from the top of the mapping going down. First, you’ll see the blue node – the template match. You need to indicate what the root element is going to be from the Source. Select Policy and drag it onto the first child of the template node – called match.

A dialog (above) will appear after you do so. Select Add full path, so that the full XPath of the Policy node is put into the template.
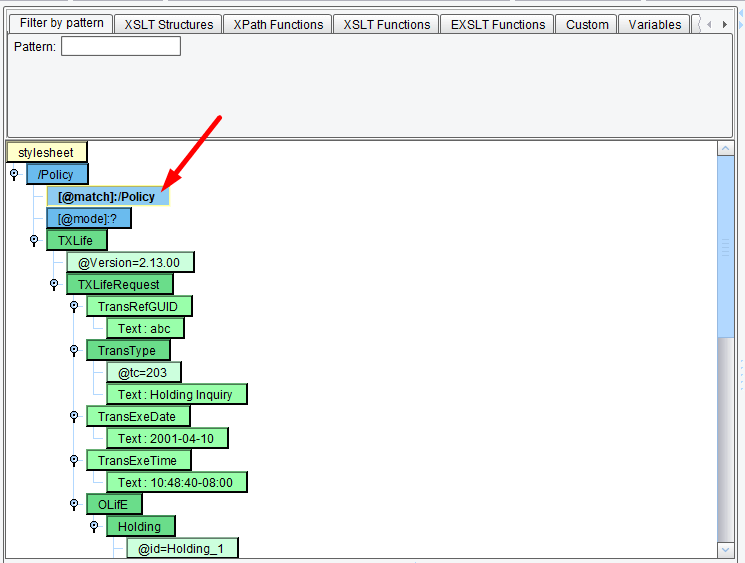
The template will be replaced by a Policy node. This means that you’ll generate one TX Life element for each Policy element in the input. The TXLife element can remain the same, as can much of what you have in the header.
Notice that the blue Policy node (in the Source) now has a red checkmark indicating it has been mapped.
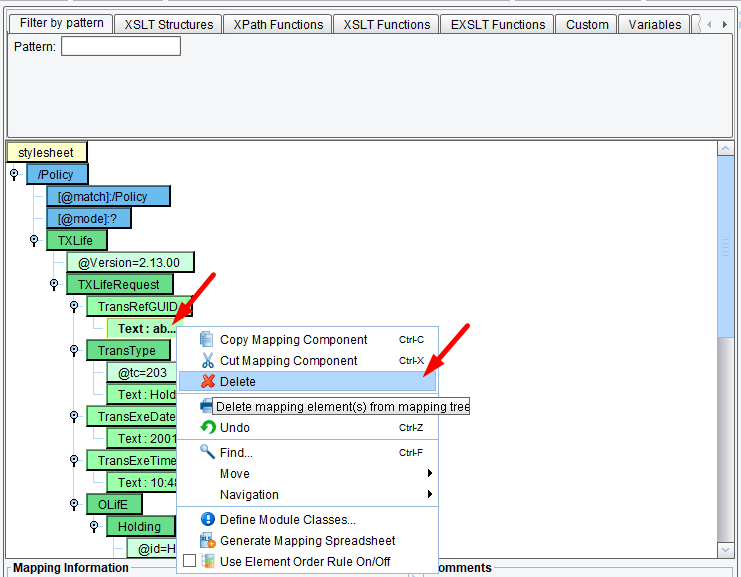
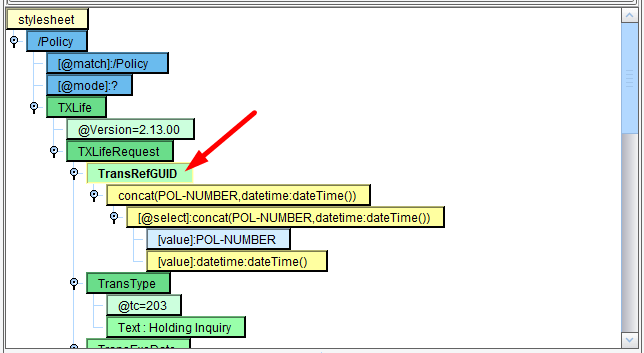
Next, double-click a few nodes to expand the tree in the center. The TransRefGUID needs to be replaced with a combination of the Policy Number and the Current Date. To accomplish this, select the text node underneath the TransRefGUID. Right-click and choose Delete from the context menu.
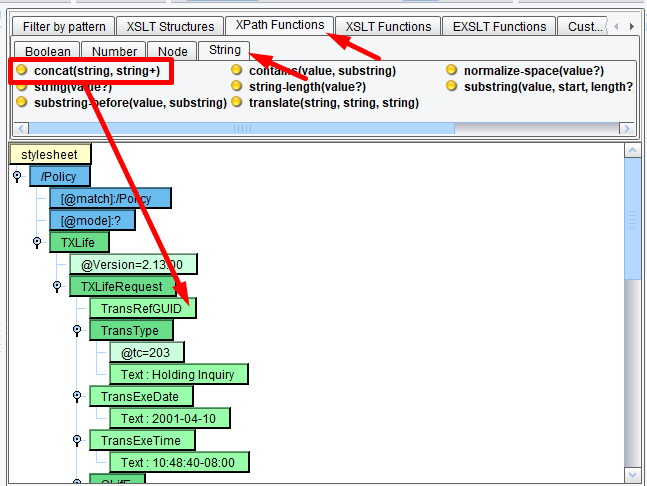
Now, you’ll want to use the string concatenation function. Click the XPath Functions tab in the pallet above.
Then click the String sub-tab. Now drag the concat element on top of the TransRefGUID node. (Remember as you drag & drop on the element to wait until you see the gray bar to release your mouse, or on a Mac, once you see the + sign.)
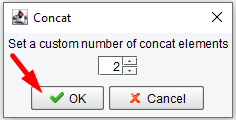
Enter 2 and click OK.
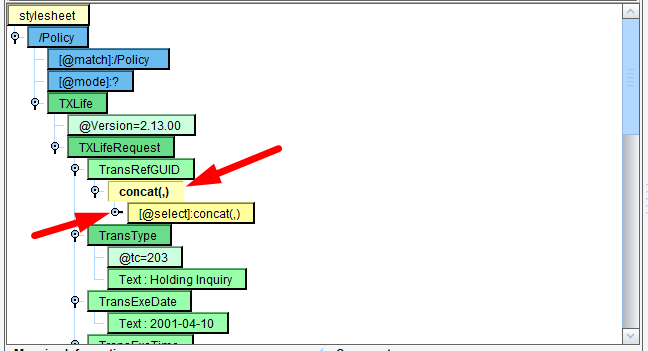
A yellow node, concat, will appear as shown above.
Note: If your mapping does not match this – for example, the yellow node appears in a different position – right-click the node, select Undo or Delete from the context menu and drag the element over the node again.
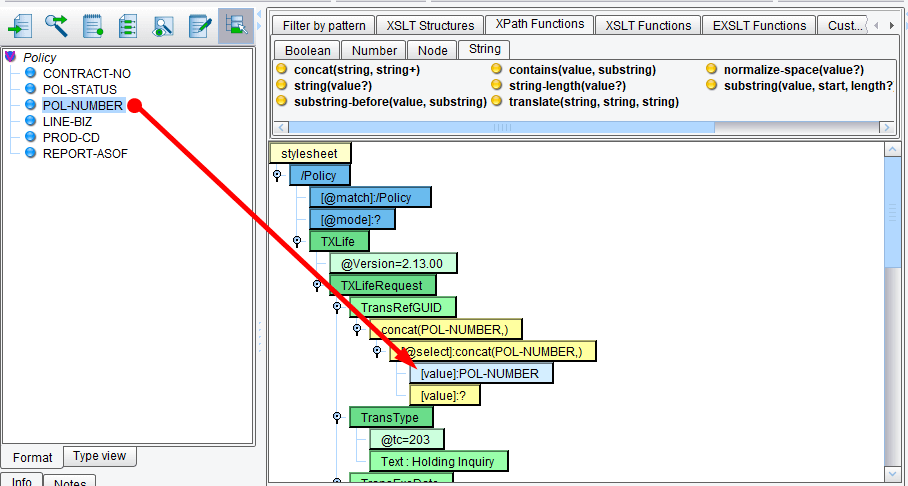
When you expand this node, you’ll see 2 value sub-nodes. These will be the 2 values that you will want to concatenate. First, select POL-NUMBER from the Source tree and drag it on top of the first value node.
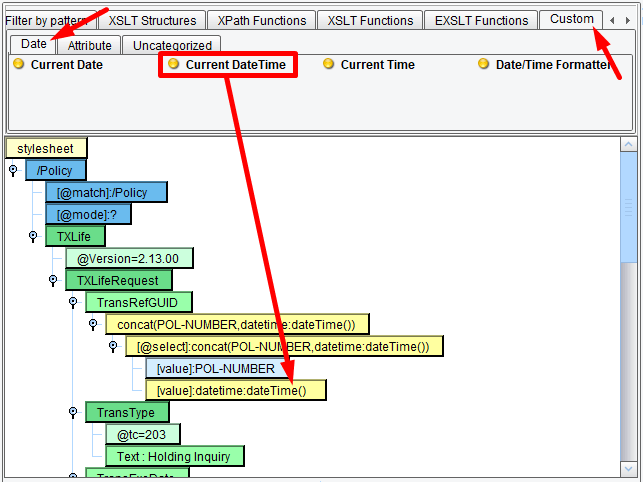
Scroll over, then select the Custom tab in the pallet, then the Date sub-tab and then drag the Current DateTime onto the second value. You’re now generating a GUID from the combination of the Policy Number and the Current DateTime.
Your mapping should now look like the above (see the TransRefGUID).
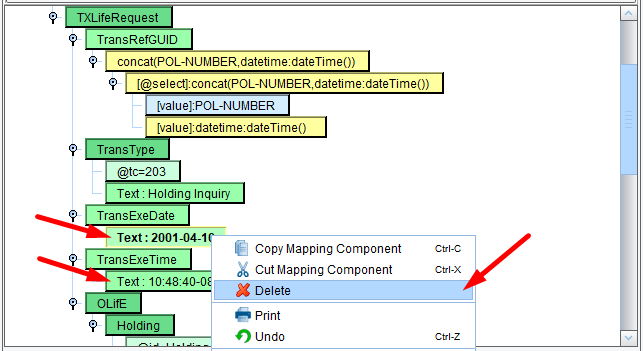
Next, TransExeDate and TransExeTime will need to be replaced. Right-click the existing value (Text ) and click Delete for each of these.
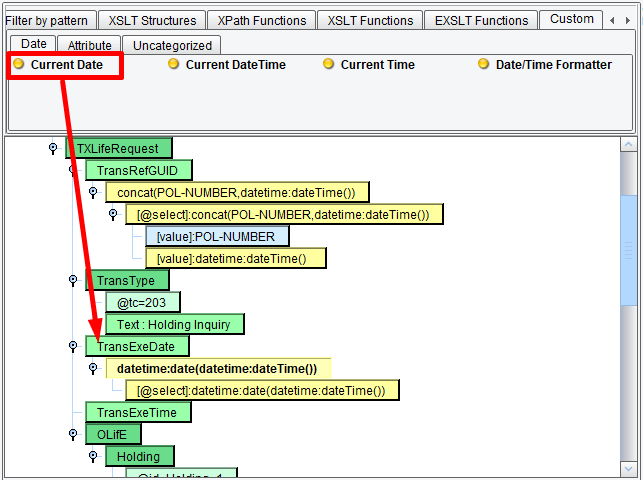
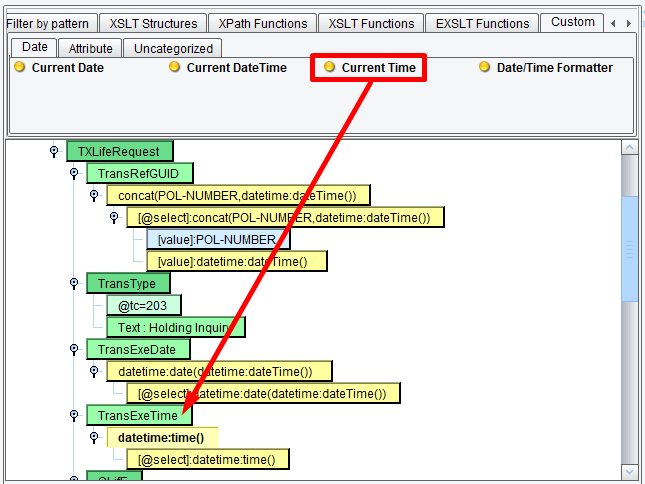
Then, select the Custom tab and the Date sub-tab and drag & drop Current Date onto the TransExeDate node.
Then drag & drop Current Time onto the TransExeTime node. Now, when the transformation is run, the date and time will be populated with the current system date and time. Your mapping should now look like the above.
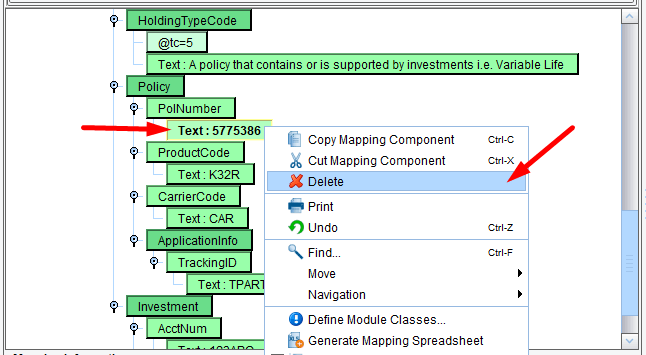
As you scroll further into the OLifE section, you begin to get into the meat of the policy inquiry. The Holding tag can remain and the ID can remain hardcoded. The HoldingKey can be left as is. The HoldingTypeCode can also remain. You will begin your work in the Policy section. In the Policy element, you have a PolNumber sub-element. Delete the hardcoded Text value by again selecting Delete from the context menu.
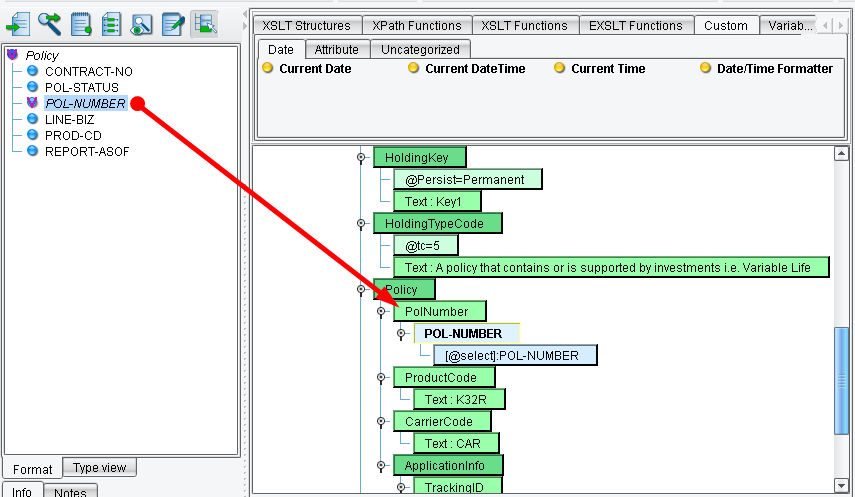
And you’ll want to map that onto POL-NUMBER from the Source format. Drag & drop POL-NUMBER from the source onto the PolNumber element in the center. Your mapping now should look like that above.
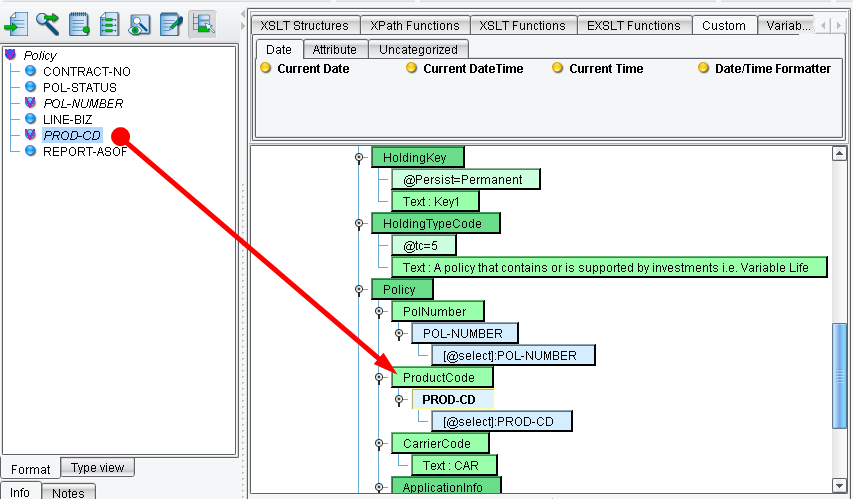
You’ll also want to populate the ProductCode dynamically. Scroll down so it is in view. Again, left-click the ProductCode text node, right-click, select Delete and map PROD_CD from the Source to ProductCode in the center. When you are done, your mapping should look like the above.
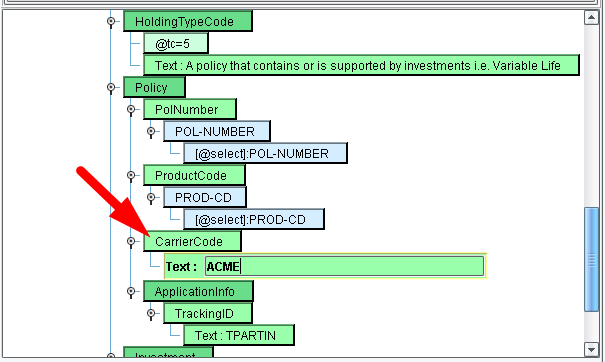
Leave CarrierCode hardcoded, because it will always be your carrier. However, you don’t want to use the text value that is there. Double-click the existing Text value and give it a new value – for instance, ACME.
Scroll down. Next, under ApplicationInfo – you have a TrackingID. Let’s say you’d also like to use the Policy Number as the TrackingID. Left-click the text node, right-click, choose Delete and again map POL-NUMBER from the source onto TrackingID. Your mapping should look like the above.
Scroll down again. Assume, for the purposes of this inquiry, that you don’t want the Investment aggregate at all. Left-click the Investment aggregate, right-click and choose Delete.
Your mapping should now look like the above. You’ll note that there are a number of elements in the Source that haven’t been mapped at all. You’ll want to add these to the template. Take a look at what you might want to do. In the Target tree, you’ll see that those elements that have already been mapped have a checkmark over them. This will help you navigate through to the aggregate that you’ll be interested in adding.
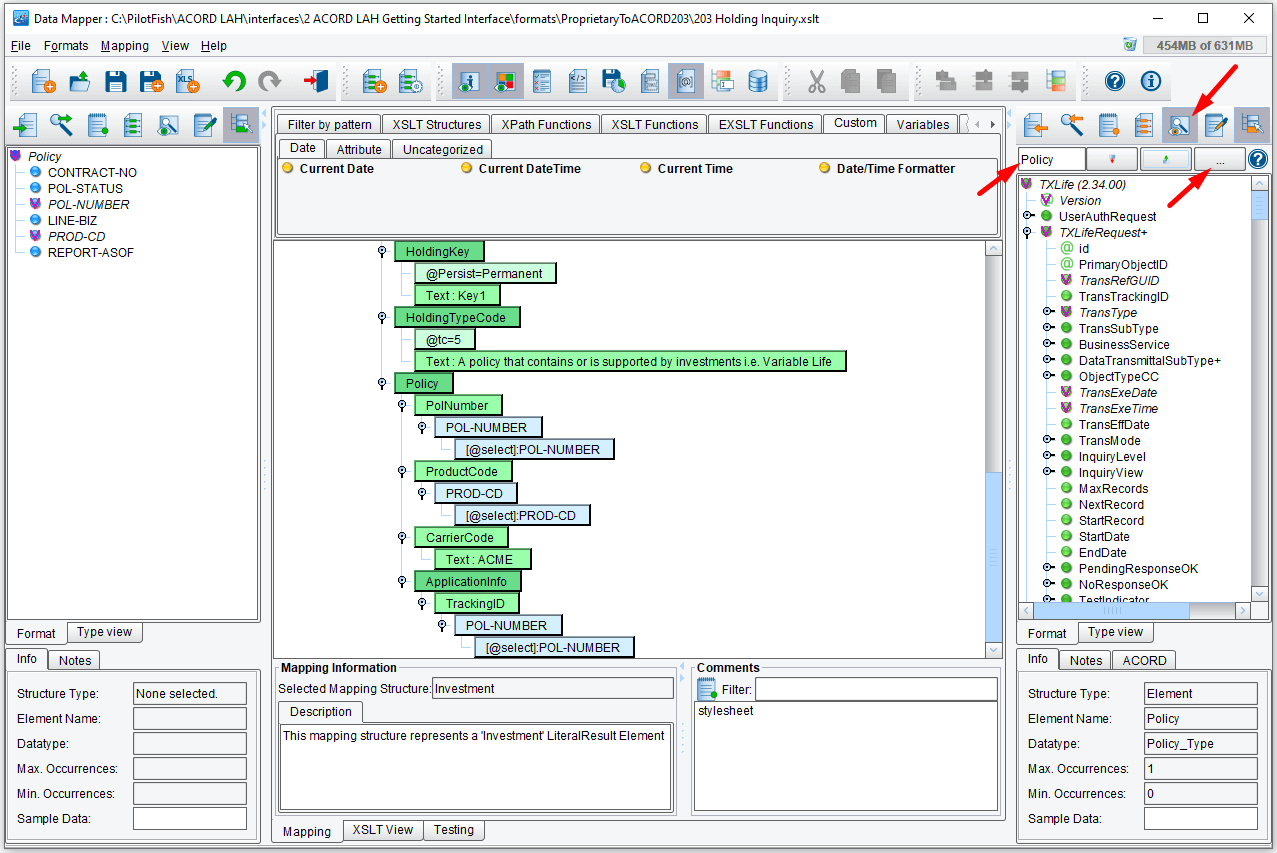
We are going to want to navigate the tree to Policy. But in this instance with the large ACORD schema, that is a tedious process and a rather long list of steps to explain in this tutorial. Like many of the features in the eiConsole designed to make the process of configuring interfaces and mapping easier and faster, you can use the built-in search function. So let’s do that.
Click on the Search icon (the binoculars), enter “Policy” then click Enter/Return. (Now if you wanted to refine your search, you’d click on the Ellipsis button (…) on the same row. We’ll cover that later in the tutorial.)
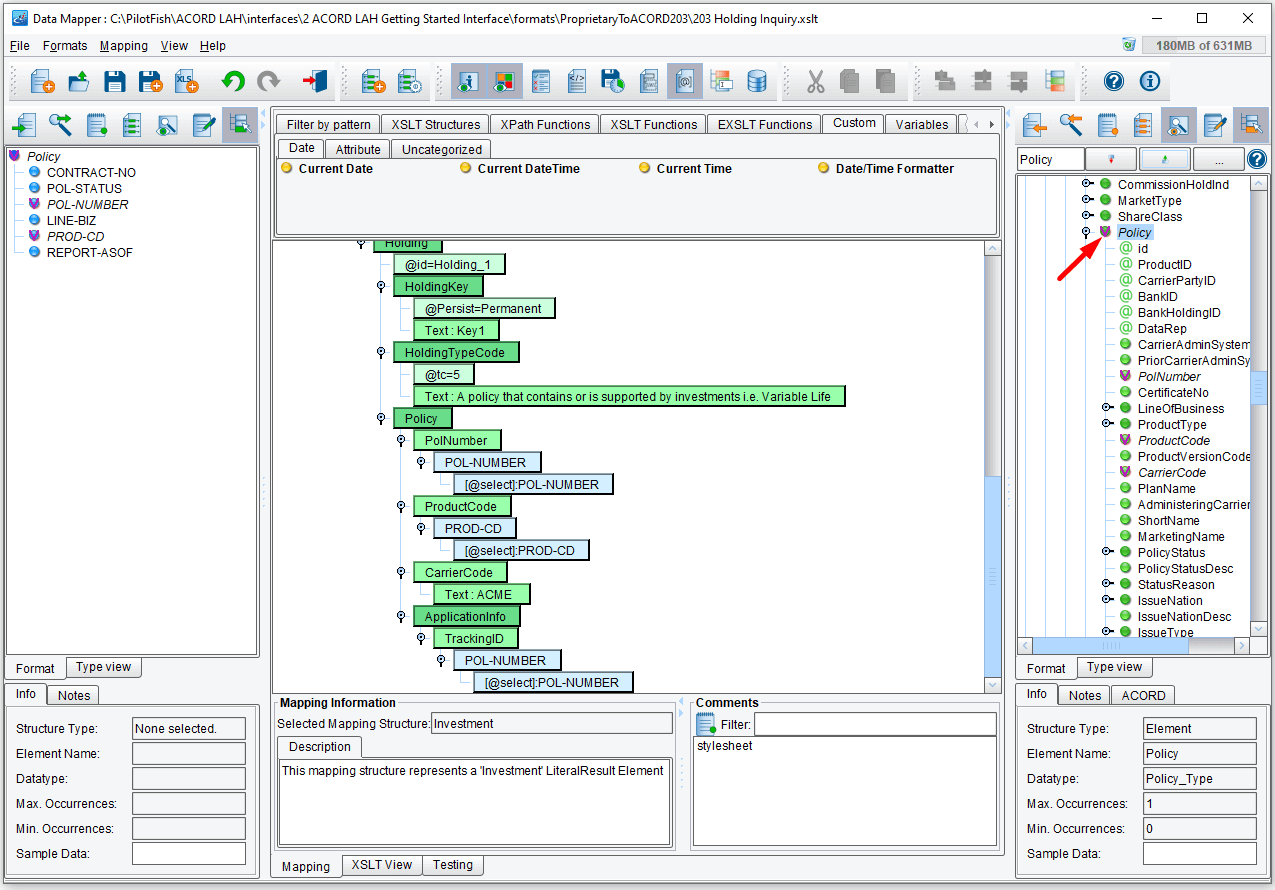
Your request will be processed and, if found, highlighted in the tree. Here, we see Policy, and it is, in fact, mapped, as indicated by the red checkmark.
Reading in ACORD Meta Data – Step 1
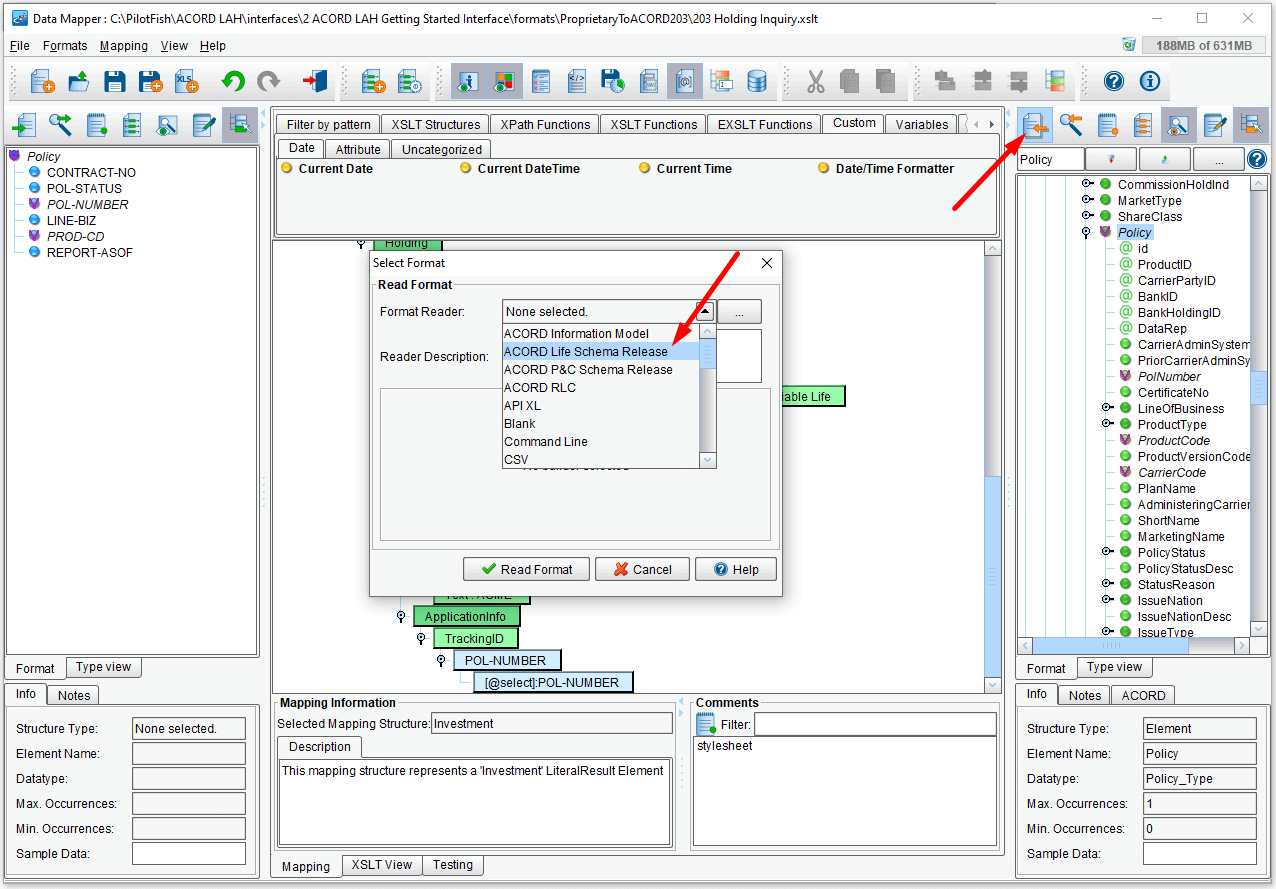
One of the huge advantages of ACORD membership is access to the ACORD MetaData. Unlike other tools, the Data Mapper was built specifically to support the ACORD standards – which means that it can read in the entire ACORD Life Schema Release, including not only the unaltered ACORD Schema file but also the Metadata file that includes the detailed typecode information. Other tools simply can’t handle these and choke on them. By doing this, the PilotFish Data Mapper is able to offer the ACORD documentation in-line, as well as all transaction codelists.
For ACORD Members: The eiConsole for ACORD comes bundled with the full ACORD schema and MetaData. Next, we will show you now how to read the Meta Data in and as we continue the tutorial and how you can leverage it.
For ACORD Non-members: You can continue with the tutorial, but you won’t have access to the MetaData. You can skip down to Reading in ACORD Meta Data – Step 7.
First, click the Read in Format button, then click ACORD Life Schema Release from the drop-down.
Reading in ACORD Meta Data – Step 2
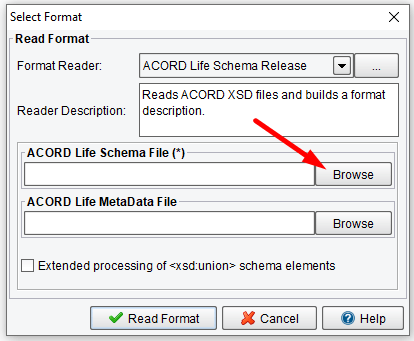
The Select Format dialogue opens. Since the template included the schema, you will need to reload the schema and then load in the MetaData. Click the Browse button for the ACORD Life Schema File.
Reading in ACORD Meta Data – Step 3
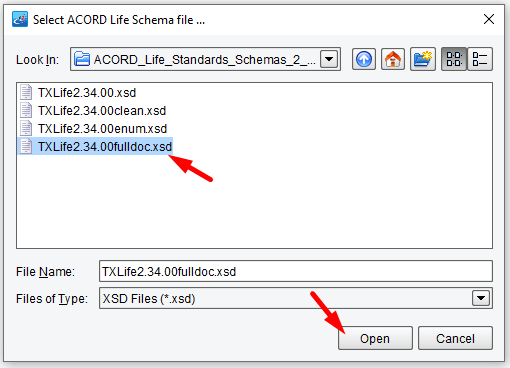
When the window opens, navigate to the location of your ACORD Member folder. Select the Schema you’d like to read in and click Open.
Reading in ACORD Meta Data- Step 4
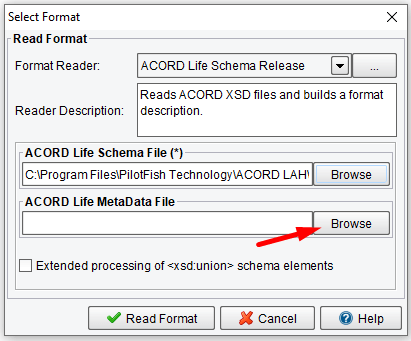
Next, click the Browse button for the ACORD Life Metadata File.
Reading in ACORD Meta Data – Step 5
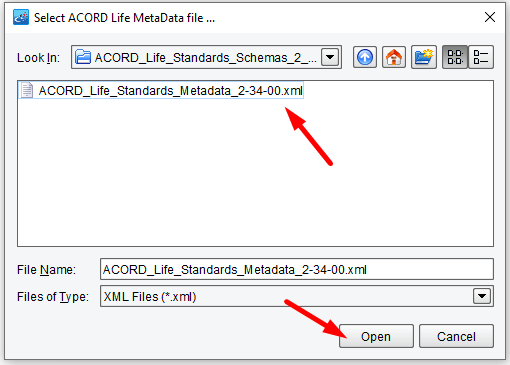
Again navigate, if you need to, to the ACORD_Life_Standards_Complete_Specification_Download… Select ACORD_Life_Standards_Metadata_2-34-00.xml and click Open.
Reading in ACORD Meta Data – Step 6
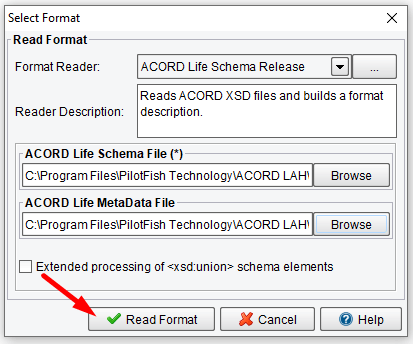
When the Select Format dialogue opens again – the Meta Data path will be selected, you can then click Read Format.

Click OK.
Reading in ACORD Meta Data – Step 7
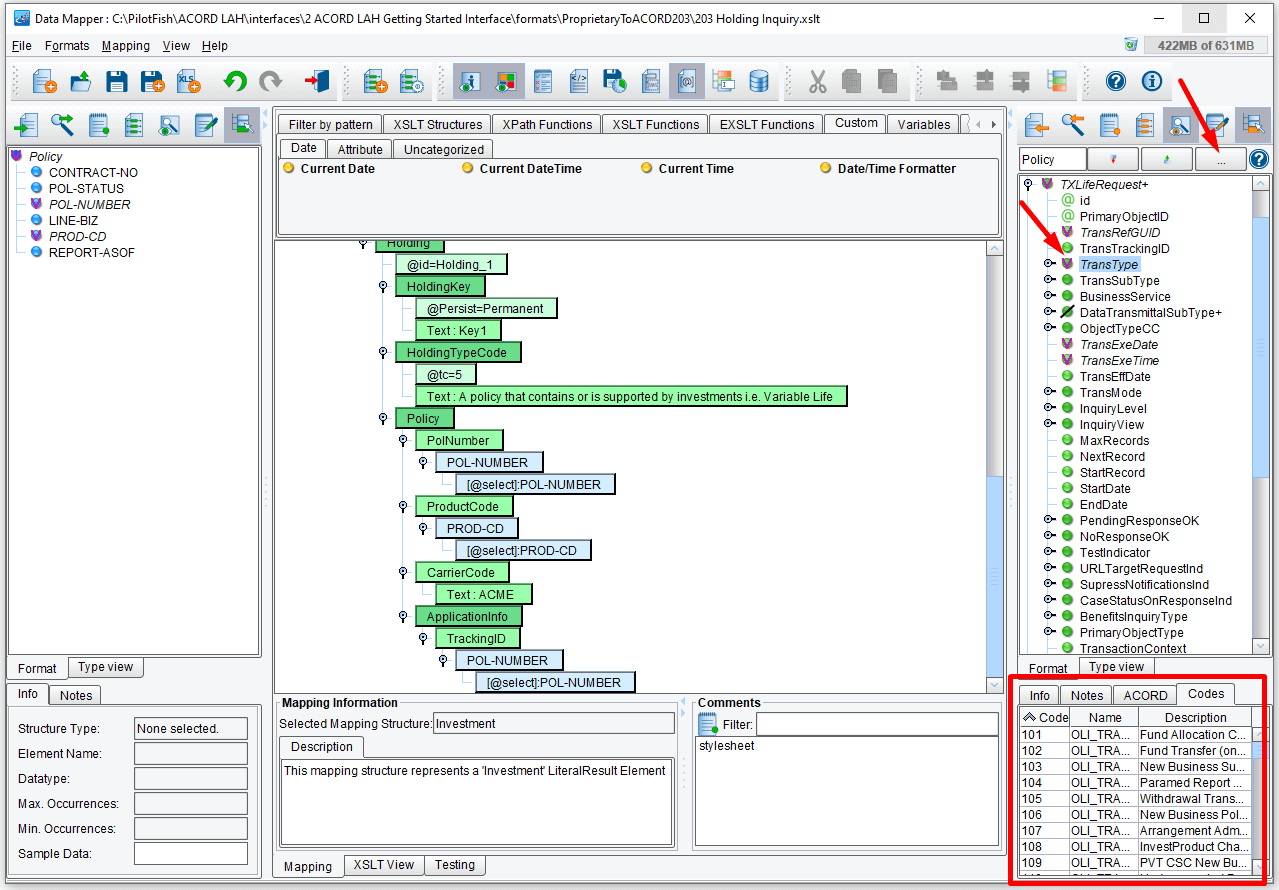
When the Data Mapper refreshes and opens, you’ll see new tabs have been added – Codes and ACORD which are the ACORD MetaData.
PilotFish ACORD Model Viewer
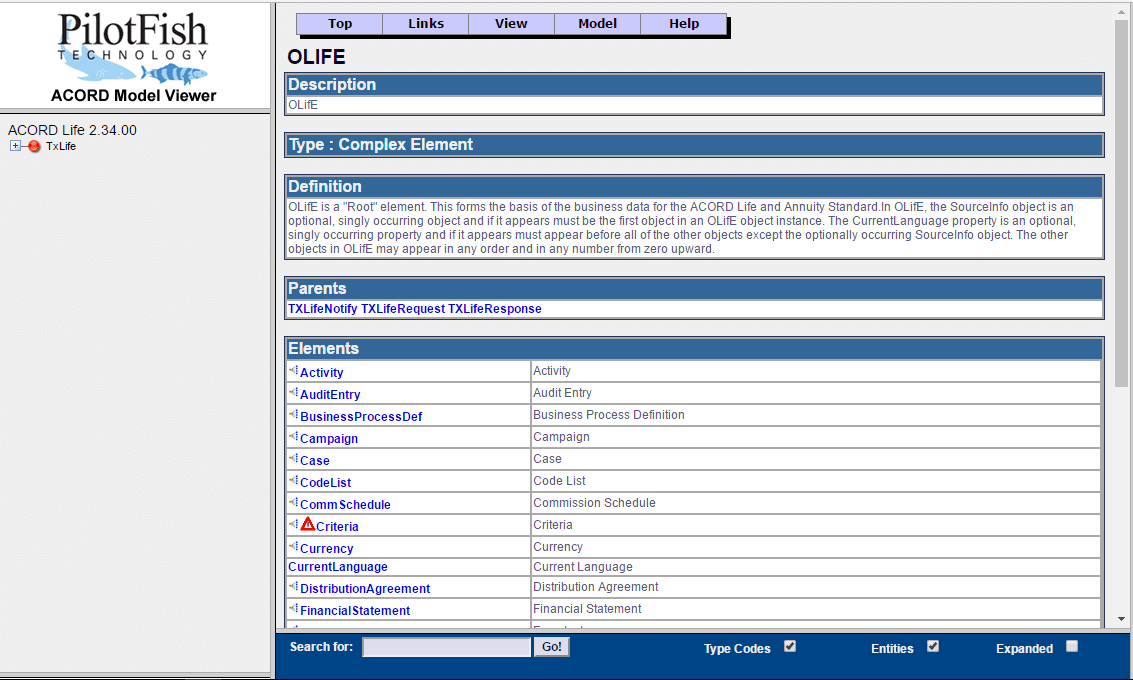
Another thing to point out is that PilotFish has another free tool that members and non-members alike can use to their great advantage. The ACORD Model Viewer is a free Web-based reference for the ACORD PCS and LAH Data Models. The Model Viewer takes the XSD and displays it in a user-friendly HTML format. Features of the ACORD Model Viewer include:
- Display of complete documentation of the imported schema/model, including all code lists and type codes.
- Menu-driven selection of the XSD Model and version number.
- Tree-based navigation system, similar to a file system explorer.
- Full-featured search.
- Sortable Code list tables.
- Entity, Aggregate and All-Inclusive indexes.
- Extensively hyperlinked, graphically enhanced entity definitions.
If you would like to take advantage of this tool, during the tutorial or after, please click on ACORD MODEL VIEWER.
Let’s continue with the tutorial.
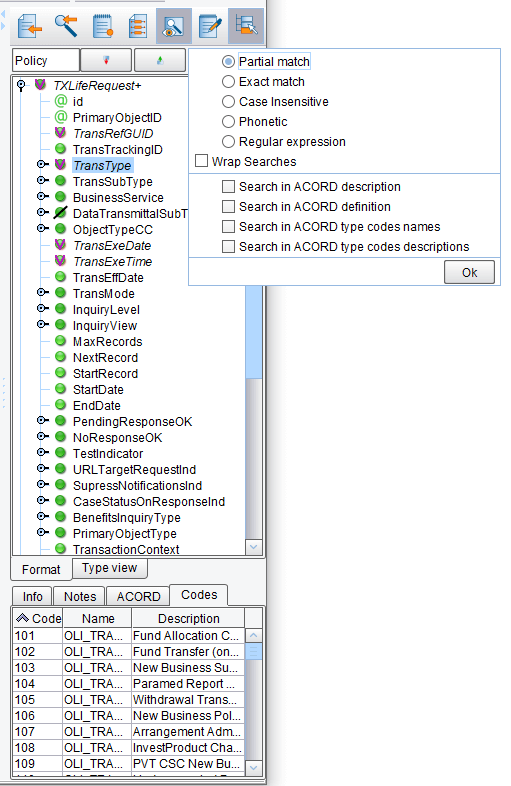
Now, since we want to continue where we left off – we will want to do a search again for policy. When the MetaData has NOT been read in yet, you can just use the eiConsole’s default search function. But with such a large schema, MetaData and a common term like Policy – it would take a while to go through searching all of these, as each instance would be served up. So to do a more defined search, click on the Ellipsis button (…) at the top.
Next, we’ll look at customizing your search. The eiConsole Search can be customized. Here we have unchecked searching the data we are not interested in right now (ACORD descriptions, definitions, type codes, etc.). We select Partial Match and click OK. Now, in this case, as there are many instances of Policy in the Target format – you’ll need to be sure that you select Policy in the proper part of the tree. You’ll find it underneath Holding+.
Note: The Code tab only appears when the type code element or attribute is selected in the tree.
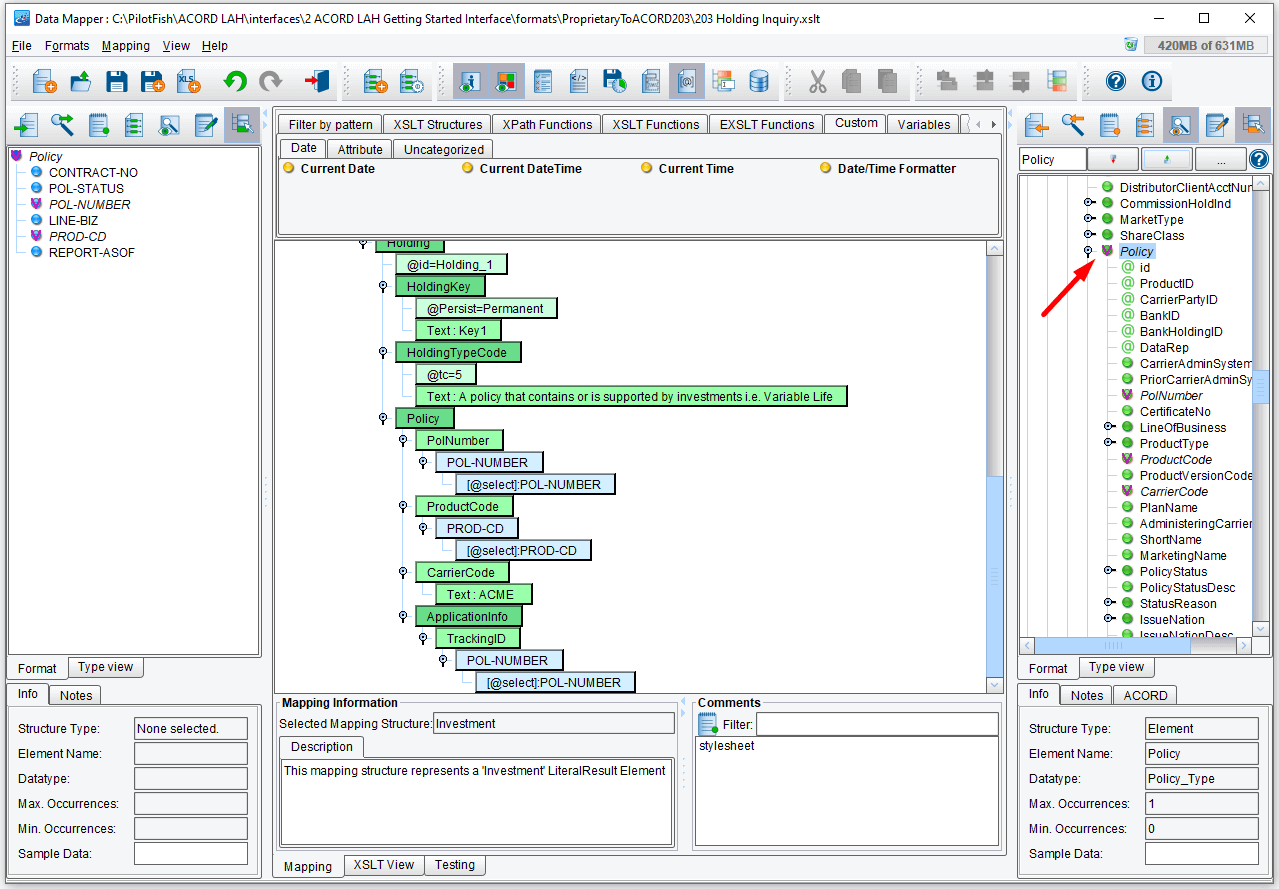
Once you are at the proper location, click to expand the Policy node.
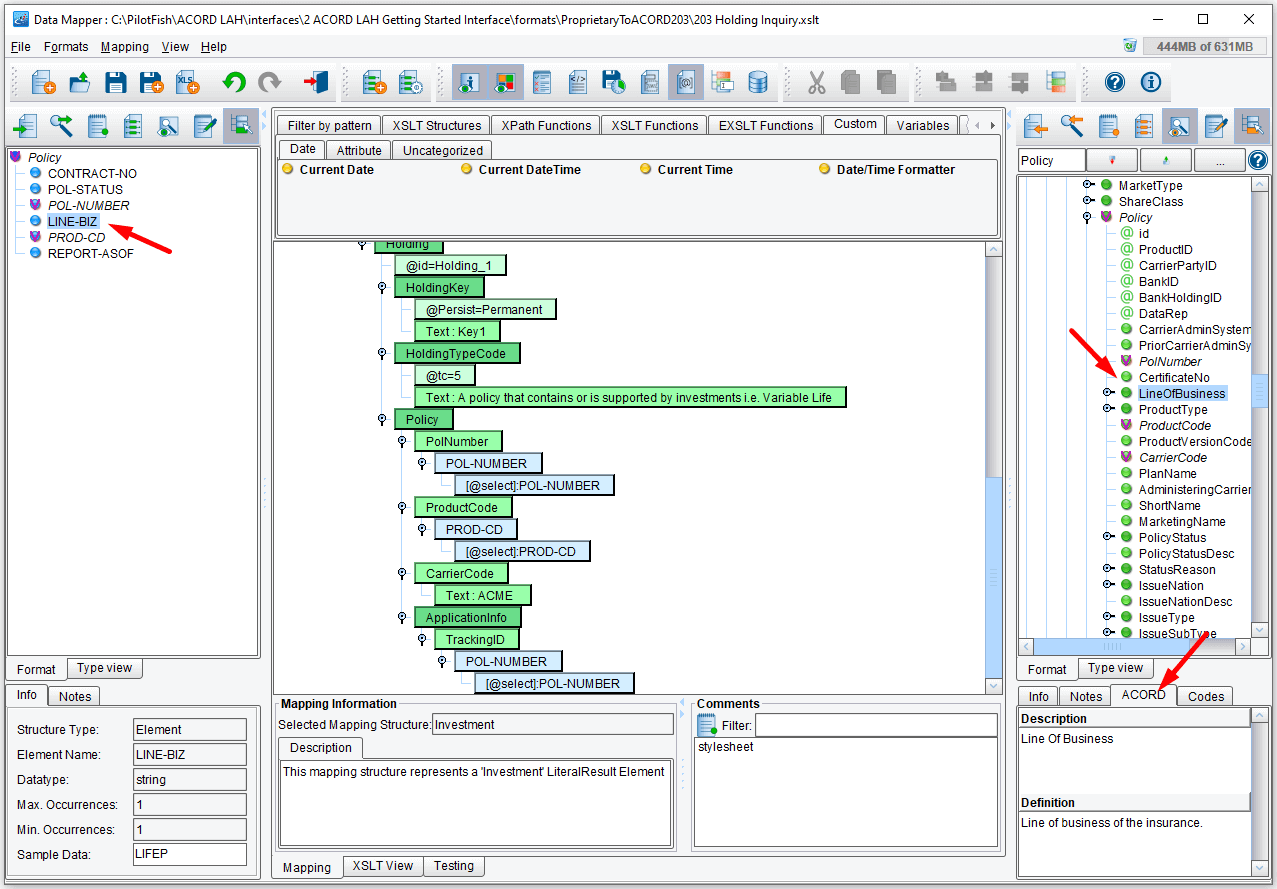
Then scroll down. You’ll see that you have a LINE-BIZ element in the Source and that ACORD also allows a LineOfBusiness element. To ensure that the meanings are the same, you can inspect the ACORD tab. Click the ACORD tab. Here you can see the useful descriptions and definitions. Next, look at the available values in the Codes tab. Click on the Codes tab.
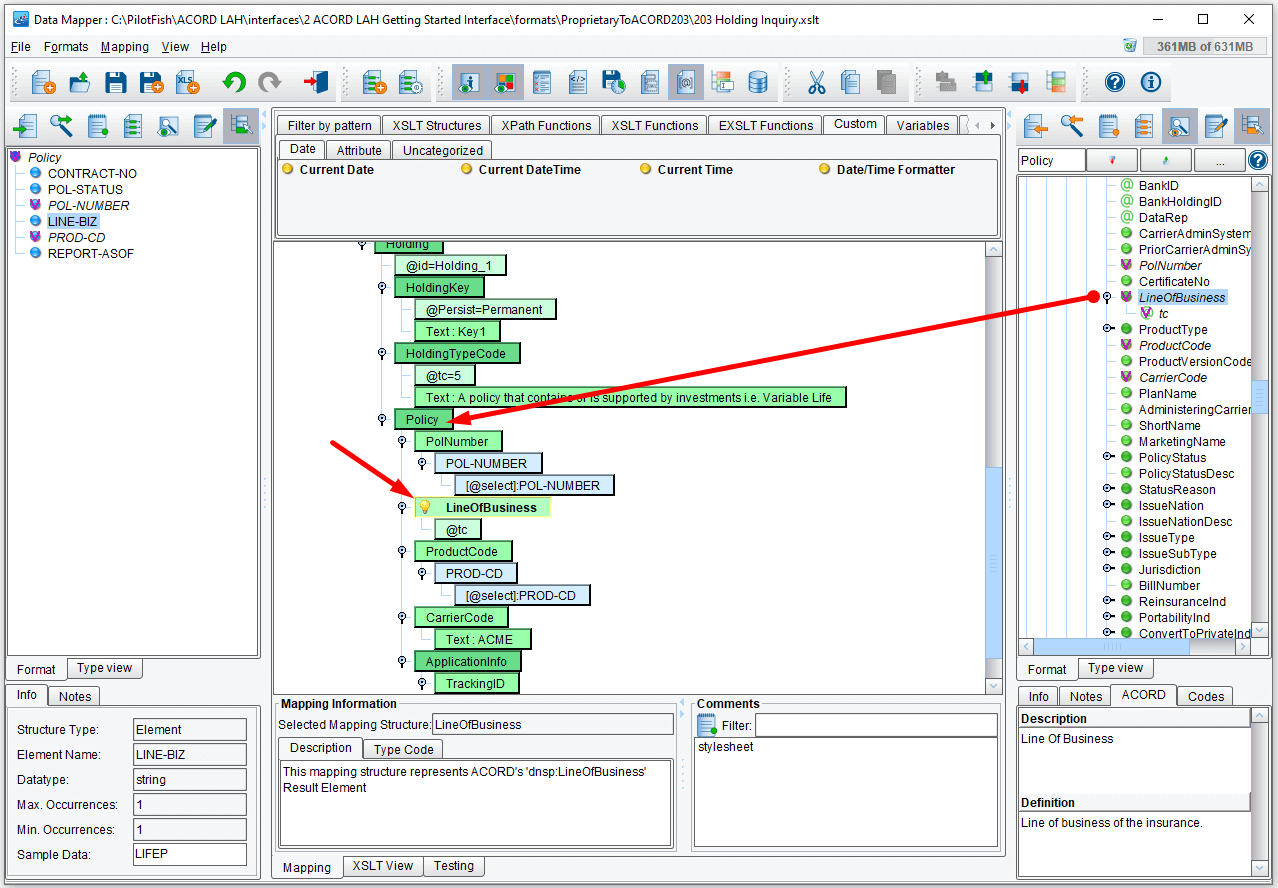
The available codes are displayed. When satisfied with what those values are, you can take the LineOfBusiness element and drag it on top of its appropriate parent on the map. In this case, LineOfBusiness lives underneath Policy. Drag & drop it and it will appear in the correct element order in the mapping, along with its required typecode attribute (etc).
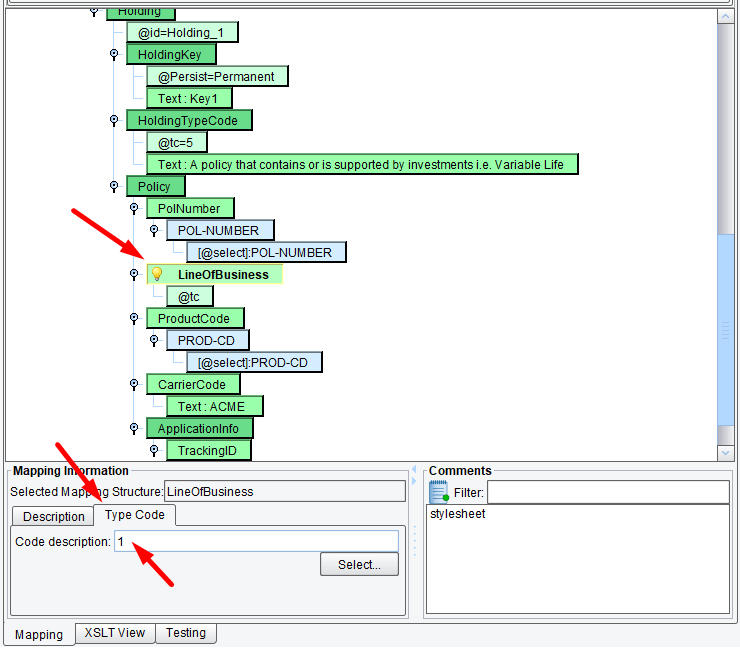
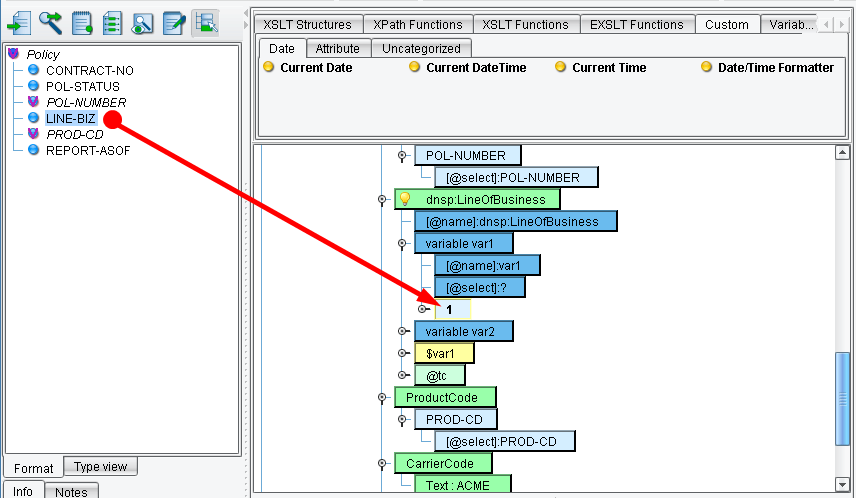
In order to map a complex element, choose the Type Code tab in the Mapping Information panel and enter “1” into the Code description field and hit the Enter button. LineOfBusiness will be populated with “1” and @tc node will be populated with “code-to-description(1)”
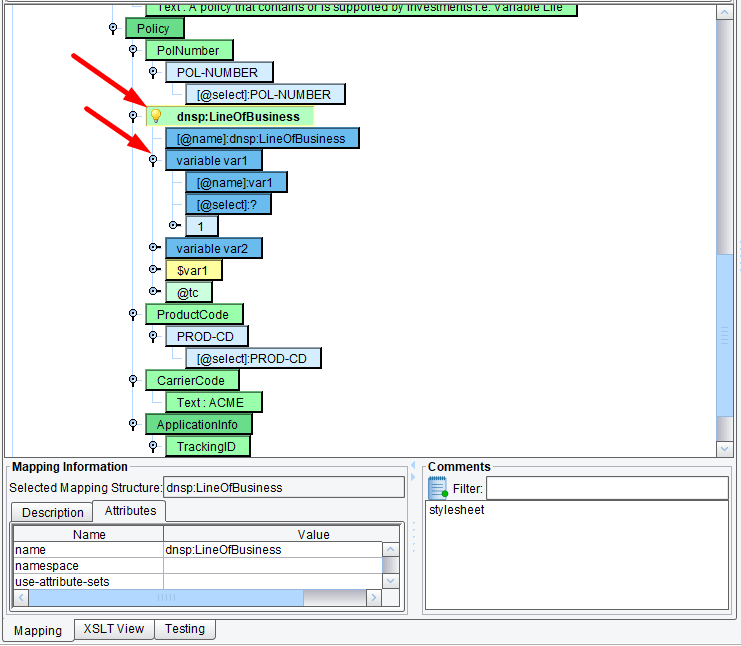
Expand the LineOfBusiness node by clicking on the yellow “lightbulb”.
Now, you’ll want to map the LINE-BIZ element onto the typecode attribute. Drag & drop Line-BIZ onto the “1” node under the variable var1 node.
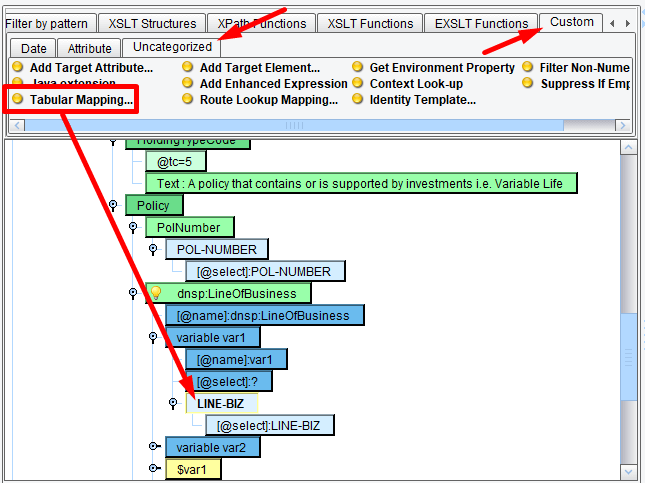
Here you’ve done a 1-1 mapping from the value in LINE-BIZ to the LineOfBusiness typecode. However, you’ll need to translate your system’s internal codes into this list of typecode values. To accomplish this, you’ll use the Tabular Mapping tool. In the XSLT palette at the top – on the Custom tab, select the Uncategorized sub-tab, scroll over again and drag & drop the Tabular Mapping tool on top of LINE-BIZ.
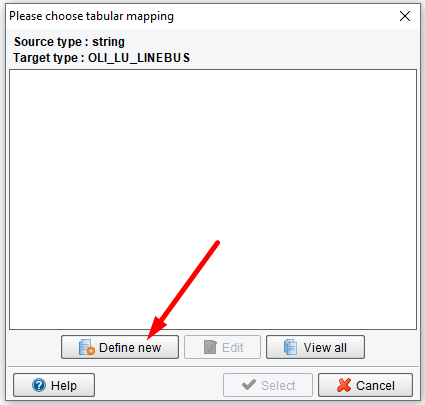
When the Please choose tabular mapping dialogue opens, click Define New.
Reading in ACORD Meta Data
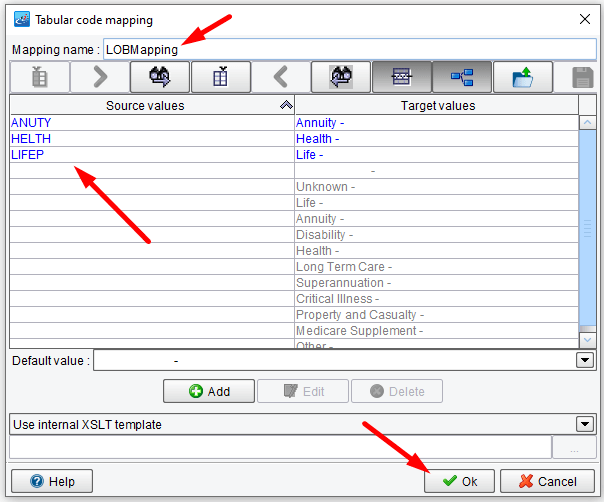
Enter the name “LOBMapping” in the Tabular code mapping tab and the Mapping name text field.
If you recall your sample data, you know that there are 3 different lines of business that can be represented: Life, Annuity, and Health. Life is represented by LIFEP, Annuity by ANUTY and Health by HELTH. Fill in those values. Click on the Source value that corresponds to the Life Target value and enter in LIFEP, hit Enter/Return. Find the Annuity value and enter in the corresponding source ANUTY and hit Enter/Return. Then, highlight the Health Insurance Target and enter the corresponding Source HELTH and hit Enter/Return. Leave the default value as unknown. Click OK.
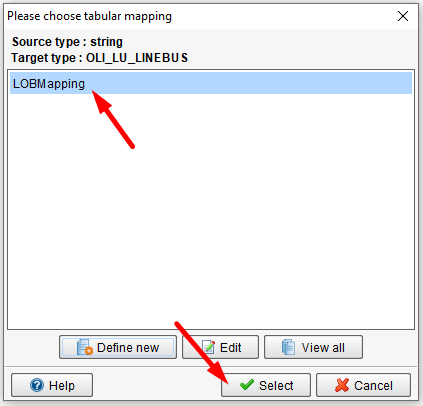
When the Please choose tabular mapping dialogue opens again – make sure your mapping is selected, then click Select to associate that mapping with the field.
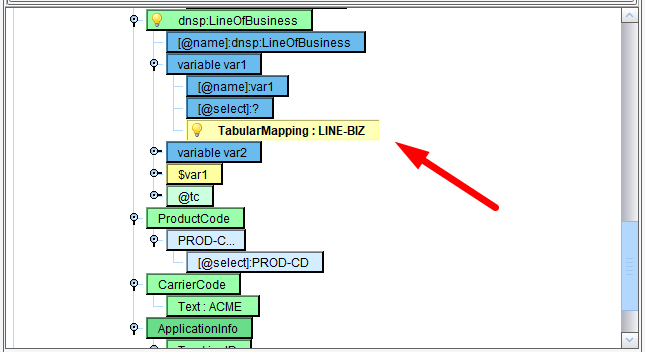
The newly created Tabular Mapping should look like the above. Click on the yellow “lightbulb” to collapse it.
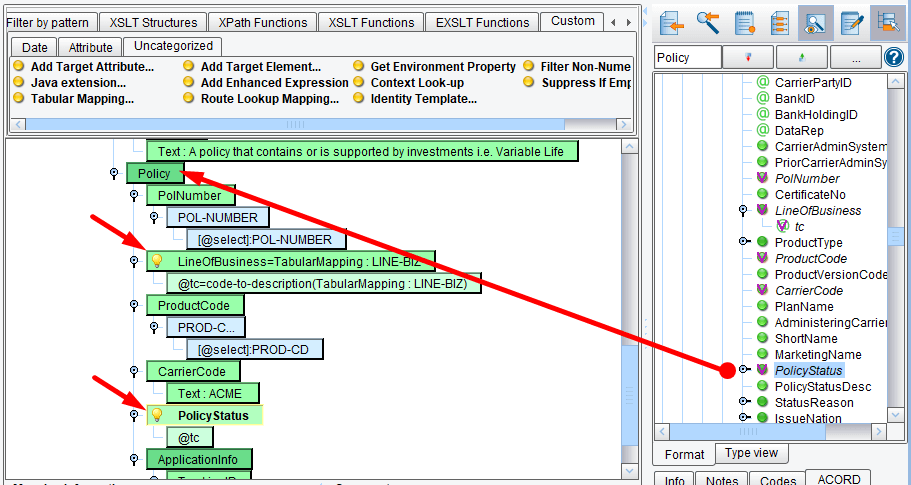
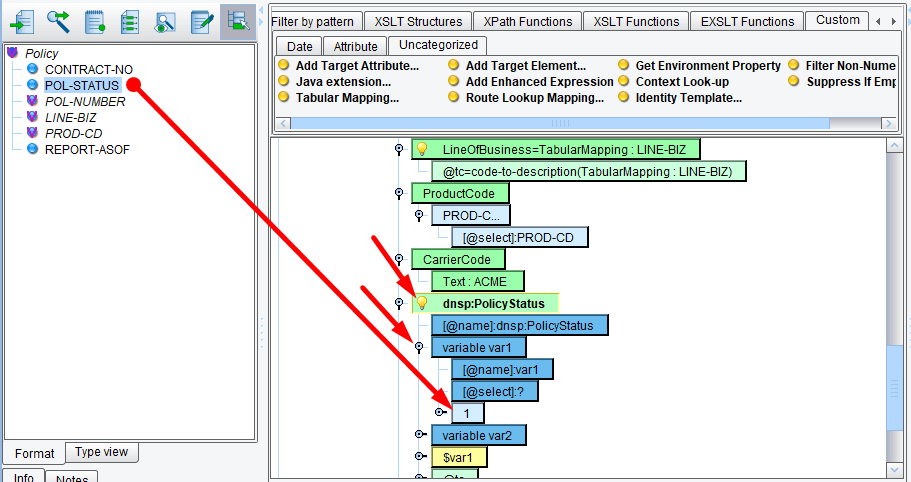
Next, add PolicyStatus. Locate PolicyStatus in the Target tree and drop it on top of the appropriate parent, again Policy. Note where it gets added. PolicyStatus will appear in the correct element order.
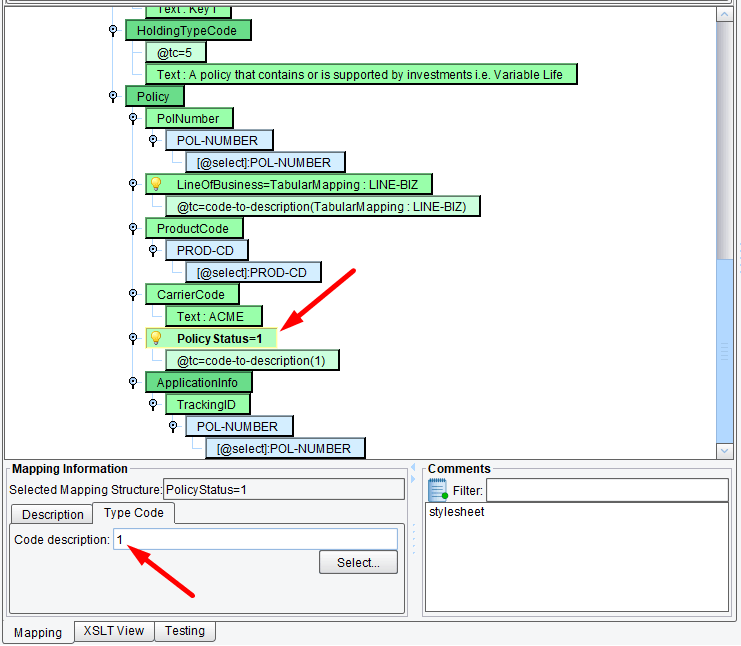
Enter “1” to the Code description field.
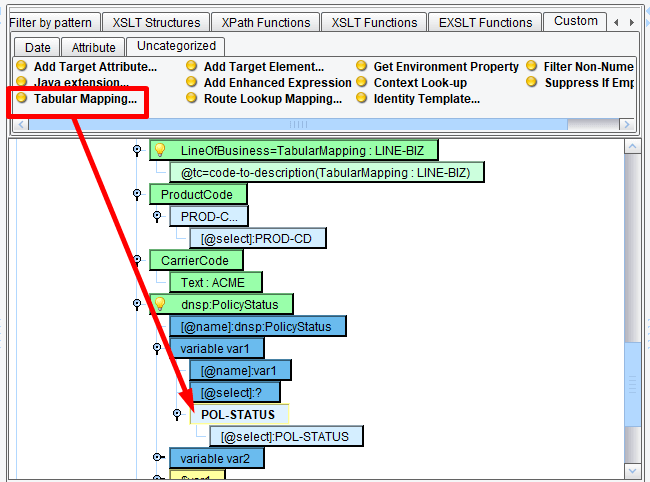
Expand the PolicyStatus node by clicking on the yellow “lightbuld” and drag & drop POL-STATUS onto the “1” node under the variable var1 node.
Scroll down in the center panel. Then select the Tabular mapping tool and drop it on the POL-STATUS typecode attribute, too.
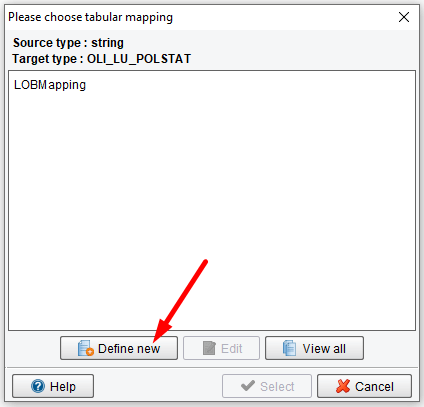
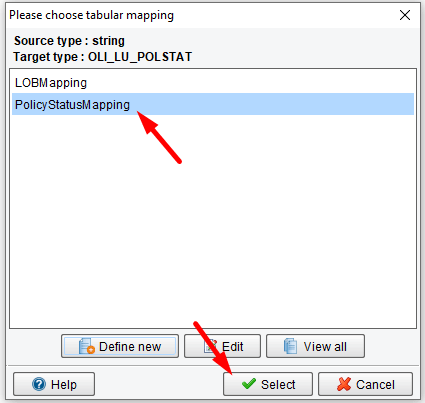
Click the Define New button (from the Please choose tabular mapping dialogue).
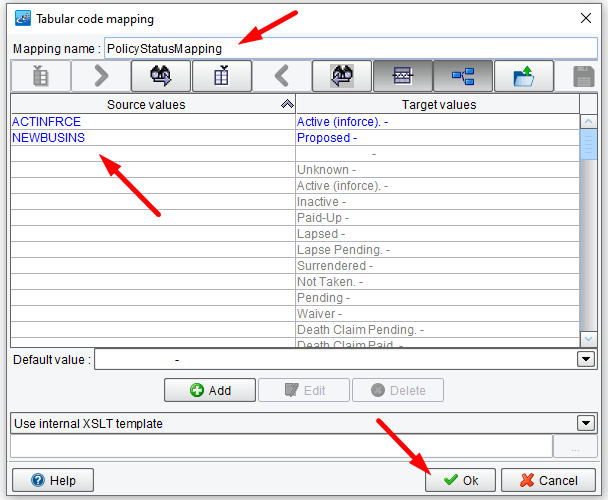
When the dialogue opens, enter “PolicyStatusMapping“. The values here are Active (inforce) or New Business. Locate the Active Target value and add the corresponding Source value ACTINFRCE. Choose to map New Business to the Proposed Target value. Locate Proposed, enter the corresponding Source value NEWBUSINS and hit Enter. Scrolling to the top, you can see your two mapped values. Click OK.
When the Please choose tabular mapping dialogue opens, choose your new mapping and click Select.
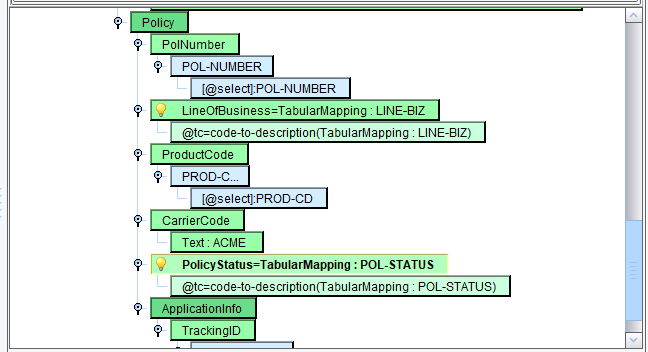
Your mapping should now look like that above.
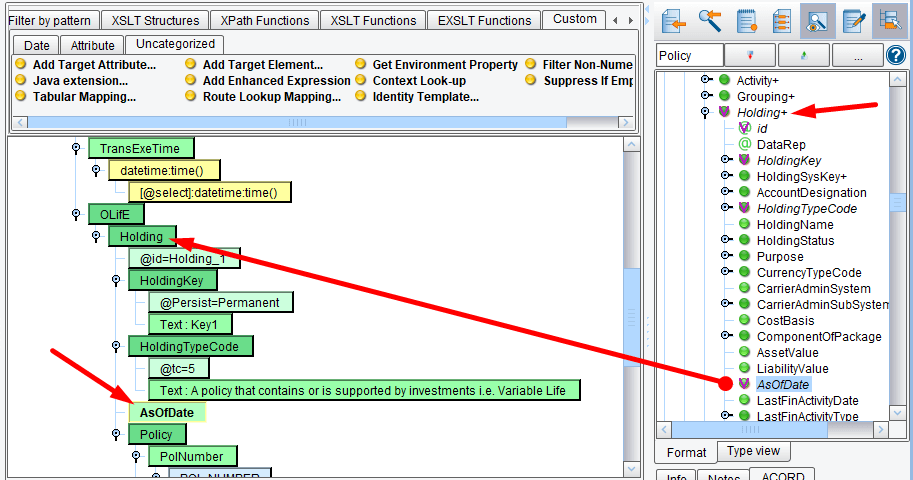
You now have a CONTRACT-NO and REPORT-ASOF date, both of which you’d like to map. If you scroll up the Target tree, you’ll see that Holding+ has an AsOfDate, so you’ll need to locate Holding+ in your main mapping, drag & drop AsOfDate from the Target tree on top of Holding. Notice where AsOfDate appears in your mapping.
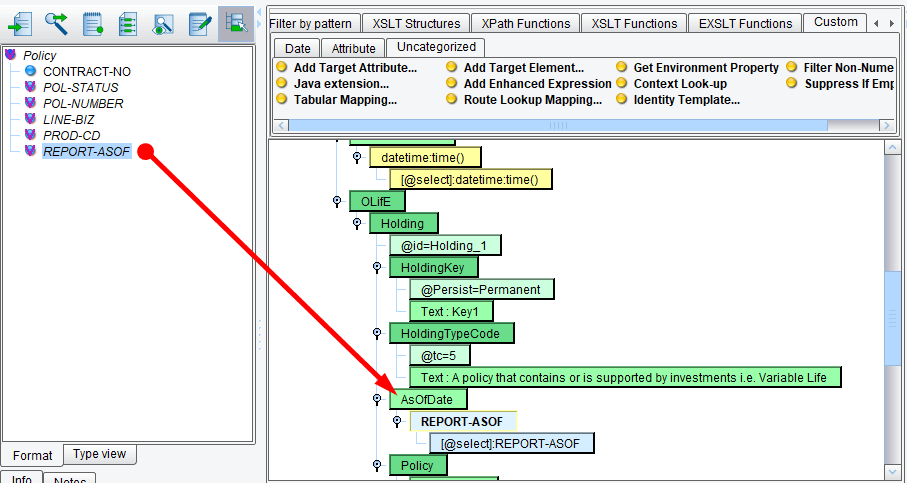
Next, drag & drop REPORT-ASOF from the Source, on top of AsOfDate in the center panel.
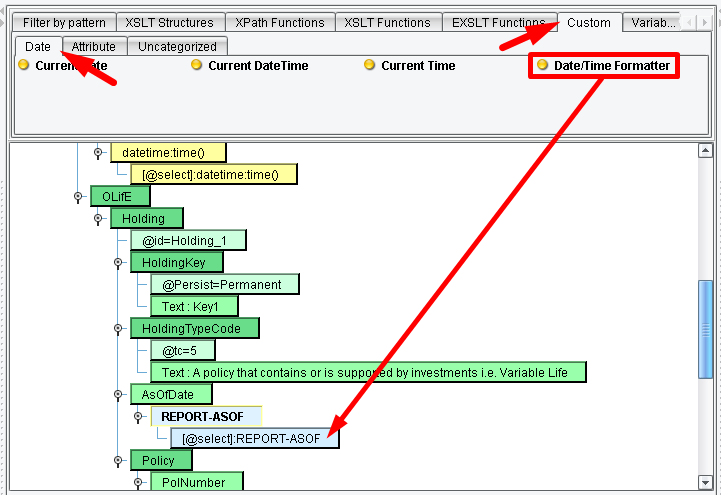
Now, the AsOfDate (or the REPORT-ASOF from the Source) is not formatted the same as ACORD expects the date to be formatted. To handle the date formatting, click on the Date sub-tab of the Custom tab in the XSLT pallet, scroll over and drag the Date/Time formatting tool on top of the REPORT-ASOF element.
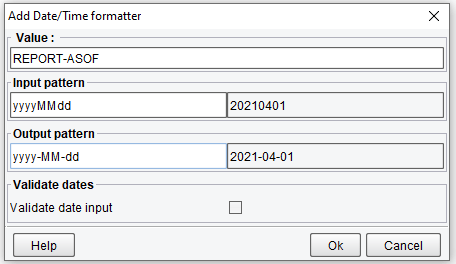
The Add Date/Time formatter dialogue will appear. In the Value Field, enter REPORT-ASOF. The format of the date in the input is yyyyMMdd. The output pattern is the same with hyphens added, yyyy-MM-dd. Enter these input and output patterns and click OK.
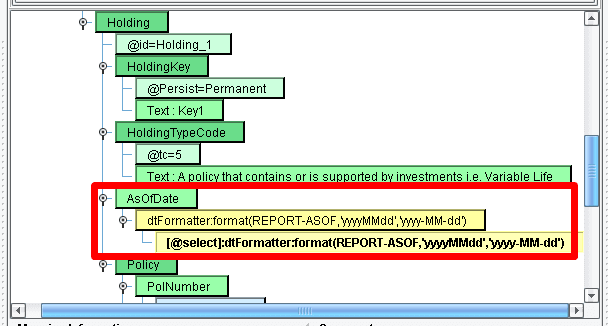
When the Data Mapper refreshes, the 1-1 mapping will be replaced by a call that will handle that date formatting for you.
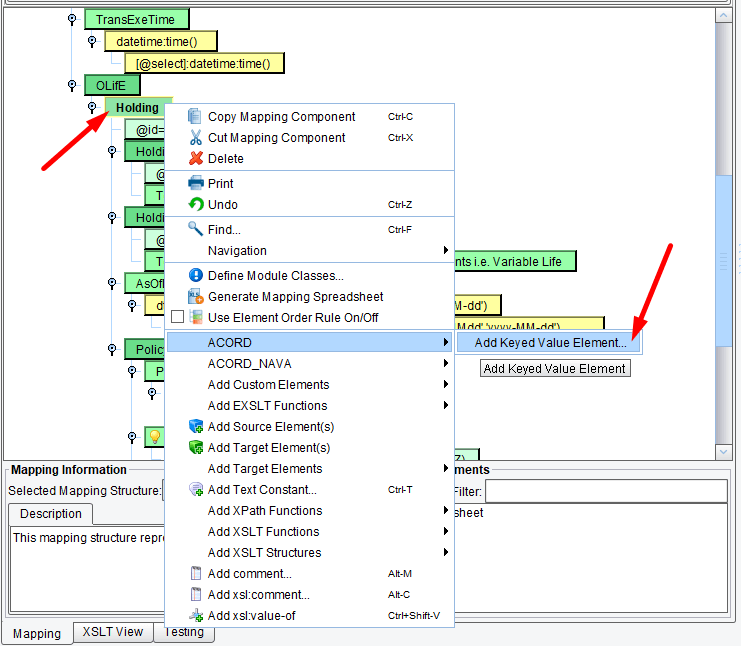
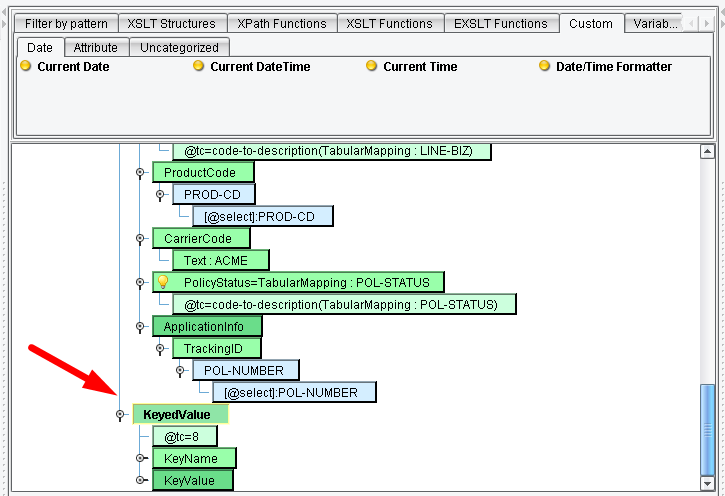
Finally, you have the CONTRACT-NO. Assume that the CONTRACT-NO does not have a simple mapping in the ACORD model. To handle this, you can add a keyed value. To create the keyed value element, left-click the Holding node in the center panel and then right-click to bring up the context menu. Choose the ACORD sub-menu (bottom) and click Add KeyedValue Element.
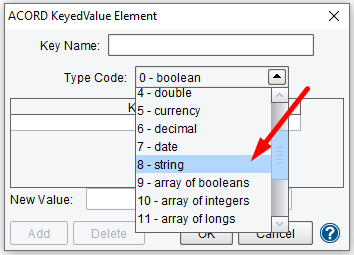
Give the Key Name the name of the field that you’d like to use. Name it “ContractNumber”. You then need to select the data type for this custom field. In the Type Code drop-down, choose 8-string.
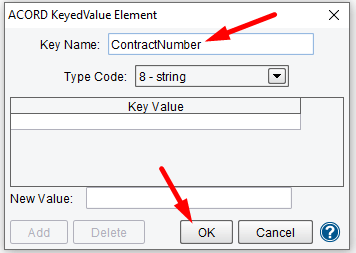
You can leave the Key Value blank for now and click OK.
You’ll see the KeyedValue structure appear in the mapping. You’ll now need to replace the empty KeyValue text constant with your CONTRACT-NO.
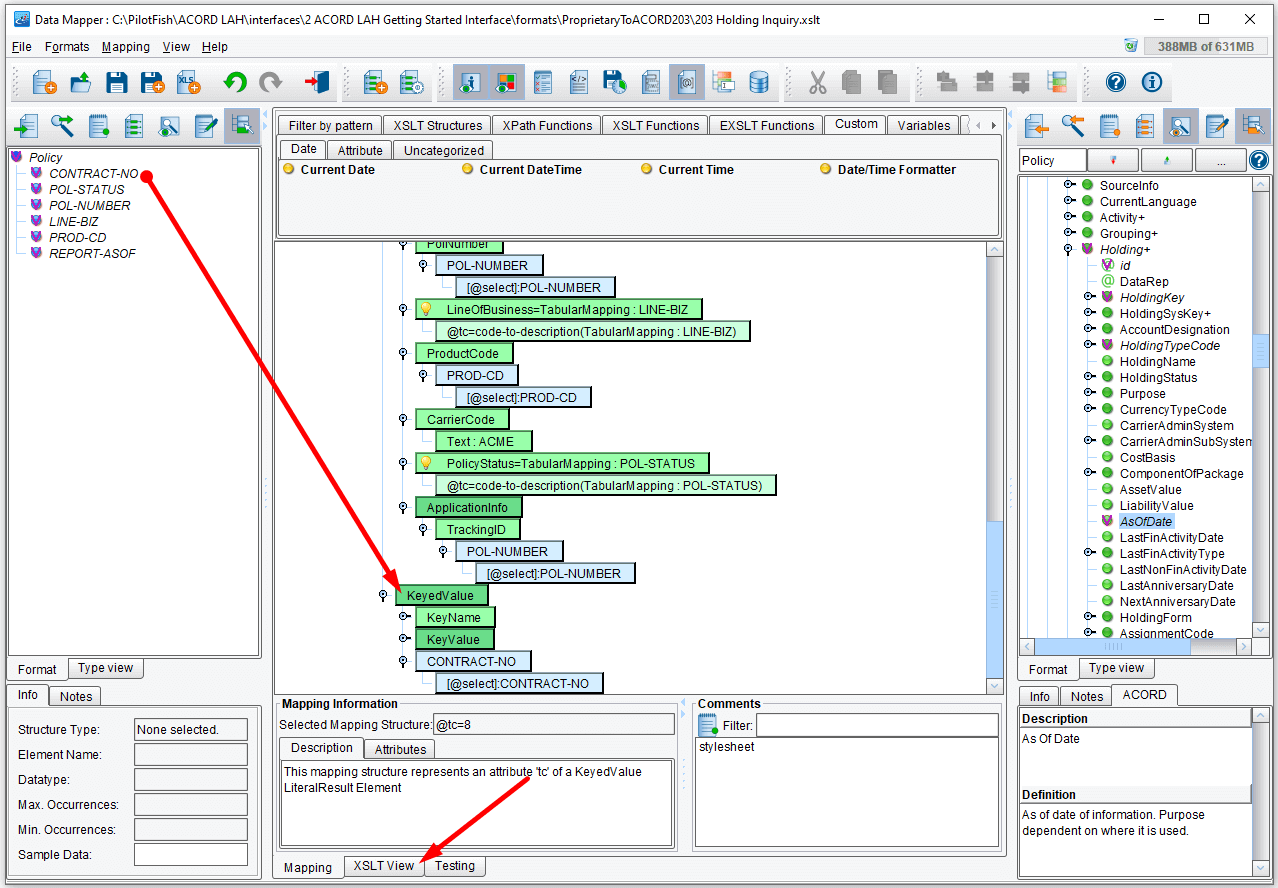
Left-click the empty text value (tc) in the mapping, right-click to Delete and then map CONTRACT-NO from the Source onto KeyedValue just as you would any other field. Your mapping should now look like the above.
You’ve now completed your mapping. You’ll note that you did this without handwriting any code. However, under the covers, everything that you do is W3C-compliant XSLT and those comfortable with XSLT can move freely between the text view and the graphical view. Click the XSLT view tab.
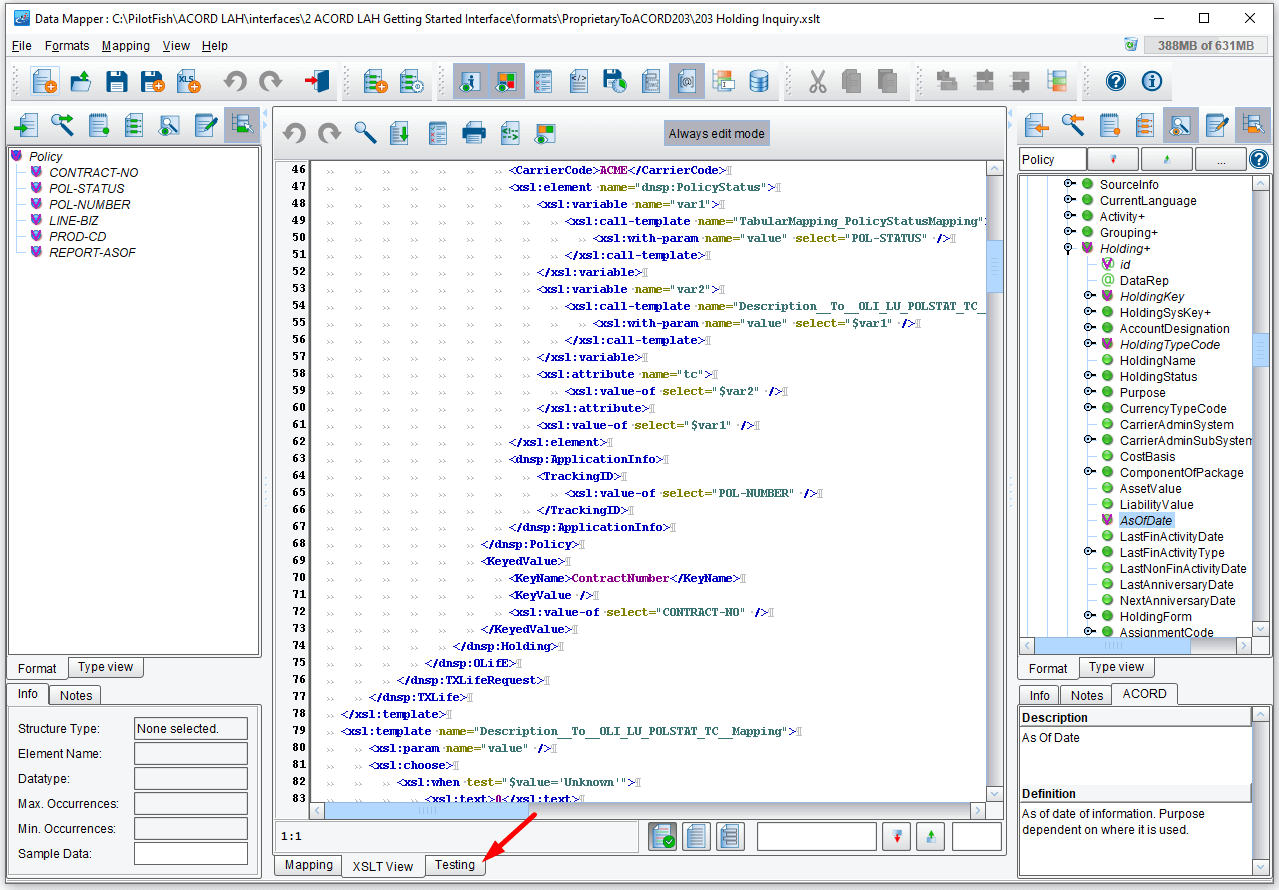
The Testing tab gives you the ability to test your Transform. Click on the Testing tab.
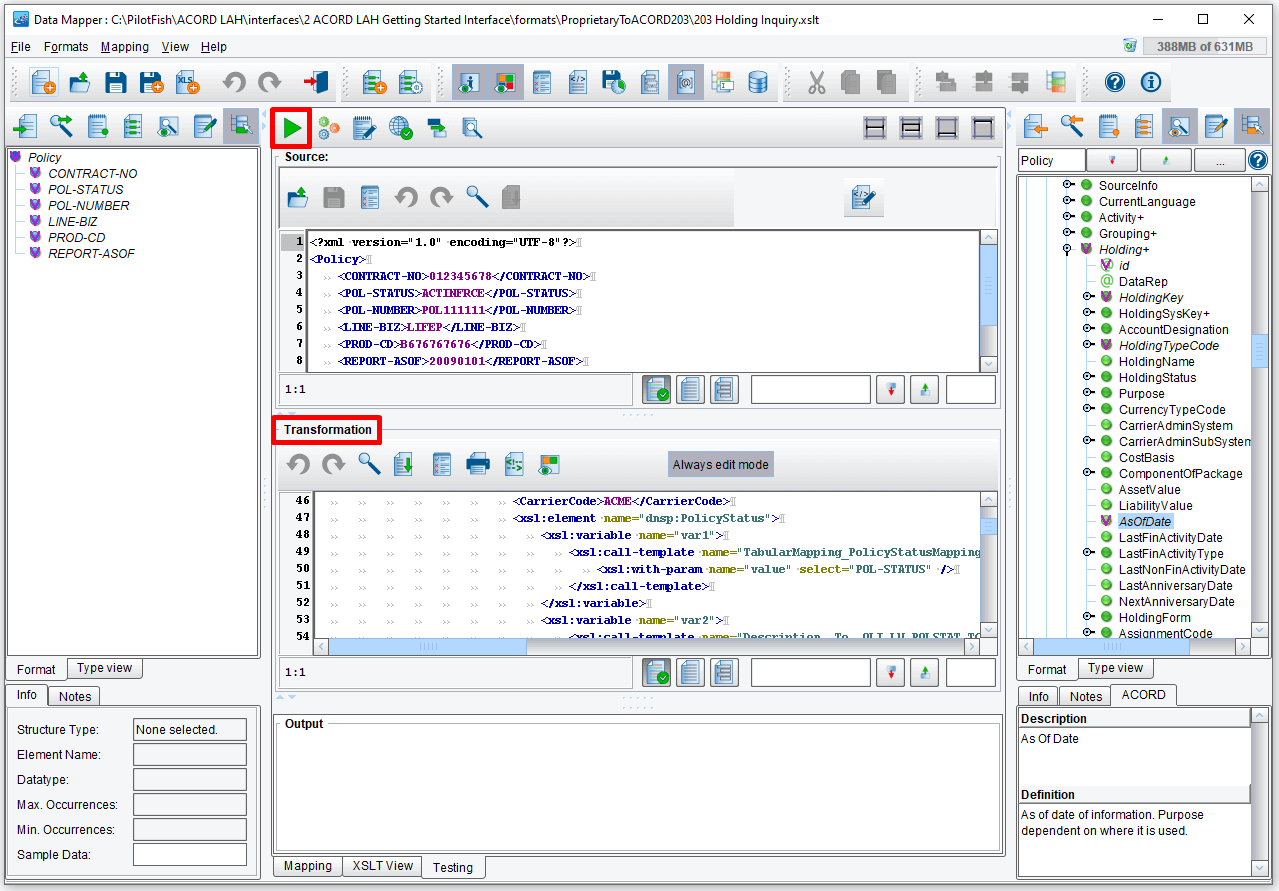
Then click the Execute Transformation icon. This will execute the Transformation.
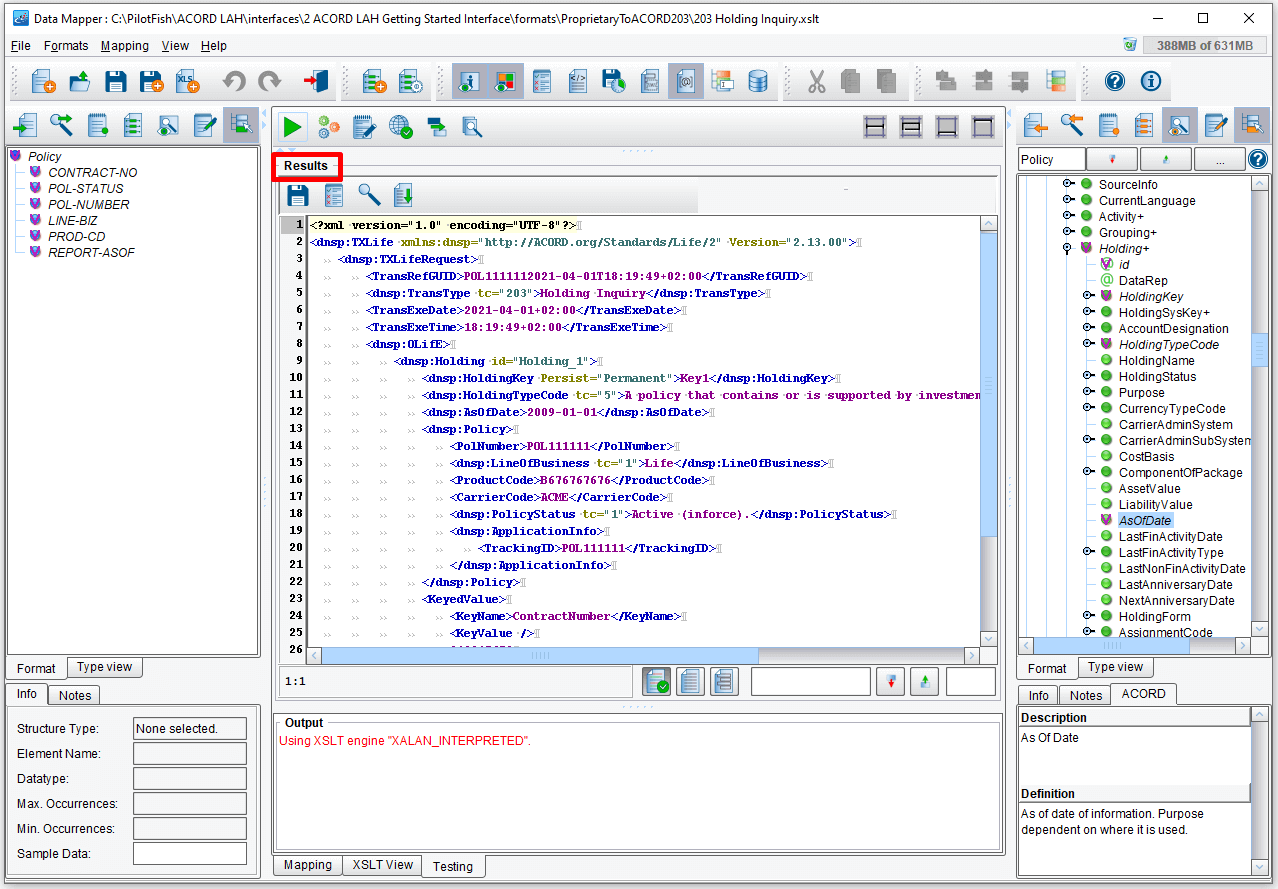
You’ll see that your Policy tag was correctly translated into an ACORD TX Life Transaction. Now, click the Mapping tab.
Now, click the Save icon. Once saved, it will appear grayed out. Then, click the Return to Console icon.
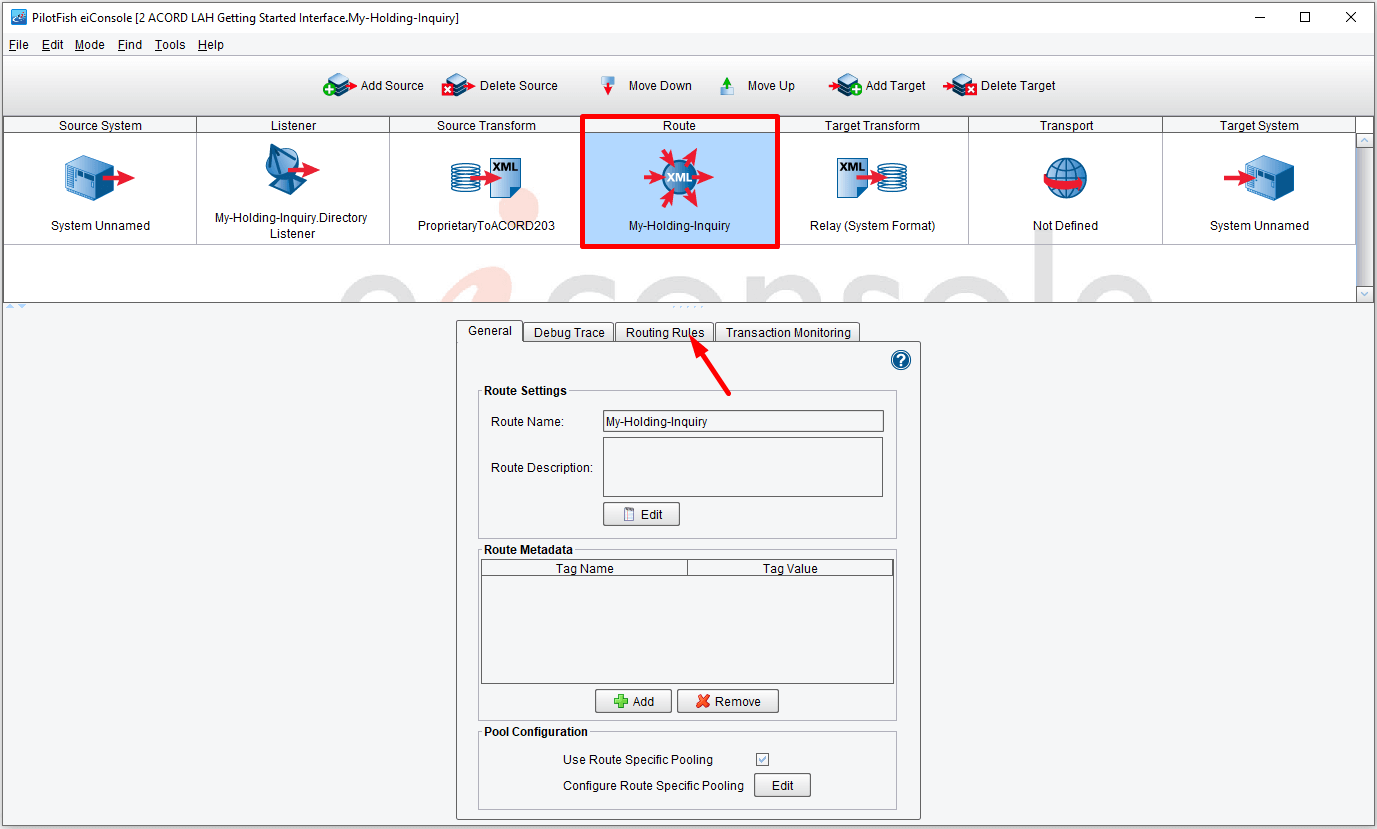
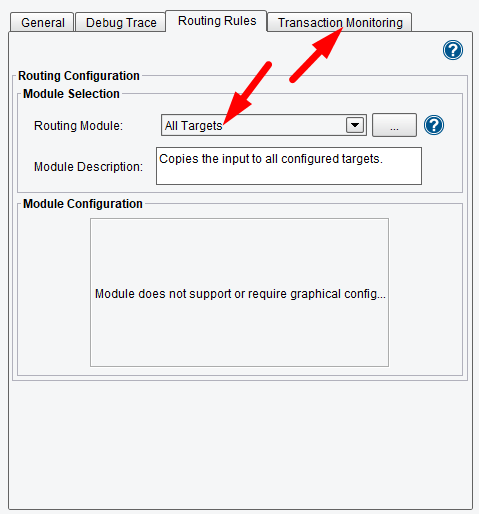
In the Main Route grid, you can now move on to the Routing stage. Click the Route Stage. The configuration panel opens. Select the Routing Rules tab.
In this Routing stage – if you had multiple Target systems – you could configure Routing Rules, where based on the content of your inbound message, you could determine which Target system(s) to send the data to. In this case, you only have one Target to send the data to, so the All Targets Routing Module is sufficient and we will leave that set as is.
Next, click the Transaction Monitoring tab.
You can also configure Transaction Monitoring here, which allows you to determine how you want to be proactively notified if something were to go wrong during the execution of this transaction in the runtime environment. However, for the purposes of this demonstration, you won’t need a Transaction Monitor.
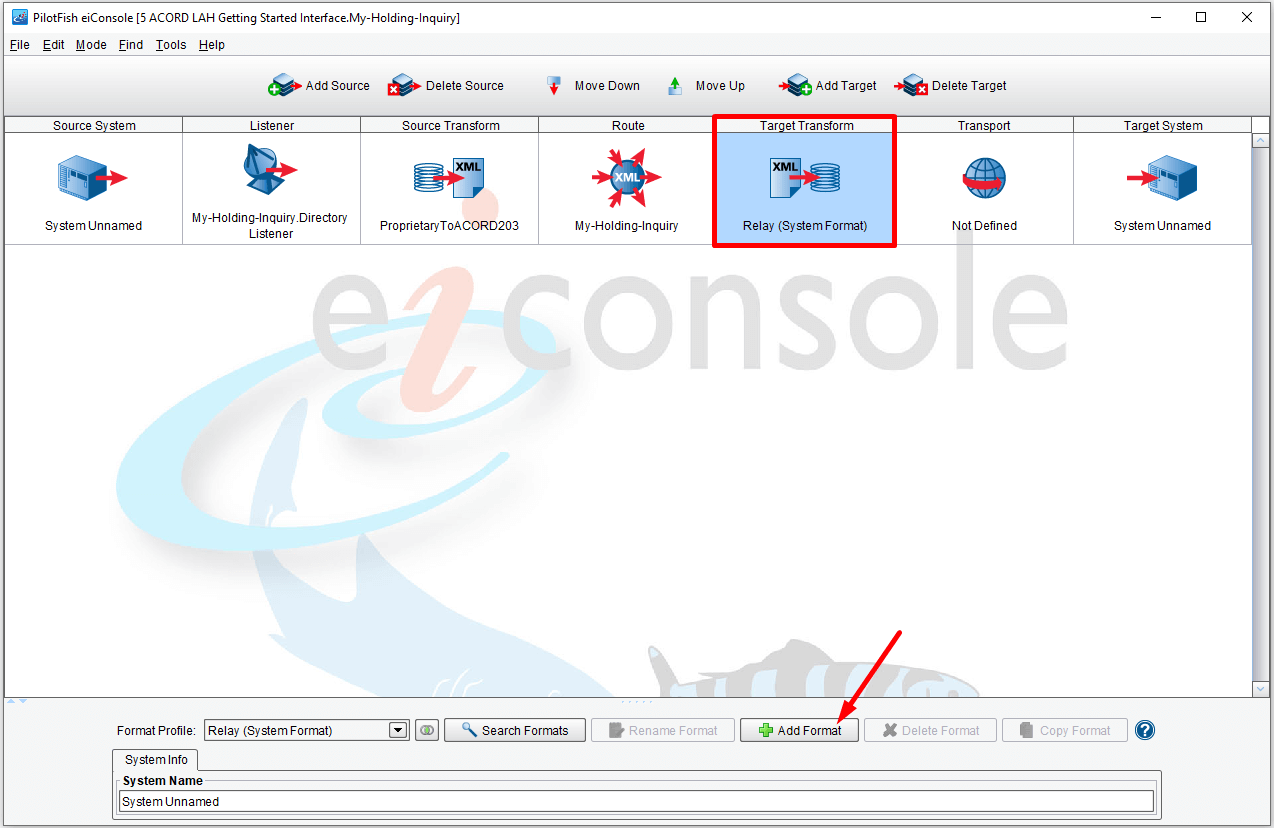
Next, click on the Target Transform stage. If your Target system were to require something different than your interpretation of the ACORD 203 – for instance, a different version, interpretation or data format entirely, you would need to do additional transformation work here. In this case, you’ll just relay the translation along as is.
Click the Add Format button.
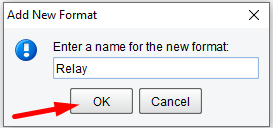
When the Add New Format dialogue opens, enter “Relay” and then click OK.
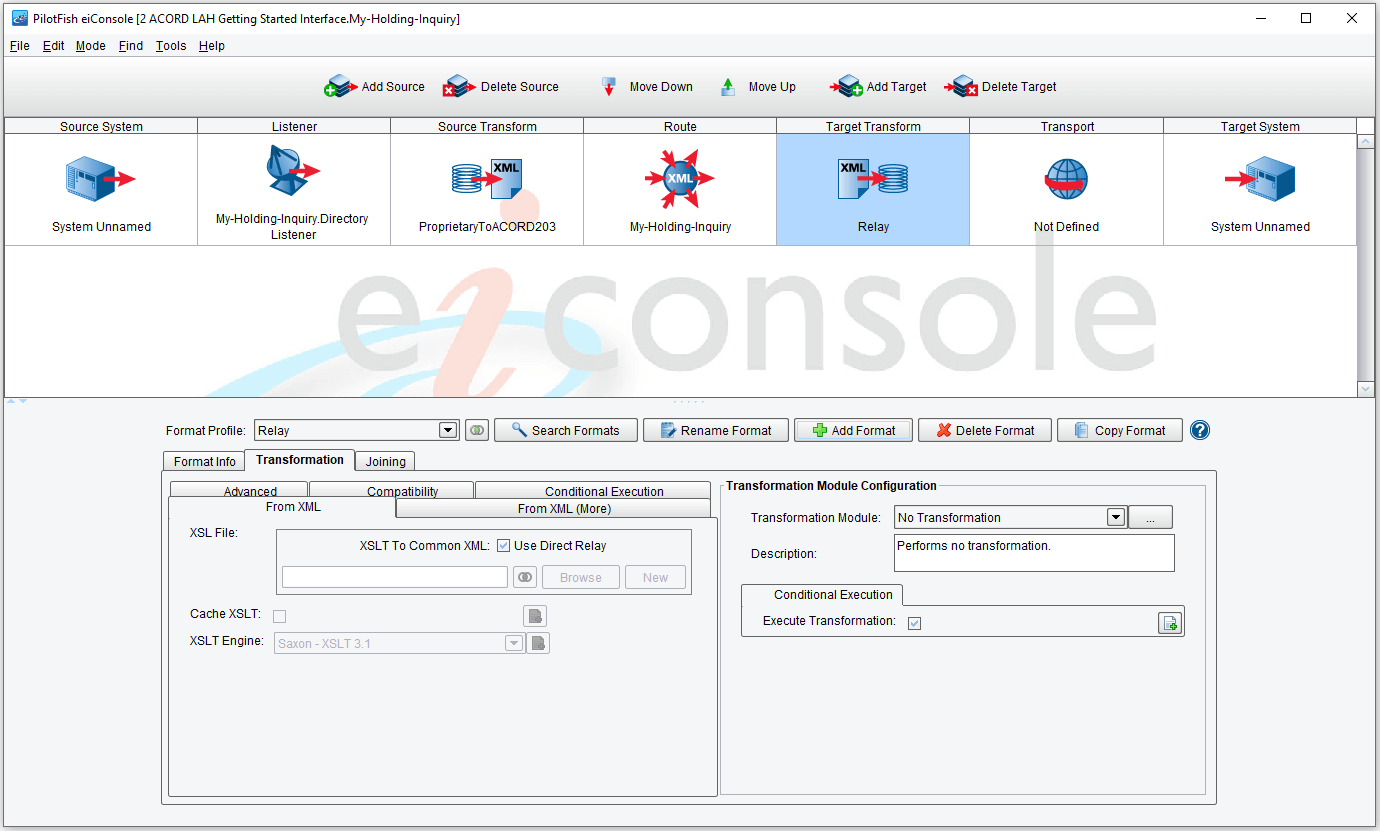
The XSLT Configuration panel will have the Use Direct Relay checkbox checked and the Transformation Module will be set to the default No Transformation. We will leave these settings as is.
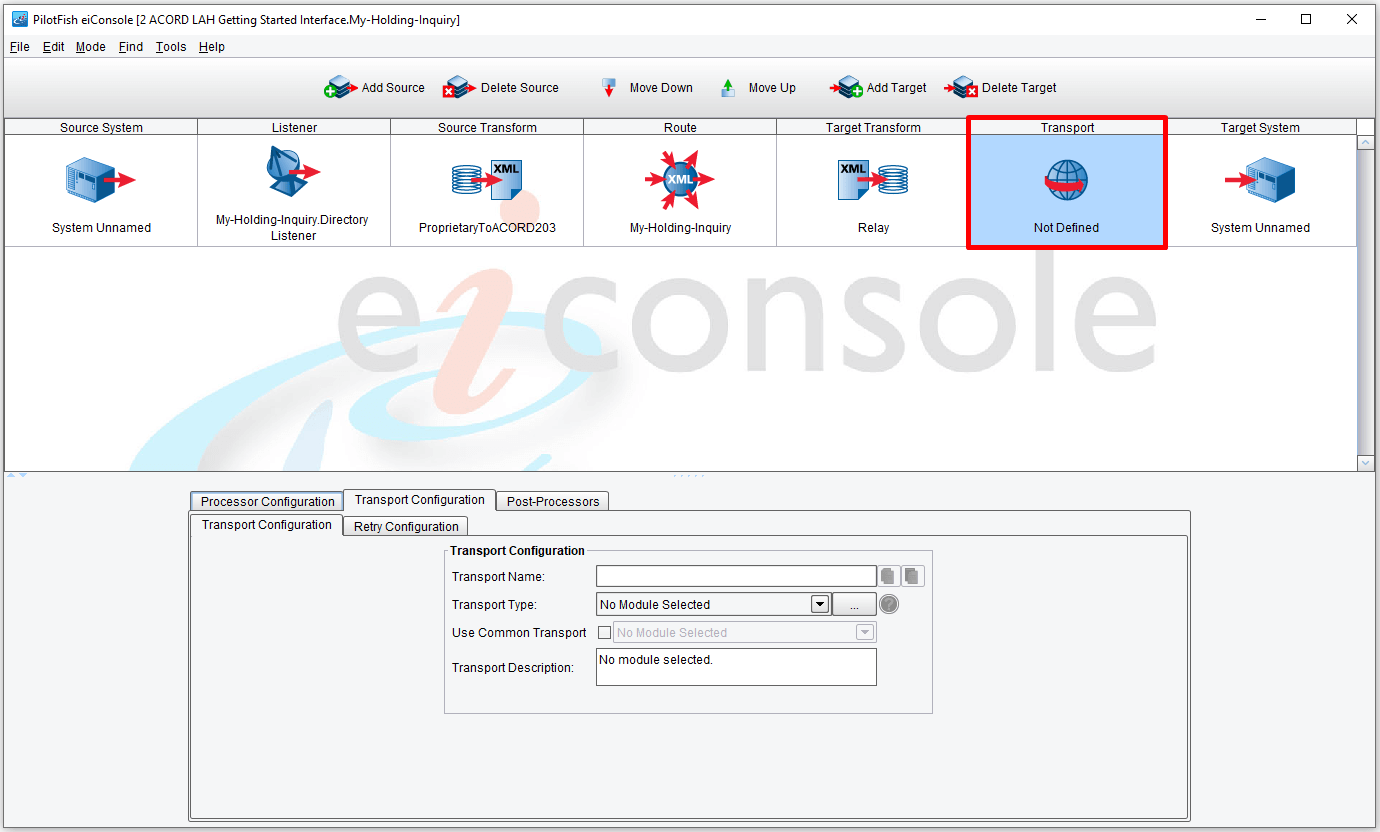
Now, click the Transport stage. The Transport has a Processor Configuration much like the Listener. If you needed to do any post-processing with the data stream you would do so here.
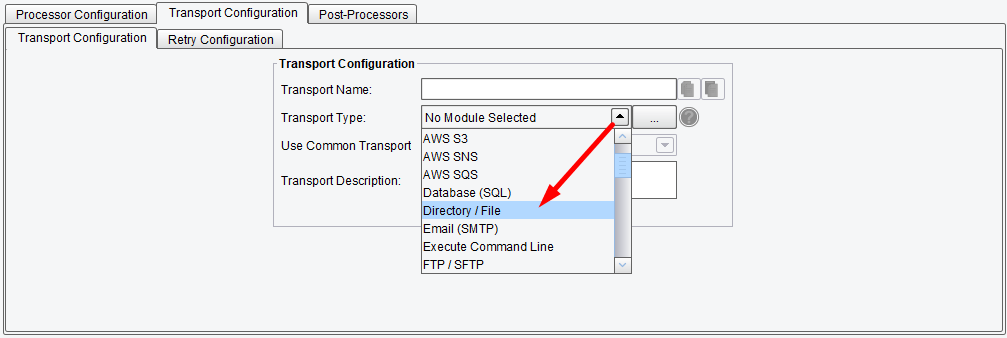
However, all you’ll do is configure a Transport to drop your generated files off in a directory. Click the Transport Type drop-down and select Directory / File.
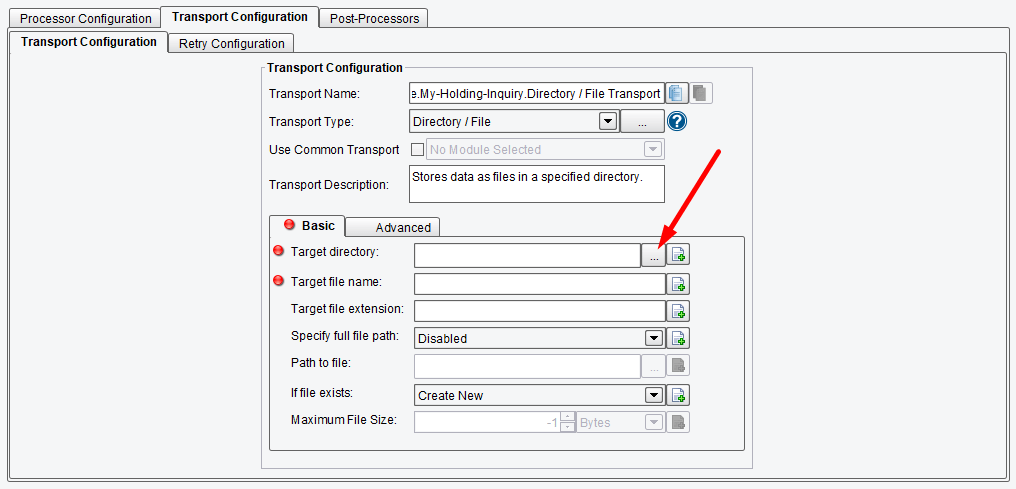
Once again – when the configuration panel opens, the red dots indicate the areas that need configuration. Click the Ellipsis button next to the Target directory.
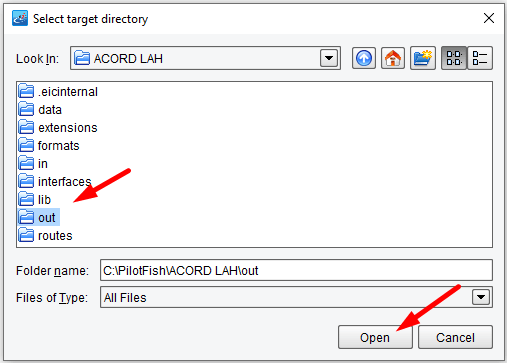
Select the out folder that you created earlier in the tutorial (within the ../ACORD LAH/ folder). Click Open.
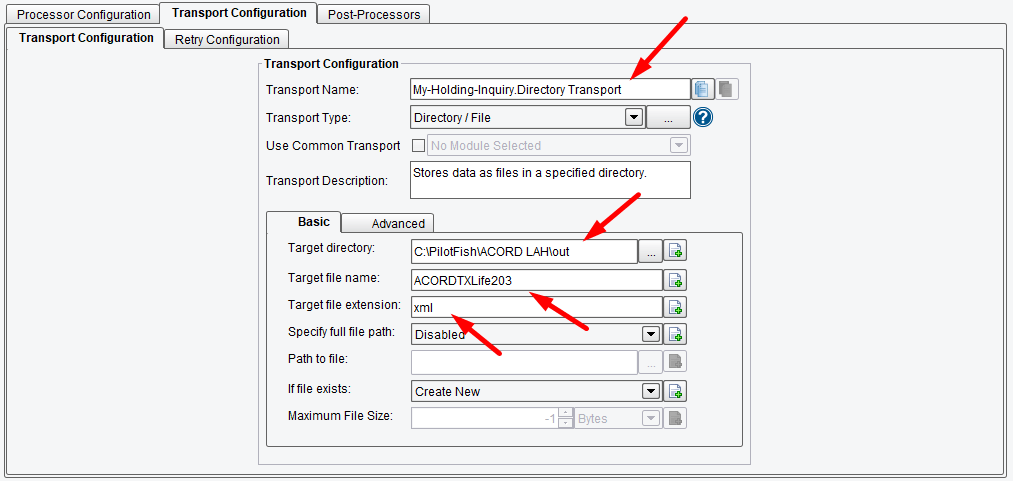
Your out folder is now set for the Target Directory. In the Target file name configuration area, enter the name “ACORDTXLife203”. In the Target file extension area, enter the extension “xml”. This will ensure that you get a unique file starting with ACORDTXLife203 with an XML extension. If you have more than one file with the same name, a sequence number will be added to the Target file name before the extension. Also, change the Transport Name to My-Holding-Inquiry.Directory Transport.
You’ve now completed the topology and the transformation for your sample route. The only things left to do are to add some Meta Data and test the interface.
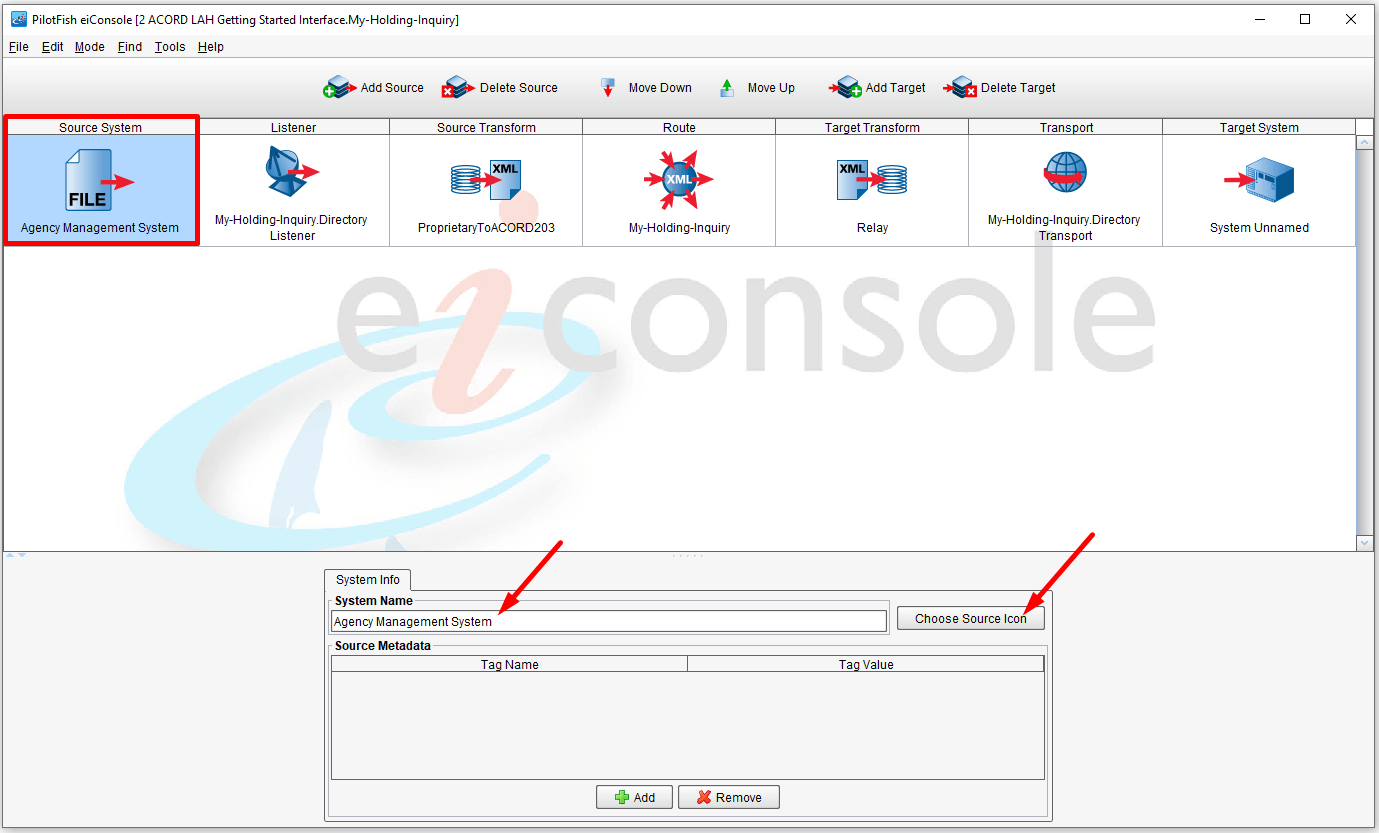
Click the Source stage. Give the Source System a more meaningful name. In the System Name text box, enter “Agency Management System” and set an icon with the Choose Source Icon function.
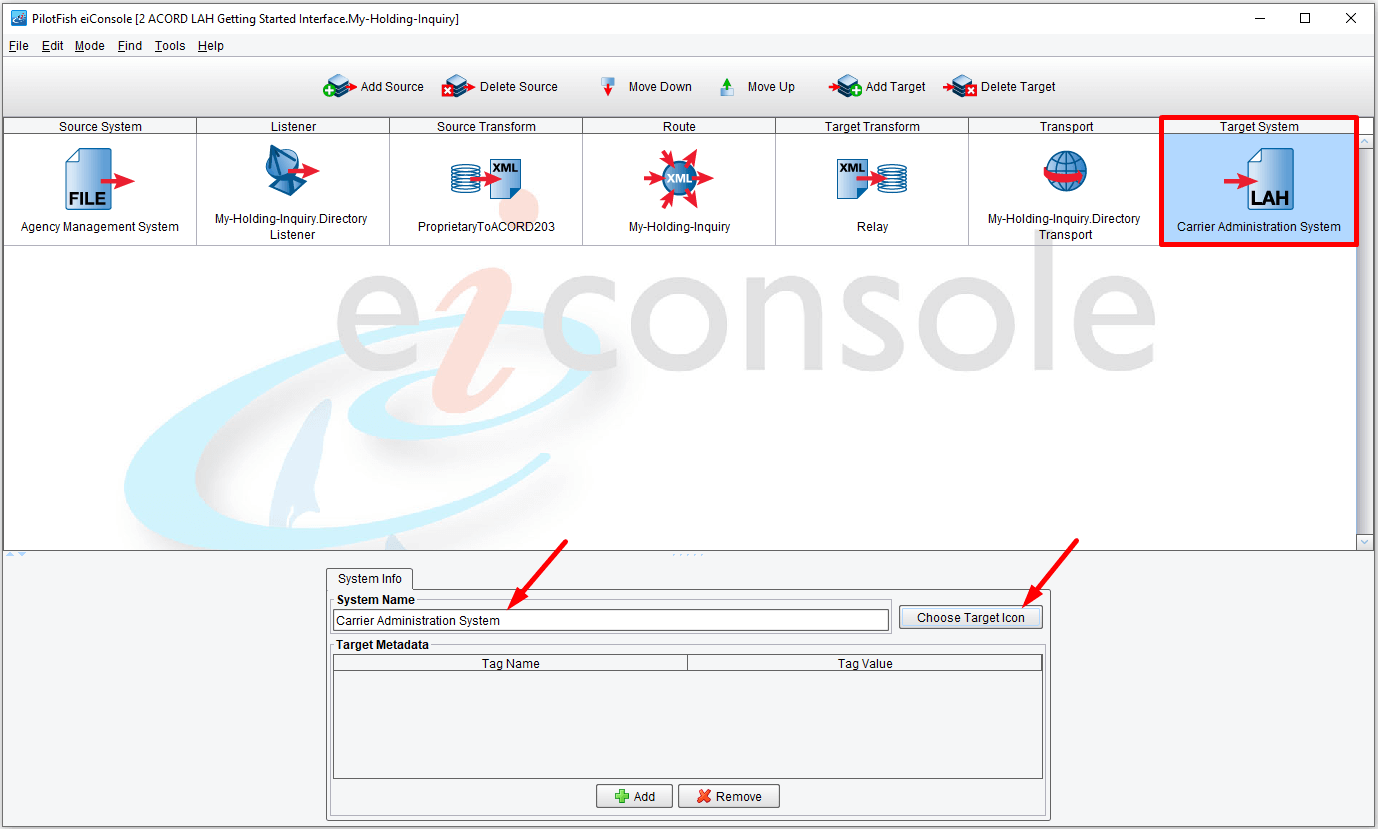
Now, click the Target System. In the System Name configuration area, enter “Carrier Administration System” and select an icon with the Choose Target Icon function.
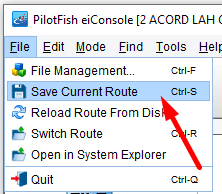
We have now completed an end-to-end ACORD interface. Now we just need to test it. Under the File menu, select Save Current Route.
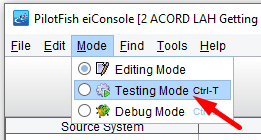
Now we’ll move on to the eiConsole’s inline testing mode. Under the Mode menu, select Testing Mode.
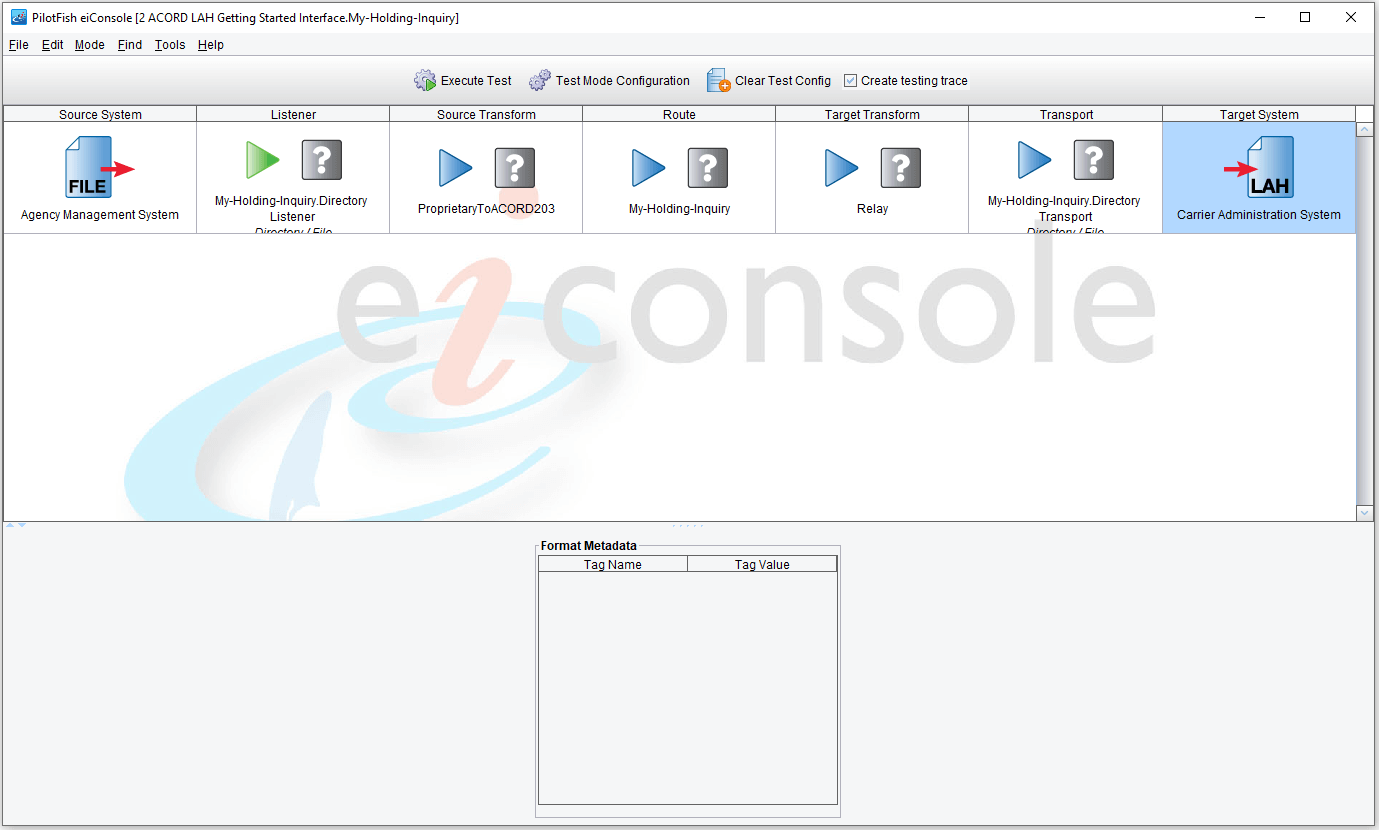
The eiConsole’s Testing grid opens. Testing mode in the eiConsole allows you to test the combination of any set of stages that you’d like. When you enter the test mode, the icons between the Source System and Target System drop away and are replaced by question marks which indicate a stage of the test that you may/may not choose to run. Let’s begin our test.
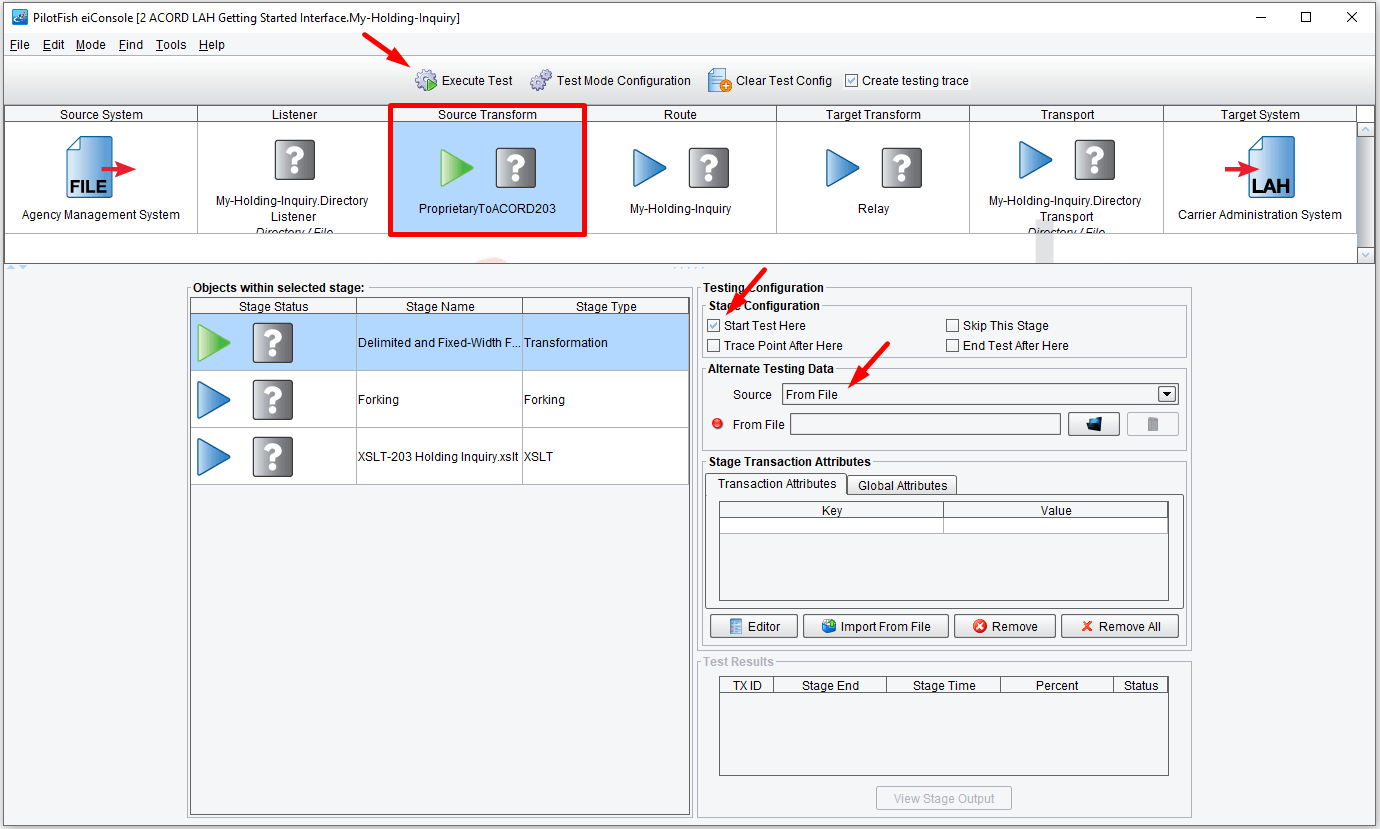
Click the Source Transform stage and then in the Stage Configuration area, check Start Test Here. This means that you’ll start your test with the first stage of the Source Transform rather than beginning with the Listener. The green arrow indicates the stage where you’ll start, with the blue arrows indicating the stages that you will choose to run.
Then click the Execute Test button.
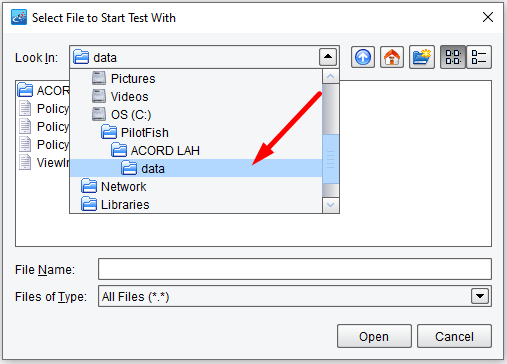
The Select File to Test With window opens and prompts you for a sample file. Navigate to the ../ACORD LAH/data folder.
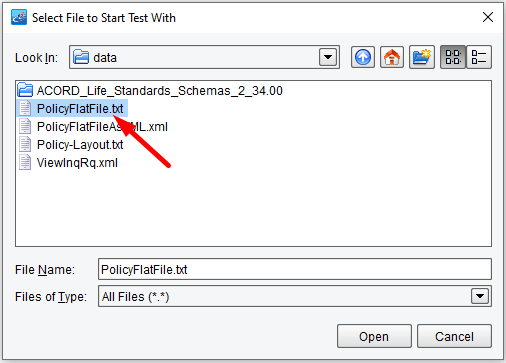
Select PolicyFlatFile.txt and click Open.
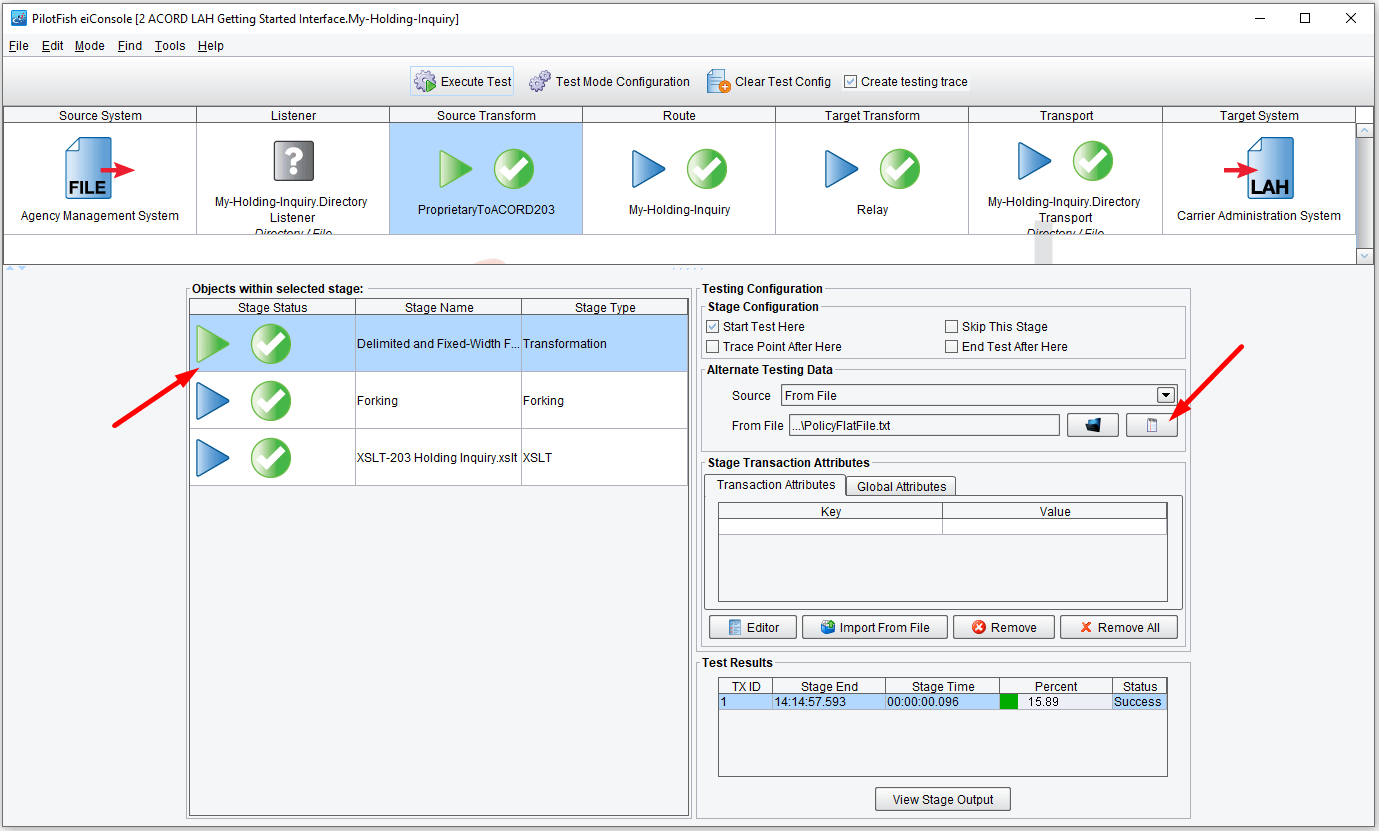
As each stage is completed, the question mark will turn into a checkmark if the stage succeeds. If there were a failure, you would see a red X. You can now look at the data as it appeared at each stage in the process. Click the View File Contents button in the Testing Configuration panel.

Here you’ll see the sample file that you selected. Click the X to close that window.
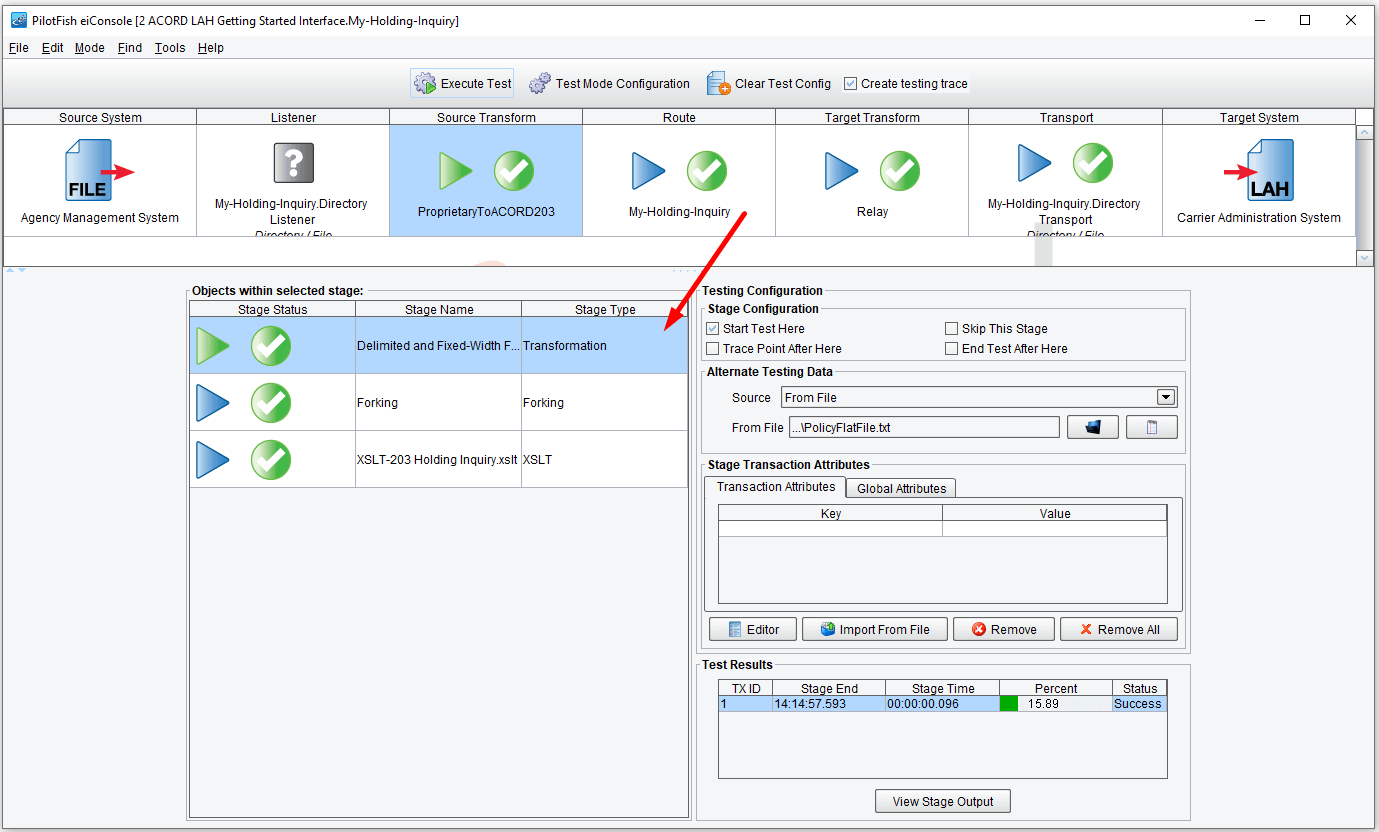
Now, double-click the Delimited and Fixed-Width File Transformation Stage in the Objects within the selected stage table.
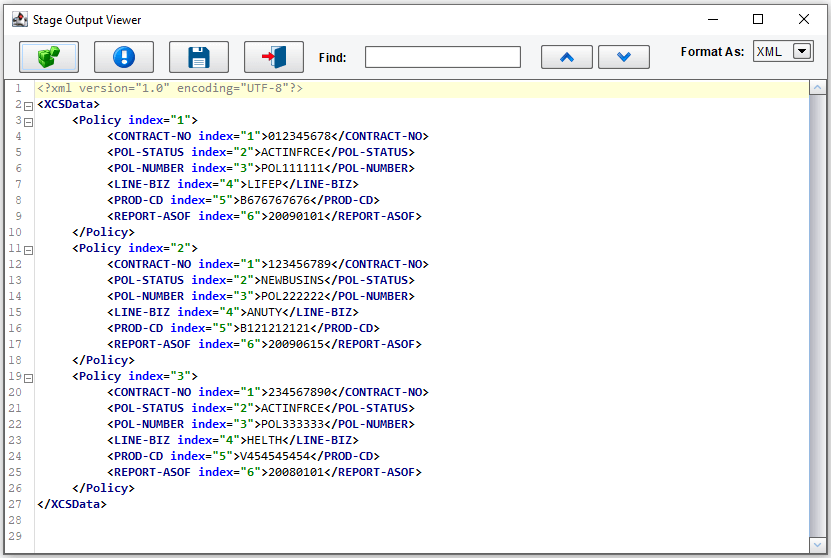
This demonstrates the XML (choose the XML format in the drop-down menu) generated by the File Specification engine as that data was parsed and converted into XML. Click the X to close.
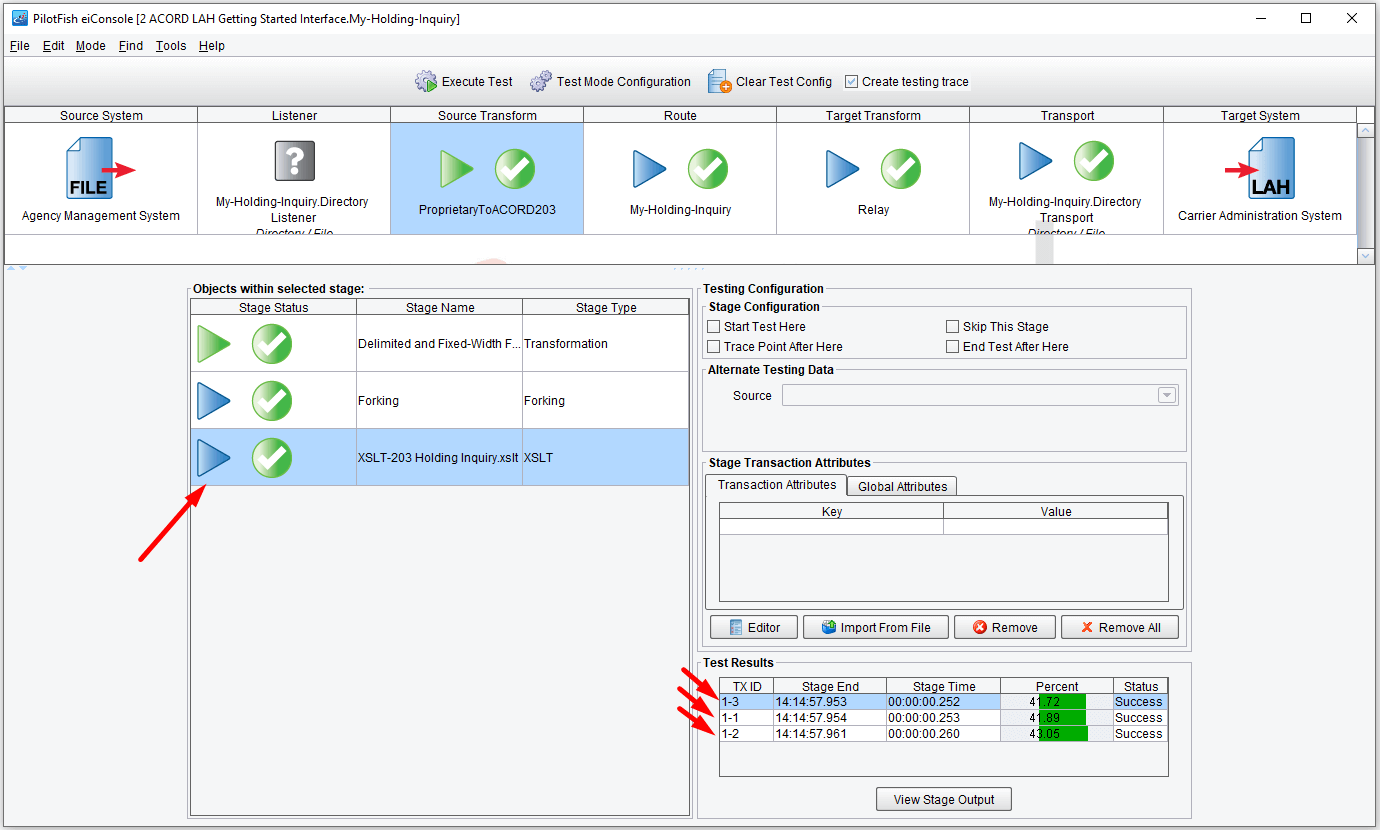
Next, select the XSLT item in that same table (under Stage Name). You’ll see now, that rather than one transaction in the Test Results, you have three.
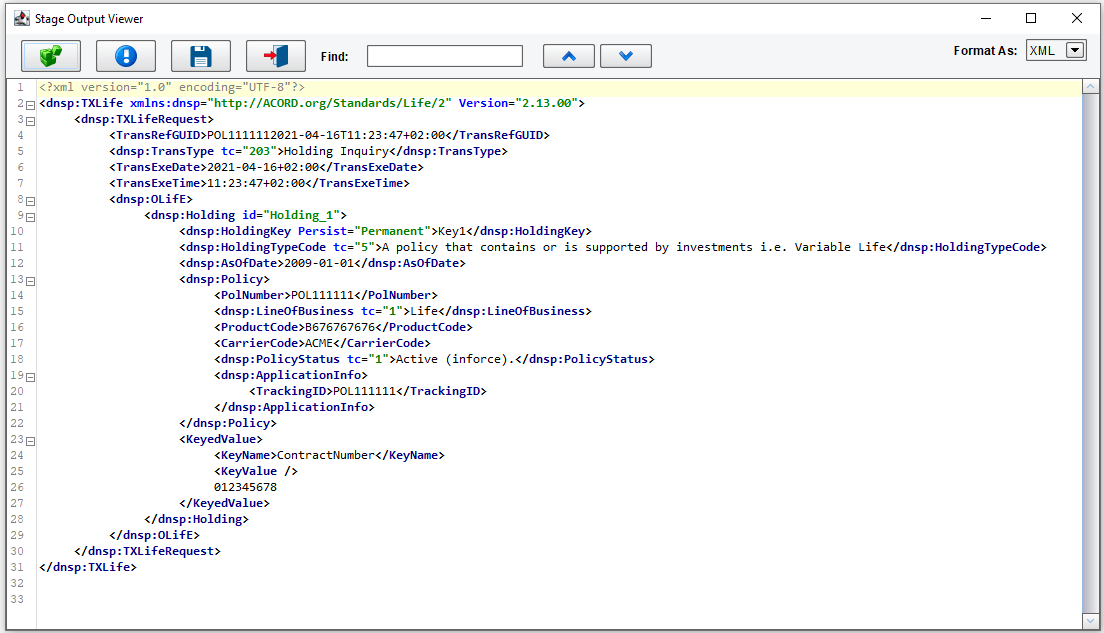
This is because you forked that single transaction by the policy tag into these three discrete pieces. Those three discrete pieces were then executed against the transformation and turned into three individual ACORD TXLife 203 transactions. Double-clicking each row in the Test Results grid will show you each of the generated transactions.
Here are the results from double-clicking the first row. Close it.
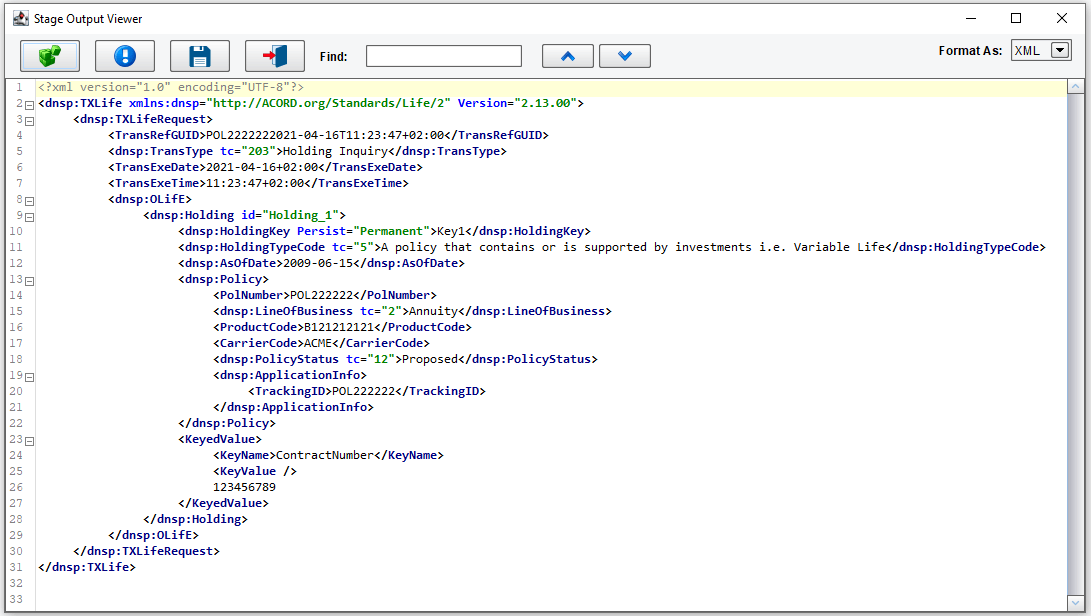
Here are the results from double-clicking the second row. Close it.
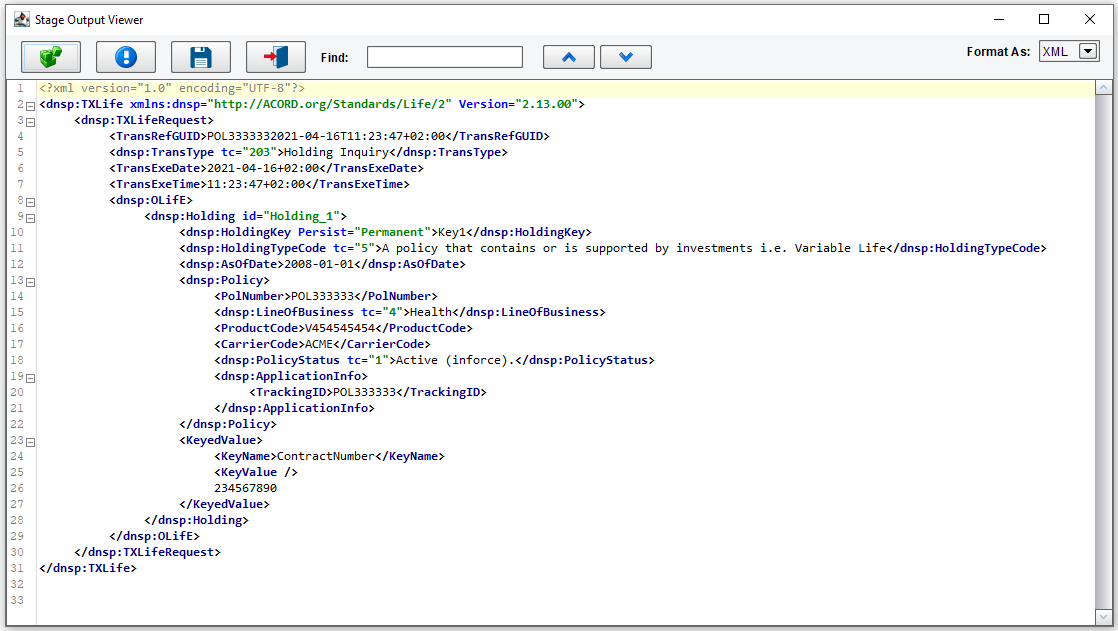
Here are the results from double-clicking the third row. Files were then simply routed along and dropped in the directory. Close it.
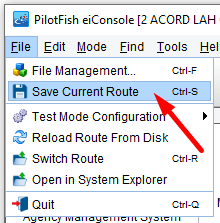
To save your work under the File menu, choose Save Current Route.
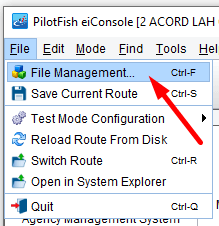
Return to the File Management screen by choosing File from the menu and then File Management.

When the Route File Management window opens, your My Holding Inquiry interface will now have a blue icon – a completed interface.
Typically, if you wanted to deploy this interface into production, you’d copy the configuration files to the server.
With that, you’ve completed your first ACORD TXLife interface using the eiConsole for ACORD LAH. To extend your skills, return to the Tutorial and use the other resources for more advanced integration topics. Or, contact us at support@pilotfishtechnology.com for some customized training.


