PilotFish eiPlatform Regression System
Table of Contents
- Introduction
- eiPlatform Version Requirements
- Basic Overview
- eiDashboard
- Initial Setup
- Using the System
- External Modules Explained
- Masking Differences
- Overriding a Pass/Fail
- Deleting Tests
- Additional Files
- Configuring the Regression System
- Including & Excluding Routes
- Additional Export/Import Features
- Regression System Errors
- Replay Mocking Explained
Introduction
The PilotFish eiPlatform engine is a powerful, highly configurable tool for building integration Interfaces. Newer releases of the eiPlatform come full of new features, support for newer standards, and other improvements that would provide substantial benefits to clients. However, any upgrade requires regression testing all existing configurations to make sure that the upgrade doesn’t introduce any new challenges for the client.
To assist with this process, PilotFish now provides an automated Regression System. The purpose of this system is to compare the behavior of Routes on both the older and newer platforms, and either provide assurance that everything is working or identify areas that will need to be adjusted. Tests are performed in an almost entirely automated fashion, requiring only a small amount of manual intervention from the user. Using this system, the regression testing for an upgrade of the eiPlatform can be done in a fraction of the time, substantially reducing the effort of deploying a new eiPlatform.
eiPlatform Version Requirements
The eiPlatform Regression System is included with the 18R2 release of the PilotFish product and is compatible to be backported to the 18R1 release. Earlier versions will not be compatible with the software and cannot be used with it.
If there is an interest in using the eiPlatform Regression System on an older version of the PilotFish product, please contact a representative of PilotFish to discuss options for working out any compatibility mode options.
Basic Overview
If new to the eiPlatform Regression System, this is an extremely important section. It will cover at a very high level all of the main concepts a user will need to be aware of to work with this system.
- Core Concept
- Capture, Replay, & Analysis
Because Capture runs exclusively on the older eiPlatform, this application is frequently referred to as the Capture eiPlatform, or Capture-EIP, in this guide.
Replay runs exclusively on the newer eiPlatform. It injects the data Capture has provided from the older eiPlatform into the routes and records how they are behaving. The outcome of Replay is stored alongside the outcome from Capture.
Because Replay runs exclusively on the newer eiPlatform, this application is frequently referred to as the Replay eiPlatform, or Replay-EIP, in this guide.
Analysis runs behind the scenes on the Replay-EIP, and in many ways is a sub-function of Replay. It takes the results of the Capture-EIP and the Replay-EIP and compares them to each other. Analysis will assign a simple pass/fail rating to each test, and if the test fails it will provide a detailed breakdown of WHY it failed.
Analysis requires very little manual interaction from the user. It is never directly activated on its own, and will simply run automatically when tests have finished going through Replay.
Limitations
Other “External” Modules are also excluded from the Regression System, but not entirely. An “external” module is one that connects to or manipulates something outside of the eiPlatform, such as the File Operation Processor. These are not tested by default, however, they can be selectively re-enabled within the Regression System configuration. It is recommended to first run tests with them all disabled, and then re-enable them to see if they have any impact. There is a full section on working with these external modules later in this guide.
Route Names should NOT be changed between the older and newer eiPlatforms. The Regression System is designed to compare the behavior of identical Routes across two separate eiPlatforms, so making changes to the Route name prevents it from easily identifying which ones match up.
Controlling and Monitoring
The eiPlatform REST API can also be used instead of the eiDashboard. This requires an in-depth knowledge of REST, HTTP, and JSON.
This guide will focus on using the eiDashboard to control the system.
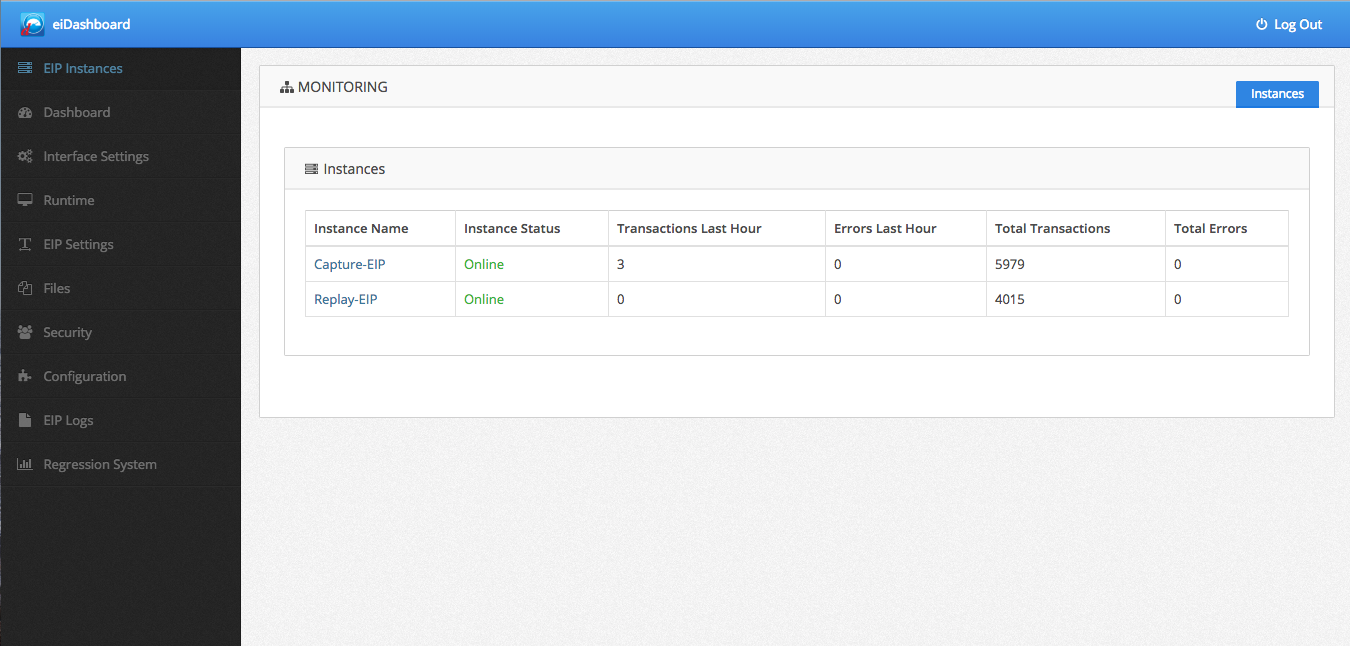
eiDashboard
The eiDashboard is a powerful reporting and monitoring tool sold separately from the eiPlatform. The user Interface for the Regression System is built into the eiDashboard, and the easiest way to work with it is through this application.
The eiDashboard can be used to make a direct connection to a single eiPlatform, or it can be used in “Enterprise Mode” to connect to multiple eiPlatforms. It is recommended, but not required, to use Enterprise Mode with the eiPlatform Regression System. Since it involves testing multiple eiPlatforms, being able to easily connect to multiple eiPlatforms through the eiDashboard provides the maximum ease of use when working with this system.
Please consult additional documentation on the eiDashboard to learn more about how to set it up. This guide will assume that the eiDashboard has already been set up and is able to be used with both eiPlatforms.
Initial Setup
Very little is needed to set up the eiPlatform Regression System, as it is designed to simply work out-of-the-box. However, due to the powerful nature of the system, it is disabled by default in the eiPlatform. Therefore, the only piece of setup that needs to be done is changing the system settings to enable it.
Please keep in mind that these settings do NOT start the Regression System, they simply allow it to be turned on whenever it is needed.
eiPlatform Settings
All settings for the eiPlatform can be found in the eipServer.conf file. There are three settings that can be added to this file that affect the Regression System. Please remember that the eiPlatform will need to be restarted after changing these settings.
com.pilotfish.eip.regression.useRegression is used to enable or disable the entire system. Once set to “true”, it will be possible to activate and deactivate the Regression System while the eiPlatform is running.
com.pilotfish.eip.regression.allowReplay is used to enable or disable the Replay functionality. Because of how powerful the Replay features are, it is necessary to explicitly set this to “true”. This should only be enabled on the Replay-EIP, and only for the duration of using the Regression System.
com.pilotfish.eip.SkipEmptyStages this must be disabled during regression. The value should bet explicitly set to “false”.
As always, system environment variables can be assigned for these settings and accessed using OGNL expressions.
NOTE: If these settings aren’t enabled, the Regression UI in the eiDashboard will display error messages informing the user that the system cannot be run.
Using the System
The following is a guide to walk users through how to use the Regression System.
The Regression UI
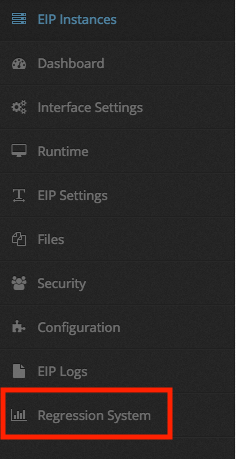
On the sidebar of the eiDashboard is an option for Regression System. By selecting this option, the Regression System UI will appear.
Starting Capture
Capture is run on the Capture-EIP, also known as the older eiPlatform or the one being upgraded from.
Once this option is selected, the main Regression UI will be displayed. The Regression UI is divided up into five sections, each for a specific feature of the system: Regression Tests, Configuration, Routes to Test, External Modules, and Export/Import. The initial page, and the one that will be most often used, is the first one, Regression Tests. That is what will be visible now.
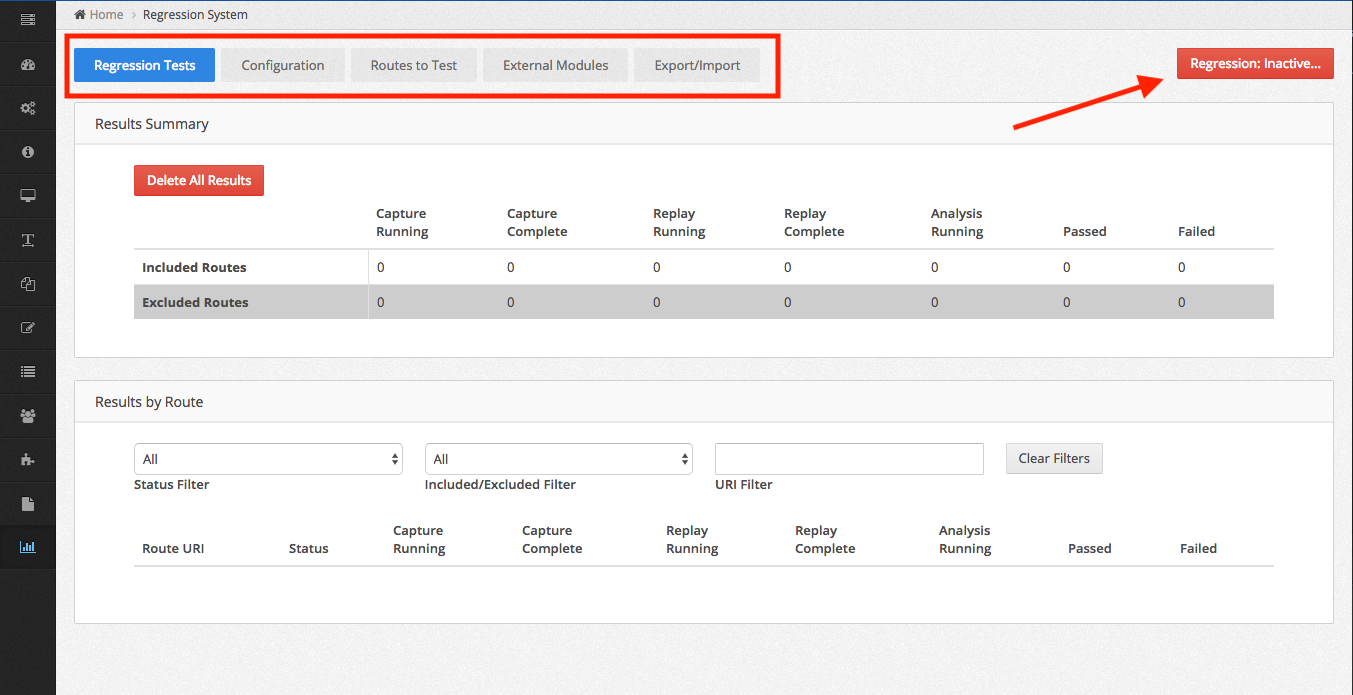
The purpose of this page is to display the results of the tests, as well as several important actions for working with the system. At the moment, no tests have been run, so the results tables are empty.
In the top right corner of the page, there is a bright red button that says “Regression: Inactive…”. This controls the activation of the Regression System and is present on all Regression UI pages. Clicking it will open the Regression System Activation dialog.

In addition to displaying whether or not the system is currently active, this dialog has two main buttons: “Activate Capture” and “Activate Replay”. These buttons will activate their respective modes. To begin Capture, click “Activate Capture” now.
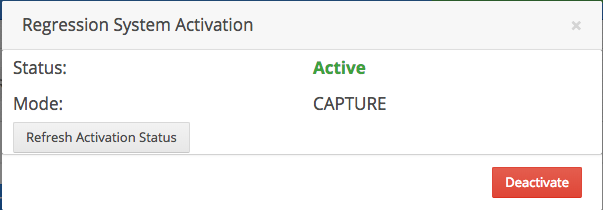
The dialog should change after that click. The Status should now be “Active”, and the Mode should be “Capture”. The activation buttons at the bottom are now gone, replaced by a “Deactivate” button, which will turn the system back off when it is no longer needed. The dialog is not the only thing that has changed, so close it and observe the main page.
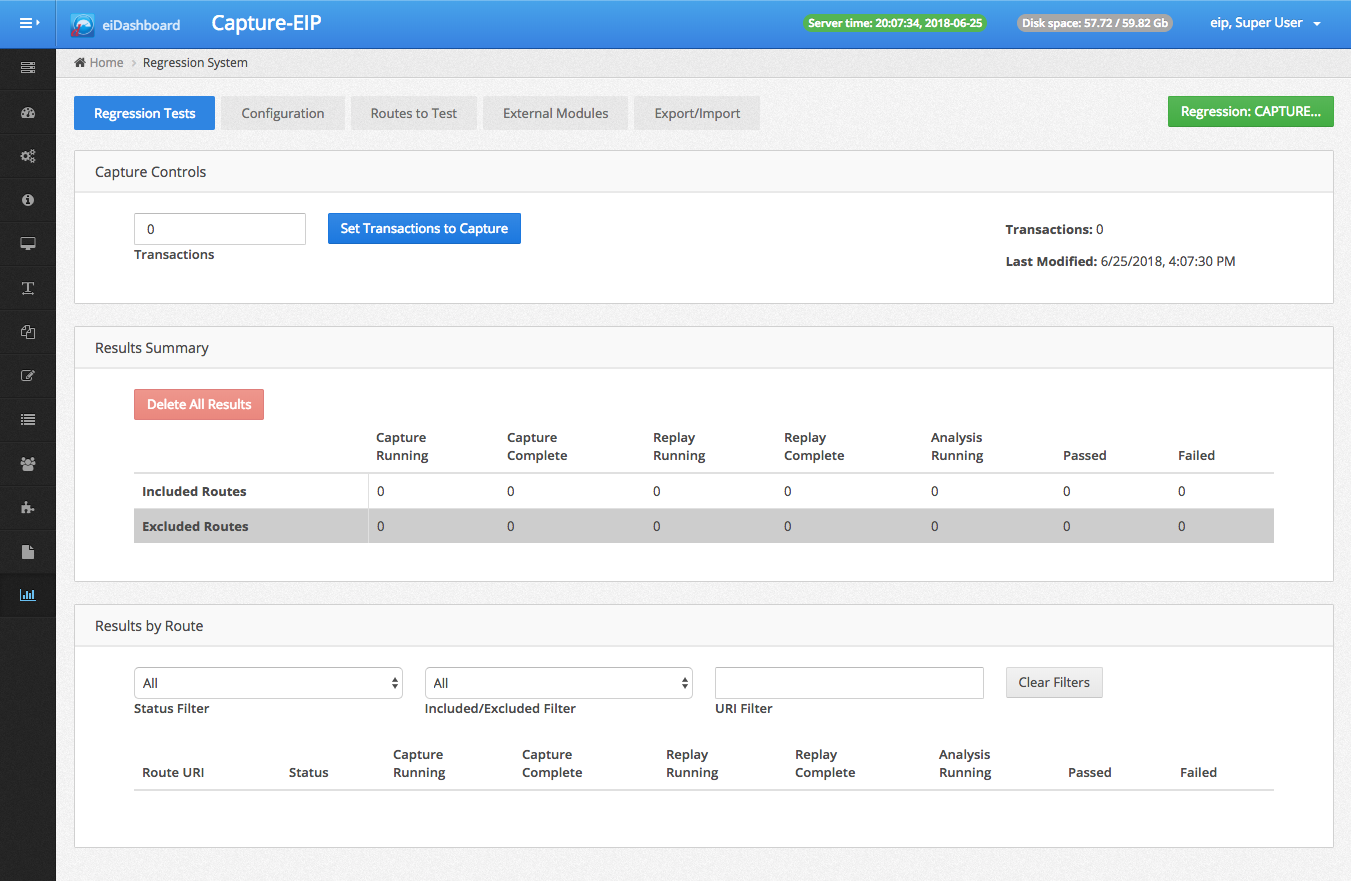
On the Regression Tests page, that button in the top right should now be green and indicate that Regression is running in Capture mode. Below it is a brand new panel, “Capture Controls”, that wasn’t present before. This is how Capture will be controlled.
Capturing Transactions
Just activating Capture isn’t enough to start capturing transactions. The next step is specifying how many transactions to capture. Please keep in mind that this will NOT be a global number, instead, it will be assigned on a per route basis. Once a number of transactions to capture is set, that number of transactions will start being captured immediately.
Setting the transactions to capture is a simple task. In the screenshot above, a new “Capture Controls” panel appeared when the Regression System was activated. Simply enter the number of transactions to be captured in the input field, and click the “Set Transactions to Capture” button.
Please note that transactions will only be captured as quickly as they are already running. For example, if a given Listener only starts a transaction once every 5 minutes, that is how fast transactions will be captured for that route. Capture only records the existing activity taking place in the eiPlatform, it doesn’t have any impact on that activity.
NOTE: For routes that see limited or sporadic transactions under normal circumstances, it may be necessary to force additional transactions to run. How this is done will vary based on how the routes are configured.
What Capture Does
As the name suggests, Capture “captures” transactions. The inputs and outputs of a transaction passing through a route are recorded, along with a lot of metadata about how it performed. Each transaction that is captured is considered to be a new “test”, since it will ultimately be run on the Replay-EIP and compared to the Replay outcome.
This Capture data provides a detailed snapshot of exactly how the older eiPlatform is behaving, which is the foundation for the comparison to the newer eiPlatform once Replay begins.
Capture Results
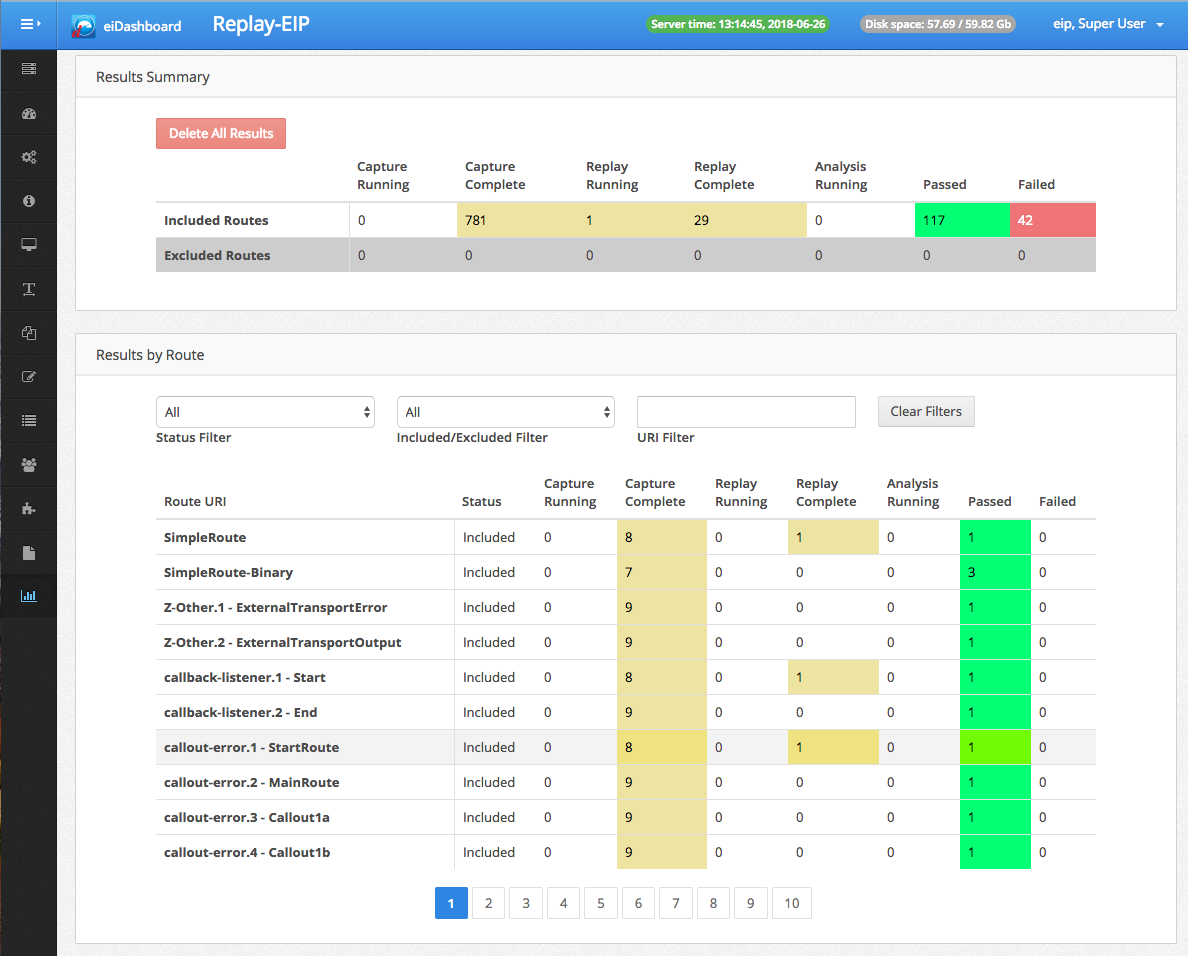
As transactions are captured, the results tables on the Regression Tests page will automatically start showing the test results. This page is designed to automatically refresh the results every few seconds, manually refreshing the page is not required.
The results seen here are divided into two separate tables.
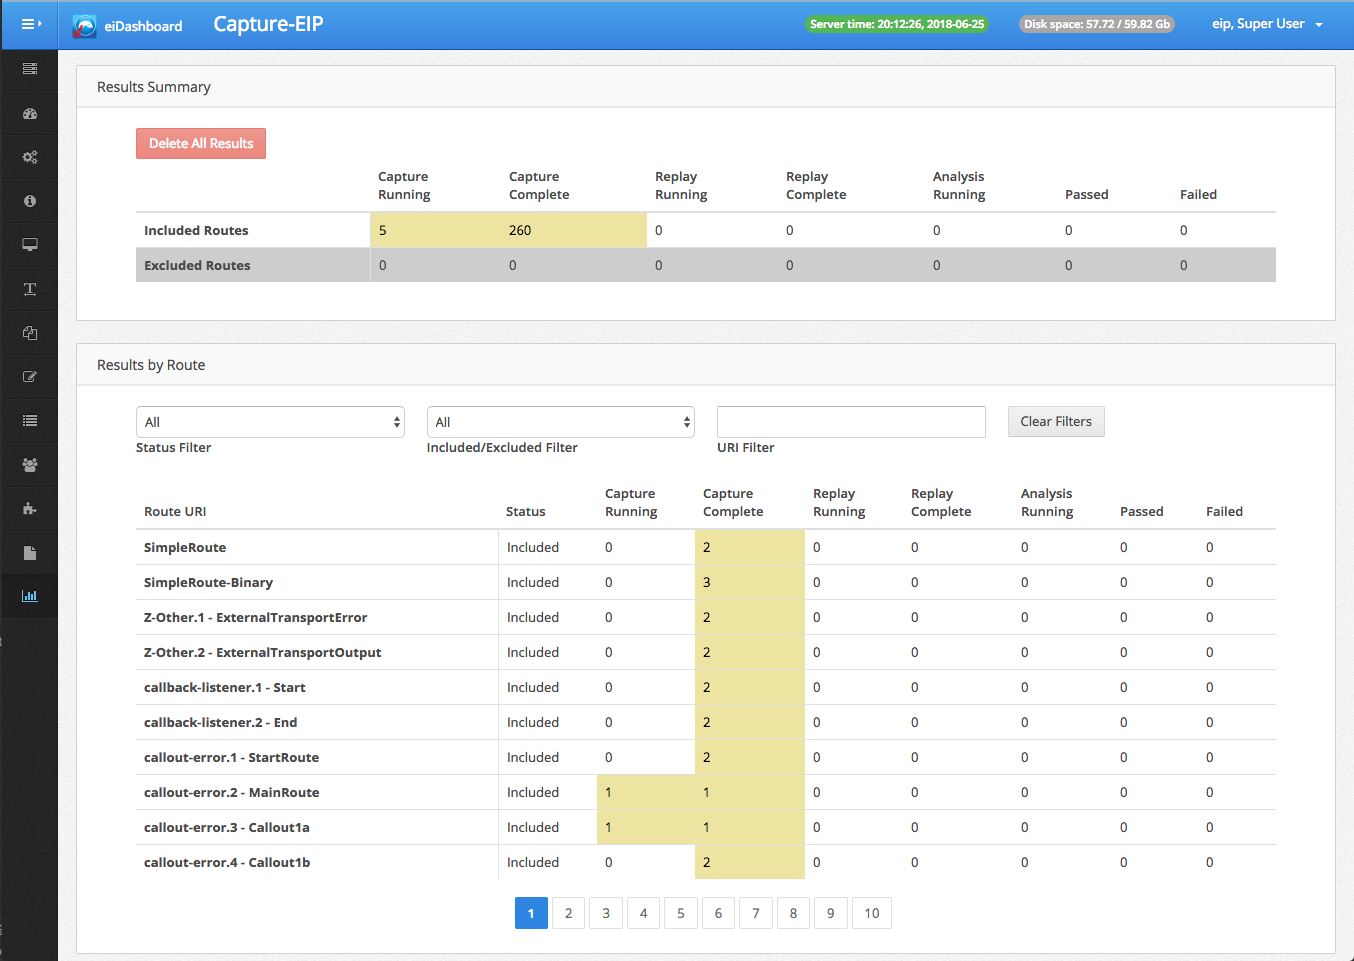
The Results Summary is a top-level summary of all activity. It gives a grand total of all tests that are either currently in the middle of or finished with capture, across all routes. These numbers are split between “Included Routes” and “Excluded Routes”. The ability to restrict tests to specific routes will be covered in a later section.
The Results by Route table gives the same summary of all tests that are either currently in the middle of or finished with capture, broken down by route. This provides a nice summary of the activity that each individual route is seeing.
Both tables show numbers in the same cells all the way across. These give a count of the number of tests that are currently in a particular state:
Capture Running tests are currently in the middle of being captured.
Capture Complete tests have completed being captured, but have not yet been replayed.
Above the table, there are filters for the test status (ie, Capture Complete), if the route is included/excluded, and for specific Route URIs. These filters provide quick and easy navigation to the exact route whose test results need to be reviewed.
Below the table, a pagination control allows for cycling through long lists of routes for large working directories.
Exporting Data
Once enough transactions have been captured, it’s time for Replay. However, there is a simple step that must be done before the tests can be replayed: they must be moved to the Replay-EIP. This can be accomplished through a simple, one-click export process.
To prepare for the export process, go to the top of the Regression Tests page and click the “Export/Import” button. This will load the Export/Import page.
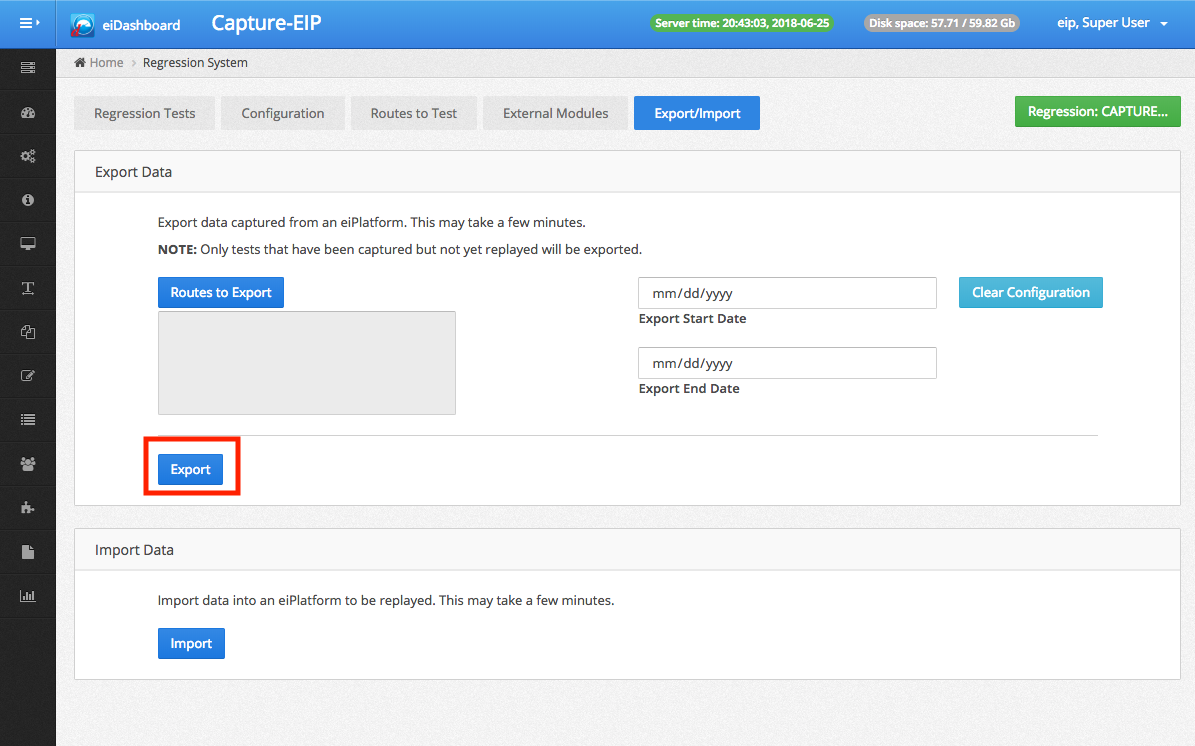
On this page, there are two panels: “Export Data” and “Import Data”. Each will be necessary to move the data from the Capture-EIP to the Replay-EIP. Export is used to take the Capture data out of the Capture-EIP and wrap it in a simple archive so it can be moved to the Replay system. Import takes that archive and loads it into the Replay-EIP so that the tests can be run through Replay.
Performing the export is as simple as clicking on the Export button in the Export Data panel. This will immediately begin the export process, and a progress bar should appear on the screen.
Once the export is complete, a download file dialog will appear, giving the ability to download the .eipreg archive directly to the current machine.
NOTE: The more tests that are being exported, the longer the export process will take. Also, if the eiDashboard is running on a separate machine from the Capture-EIP, network latency might also affect the duration of the process. Because of this, it is recommended to use the available filters to reduce the number of tests being exported. A detailed breakdown of the export filters will be provided in a later section.
Importing Data
Once the data has been exported, it’s time to transfer it to Replay-EIP. This process is as simple as the export one.
First, switch to the Replay-EIP in the eiDashboard. If using the eiDashboard in Enterprise Mode, this is as simple as going to the EIP Instances page and choosing the other eiPlatform. If not running the eiDashboard in Enterprise Mode, take whatever steps are necessary to have the eiDashboard connected to the Replay-EIP.
Once in the Replay-EIP, select the Regression System again from the sidebar, and then go back to the Export/Import page from earlier. The page that comes up should be the same as it was before, other than the eiPlatform name in the title bar.

This time, though, click the “Import” button, which will start the import process. A file chooser dialog will appear on the screen, use it to select the .eipreg file that was downloaded by the export process. Once it is selected, the import will begin, and a progress bar will appear.
Once the import is complete, the progress bar will go away. Upon returning to the Regression Tests page, all of the tests from the Capture-EIP should now appear in the results tables.
Starting Replay
Back on the Regression Tests page, it’s now time to start Replay. Starting Replay is, in most ways, as simple as starting Capture. Simply click on the “Regression” button in the top right corner of the screen to open the Regression Activation Dialog.
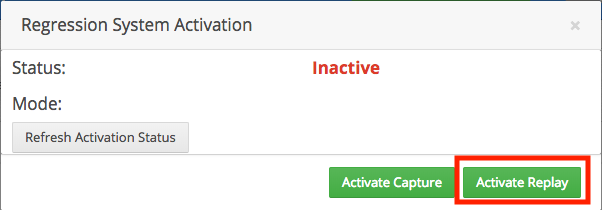
This time, click the “Activate Replay” button. This will start the Replay process. However, before Replay begins, there will be one fine prompt to respond to:
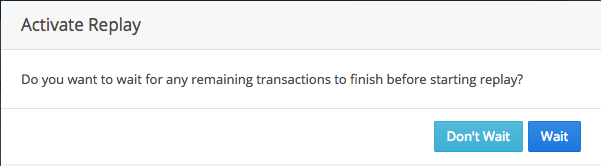
Because Replay hijacks the normal behavior of the eiPlatform, “normal” transactions can no longer process while Replay is active. Because of this, there are two different ways to activate Replay:
Wait for all existing transactions to finish. All listeners will be stopped, so no new transactions can begin, but Replay itself will wait until all remaining transactions are finished before fully turning on. This is recommended if there is concern about the state of the currently flowing transactions.
Don’t Wait for transactions to finish. This will both stop all listeners and terminate all ongoing transactions so that Replay can be started immediately. If the current transactions in the eiPlatform are not of concern (such as on a test instance), then this should be used to quickly get to Replay. Please be aware, however, that there will likely be some error messages in the logs from the transactions being terminated.
Regardless of which option is chosen, Replay will ultimately startup after this, and begin processing the Capture tests.
What Replay Does
The goal of Replay is to do a controlled re-run of each test through its Route, producing a new output that can be compared to the original to check for differences. To this end, the moment it is turned on Replay begins running the Capture tests on the new eiPlatform. This is done a few at a time to avoid overwhelming the system. (Configuration options to change the rate at which Replay runs tests will be covered in a later section)
Replay takes the input data and attributes from the Capture test and injects it back into the Route. It then records the output of this new transaction, along with a lot of metadata on how it performed.
As was mentioned earlier, Analysis exists as a subset of Replay. As soon as a test has finished Replay, it is immediately queued up for Analysis. The purpose of Analysis is to take both the results and metadata collected from Capture & Replay and compare them, thus assigning a pass/fail rating to the test.
Tests that “pass” behaved identically on the Capture-EIP and the Replay-EIP. Tests that “fail” had some difference in the behavior between the Capture-EIP and the Replay-EIP, and that difference is recorded in the Fail Reasons assigned to the test.
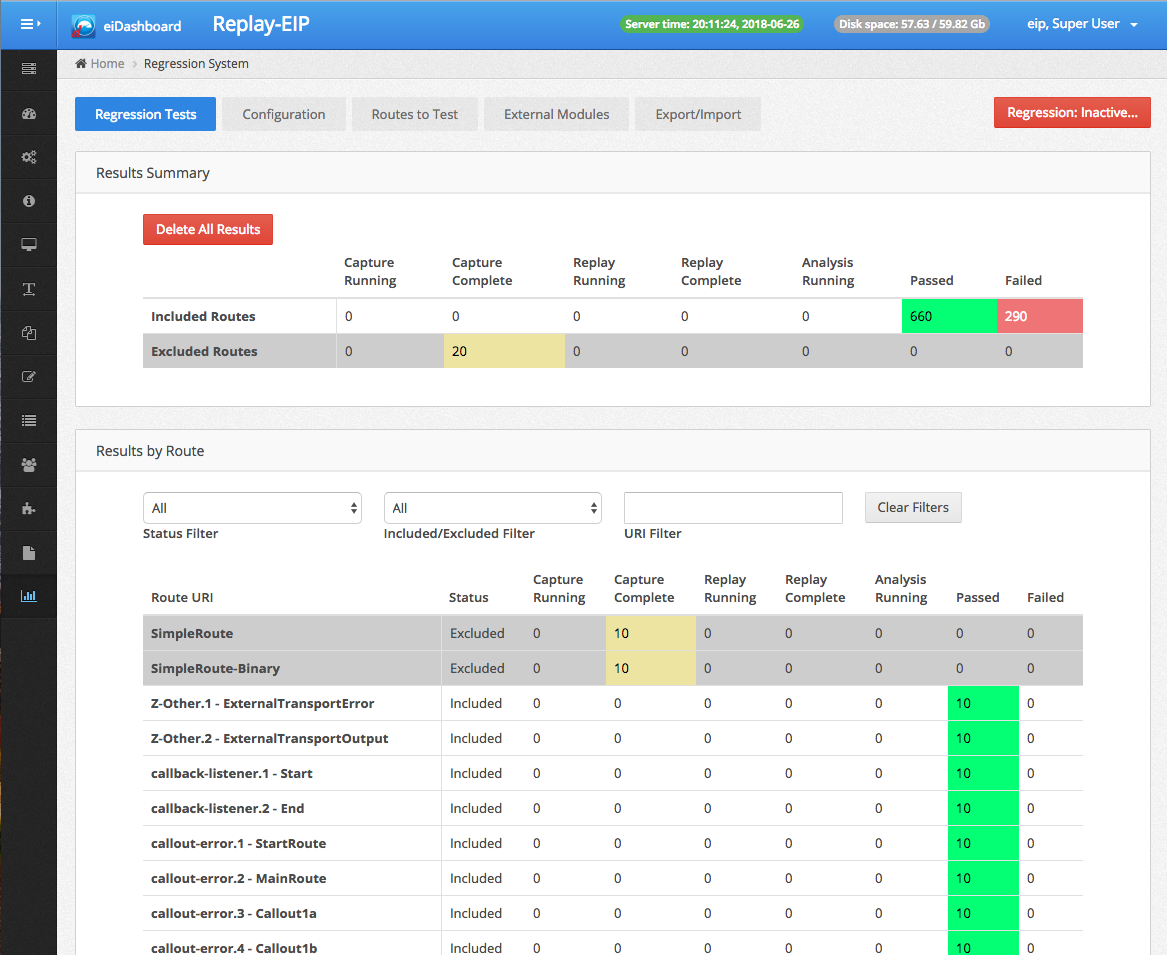
Replay Results
As Replay runs, the results tables on the Regression Tests page will continue to display the current status of every test running through the system.
At this point, tests will be listed as being in one of the following columns, based on their current state:
Capture Complete tests are the ones who have finished Capture (which should be all of them at this point), but are still waiting in the queue for Replay.
Replay Running tests are currently in the middle of running through Replay, but have not yet finished.
Replay Complete tests have finished Replay and are currently in a queue waiting to run through Analysis.
Analysis Running tests have begun the Analysis process, but have not yet finished it.
Passed tests have completed Analysis, and are now completely finished with being Regression tested. No differences were found between Capture & Replay, so they passed.
Failed tests have completed Analysis, and are now completely finished with being Regression tested. One or more differences were found between Capture & Replay, so they failed.
This nice summary is quite useful to get started, however, the true benefit of the Regression System is the ability to dig deep down into the outcome of the various tests. The Regression System provides a substantial amount of detail about each test, which helps understand exactly why they either passed or failed.
Examining Test Results
Once the tests are complete, it’s time to examine the results. There are a wide range of tools in the Regression System UI to dig deep into how each test behaved. At the top level are the filters for the Results by Route table. Changing the Status Filter to “Failed”, for example, is a quick way to see all of the failures.
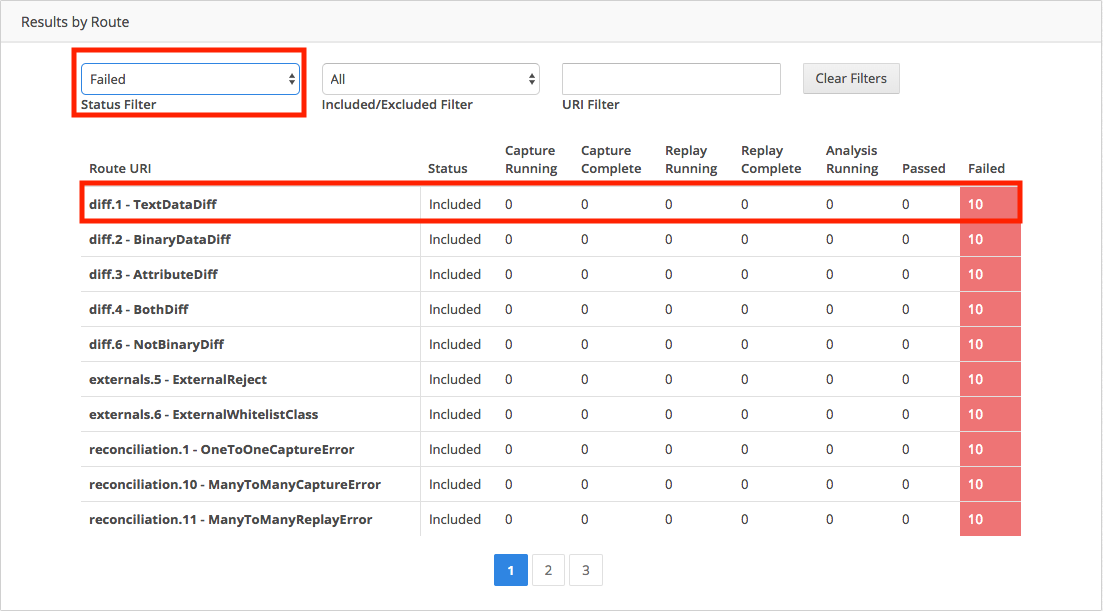
To get even more details, each row in the table is actually a link to open up a more detailed test breakdown for that Route. Clicking on one will bring up a new list of each of the individual tests that took place for that route.
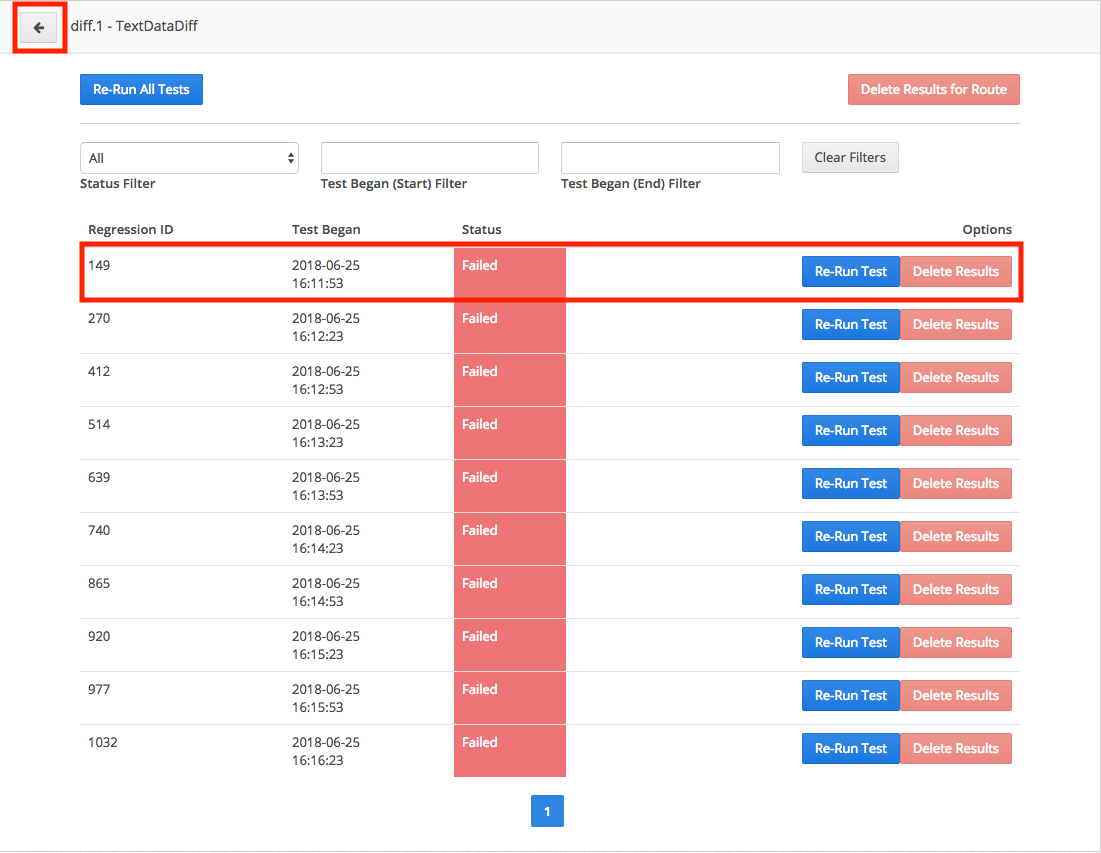
This view has some similarities to the Results by Route table, for example, there are filters at the top. In the table itself, tests are each assigned a unique Regression ID and have been assigned a Test Began timestamp (which refers to when the test started Capture). The Status, of course, indicates where that particular test is in the Regression System and can be any of the states that are columns in the Results by Route table. Finally, there are several actions for each test that will be covered more later on.
The responsive nature of the Regression UI means that going back to the previous Results by Route view is as simple as clicking the arrow button at the top left of the panel. However, there is even more deeper in here, so instead click on one of the test result rows to open up the Test Details page.
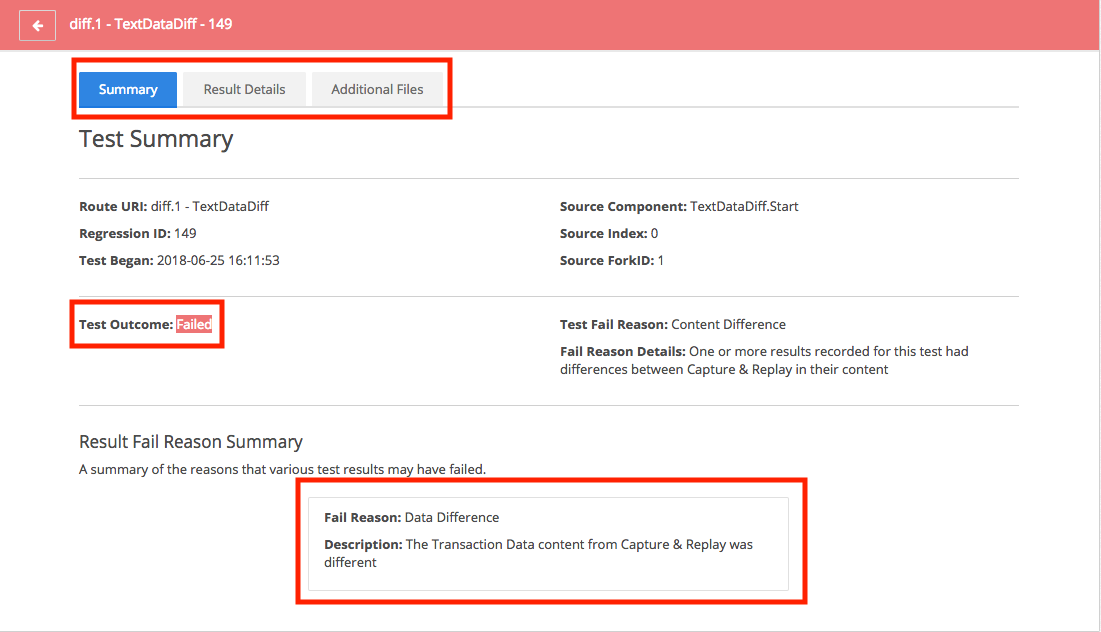
The Result Details page is broken down into three sections: Summary, Result Details, and Additional Files. The first two will be explained here, the third in a later section.
The Summary part simply provides a high-level summary of the test. In addition to simply giving some simple stats about the test, it specifies whether or not the test passed or failed. More importantly, it gives a summary of WHY it failed. Fail Reasons are calculated and assigned by Analysis, and depending on how complex a test is it can have multiple Fail Reasons. The Result Fail Reason Summary provides a simple list of each unique Fail Reason that was incurred by this test.

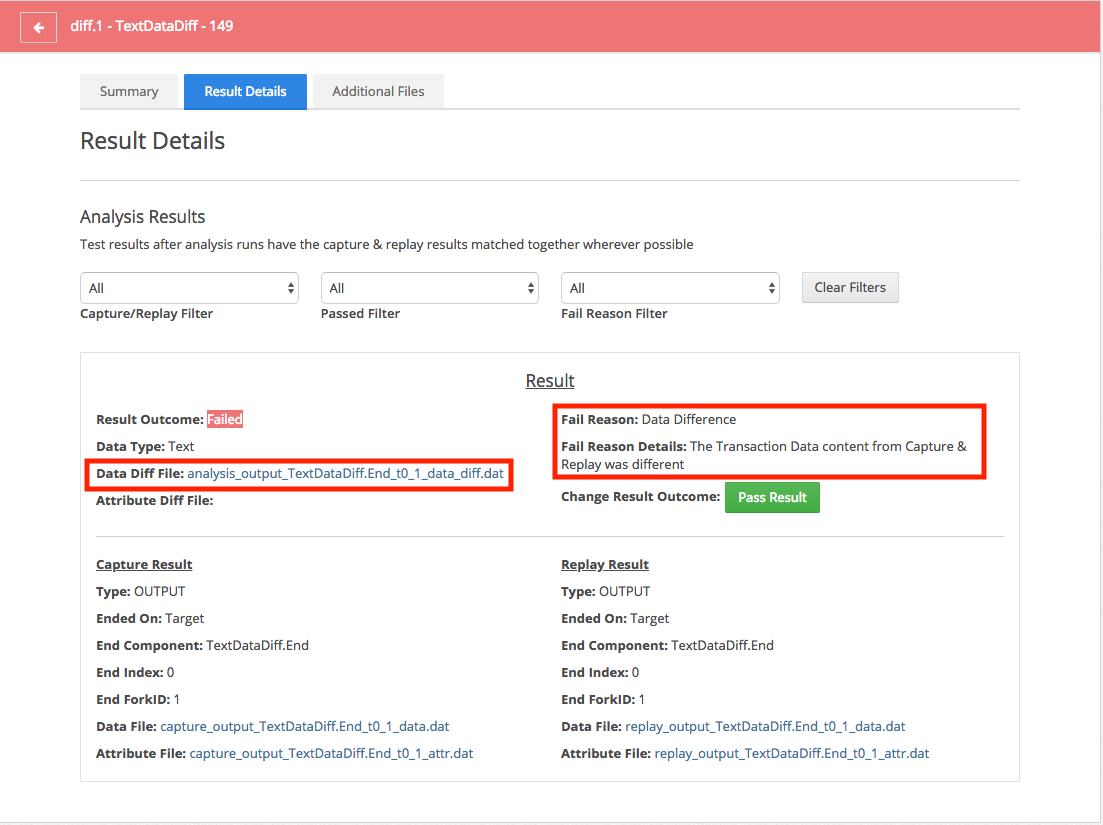
The Result Details part provides a MUCH more in-depth breakdown of the test. Just about every piece of information that could help to diagnose the issue and fix the problem is provided here.
One or more Results will be listed on this page. Each Result represents a single output from the test. Forking or routing to multiple Targets are examples of ways to generate more than one result. Also, if the Capture and Replay results behaved so completely different they cannot be reconciled, they will be listed separately, however, in most cases they will be listed side by side in each result.
If a Result failed, it will be assigned an individual Fail Reason. This Fail Reason is unique to that Result and provides a description about exactly what went wrong. This information is the basis for ultimately investigating and solving the issue so that the test can pass.
How to View Pass/Fail
The ultimate goal of the Regression System is to ensure that all Routes are ready to be deployed on the new eiPlatform. By giving tests a pass/fail rating, the Regression System substantially narrows down the amount of work that testers have to do. Instead of having to study each and every Route, users can focus all of their attention only on the ones that fail, being confident that the ones that pass are already ready to go, and substantially reducing the overall testing workload.
However, tests that fail do need additional attention, as these are the points where something will need to be changed on the new eiPlatform to fix an issue. Fortunately, the Regression System provides far more than just a pass/fail rating, it provides detailed information about the failure to help make diagnosing and fixing the problem as quickly as possible.
Investigating Failures
For tests that fail, the next step is to investigate the failure and determine what needs to be changed about the Route so that the test can pass. There are several specific parts of the Result Details that provide significant assistance with this.
The first thing to be aware of is that there are generally two main types of failures: Result Differences, and Content Differences
Result Differences

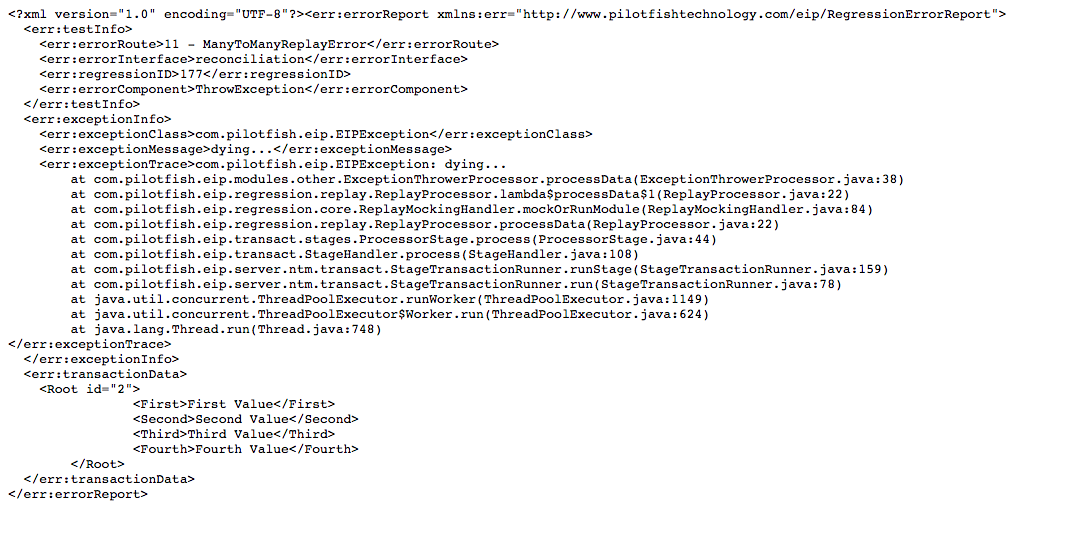
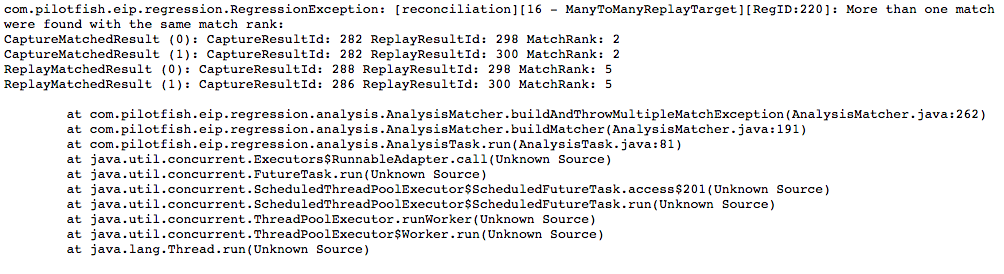
The image above shows a Result Difference. This is when the outcome of Capture & Replay is different. This can be for a number of reasons, including unexpected exceptions or improper forking or routing, among other things. When diagnosing the Result Difference, the Fail Reason will explain exactly how the results diverged, which will indicate which part of the route configuration should be opened up and examined in the eiConsole.
To help with the investigation even more, the actual outcomes of the Capture & Replay tests are included. This is an invaluable tool for resolving all differences, not just Result ones. In the example above, the difference is that Replay should not have ended with an error. The Replay Result Data File contains a full report on the error, including a full stack trace.
Content Differences
A Content Difference is one where Capture & Replay were almost identical. There were no unexpected exceptions and the transactions followed the exact same path through the Route on both eiPlatforms. However, when looking at the content of the output, differences exist between them. This likely means that something went wrong during a transformation, mapping, or other data altering process.
Content Differences come in two flavors: the Transaction Data being different, or the Transaction Attributes being different. It is also possible for both to be different.
Attribute differences tend to be less severe. They should definitely be reviewed closely because an attribute difference in one route could ultimately cause problems for another route that it calls into. However, in many cases, they can safely be ignored. Do NOT, though, simply assume that all Attribute differences aren’t worth looking at closely, because that will lead to later production errors. If the Attribute difference isn’t severe, please consult the section on overriding the pass/fail setting for details on how to respond to this.
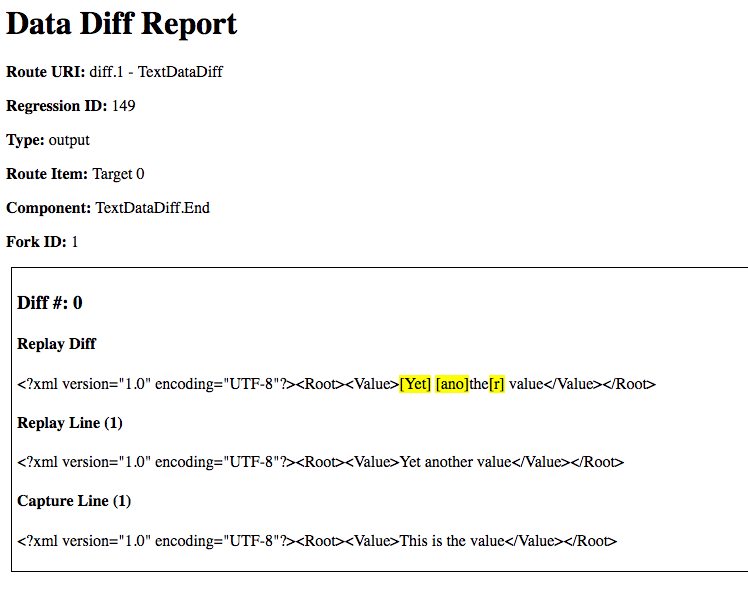
Data differences definitely point to transformation issues, and should always be resolved by fixing the issue in the Route configuration.
In both cases, identifying the exact differences is easy with the Regression System Diff Reports. These are detailed breakdowns of every difference in the output, and they make it obvious exactly what went wrong.
Re-Running Tests
After investigating the tests that fail and making changes to the route configuration, there will be a need to determine if the changes actually worked. This can be done through the easy ability to re-run any and all tests through Replay. By re-running a test after the Route configurations have been changed, it will be re-analyzed and a new pass/fail rating will be assigned.
NOTE: This assumes that the changes to route configurations have been deployed to the eiPlatform and the application restarted so the changes have taken effect.
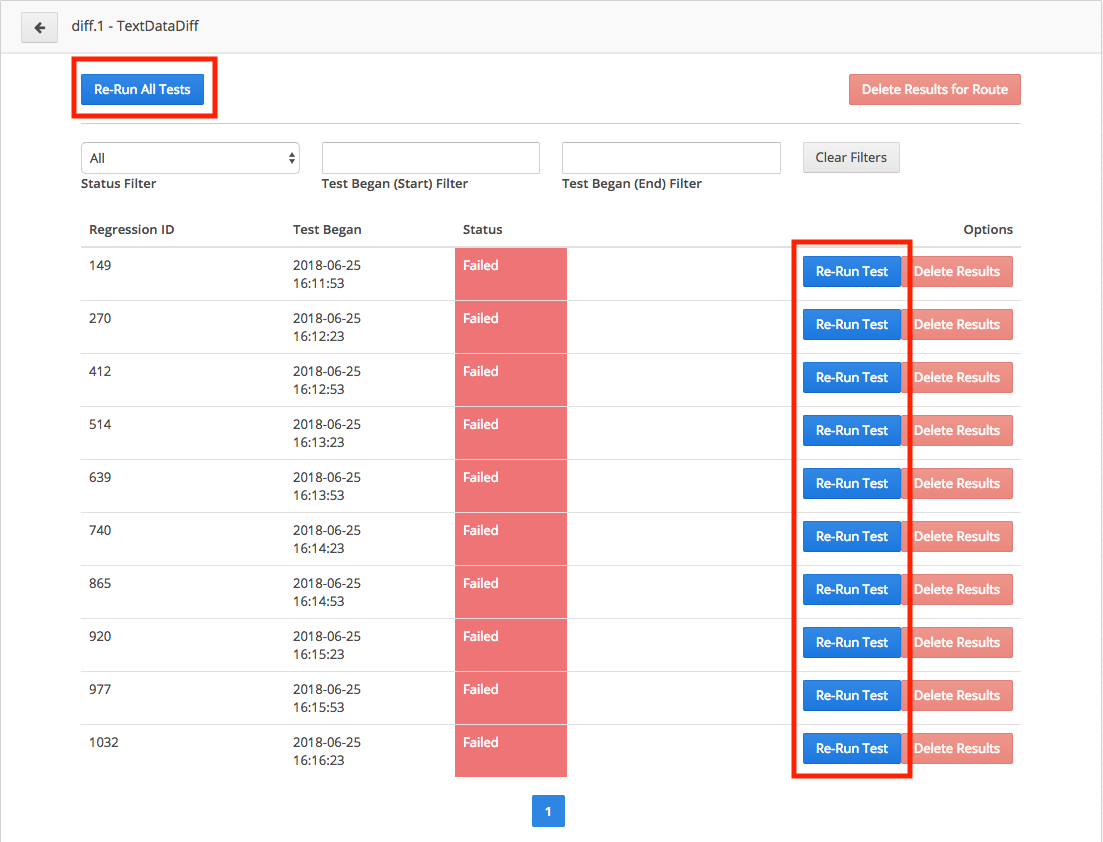
The ability to re-run tests can be found in the Results by Tests screen. Here, there are two main ways to re-run a test. The first is to do it for specific, individual tests, as can be seen with the “Re-Run Test” button in the “Options” column. The second is to re-run all tests for the entire route, as can be seen with the “Re-Run All Tests” button in the top left.
Regardless of which re-run option is chosen, the re-run process is fairly simple. The results recorded for that test are completely reset to where it was after the completion of Capture. The status on the tests will even change back to “Capture Complete”, and they will be placed in the queue for Replay to pick them up again. When Replay runs, it will treat these tests like any others that haven’t been through Replay yet, and start running them through the new eiPlatform.
When the re-run test has finished, a new pass/fail rating and result details will be assigned to it. In some cases, the test will now pass because all issues have been resolved. In others, it may still fail because of other problems that still need to be resolved.
External Modules
Once all other issues are resolved, the last thing to focus on is the External Modules. These are modules in routes that manipulate data outside of the eiPlatform and therefore are mocked by default during Replay. They can be selectively re-enabled from the “External Modules” section of the Regression UI.

The details of how to handle External Modules will be covered in its own section later in this document. It is being mentioned here to make it clear that it is strongly recommended that regression testing not be considered complete until all routes with External Modules have had the modules re-enabled and tested to ensure they work properly.
- Next Steps
At some point, all tests will be coming up with green “Passed” labels on them, and the use of the Regression System will come to an end. Once this happens, there is still one more thing to do before the upgrade is complete.
As was mentioned earlier, the Regression System doesn’t touch listeners and transports. The many different forms of external connectivity that would need to be handled would’ve undermined the overall goal of providing this powerful, automated testing tool. However, Listeners and Transports are still hugely important to test for the upgrade.
Since it can be guaranteed that all of the actions within each Route will succeed, the Routes should be run for a brief time through a normal QA environment. The focus should be on can the data get into and out of the Routes correctly. Once this is complete, then the process of testing the upgrade is now finished.
Workflow Recap
This section has been long, and it has covered a lot of things. Many parts of this will be revisited in later sections, providing more details about advanced features and configuration options. For the moment, let’s just do a quick recap of the process of using the Regression System.
Capture is run on the older eiPlatform. It records the transactions that pass through the system to gain an understanding of how they behaved on the older eiPlatform. It then provides the means to export that data from the older eiPlatform.
Replay is run on the newer eiPlatform. The Capture data is imported into it, and it then hijacks the normal eiPlatform operations and injects the inputs of various Capture tests to generate new output on the newer eiPlatform.
Analysis runs immediately after each test finishes Replay. It takes the Capture and Replay outputs and compares them to determine if the test passed or failed. If it fails, it assigned one or more Fail Reasons to describe why the failure occurred.
For tests that fail, a careful review of the substantial information about each result will reveal exactly why that failure occurred, allowing for the tester to go into the Route configuration and fix the problem.
The failed tests can be re-run again and again as part of an iterative process of fixing various failings with the route configuration until everything finally passes.
External Modules should be carefully re-enabled in order to fully test each Route and make sure that it is completely functional.
Listeners & Transports should be tested by doing a short, normal QA process on the Routes after the use of the Regression System is complete.
External Modules Explained
This section is a deep dive into External Modules. They have been referenced several times so far in this guide, so this will provide a more thorough explanation for what they are, and how to work with them in the Regression System.
What Are External Modules?
In the PilotFish eiPlatform, a module is a single piece of a Route that performs a specific function. Individual Listeners, Transports, Processors, Transformers, Mappings, etc, all of them are each modules in the system. Many modules are completely internal to the eiPlatform, which means they only affect the transaction passing through them. XSLT Mappings are a good example of this, it performs a transformation on the Transaction Data but doesn’t affect anything outside of that.
Some modules, however, do interact with things outside of the eiPlatform. They manipulate the filesystem or communicate with databases. These modules can have side effects on those external systems, such as deleting files or directories. These side effects present challenges for the Regression System’s Replay mode. Because Replay just runs through the tests without any regard to external conditions, this can lead to these kinds of modules causing problems to those external systems.
Because of this, all modules that can have these kinds of side effects have been marked as “External Modules” by the Regression System. These modules are mocked by Replay, which means they are not actually run during the Replay part of the test. This avoids the risk of those side effects, but it also doesn’t test a potential point of failure in the Route.
Examples of External Modules include the File Operation Processor and the Database SQL Transformation Module.
NOTE: In principle, Listeners and Transports could be considered to be External Modules. However, unlike the actual External Modules, Listeners and Transports cannot be re-enabled as part of the Regression System. Therefore they should be thought of as something different than normal External Modules, despite their similarities.
Whitelisting
In order to make the testing as thorough as possible, External Modules have the ability to be whitelisted. A whitelisted External Module will not be mocked for Replay, and will instead be run normally. Whitelisting should be done carefully with consideration for possible side effects.
When whitelisting an External Module, things to think about include: What does this module interact with? What does it do? What should I do to minimize consequences from using it?
Lastly, some external modules might depend on that external system being in a certain state in order to run properly. Steps should be taken outside of the Regression System to put the external system into the necessary state, such as putting files in the appropriate directories.
NOTE: When whitelisting external modules, only ever do it on the Replay-EIP. While whitelisting can be done on the Capture-EIP, there are certain complications that could arise from not configuring things perfectly across both systems. Only whitelisting on the Replay-EIP is a simple way to avoid all issues.
The External Modules Configuration UI
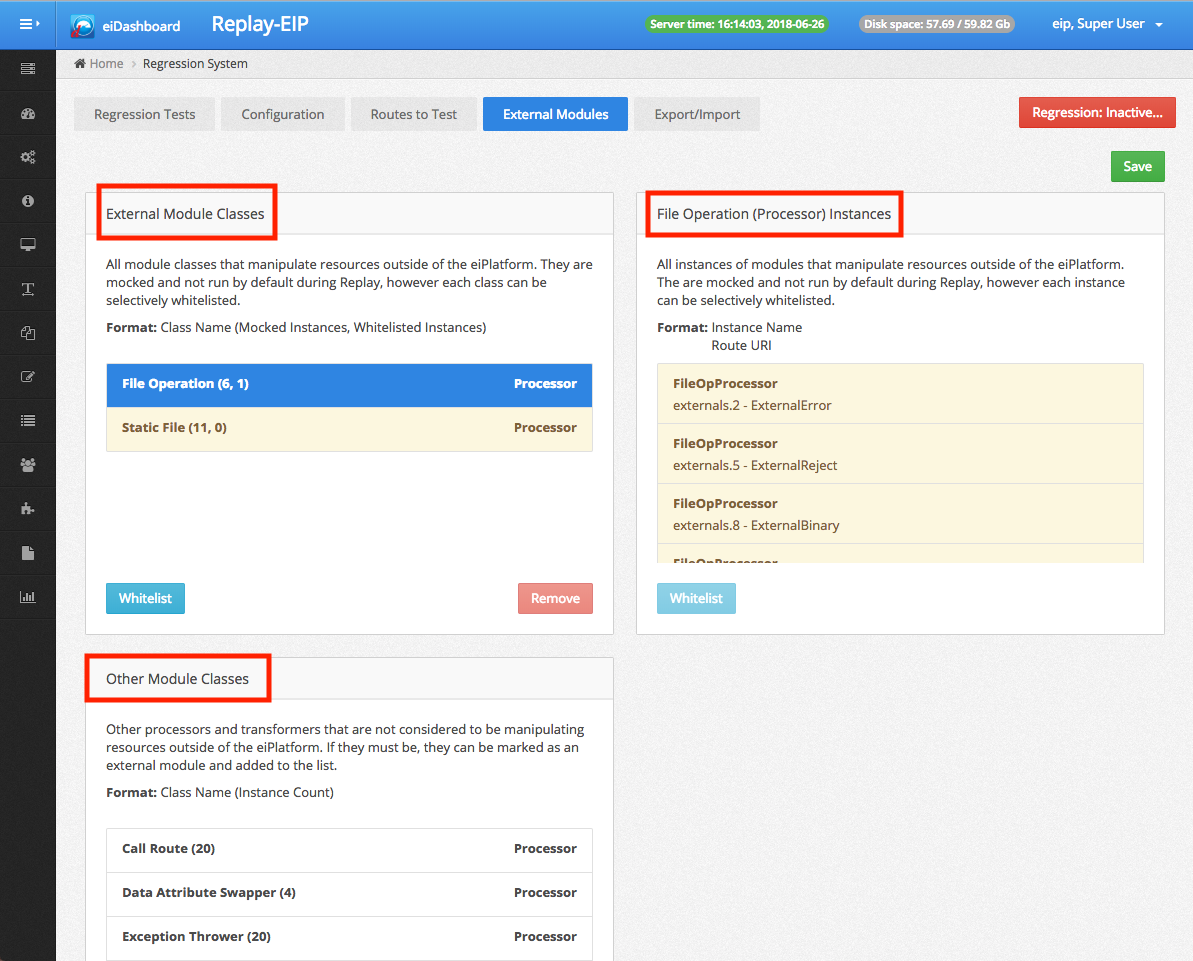
Controlling which external modules are whitelisted is done through the External Modules page in the Regression UI. This page is divided into three separate lists.
External Module Classes is a list of all the unique External Module classes or types of modules. This list is limited to only those classes that are used in the current Working Directory. Each class has the option of being whitelisted. Whitelisting a class means that all instances of that class throughout the working directory will be whitelisted.
External Module Instances is a list of all the instances of a particular External Module class. When a class is selected from the External Module Classes list, this list becomes populated based on the selection. This gives the ability to only whitelist specific instances, rather than all instances of a particular class. It also lists each route the instance belongs to, allowing an easy way to review what that Route does when deciding how to handle this particular External Module.
Other Module Classes is a list of all other Processors and Transformers in the working directory. None of these are considered to be External Modules by default, however, the option is provided to select them and add them to the External Modules list. This is mainly to support custom modules created specifically for clients, which won’t be on the External Modules list by default.
NOTE: When adding Other Module Classes as External Modules, this is the one configuration that MUST be done on both the Capture and Replay eiPlatforms. If not, it won’t work correctly.
NOTE: Like all configurations for the Regression System, changes to External Modules can only be saved when the Regression System is inactive.
How to Use External Modules in Tests
This is a general set of suggestions for how to go about whitelisting the various External Modules. It contains some useful suggestions for the process that should be followed when integrating them into the tests.
Consider Side Effects. Before whitelisting any of the External Modules, take a moment to consider side effects. What do the modules do? If they were run right now, with the system in its current state, could there be any consequences?
Consider Preparing for Tests. If the External Module depends on the external system being set up in a certain way, make preparations to set it up appropriately. This might also mean re-running the tests one at a time if the preparations need to be reset in between tests (ie, files added to a directory).
Re-Run Tests After Whitelisting. After whitelisting any modules, re-run the appropriate tests. All the items in the External Module Instances list contain the URIs of the routes they are in, so it’s easy to find the correct ones to re-run. If the tests pass after being re-run, then there are no issues with the External Module.
All Tests Should Pass With All Modules Whitelisted. The need to whitelist comes from the desire to avoid unwanted side effects. However, regression testing should not be considered complete unless every External Module has been whitelisted, and all tests are still passing.
Masking Differences
Sometimes there will be a difference between the Capture and Replay data that is expected. This is to say, every time the test is run, a specific value will always be different. The most common examples of this behavior include timestamps and GUIDs. Quite obviously, this would seem to cause problems for the Regression System, since any differences between Capture and Replay result in the test failing.
To handle this, the Regression System has a special feature called “Masking”. It works by comparing a difference found by Analysis against known patterns, and if it matches any of those patterns, the difference is ignored. At a high level, it means that pesky timestamp that breaks every test will no longer be considered a difference, and the test will pass.
Masking is disabled by default. To enable it, there are a series of configuration options for various patterns supported by Masking. These patterns are global, meaning they get turned on for all tests.
It is always recommended to start the Regression System without Masking, and only turn the feature on if it becomes necessary.
Overriding a Pass/Fail
It is possible that the Regression System will either fail a test that, upon further review, the failure isn’t actually something to worry about. Because of this, the pass/fail determination on a test can be manually overridden.
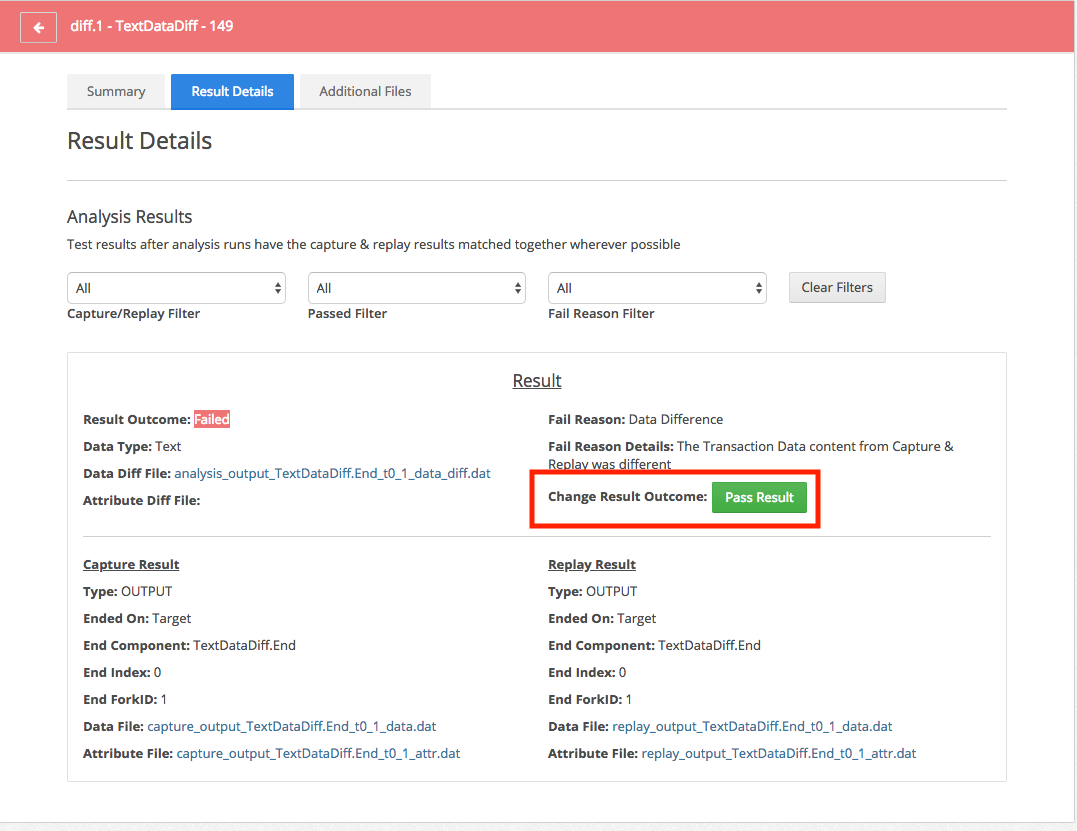
This is done through the “Change Result Outcome” option in the Result Details. It provides a button that can toggle the pass/fail status of that particular test result.
NOTE: This only changes the pass/fail status of that specific Result, not for the entire test. However, the pass/fail status of the entire test does recalculate based on its individual Results. The rule is that if one Result fails, the whole test is considered a failure. If all Results pass, the whole test passes.
Deleting Tests
The Regression System records a substantial amount of data about each test, and that data takes up space on the system. Because of this, it is quite likely that users will want to delete test results at times. Whether it is clearing everything away after the entire process is done, or simply deleting certain sets of tests that are no longer needed in the middle of the process, removing test results is a simple process with several ways to do it.
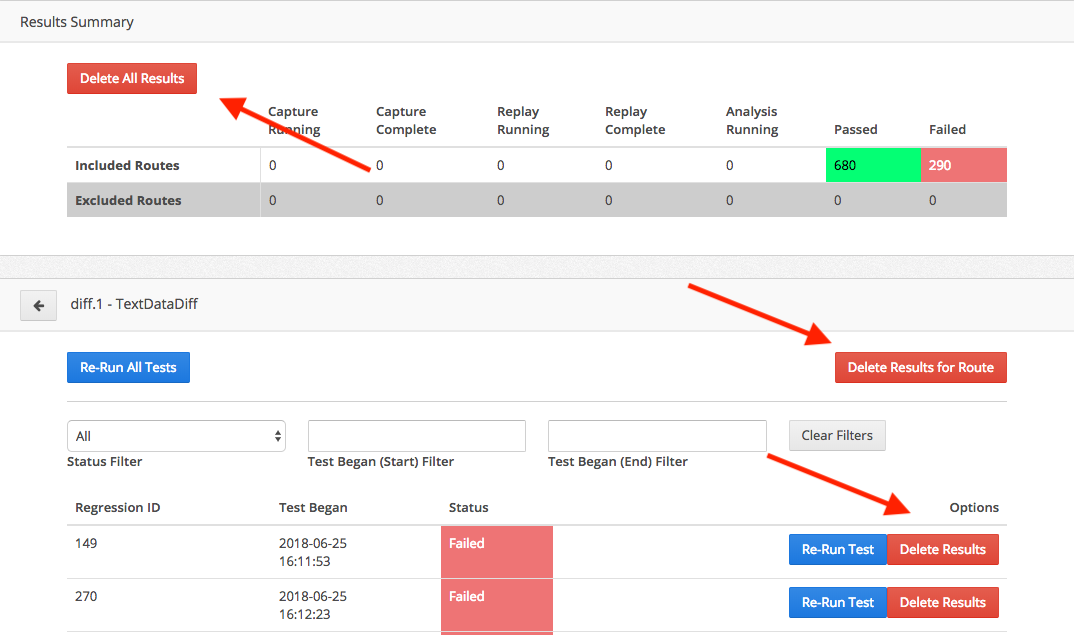
There are three main buttons that delete test results. The first two appear when opening a Route and seeing the list of all tests for it. Each individual test has a button called “Delete Results”, which deletes that particular test and all data associated with it. There is also a “Delete Results for Route” button that deletes all tests and results for that particular Route.
Lastly, there is a “Delete All Results” button in the Results Summary panel. This will completely wipe all data from the Regression System. No tests will remain after this.
Additional Files
When discussing test Result Details, the Additional Files page was omitted from the description. In most cases tests can be handled without ever checking this page, however, it contains some useful additional information about what took place.
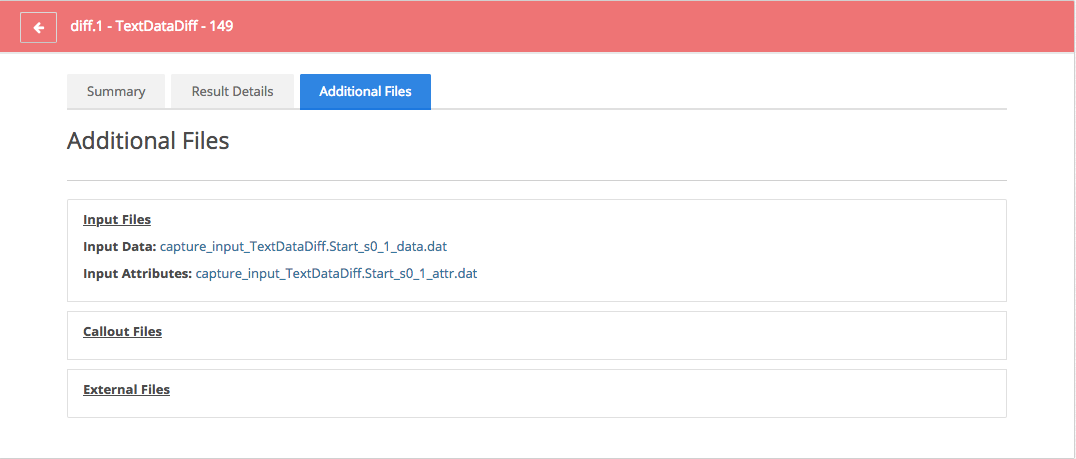
The Regression System records more about a transaction than just its output. Additional files at various points along the way are recorded during Capture and then used during the Replay process. All of these files are made available here, so they can be reviewed alongside the other test information.
The Input Files are the one set of files that every test will have. These are a record of the initial state of the transaction when Capture began. This is also what is injected into the Route to start a transaction for the Replay part of the test.
The Callout Files are only there if the Route called into other Routes. Route callouts are mocked by default in the Regression System, and these files are a big part of how that mocking process works. Please see the section on Replay Mocking for a more detailed explanation.
The External Files are only there if the Route contained External Modules. External Modules are mocked by default in the Regression System, and these files are a big part of how that mocking process works. Please see the sections on External Modules and Replay Mocking for a more detailed explanation.
Configuring the Regression System
The Regression System will work perfectly well out-of-the-box, without any need for additional configuration changes. However, there are some areas where settings can be customized, and that is done through the Configuration page.
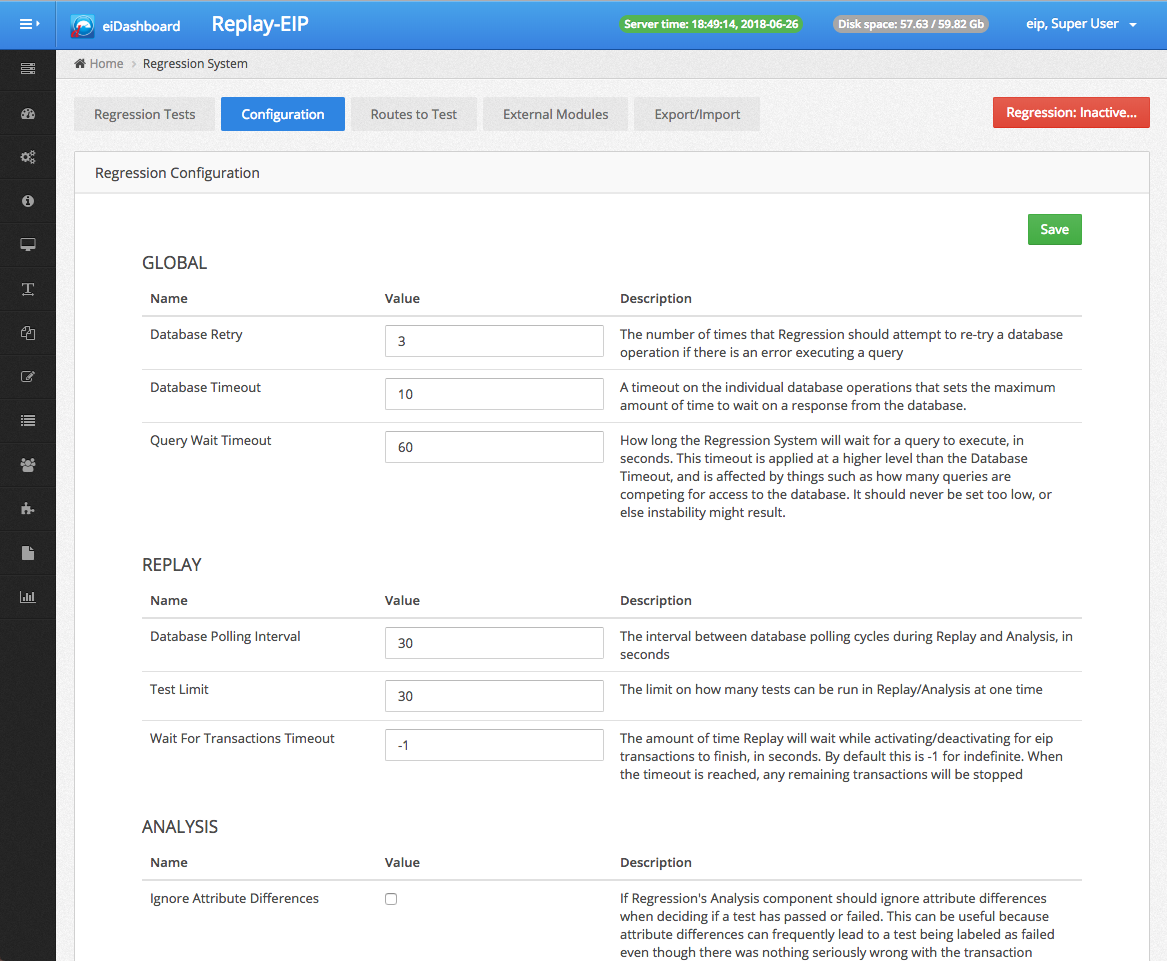
The Configuration page is mostly self-explanatory. A series of configuration options whose values can be changed, alongside a save button. Detailed descriptions of each option are already included in the configuration UI, so it won’t be repeated in full here.
Important features such as the speed of Replay performance and the various Mocking options are configured here. Like all Regression System configurations, these settings cannot be changed while the Regression System is active.
A Note on Replay Performance
By default, Replay is heavily throttled and will feel like it is running very slowly. This is because Replay processes transactions differently than the eiPlatform normally does. Rather than running at whatever intervals the Listeners would run at, Replay simply grabs transactions from the queue and starts them up. To avoid this behavior overwhelming the available system resources (such as available memory), Replay has been heavily throttled.
The two main settings that control Replay performance are the Database Polling Interval (which controls how often it checks the queue for more tests), and the Test Limit (which is the maximum number of tests that can run at a single time). A lower polling interval and/or a higher test limit will increase the speed at which Replay runs tests, but it will also increase the amount of system resources Replay consumes.
Most users will want to increase Replay’s speed, but it’s important to keep in mind the available system resources if the decision is made to change these settings. The smaller the average amount of memory for transactions, the faster Replay can be allowed to run.
Including & Excluding Routes
When dealing with very large working directories with dozens or hundreds of Routes, there will be an understandable desire to work on the regression process in batches. This can be easily accomplished with the Routes to Test feature.
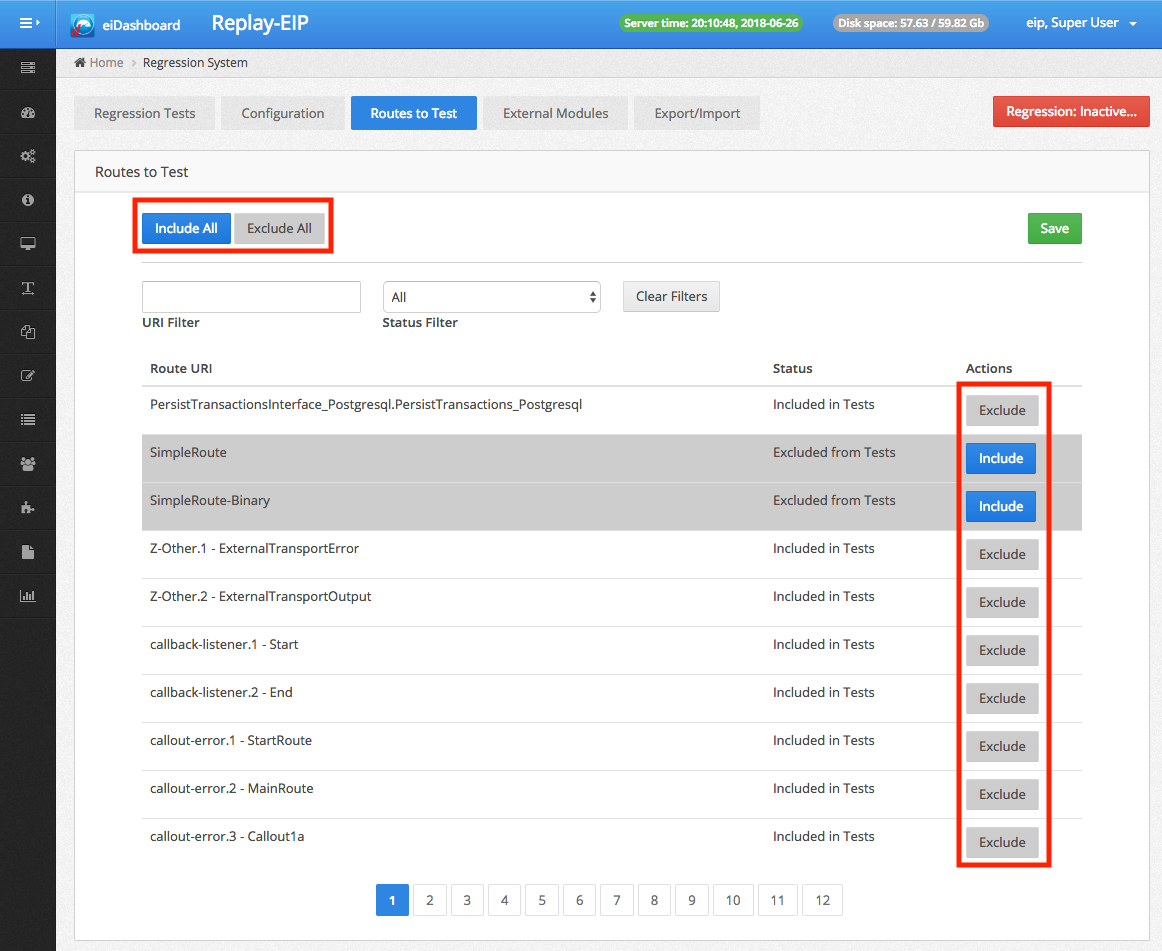
On the Routes to Test page is a list of all of the Routes currently on that particular eiPlatform. Each route has an include/exclude button. Included Routes will be used when running regression tests, Excluded Routes will not be touched when running regression tests. By default, all Routes are included.
There are also helpful include/exclude all buttons, as well as filters to quickly find a given route in the list.
Once Routes have been set to be included or excluded, the Regression Tests result tables are affected. All tests for excluded Routes are highlighted in gray, to indicate that the user should not expect anything to happen with them. With Capture, no tests will be captured for an excluded Route. For Replay, no tests will be replayed for an excluded Route, and they will just remain in their Capture Complete state.
 NOTE: Like all Regression System configurations, included/excluded Routes can only be changed when the Regression System is inactive.
Additional Export/Import Features
The overall workflow of using the Export/Import features of the Regression System was covered in an earlier section. However, there are a few important advanced features to be aware of when using these options.
Export Filters
When exporting Capture data, the total amount of data collected can get quite large. In many cases, exporting all of the data at once might not be what is necessary. Because of this, there are several filters available to use when using Export.
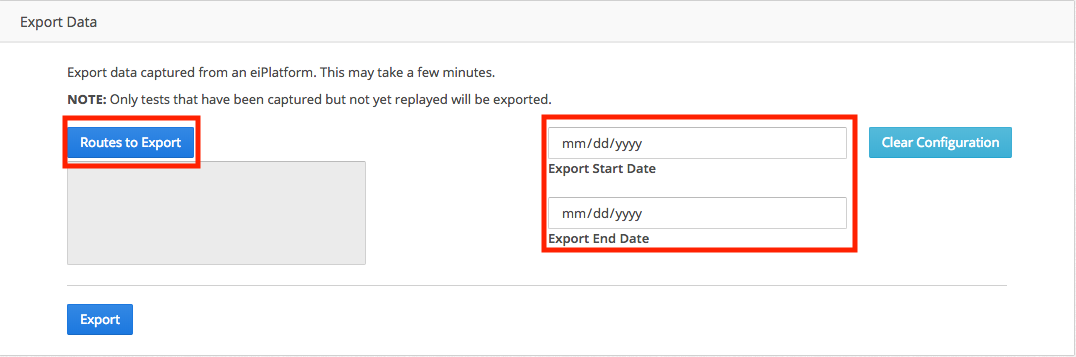
There are two main filters provided: Routes and Dates.
Routes to Export opens a dialog that allows the user to select a series of Routes. Only test data from the selected Routes will be exported. If none are selected, it defaults to exporting everything.
Dates to Export are a part of date selection fields for the start and end date of the tests. These dates refer to when Capture was started on a particular test. Only tests between those two dates will be exported. If nothing is selected, then it becomes an open-ended boundary (ie, no beginning or ending restriction).
Import Parsing
When importing data, there very rarely needs to be any worry about clashes between tests. Import does substantial parsing on the data being imported, and automatically resolves any clashes that may occur between the tests. If a test already exists on the Replay-EIP, for example, it will be recognized and won’t be imported again. So feel free to Import anything with confidence, and rely on the system to resolve everything automatically.
Import Missing Routes
When Importing data from the Capture-EIP, it is possible that there will be a Route on the Capture-EIP that won’t exist (or can’t be identified) on the Replay-EIP. This is an unlikely scenario since the Regression System should only be used for regression testing and therefore the working directories should be identical (at least before changes to fix bugs begin). Nevertheless, Import is able to detect if a route from the Capture-EIP is missing on the Replay-EIP.
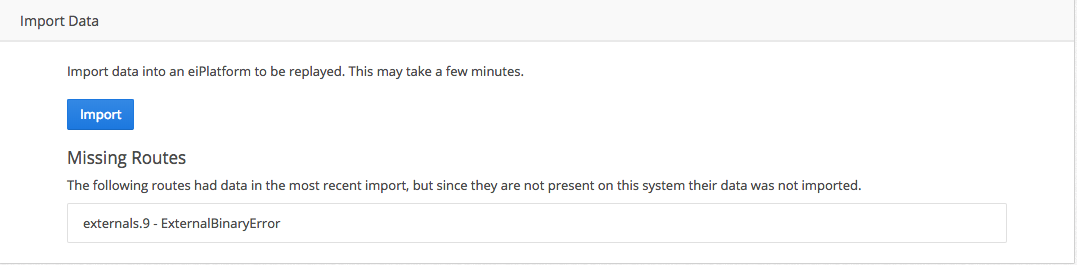
When it detects that a Route is missing, upon the completion of the import process the URI of the missing Routes are listed in the UI. All tests for those missing Routes are not imported, and will not be run for Replay.
Regression System Errors
Like with any application, the eiPlatform Regression System could at some point have an error. Regression Errors are reported alongside the test results, to give the user the most possible information about what happened.
What is a Regression Error
First, it is important to distinguish Regression Errors from normal exceptions. A normal exception occurs during the processing of a transaction if a PilotFish module encounters a problem while performing its normal functions. These kinds of exceptions are NOT Regression Errors. They are recorded the same as any other data about the test, and in fact, if the same exception occurs at the same point in both Capture and Replay, the test will be considered to have passed, because the behavior of the Route was still the same.
What makes an exception a Regression Error is it occurs during part of the Regression System’s operations. A problem writing out Capture data, injecting the input data for Replay, or calculating the test result during Analysis, these are just some examples of types of Regression Errors.
Regression Error Reporting
If a test has a Regression Error, it will immediately be marked as a failure, even if it occurs during Capture mode. It will also have a special Fail Reason is assigned to indicate that it’s a Regression Error, and to say which stage in the process the error occurred.

There will also be a Regression Error Report file written out along with the test’s other files. This file contains a great amount of detail on why the error occurred.
The Regression Error Reports can be found in the Result Details section. There will always be a section at the top of the result list containing the error reports, however, if some of them are associated with specific results, they may also appear with that result.

Responding to Regression Errors
A Regression Error does not mean that the Route could not otherwise pass the Regression System’s tests. Regression Errors mean that a problem happened within the Regression System, and that problem usually has nothing to do with whether or not the Route is good or not.
If a Regression Error occurs, it should be reported back to PilotFish so that it can be investigated and any possible underlying bugs in the system resolved.
Replay Mocking Explained
Throughout this document, there have been references to Replay mocking certain functions of the eiPlatform. This is done to work around some complications with certain parts of the eiPlatform interface workflow and the Regression System. This section will explain what gets mocked, why it is mocked, and how the mocking is done.
What is Mocked, and Why
Route Callouts
Route Callouts are always mocked, no matter what. A “Route Callout” is defined as when Route A calls into Route B, and then Route A waits for a synchronous response from Route B before proceeding with the transaction. Certain modules, such as the Call Route Processor, provide the ability to do these callouts.
The Regression System breaks down its tests on a Route by Route basis. All Routes are tested as if in a silo, without any interaction with other Routes, to minimize side effects and allow for pinpointing exactly where problems occur.
Route Callouts produce deep interactions between multiple Routes and would break that effort to isolate all testing to individual Routes. Therefore all Callouts are mocked so that all Replay testing is still limited to individual Routes.
External Modules
External Modules are also mocked, however, the mocking can be turned off on a case by case basis.
As is explained in the External Modules section, an External Module is a module that interacts with a system outside of the eiPlatform in a way that can cause side effects. To avoid these kinds of side effects, they are mocked by default, although it is recommended that the mocking be turned off and the tests re-run carefully to ensure that everything is thoroughly tested before the end of the regression process.
More details can be found in the External Modules section earlier in this document.
- How Mocking Works
Mocking is primarily done during Replay to simulate certain actions, however, it requires specific behavior from Capture in order to work.
- During Capture, when something that will be mocked during Replay (ie, a Route Callout) is encountered, Capture records the current state of the test before running that action.
- Once the action is complete, Capture will also record the output. So now the inputs and outputs of the action being mocked have been captured.
- On Replay, when that action is encountered, Replay searches for the files Capture recorded about it.
- Replay first loads the inputs and compares them to the current state of the test. If there are any differences at this point, it instantly fails the test with a special “Rejected” Fail Reason.
- The reason for failing the test at this point is to not cover up problems that had occurred prior to this action during the upcoming mocking process.
- After passing the input comparison, Replay then loads the output from the Capture action and resumes the transaction. This results in the next stage of the Route seeing an outcome identical to if the action had actually occurred.
- Mocking’s Impact on Tests
With Route Callouts, Mocking has no impact on the tests. All Routes get run through Replay, so if the calling Route or the Route being called has an issue, it will be identified by the system. By mocking the callout, rather than doing it directly, the differences are able to be isolated to the specific Route that causes them.With External Modules, Mocking does have the potential to conceal problems that should be addressed. This is why it is strongly recommended to gradually whitelist the External Modules during the Replay testing process. Please see the section on External Modules for more details.